To avoid these ads, REGISTER NOW!

rattle_snake's random shop projects v0.1

FallibleFlyer

Well-known member
Joined
Nov 18, 2011
Messages
159
Location
Arizona
Front receiver is for a generator mount for a Honda 3000 handi. Front location works well for my setup.
Also used front hitch for winch, but can't have both at same time and winch is really heavy. So solution was to spend a pile of money for something I hope to not have to use.:confused: (just like insurance)

I had built my own front receiver that exited through bumper up much higher than any of the commercially available one. Then built winch and gen cradles.

Makes sense, looks great
 
To avoid these ads, REGISTER NOW!
OP
R

rattle_snake

Well-known member
Joined
Jun 25, 2015
Messages
5,226
Location
Chandler, AZ
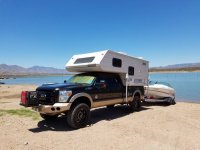
Spent way too long shimming and adjusting the new bumper to get it to sit just right, but got it done in time for lake camping trip. Beach was soft but no need for winch this trip.
attachment.php
 

Attachments

  • 20180601_124246.jpeg
    20180601_124246.jpeg
    91 KB · Views: 2,360
Last edited:
OP
R

rattle_snake

Well-known member
Joined
Jun 25, 2015
Messages
5,226
Location
Chandler, AZ
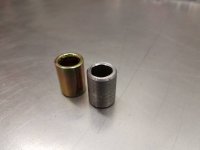
Made some steel bushings on the lathe for kids quad new front shocks. The originals didnt move at all and were just a link that looked like a coilover.
Next is an adjustable carb.
20180611_151141.jpeg20180611_160420.jpeg
 
Last edited:
OP
R

rattle_snake

Well-known member
Joined
Jun 25, 2015
Messages
5,226
Location
Chandler, AZ
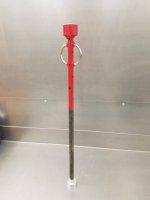
Made a dog chain stake out of a concrete form stake for beach camping. Been kinda laid up for awhile so I farted around with the lathe and made a cap for it, so nobody's kid impales themselves on it after being mowed over by my dog(s). Added some red paint to make it a more noticeable trip hazard.

20180613_182614.jpg
 
Last edited:

FallibleFlyer

Well-known member
Joined
Nov 18, 2011
Messages
159
Location
Arizona
I'm envious of your air conditioned shop space... too damn hot in mine recently to get anything done. Nice recent projects
 
OP
R

rattle_snake

Well-known member
Joined
Jun 25, 2015
Messages
5,226
Location
Chandler, AZ
I'm envious of your air conditioned shop space... too damn hot in mine recently to get anything done. Nice recent projects
The A/C is a game changer for sure. that and the lift make what were miserable jobs something I can almost enjoy.
Case in point, my Cobra ate a blower belt and needed yet another set of blower drive idler bearings. It also needs tags and emissions tests within a week, which requires some, uh 'TLC'.
I've been recovering from an injury and probably still shouldn't be wrenching much, let alone crawling under the car 25 times. Being able to knock out these jobs without laying on the ground or sweating to death is awesome, and I don't have to stress out on the time frame.

I get only 2 years/6k miles out of these bearings. Stock idler use same bearing. price for 15psi I guess.

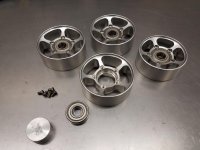
Made a bearing seat tool on the lathe. The lathe is my favorite tool to play with now even if what I make isn't really necessary.
 

Attachments

  • 20180621_174811.jpg
    20180621_174811.jpg
    125.8 KB · Views: 263
  • 20180621_175656.jpg
    20180621_175656.jpg
    153.8 KB · Views: 264
Last edited:
OP
R

rattle_snake

Well-known member
Joined
Jun 25, 2015
Messages
5,226
Location
Chandler, AZ
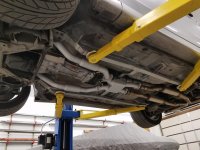
Added a 5th O2 bung to cobra's midpipe. Also touched up the paint while I had it out. Going to need rear tires soon again.
 

Attachments

  • 20180624_191333.jpg
    20180624_191333.jpg
    121.7 KB · Views: 200
  • 20180624_191325.jpg
    20180624_191325.jpg
    149.6 KB · Views: 1,873
OP
R

rattle_snake

Well-known member
Joined
Jun 25, 2015
Messages
5,226
Location
Chandler, AZ
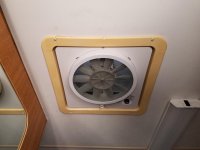
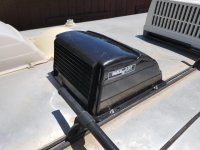
Installed a vent fan in my cab-over camper. Luckily the wiring was already present. Should provide some air movement when A/C isn't quite needed.
Also swapped out the vent cover for a black one that really cut down on the sunlight entering in the mornings, so no need for a interior cover. I tinted all the windows and made blackout shades to keep the kids and dogs asleep till a reasonable hour when camping. Now that cracked up trim ring looks even worse...
 

Attachments

  • 20180623_111800.jpg
    20180623_111800.jpg
    103.3 KB · Views: 145
  • 20180623_111810.jpg
    20180623_111810.jpg
    124.3 KB · Views: 141
OP
R

rattle_snake

Well-known member
Joined
Jun 25, 2015
Messages
5,226
Location
Chandler, AZ
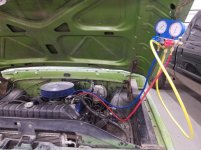
Got the A/C in my old Ford working to some extent. Had to rework the compressor mounting bracket and space the fan forward to get belt to line up. Some how the system was still pressurized after who knows how many years of not being used/broken. Initial pressure test looked OK but had wiring issues and fan motor is on it's last leg. Dug around in the dash and found a bad switch, bypassed, so at this point the system is at least functional. The fan switch 'Hi' position doesn't work. I don't think this old system has the capacity to cool the cab from 140+ degrees in a reasonable amount of time, but better than nothing for $50 investment. Few more things to get worked out on it.
 

Attachments

  • 20180623_094425.jpg
    20180623_094425.jpg
    152 KB · Views: 167
OP
R

rattle_snake

Well-known member
Joined
Jun 25, 2015
Messages
5,226
Location
Chandler, AZ
I upgraded my drill press to a hybrid including this sweet 22mm carburetor. It runs a little faster now but has a flat spot.
:)
attachment.php
 

Attachments

  • 20180623_134946.jpg
    20180623_134946.jpg
    83.6 KB · Views: 1,704
Last edited:
OP
R

rattle_snake

Well-known member
Joined
Jun 25, 2015
Messages
5,226
Location
Chandler, AZ
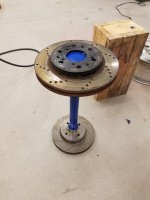
Build another pedestal/tool stand out of a truck drum. 1st step was to acid etch/rust the disc rotor to give it some character. Unfortunately the welding process messed up my nice uniform oxide layer so I had to go back and 'touch it up' with a spray bottle.

I imagine there are some of you who don't consider rust a 'finish', but just a pain the *** that prevents a good paint job.

For now I mounted a shamefully small and imported vice I had lying around, certainly not worthy of GJ. I have a 2" receiver tube to add when I can decide how I want to do it, exactly.
:beer:
attachment.php
 

Attachments

  • 20180625_182009.jpg
    20180625_182009.jpg
    80 KB · Views: 1,774
Last edited:

NUTTSGT

Super Moderator
Staff member
Joined
Sep 14, 2009
Messages
51,101
Location
Northern Central Ohio
Completed rear axle assembly. Decided to remove the wiring and weld the holes shut on both axles. 9 years of use showed that the axle fills with water and was rusting out the holes.
64d00b90af8ea0e9fabea39b49b17c9f.jpg
Installed the axles, added a 't', hose bracket and hard line to the trailer frame for the new front brakes. While I had the u bolt plates off I had the paint color matched for future paint repair/touch up. First the rest purple vinyl pin stripes need to be removed.

Put all new bearings in to complement new races/drums and blead the system. No leaks but the front brakes didn't function properly and one wouldn't release, so all came back apart for inspection. I had tightened a pivot bolt/nut on the primary shoe that bound up the operation on 2 of the 4. They need to stay loose so I re-crimped the non-locking lock nuts and reinstalled. Found a questionable valve stem as I was checking tire pressure but ready for a test tow.
91b0bdc4e8786367a6a6f242f85dbea1.jpg

C-hawk trailer ? They were local within a few miles from the Baja factory.
 

Attachments

  • 64d00b90af8ea0e9fabea39b49b17c9f.jpg
    64d00b90af8ea0e9fabea39b49b17c9f.jpg
    83.6 KB · Views: 1
  • 91b0bdc4e8786367a6a6f242f85dbea1.jpg
    91b0bdc4e8786367a6a6f242f85dbea1.jpg
    63.7 KB · Views: 1
OP
R

rattle_snake

Well-known member
Joined
Jun 25, 2015
Messages
5,226
Location
Chandler, AZ
Great thread.
Thanks! I have to tinker to stay sane.
:beer:

C-hawk trailer ? They were local within a few miles from the Baja factory.

No this is a Dorsey trailer. Build quality is OK, but it sits very low maybe only 4" off the ground. I launch the boat on the beach sometimes and the cross members plows the mud...
Not sure if Dorsey built or sourced the drop axles, but I had one fail on me. Broke spindle off at riser. Drove it 500 miles home after purchase then failed on way to DMV for out of state inspection/title. Guess I got lucky.
 

bonneyman

Well-known member
Joined
Apr 22, 2010
Messages
8,857
Location
Desert SW
The A/C is a game changer for sure. that and the lift make what were miserable jobs something I can almost enjoy.
Case in point, my Cobra ate a blower belt and needed yet another set of blower drive idler bearings. It also needs tags and emissions tests within a week, which requires some, uh 'TLC'.
I've been recovering from an injury and probably still shouldn't be wrenching much, let alone crawling under the car 25 times. Being able to knock out these jobs without laying on the ground or sweating to death is awesome, and I don't have to stress out on the time frame.

I get only 2 years/6k miles out of these bearings. Stock idler use same bearing. price for 15psi I guess.

Made a bearing seat tool on the lathe. The lathe is my favorite tool to play with now even if what I make isn't really necessary.

Nice work on the pulleys!

And I hear you on recovering from injuries and/or surgery. Makes having fun in the shop - and fixing **** that needs done - a whole lot harder.
 
OP
R

rattle_snake

Well-known member
Joined
Jun 25, 2015
Messages
5,226
Location
Chandler, AZ
Nice work on the pulleys!

And I hear you on recovering from injuries and/or surgery. Makes having fun in the shop - and fixing **** that needs done - a whole lot harder.

Thanks. Ya it can be frustrating not to be able to get things done. I'm not a good patient - don't want to watch TV, rather be out in shop building something... just like my old man.

My dad had lots of knee surgeries when I was in high school, we were building 69 mach 1. He would say things like 'don't tell your mother', and fall out of his wheelchair but we continued forward anyhow.
 
Last edited:
OP
R

rattle_snake

Well-known member
Joined
Jun 25, 2015
Messages
5,226
Location
Chandler, AZ
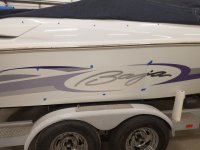
In an effort to get my boat out of the 90s I am toning down the purple where I can, specially the light purple/ lavender. I painfully removed all the vinyl pin stripes from the trailer. For the hull I bought a 10 yard roll of charcoal metallic vinyl to cover up the light purple in the gel coat. Using a roll of tracing paper I made stencils of the graphics to transfer to the vinyl, then hand cut slightly over sized. I applied the vinyl wet with a squeegee came out OK.

attachment.php


attachment.php


attachment.php
 

Attachments

  • 20180707_123052.jpg
    20180707_123052.jpg
    114.1 KB · Views: 1,609
  • 20180707_132455.jpg
    20180707_132455.jpg
    125.7 KB · Views: 1,619
  • 20180707_130714.jpg
    20180707_130714.jpg
    136.8 KB · Views: 1,617
Last edited:
OP
R

rattle_snake

Well-known member
Joined
Jun 25, 2015
Messages
5,226
Location
Chandler, AZ
Upgraded my original attempt at a tool stand from leftover parts. The main issue was that the thin wall tubing riser wasn't stiff enough and would oscillate. I built 2 more heavy stands but still need another for this POS HF belt/disc sander (perhaps 'HF' implies 'POS') so I added some weight down low and beefed up the riser pipe.

Like many things in life, I had mismatch 5 lug wheel, and 4 & 6 lug discs. To mount the riser from the bottom like it was before, the top needed to be removable. I welded a captive nut on a large washer on the top to attached the fox body disc. I re-drilled the 6 lug chebby disc to a 5 lug pattern to match the wheel and riser flange. Painted blue as to not be red like many other things in the shop. Much improved for $0.

I was noticing how much cooler it looked than my old stool or 3-2-1 box that I use as little table to set my beer on. Might have to build another.

attachment.php


attachment.php


attachment.php
 

Attachments

  • 20180708_161734.jpg
    20180708_161734.jpg
    68.2 KB · Views: 1,622
  • 20180708_164007.jpg
    20180708_164007.jpg
    91.5 KB · Views: 1,633
  • 20180708_163826.jpg
    20180708_163826.jpg
    86.5 KB · Views: 1,637
Last edited:

FallibleFlyer

Well-known member
Joined
Nov 18, 2011
Messages
159
Location
Arizona
Upgraded my original attempt at a tool stand from leftover parts. The main issue was that the thin wall tubing riser wasn't stiff enough and would oscillate. I built 2 more heavy stands but still need another for this POS HF belt/disc sander (perhaps 'HF' implies 'POS') so I added some weight down low and beefed up the riser pipe.

Like many things in life, I had mismatch 5 lug wheel, and 4 & 6 lug discs. To mount the riser from the bottom like it was before, the top needed to be removable. I welded a captive nut on a large washer on the top to attached the fox body disc. I re-drilled the 6 lug chebby disc to a 5 lug pattern to match the wheel and riser flange. Painted blue as to not be red like many other things in the shop. Much improved for $0.

I was noticing how much cooler it looked than my old stool or 3-2-1 box that I use as little table to set my beer on. Might have to build another.

I like this one a lot better, well done.
 
OP
R

rattle_snake

Well-known member
Joined
Jun 25, 2015
Messages
5,226
Location
Chandler, AZ
Took a road trip to smoky California to spend some time fishing (aka beer drinking) and hiking. Took some leftover vinyl from boat graphics and had my friend cut some letters so my floating money pit can have a name.

attachment.php
 

Attachments

  • 20180809_185156[1].jpg
    20180809_185156[1].jpg
    113.6 KB · Views: 1,533
To avoid these ads, REGISTER NOW!
OP
R

rattle_snake

Well-known member
Joined
Jun 25, 2015
Messages
5,226
Location
Chandler, AZ
Nice, I like it!
Thanks!

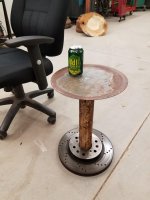
Built a little table out of junk to free up my step stool. Top is a 'seasoned' irrigation port cover. I replaced the stud with a 7/16 threads to attach to the pipe The thin metal isn't ideal and could slice open one's knee if unlucky. Will change up the design at some point but for now it spaces my beer up off the floor.

attachment.php
 

Attachments

  • 20180811_140807.jpg
    20180811_140807.jpg
    78.3 KB · Views: 2,013
OP
R

rattle_snake

Well-known member
Joined
Jun 25, 2015
Messages
5,226
Location
Chandler, AZ
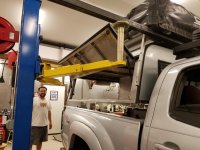
Helped a friend fab some low profile bed rail covers for his Taco. Has a roof top tent, which is heavy so we used the 2 post lift to lift the canopy/tent. Also installed a high output alternator and upgraded associated wiring with 1/0.
Shady frame extension stacking and beams
attachment.php


attachment.php


Also R&R'd front CV boots on a friend's Suzuki 4x4 quad. Since my A/C'd shop is popular this time of year, I had both of them show up at the same day/time, while I was trimming trees. Needless to say the yard work took 1/3 as long in the miserable humid and hot weather...

attachment.php
 

Attachments

  • 20180812_173547.jpg
    20180812_173547.jpg
    123.1 KB · Views: 1,970
  • 20180812_161114.jpg
    20180812_161114.jpg
    149.6 KB · Views: 1,983
  • 20180812_104402.jpg
    20180812_104402.jpg
    94.5 KB · Views: 1,962
OP
R

rattle_snake

Well-known member
Joined
Jun 25, 2015
Messages
5,226
Location
Chandler, AZ
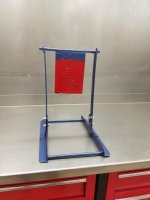
Finally got around to rebuilding a steel pistol target that I found in a wash a few years ago on a hunting trip. I have built a few other steel targets but seem to use this one often as it is the right size. It's a turd and takes up a bunch of space, so I addressed it's shortcoming without completely starting over as it will just get shot up anyhow. Started like this
attachment.php


Evened up the frame and beveled the edges. Cut off the uprights and drilled them for bolts, so the unit can fold flat for storage. Slapped some paint on it. Need to get some wing nuts so no tools are required.
attachment.php


attachment.php
 

Attachments

  • 20180906_202407.jpg
    20180906_202407.jpg
    50 KB · Views: 1,839
  • 20180906_202518.jpg
    20180906_202518.jpg
    113 KB · Views: 1,857
  • 20180906_184041.jpg
    20180906_184041.jpg
    63.9 KB · Views: 1,854

Ohmthis

Well-known member
Joined
Jan 20, 2013
Messages
3,019
Location
Outside of Louisville KY
Justin, loving your thread here. I like to see everyone’s projects and their problem solving too. I have had two 90’s Bajas, a 95 240 sport and a 96 25th anniversary 272. Both had 454 mags in them. I built the engine in the 95 from a 97 roller block and rectangular port heads. With the upgraded exhaust it would run 74 on the gps. I never modded the 272, much to classy to me. I love the older Bajas, I’d love to find a 25 or 27’ islander as I have a good size family now. Why do you call yours a money pit? Besides the engine build (bought it with a blown engine) both boats were pretty trouble free. I also had the same problem with the trailer on my 96, it sat so low I’d scrap it on rises coming on and off the road. Keep the good work going.
 
OP
R

rattle_snake

Well-known member
Joined
Jun 25, 2015
Messages
5,226
Location
Chandler, AZ
Justin, loving your thread here. I like to see everyone’s projects and their problem solving too. I have had two 90’s Bajas, a 95 240 sport and a 96 25th anniversary 272. Both had 454 mags in them. I built the engine in the 95 from a 97 roller block and rectangular port heads. With the upgraded exhaust it would run 74 on the gps. I never modded the 272, much to classy to me. I love the older Bajas, I’d love to find a 25 or 27’ islander as I have a good size family now. Why do you call yours a money pit? Besides the engine build (bought it with a blown engine) both boats were pretty trouble free. I also had the same problem with the trailer on my 96, it sat so low I’d scrap it on rises coming on and off the road. Keep the good work going.

Thanks. I've had good luck with my Baja, I've owned it for about 9 years now. As with any boat they do need maintenance and TLC to look and perform well 20 yrs later. I try to repair something if needed every winter to spread out the cost and keep everything tip top.
I was originally looking for a 21' Islander but couldn't find anything and ended up with this 232 that was at the top of my budget. Glad I got the 232 as we usually have quite a crew on board with lots of gear and toys. The 454 MPI has enough torque, makes the right noises and sips fuel for what it weights. It turns a 24" prop and will do 59 on gps which is faster than anyone wants to go except me.
:)
I usually mod/hotrod everything I own, but I have left the motor alone as it has been reliable and efficient. I'm at 666hrs with minimal repairs, doesn't leak a drop of any fluid. The drive has been solid and I have only done preventative maintenance.
 
OP
R

rattle_snake

Well-known member
Joined
Jun 25, 2015
Messages
5,226
Location
Chandler, AZ
Not a lot of exciting shop projects lately to bore others with. Been working on the house interior including paint and adding can lighting. Also been modifying and organizing every storage space/closet, including building adjustable shelving and whatnot. But this is 'garage' journal so no girly house pics.

Finally committed to my '72 Ford 4WD conversion project and bough the major hardware;
'95 high pinion, ball joint Dana 60 and Sterling 10.25
attachment.php

460, C6, NP205
attachment.php

This will be a long and expensive project. I plan to enjoy it.
Will make a separate build thread for it on another site maybe here on GJ too.
 

Attachments

  • 20181023_212810[1].jpg
    20181023_212810[1].jpg
    152.9 KB · Views: 1,663
  • 20181023_212800[1].jpg
    20181023_212800[1].jpg
    154 KB · Views: 1,666
Last edited:

Bigblue&Goldie

Well-known member
Joined
Mar 12, 2009
Messages
10,714
Location
AZ
Hit me up if you are interested in a set of brand new rear Deavers and some Cage radius arms. I started on a 1977 F100 and had to bail on it. I even have a C6 and NP205, but it looks like you have that covered.
 
OP
R

rattle_snake

Well-known member
Joined
Jun 25, 2015
Messages
5,226
Location
Chandler, AZ
Looks like an awesome project Justin. Looking forward to following along with it.
Thanks now that my shop is 'done-ish' I can play with trucks again. It will take a long time compare to your son's jeep project...

Hit me up if you are interested in a set of brand new rear Deavers and some Cage radius arms. I started on a 1977 F100 and had to bail on it. I even have a C6 and NP205, but it looks like you have that covered.
Hmm. Might be interested in the Deavers. I'll send a PM at some point. Going to build tube radius arms instead of the 1/2 ton wedge style. I had a set of Duff (aka cage) long arms on my 77 bronco and they performed very well.
 
OP
R

rattle_snake

Well-known member
Joined
Jun 25, 2015
Messages
5,226
Location
Chandler, AZ
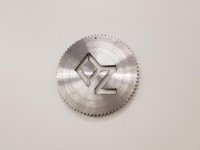
Made some more shop wall art. Used the plasma to cut family brand into an old saw blade. $0.
attachment.php


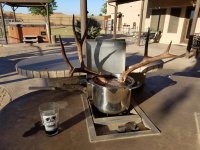
FINALLY got a decent buck this year. Prepping skull for a mount. It was Halloween so I told my kinds we were having brain stew for dinner, then proceeded to show them the pot complete with brains. Got some strange looks but eventually my oldest convinced herself it was a joke.
attachment.php

:beer:
 

Attachments

  • 20181030_161848.jpg
    20181030_161848.jpg
    153.4 KB · Views: 1,525
  • 20181016_194430.jpg
    20181016_194430.jpg
    60.4 KB · Views: 1,516
OP
R

rattle_snake

Well-known member
Joined
Jun 25, 2015
Messages
5,226
Location
Chandler, AZ
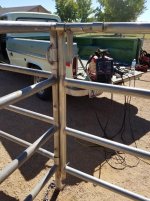
I finished the 'last' of my planned horse stall welding upgrade projects (not to be confused with 'repairs'). 2 of the stalls had the rear half cut off rendering them useless so I extended what was a division gate into a rear wall. The swing posts are only 1.5" sch40 and not up to supporting a heavy 12' gate so I welded a rest and used a chain to secure. The horse lean and kick the @#% out of them so they would get jammed and not allow the adjacent gates to open. PITA.

So 4 years later I finally built a set of bolt latches for them top and bottom.
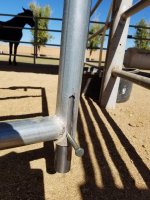
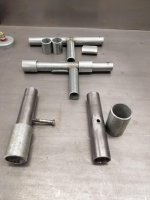
The bottom bolt is 1.5 tube with a captive nut welded in. I used the lathe to make a nut round and then TIG'd it in.
attachment.php


Cut a slot into the existing pipe and used a bolt as a handle. Also added another (no shown) horizontal notch to hold the bolt in the up position, so the gate can be operated with one hand. The offending horse who shall remain nameless is seen in the background inspecting my work looking for weaknesses to exploit in the future.
attachment.php


The lower bolt receiver also supports the weight of the gate, allowing the upper bolt to not be bound up in it's hole. The system works great and is wife approved.
attachment.php
 

Attachments

  • 20181103_114430.jpg
    20181103_114430.jpg
    148.7 KB · Views: 1,516
  • 20181103_114348.jpg
    20181103_114348.jpg
    119.9 KB · Views: 1,511
  • 20181103_102527.jpg
    20181103_102527.jpg
    74.6 KB · Views: 1,506
OP
R

rattle_snake

Well-known member
Joined
Jun 25, 2015
Messages
5,226
Location
Chandler, AZ
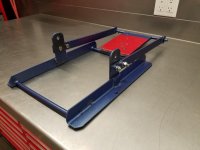
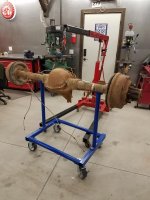
Built a axle stand to make it easier to move and work on the axles. I would have built an adapter for my engine stand but it is in use for the foreseeable future...
I used leftover material I had on hand so it was 'free'. I made the uprights removable for compact storage or I can re-purpose the base for something else later like a table.
attachment.php


Luckily the casters are just tall enough to clear the engine hoist legs.
attachment.php
 

Attachments

  • 20181104_183900.jpg
    20181104_183900.jpg
    150.9 KB · Views: 1,432
  • 20181104_203253.jpg
    20181104_203253.jpg
    97.3 KB · Views: 1,498

zmotorsports

ALLIANCE MEMBER
Joined
Oct 20, 2009
Messages
21,447
Location
Northern Utah
Built a axle stand to make it easier to move and work on the axles. I would have built an adapter for my engine stand but it is in use for the foreseeable future...
I used leftover material I had on hand so it was 'free'. I made the uprights removable for compact storage or I can re-purpose the base for something else later like a table.
attachment.php


Luckily the casters are just tall enough to clear the engine hoist legs.
attachment.php

Nice axle stand Justin. That should make it much nicer to work on.
 

Bigblue&Goldie

Well-known member
Joined
Mar 12, 2009
Messages
10,714
Location
AZ
I used leftover material I had on hand so it was 'free'.

Dude, that's about $100 of steel at Industrial Metal Supply right now!

Stand looks good. I've been tripping over a rebuilt 10.25 on HF dollies for about 6yrs now; it'd be nice to have it up in the air for a change.
 
OP
R

rattle_snake

Well-known member
Joined
Jun 25, 2015
Messages
5,226
Location
Chandler, AZ
Nice axle stand Justin. That should make it much nicer to work on.

Dude, that's about $100 of steel at Industrial Metal Supply right now!

Stand looks good. I've been tripping over a rebuilt 10.25 on HF dollies for about 6yrs now; it'd be nice to have it up in the air for a change.

I figured the axles are heavy enough to make moving and working on them worth the effort. I was able to easily wheel the rear outside for it's 1st round cleaning. Since it's going to be a long term project they will get shuffled around too. Plan is to rebuild one at a time and have them all ready to go before blowing apart the truck itself. Going to make some more dollies for the cab and maybe the bed.
 
OP
R

rattle_snake

Well-known member
Joined
Jun 25, 2015
Messages
5,226
Location
Chandler, AZ
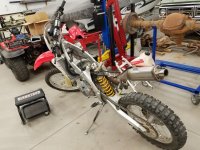
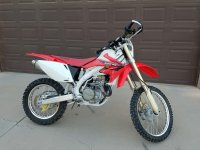
Need some more batteries to go dead and tires to go flat so I picked up another safety cycle, a 2005 CRF 450X. Had to sell essentially the same bike 5 years ago and make a deal with the devil (wife) to get my Raider. Been shopping for a replacement for some time now. I was very happy with the X for my riding style so bought another. This bike has the original tires from 2005, so super low hours. That said the carb was gummed up and ran like a turd, among other problems. I bought it anyhow hoping it was an easy fix and nothing major....

So step 1 was to pull carb and airbox for mods. Good time to clean and inspect everything. Bike is a survivor and hasn't been touched much at all.
attachment.php


Chopped up the airbox to increase flow. Also cut out the little side vents. Makes a big difference for $0 with proper jetting.
attachment.php


Carb got a cleaning, new pilot jet and jet kit (main jet and needle). Also updated the accelerator pump to the 2008+ design.
attachment.php


Removed exhaust baffle and made provisions for a license plate. Also swapped out the tail light for a tail/brake light combo and added a brake switch to make it street legal.
attachment.php


Added hand guards (a must in the desert!), a mirror and an electric horn. Gave her a bath and looking shiny and new(er) again. Idles and runs properly now (phew!) and pulls hard at WOT. Still have some more items to address but it's ready to ride wheelies.
:beer:
attachment.php
 

Attachments

  • Inked20181107_181402_LI.jpg
    Inked20181107_181402_LI.jpg
    158.1 KB · Views: 1,355
  • Inked20181108_200745_LI.jpg
    Inked20181108_200745_LI.jpg
    94.7 KB · Views: 1,328
  • 20181107_183047.jpg
    20181107_183047.jpg
    145 KB · Views: 1,344
  • 20181107_214302.jpg
    20181107_214302.jpg
    116 KB · Views: 1,347
  • 20181109_170012.jpg
    20181109_170012.jpg
    143.7 KB · Views: 1,341

WoodsTruck

Well-known member
Joined
Jan 12, 2013
Messages
1,025
Nice bike.

Is the Suzuki quad in the back the 250cc or the King Quad? I have one that I did some mods to that really make it better.
 
OP
R

rattle_snake

Well-known member
Joined
Jun 25, 2015
Messages
5,226
Location
Chandler, AZ
Nice bike.

Is the Suzuki quad in the back the 250cc or the King Quad? I have one that I did some mods to that really make it better.

Thanks. The Zuk is a 96' 250cc 4x4 my buddy picked up for $1000. For the money it does everything it needs to do. Please share the mods and I will pass them along to him.
 
To avoid these ads, REGISTER NOW!
Top Bottom