To avoid these ads, REGISTER NOW!

rattle_snake's welding table build

rattle_snake

Well-known member
Joined
Jun 25, 2015
Messages
5,175
Location
Chandler, AZ
A decent welding table has been on my todo list for some time now. I looked for a hunk of plate for a top and used tables for some time, but didn't find anything worth pursuing. After settling on a design, I got hung up on material prices... so I waited another month and they went up another 20%. Dooh! I wanted a 1/2 or 3/8 plate top but couldn't justify the significant extra cost given MY use and needs for the surface.

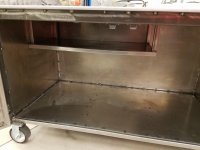
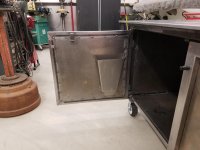
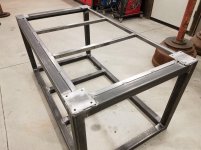
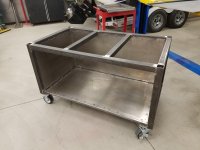
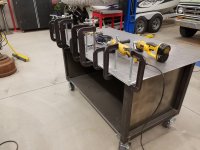
I looked though many table builds for ideas and how they would work with my limited space and usage. I wanted to fully utilize the space underneath, so I decided to fully enclose for clean storage. This allows me to get rid of an existing cabinet to make room for the table. I also wanted to keep my welding machines portable and mounting a tank presented some problems. So the design is a boring, simple cubic rectangle. I chose to use casters for portability. We'll see how that works out, I can always replace with fixed feet if desired in the future. I settled on a height of 32.5" and can add spacer/lift blocks above casters if needed. So far it seems too low...

First step was to build the frame. Material is 2" rectangular 0.120 wall. I built the short ends first and got them as square and flat as possible, then squared up the rest of the frame. I've learned a few things over the years on weld cool/contraction and it effects, and each project comes out a little better than the last. I went slow and re-measured things 5 times before committing to the next step. Cut a lot of tack welds to adjust until perfect. I decided not to use 2" on the lower front to allow the doors and shelf to extend to the bottom. 1" tube frame supports the shelf and gives a place to attach the skin. The resulting errors are very minimal and I am happy with the results.
attachment.php


Cut some plate for caster mounts with the plasma and tapped to 3/8
attachment.php


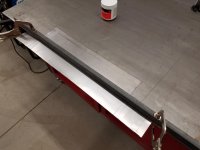
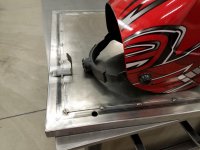
Test fit of the 1/4 top, whole thing was cupped
attachment.php
 

Attachments

  • 20180819_163742.jpg
    20180819_163742.jpg
    148.4 KB · Views: 2,075
  • 20180820_222559.jpg
    20180820_222559.jpg
    146.9 KB · Views: 2,066
  • 20180820_225645.jpg
    20180820_225645.jpg
    138.1 KB · Views: 2,072
To avoid these ads, REGISTER NOW!
OP
R

rattle_snake

Well-known member
Joined
Jun 25, 2015
Messages
5,175
Location
Chandler, AZ
Next step was to cut and install the skins. I used 18ga sheetmetal and calculated a method to get everything out of one sheet with almost no waste. I used the plasma and tried a new method to space the tip off the surface (with 1/2 angle) instead of dragging.
attachment.php


The door frames are made of 1x2 16ga tube. The miters came out very nice so I used the tig to reduce the grinding. Going to paint so didn't have to get them as nice as all the bare metal finish cabinet doors I made.
attachment.php


Crude construction but robust. tried drilling some pilot holes for spot welds but didn't penetrate into the ticker 0.120 wall tube well so just took lazy route and edge welded
attachment.php
 

Attachments

  • 20180825_190126.jpg
    20180825_190126.jpg
    122 KB · Views: 2,048
  • 20180826_140353.jpg
    20180826_140353.jpg
    121.6 KB · Views: 2,057
  • 20180826_155350.jpg
    20180826_155350.jpg
    135.5 KB · Views: 2,059
OP
R

rattle_snake

Well-known member
Joined
Jun 25, 2015
Messages
5,175
Location
Chandler, AZ
I anticipated getting the top on flat would be a challenge. It was. I tacked in a head torque pattern but made a few too many and caused some bowls to form between supports. Max error is 0.020" which is plenty good for my use. As I welded I went over the surface with a strait edge and a feeler gauge so it would take forever.

For this project I used a common woodworking trick to make the top appear thicker. I added 1/4 x 3 flat on the bottom around the edge. After struggling to get the top as flat as possible this seemed like a poor idea that could really f' up the top. Although outside my comfort zone, I decided to go for it and build some skills.
attachment.php


I ground a bevel on the edge to fill with weld and slowly placed boogers in an even fashion. Most of the inner side welds are welded to the welds on the top (as opposed to the frame), as to not torque the edge down further. After several hours of grinding it came out nice. Only one corner was affected buy the process but not enough to worry about.
attachment.php


attachment.php


So why exactly did I do this? Because it looks beefier and provides marginal, if any structural rigidity.
attachment.php
 

Attachments

  • 20180829_215848.jpg
    20180829_215848.jpg
    111.8 KB · Views: 2,051
  • 20180829_215906.jpg
    20180829_215906.jpg
    63.6 KB · Views: 2,036
  • 20180828_181536.jpg
    20180828_181536.jpg
    90.8 KB · Views: 2,057
  • 20180828_201137.jpg
    20180828_201137.jpg
    146.5 KB · Views: 2,056
Last edited:
OP
R

rattle_snake

Well-known member
Joined
Jun 25, 2015
Messages
5,175
Location
Chandler, AZ
Thanks!

Instead of rushing to finish and paint, I'm adding some storage items.
Added a C clamp rack on the right side.
attachment.php

attachment.php


Also want to store a few of the main welding items in the cabinet like helmet & gloves so they don't get covered in grinder grit when not in use. Added a hook to the door and have some more plans for it and the other side.
attachment.php
 

Attachments

  • 20180830_220853.jpg
    20180830_220853.jpg
    105.6 KB · Views: 1,921
  • 20180830_210045.jpg
    20180830_210045.jpg
    147 KB · Views: 1,938
  • 20180830_215117.jpg
    20180830_215117.jpg
    124.4 KB · Views: 115
  • 20180830_221000.jpg
    20180830_221000.jpg
    61.4 KB · Views: 1,925
OP
R

rattle_snake

Well-known member
Joined
Jun 25, 2015
Messages
5,175
Location
Chandler, AZ
OP
R

rattle_snake

Well-known member
Joined
Jun 25, 2015
Messages
5,175
Location
Chandler, AZ
Built a glove pouch out of a chunk of sheet. Started with cardboard until I found a decent shape then cut n' bent it up. Works well.
attachment.php


Added a shallow shelf out of steel that clears the helmet on the door.
attachment.php


Space underneath is enough for my largest jack stands, mechanic seat and other items.
attachment.php
 

Attachments

  • 20180902_103653.jpg
    20180902_103653.jpg
    110.3 KB · Views: 1,655
  • 20180901_111927.jpg
    20180901_111927.jpg
    134.2 KB · Views: 1,664
  • 20180831_184318.jpg
    20180831_184318.jpg
    123.6 KB · Views: 1,662
OP
R

rattle_snake

Well-known member
Joined
Jun 25, 2015
Messages
5,175
Location
Chandler, AZ
On past projects with metal panels I had to run an edge bead of silicone to stop buzzes and rattles from audio system. On this project I used a tube of autobody seam sealer under the paint instead. It worked out nice and dampens all the panels resulting in a more solid feel without having to add welds that distort the sheets.

I waffled on colors for awhile and decided to match workbench with black frame and red doors. I used my HVLP gun to apply satin black inside and out. Did the paint job outside while a decent storm was approaching, got lucky and it flashed before a haboob or rain.
attachment.php


attachment.php


After using helmet hook for a day I realized it wasn't quite right. Some times I take the helmet off when up, other times down. The hook was too short for the down case, so I build a longer one at a steeper angle. Now it's right.
attachment.php


Didn't need to add a grinder rack, torch tube or other accessories as I already built them into my welding machines
 

Attachments

  • 20180902_212810.jpg
    20180902_212810.jpg
    121 KB · Views: 1,665
  • 20180902_230537.jpg
    20180902_230537.jpg
    88.8 KB · Views: 1,653
  • 20180903_170237.jpg
    20180903_170237.jpg
    122.8 KB · Views: 1,655
Last edited:

FallibleFlyer

Well-known member
Joined
Nov 18, 2011
Messages
159
Location
Arizona
That's a slick table! I mulled over how to make doors and eventually gave up, you made it look simple. Well done

Looks like from the photos there is a slight bow to the table. Just the photos? or how bad is it actually.
 
OP
R

rattle_snake

Well-known member
Joined
Jun 25, 2015
Messages
5,175
Location
Chandler, AZ
Hot damn that's nice.
I like the innovative glove holder too.


That's a slick table! I mulled over how to make doors and eventually gave up, you made it look simple. Well done

Looks like from the photos there is a slight bow to the table. Just the photos? or how bad is it actually.

Thanks guys.
For the doors, just cut and weld :)
After making 10 large doors these little ones were a breeze. I went to great effort to make the table as flat as possible, so just the pics.
 

LSVLance

Well-known member
Joined
Jul 17, 2010
Messages
298
Location
Peoria, AZ
Look great!! Thanks for the inspiration...I am now rethinking a few design elements on my project.

How far does your top overhang the frame on all 4 sides and would you do that differently next time or like it as is? I really like the doubled up edge...
 
OP
R

rattle_snake

Well-known member
Joined
Jun 25, 2015
Messages
5,175
Location
Chandler, AZ
Look great!! Thanks for the inspiration...I am now rethinking a few design elements on my project.

How far does your top overhang the frame on all 4 sides and would you do that differently next time or like it as is? I really like the doubled up edge...

Thanks, but to be honest I stole most of the design and ideas from other members here.

Overhang is 3". Seems like a good distance so far. Double edge was a lot of extra work, I suggest just getting a thicker top (haha with your money of course. What's another $300-500?)
 
To avoid these ads, REGISTER NOW!

bad_idea

Well-known member
Joined
Jun 11, 2011
Messages
4,332
Location
Pasquotank, NC
I like the table. The closed in lower section is really nice. Mine just has a cross bar. I think I will steal that idea and close mine in later when I get a couple more projects sorted. I had a couple chunks of 2x12 across the lower section as a shelf in the last shop. Moving into/building the new shop so please forgive the mess. The table is so rusty because it spent the last year in my driveway while I moved into the new house and built the shop.

attachment.php


Posting a picture of mine to show how I addressed the thicker edge for the top. Rather than using square tube for the bottom of the top and then adding angle around that, I used angle between the legs then stitched the top to that. My top is 5/8" and the angle is 4x4x1/2" angle. Your method allows you to clamp things at the corner of the table. I've used my table for several years now and built many projects on it, haven't ran into a time when clamping something on the edge of the table was critical. I like how you welded the entire perimeter and ground it smooth, looks very finished.
 

Attachments

  • IMG_0709.jpg
    IMG_0709.jpg
    148.2 KB · Views: 1,235
Last edited:

tarmy

Well-known member
Joined
May 28, 2014
Messages
4,665
Location
Nor Cal
Here is my 1/2” top layout table I recently built...and the real welding table working...all stolen ideas!

That 1/2 is dead flat and tacked...not welded too much as that would warp it.

OP...very nice build. I like your build...doors look sweet.

52FBE996-3142-456E-854C-59DD34D073AA.jpg

3BB8629D-9B92-4F1A-914E-4F8A1C5B8167.jpg
 
Last edited:
OP
R

rattle_snake

Well-known member
Joined
Jun 25, 2015
Messages
5,175
Location
Chandler, AZ
....Posting a picture of mine to show how I addressed the thicker edge for the top. Rather than using square tube for the bottom of the top and then adding angle around that, I used angle between the legs then stitched the top to that. My top is 5/8" and the angle is 4x4x1/2" angle. Your method allows you to clamp things at the corner of the table. I've used my table for several years now and built many projects on it, haven't ran into a time when clamping something on the edge of the table was critical. I like how you welded the entire perimeter and ground it smooth, looks very finished.

That's a slick idea, thanks for sharing.

Excellent job on the table.
Thanks Cam

Here is my 1/2’ top layout table I recently built...and the real welding table working...all stolen ideas!
That 1/2 is dead flat and tacked...not welded too much as that would warp it.
OP...very nice build. I like your build...doors look sweet.
Thanks doors came out nice and allow some additional convenient storage. Added a die grinder rack. Still have to make a shelf below.
attachment.php
 

rixtrix1

Well-known member
Joined
Aug 25, 2013
Messages
3,010
Location
Chandler, AZ (from west NE)
Table turned out very nice, Justin, as expected. Mine has a 1/4" top, too, and I turned the 2"x1/4" angle supporting the top flange out to achieve much the same effect as yours, but didn't weld it. Secured the tip with countersunk machine screws as it was already warped from being over-welded by the PO. Like your doors and helmet/glove holders!
 
OP
R

rattle_snake

Well-known member
Joined
Jun 25, 2015
Messages
5,175
Location
Chandler, AZ
Thanks Ric,
Sounds similar to what bad_idea did above. Would have stolen that idea too!

Now that I have been using the table for a little while now I like not having to GND each piece of materail. Just clamp to table surface. Using a magnetic GND at this time.

I did find the need to level the table and it has stayed put even on the casters.
 
OP
R

rattle_snake

Well-known member
Joined
Jun 25, 2015
Messages
5,175
Location
Chandler, AZ
Table turned out awesome Justin. Great job.:thumbup:

Great work on the table. It came out beautiful.

Thanks guys, appreciate the complements.

Whipped up another sheet metal tray for the door. Found a scrap of 24ga and cut out the shape. Used tighter edge radius of welding table to bend long sides but resulting radius was not so good.
attachment.php


Should have done seams with fold over overlap and spot welds instead of just welding. No way to keep inside of seam looking clean so I goop'd some auto seam sealer over the boogers. :)
attachment.php


Little paint makes any hack at sheet metal work look great!
attachment.php
 

Attachments

  • 20190212_182915.jpg
    20190212_182915.jpg
    104.9 KB · Views: 737
  • 20190212_192131.jpg
    20190212_192131.jpg
    124 KB · Views: 737
  • 20190212_222407.jpg
    20190212_222407.jpg
    90.4 KB · Views: 733

StormcrowAz

Well-known member
Joined
Nov 3, 2011
Messages
750
Location
Phoenix, AZ
Little paint makes any hack at sheet metal work look great!

That reminds me of what the guys over on the Welding Web forum often say: "A grinder and paint makes you the welder you ain't". Pretty much how I feel about a lot of what I do. We're all our own worst critics.

At the end of the day it's functional and looks good. Nice Work!
 

Monza Harry

Well-known member
Joined
Dec 29, 2018
Messages
1,433
Location
Windsor ON
Justin can I suggest that you add a cover over your up facing air inlet ports on your door mounted air tools. All of the dust that can settle in them doesn't make them last longer. I use the covers from the tubes small cutters used to come in [may still I just haven't seen them at my work in quite some time, they can be bought though, I have seen them in the shelving section for the cut to length wire shelves, mine are 5/16" Dia.]. Looks pretty nice! Harry
 
OP
R

rattle_snake

Well-known member
Joined
Jun 25, 2015
Messages
5,175
Location
Chandler, AZ
Justin can I suggest that you add a cover over your up facing air inlet ports on your door mounted air tools. All of the dust that can settle in them doesn't make them last longer. I use the covers from the tubes small cutters used to come in [may still I just haven't seen them at my work in quite some time, they can be bought though, I have seen them in the shelving section for the cut to length wire shelves, mine are 5/16" Dia.]. Looks pretty nice! Harry
Sure, thanks for the tip

Awesome build :thumbup:
Thanks, it is working well for how I use it. Was able to level it with shims under wheels and it stay put well enough. Glad I did not mount a vice to it now that I have a decent selection of clamps and a 3" edge/overhang.
 

jkherd

Well-known member
Joined
Mar 22, 2009
Messages
564
Location
Southwest Missouri
:thumbup: I hope you don't mind if I borrow a few of these ideas for the welding table that I just got off of Craigslist. It was cheaper than building one from scratch. It just needs some modifications.
 

Attachments

  • Fab bench 2.jpg
    Fab bench 2.jpg
    76.5 KB · Views: 97
  • Fab bench 1.jpg
    Fab bench 1.jpg
    93.6 KB · Views: 92

ThiessenTillage

New member
Joined
Aug 26, 2019
Messages
1
Location
Ontario, Canada
Here is my 1/2” top layout table I recently built...and the real welding table working...all stolen ideas!

That 1/2 is dead flat and tacked...not welded too much as that would warp it.

OP...very nice build. I like your build...doors look sweet.

52FBE996-3142-456E-854C-59DD34D073AA.jpg

3BB8629D-9B92-4F1A-914E-4F8A1C5B8167.jpg

Do you have a photo of that "real welding table" without all the clamps on it? I have a beast of welding table, skeleton style, 3ftx5ft, but want to send that one over to be a worktable and build a new welding table and love all the ideas in this thread.
 

Matias

Well-known member
Joined
Feb 28, 2015
Messages
616
Location
Finland
Thanks, it is working well for how I use it. Was able to level it with shims under wheels and it stay put well enough. Glad I did not mount a vice to it now that I have a decent selection of clamps and a 3" edge/overhang.

Thread resurrection! :) Great build! Looking into something similar and will probably copy some ideas...

How's it been now with some years use? Any updates/developments?
 
OP
R

rattle_snake

Well-known member
Joined
Jun 25, 2015
Messages
5,175
Location
Chandler, AZ
Thread resurrection! :) Great build! Looking into something similar and will probably copy some ideas...

How's it been now with some years use? Any updates/developments?

Yes, thanks. Many great builds here to get ideas from.

Table has worked well. Emptied another C25 tanks an two 10# rolls of wire so it's go some miles on it now. The overall height is a little low, but not enough to put effort into caster spacers. I do a fair amount of grinding and having the interior enclosed is nice to keep contents clean. The door gaps are tight enough. Storage on the doors is slick.
The addition of the belt grinder is a game changer and replaces much of the angle grinder work and clamping to the table surface.

The only drawback of the setup is that the grinder cords can catch on the clamps and knock them off. I leave all my grinders plugged in for convenience.

Another great addition is the welding curtain, so I can hog away and not set my boat on fire.
R-sbswZ2g4OdlJVNS12Vd4TrGb0TftHEtBbiSZqkyYlgn5UN-1RYkDJvuFUu1AHZUECnOhc89Vhq4TNB4tj8KV_nZ8a6xsVz10EAD6ecG0BAvU3OcjMbv1fV1ZUXYkdFyPLn-LuQ4A=w2400
 
To avoid these ads, REGISTER NOW!
Top Bottom