To avoid these ads, REGISTER NOW!

Ready for my floor project!

rktinc

Well-known member
Joined
Nov 25, 2007
Messages
387
Location
Midwest/USA
I KNOW THIS BELONGS IN THE FLOOR THREAD

I have posted this in the Floor thread as well but thought more of you would see it in the general area. Regulars will know my project from other posts.


Need some ideas from the forum:

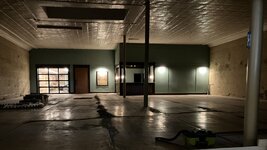
After 3.5 years of working toward finished up my circa 1901 building, I am finally ready to deal with these floors. Need some creative ideas from the group.

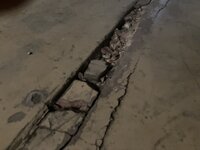
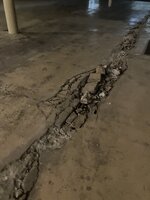
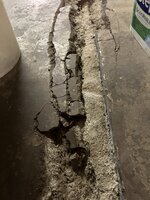
I am ready to start finish up my circa 1901 concrete floor. I am looking for good advice on how to deal with these heave cracks and failures in the floor expansion gaps. I am not looking for anything pretty, just trying to seal it and level it up to be able to park cars inside this room and keep people form tripping in the holes.

I spent a great deal of time digging out the loose bits and large pieces (ended up with a small trailer full of dust and rocks) I vacuumed every one of them so there is a clean bed of original material to build upon. I will be doing it myself like everything else in this project.


I know the "correct way" to repair this is to saw them out and pour new concrete. I have done that on one expansion gap already for the new sewer and water lines. I just can't bear to deal with the dust and mess of that again. I also am convinced that they will just crack and fail again over time. I need something flexible or at least easily touched up as it fails again. The previous owner used lots of quickcrete which failed miserably and turned to powder over the years with one spot of exception...

One place was repaired using small pea-sized gravel/chat as we call it around here. This very smalll aggregate mixed with some type of cement has outlasted every other patch in the building and is in a high traffic area. I am leaning toward buying a few bags of old fashioned chat and mixing some old style slurry up.

I have a few ideas:

1.) Is there some kind of floor leveler/mortar product with fiberglass in it?
2.) The epoxy systems look like they would work but are very very expensive and it would take too much material
3.) I tried mixing retail mulch/rock glue at full strength with different sized aggregate with some degree of success
4.) I will next try buying clear gorilla glue slightly diluted with small aggregate mixed in to fill these areas.

I know there is a new method in Europe replacing exterior concrete drives that use aggregate and epoxy resigns to create a pourable slurry that is laid down and trowled almost like plaster but I just can't seem to find the material here is the U.S.

Not really worried about the look as I will probably cover this floor someday with a HUGE order of Swisstrax. In the mean time I need to seal this with something forgiving as a 125 year old building moves a great deal.

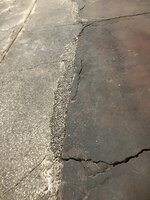
Any thoughts from the forum members? See photos.
IMG_3790.jpeg


IMG_3817.jpeg


IMG_3799.jpegIMG_3793.jpegIMG_3815.jpeg
 
To avoid these ads, REGISTER NOW!

carlaisle

Well-known member
Joined
May 14, 2022
Messages
388
Is there a thin(ner) layer of newer concrete installed over an older slab there?
 

Youngandfree

Well-known member
Joined
Dec 29, 2020
Messages
877
Location
VA
Seems like you could have just cut it out and done it properly before spending thr time and effort to clean the dust up.
 
OP
R

rktinc

Well-known member
Joined
Nov 25, 2007
Messages
387
Location
Midwest/USA
Is there a thin(ner) layer of newer concrete installed over an older slab there?
yes, The original floor was poured sometime just after it was built. The red layer was a cap added at some time later in the 1940's. it is a mess and is just a garage area for me so I am not terribly picky about how it looks. It relatively flat and I plan to eventually use SwissTrax on it. I am leaning toward an epoxy filler of some sort. It is expensive but I am willing to try anything.
 
To avoid these ads, REGISTER NOW!

carlaisle

Well-known member
Joined
May 14, 2022
Messages
388
My experience with concrete is that it does not like to be installed in layers period and the thinner the layer the less satisfactory and less durable the result. If that was my problem to solve and I didn't want/wasn't able/wasn't willing to replace the entire floor I would probably remove everything that I could knock loose with a chipping hammer and then use a bonding agent and non-shrink grout. I still would not hold more than a coin flip worth of hope that the repair would last.
 
OP
R

rktinc

Well-known member
Joined
Nov 25, 2007
Messages
387
Location
Midwest/USA
UPDATE:

Well I finally got my materials to experiment on my aging/failing building floor. I have to say that the results seem to be working out just as I had hoped.

1.) Polyurethane based (expensive) rock/gravel glue

2.) Common water based gravel/mulch glue

I purchased a couple buckets of 1/8" to 1/4" gravel. I bought both "clean" and lime/dirty/dusty versions

I further washed and cleaned a five gallon bucket of this rock and mixed a batch up per the Polyurethane directions.

I also mixed up a batch of the water-based gravel/mulch glue using the clean rock and also a batch using the "dirty/dusty" lime filled rock.


The results have been pretty amazing. All three of my mixes have worked well in filling the failure points of my 100 year old floors. These floors are way beyond conventional repair in many spot and I am just tying to fill holes and safety and appearance reasons.

The winner by far is the more expensive Gravel-Lok brand polyurethane mix. It is similar to molasses or maple syrup and only requires about 5 oz per gallon of clean rock. It sets up over night, is very firm/hard yet feels somewhat flexible. I plan to move forward using it as the primary fix.

The less expensive water-based gravel/mulch glue has also worked well. Surprisingly, I mixed it full strength with the dirty rock and it created a very nice slurry-type spead that works great in small cracks and shallower holes. My prototype test spots were all allowed to set up hard, then I brushed another coat on top of the mixed fill I used the day before.

I think i have found a solution, I also think it will hold up well inside a cliamate controlled building not expased to UV or weather conditions.

I plan to spend the rest of the week finished it out so I hope to be finished by early December. Here are a few pics. As you will see, the floor is a real disaster so traditional concrete patch products applied by the previous owners just kept failing over the years. The second two pics are of the water-based mulch glue product. The first pic is of the Polyurethane product in a very uneven spot under a wall. IMG_3977.jpeg


IMG_3976.jpegIMG_3975.jpeg
 

no704

Well-known member
Joined
Apr 27, 2016
Messages
5,233
Looks like the “new” layer did not get expansion grooves to match the old.
 

BobnCO

Well-known member
Joined
Apr 2, 2023
Messages
211
Looks great! .. these guys are too picky! : ) Once you put a rubber mat down in front of the bench you’ll be Cadillac nice!
 
To avoid these ads, REGISTER NOW!
Top Bottom