To avoid these ads, REGISTER NOW!

Rear Bumper

Sureshot

ALLIANCE MEMBER
Joined
Jan 3, 2011
Messages
3,134
Location
Bridge Creek, OK
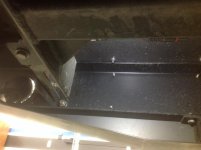
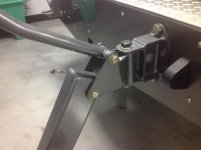
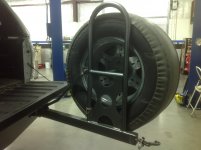
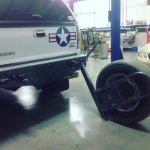
I bought a 2016 Ram 3500 SRW and it needs a rear bumper. I searched but couldn't find any threads of DIY stuff but I am sure they are here. Anyone build their own bumpers and have pics or a link to a thread?
 
To avoid these ads, REGISTER NOW!

Thumper68

Well-known member
Joined
May 16, 2013
Messages
5,134
Location
Duluth MN
Here is a link to the rear bumper video I built for my truck, there is another set of videos on the front bumper plus the ones I did for another truck.


shedfullatools

Well-known member
Joined
Apr 10, 2016
Messages
834
Location
Nova Scotia
I did a quick google image search on 2016 Ram 3500 Custom Rear Bumper, start picking the ones you like then follow the picture to its source. Quite a few build threads on different forums, that's my method for finding info on anything I'm thinking of doing. Lots of times I end up back here in build threads from google images, Beautiful truck by the way coming from a Dodge guy :beer:
 

fnieto

Well-known member
Joined
Aug 27, 2013
Messages
1,401
Location
Tucson,Arizona
I built this one back in 06 for my 05 2500 GMC Dmax. After lifting the truck and adding larger tire size the spare no longer fit under the bed. I also wanted to mount the propane tank in the same area that once held the spare (propane injection).

The main structural portion of the bumper is made of 9" channel and is covered by a single piece of .120 plate. I used Bobcad to draw the bumper skin and used a CNC plasma table to cut the entire bumper to include the receiver, recovery pads and lights holes. The entire bumper was cut like a unfolded box and a 8' manual break was used to break the top and bottom of the bumper. The tire carrier hinges and latch system was was also made in the shop. Everything was drilled and tapped to mount to the channel.
continued...
 

Attachments

  • IMG_0675.jpg
    IMG_0675.jpg
    152.3 KB · Views: 136
  • IMG_0673.jpg
    IMG_0673.jpg
    146.3 KB · Views: 132
  • IMG_0660.jpg
    IMG_0660.jpg
    150.7 KB · Views: 141
  • IMG_0652.jpg
    IMG_0652.jpg
    142 KB · Views: 136
  • IMG_0656.jpg
    IMG_0656.jpg
    132.9 KB · Views: 139
  • IMG_0377.jpg
    IMG_0377.jpg
    130.6 KB · Views: 158

fnieto

Well-known member
Joined
Aug 27, 2013
Messages
1,401
Location
Tucson,Arizona
The tire carrier drops to the ground for removing spare without braking my back. I used thick delrin pads on the latch system to prevent squeaking. The main channel and custom receiver where powder coated in black while the skin was finished in gun metal grey, a back up camera was also added.
I hope you can use some ideas for your build.
 

Attachments

  • IMG_0661.jpg
    IMG_0661.jpg
    133.8 KB · Views: 100

GLTHFJ60

Well-known member
Joined
Oct 31, 2013
Messages
821
Location
Durham, NC
The tire carrier drops to the ground for removing spare without braking my back. I used thick delrin pads on the latch system to prevent squeaking. The main channel and custom receiver where powder coated in black while the skin was finished in gun metal grey, a back up camera was also added.
I hope you can use some ideas for your build.

I really like that, but aren't you just lifting the tire and arm which is more weight than the tire itself?
 

fnieto

Well-known member
Joined
Aug 27, 2013
Messages
1,401
Location
Tucson,Arizona
Yes, but I have more control and use proper lifting technique. Grabbing a large tire and indexing the mounting holes is a PITA (for me anyway). The support arm weight negligible.
 

GLTHFJ60

Well-known member
Joined
Oct 31, 2013
Messages
821
Location
Durham, NC
Yes, but I have more control and use proper lifting technique. Grabbing a large tire and indexing the mounting holes is a PITA (for me anyway). The support arm weight negligible.

Makes sense to me!

If you have any more pictures of the build process I'd love to see them. I would love to copy that design for my truck.
 

fnieto

Well-known member
Joined
Aug 27, 2013
Messages
1,401
Location
Tucson,Arizona
Sorry, but no. I built this prior to joining any forums and limited documentation was done, but I can answer any questions. Hit me up (PM) on ih8mud. I recognize your avatar I'm firestopper on that forum. I seldom visit this site.
Later....
 

LXCam

ALLIANCE MEMBER
Joined
Apr 23, 2013
Messages
19,090
Location
AZ
That's pretty slick fnieto, nice job!.

OP I've done a few different one-offers but no pictures to show. What I would suggest is find a look you like and either get some cardboard or heavy craft paper and make a mock up. Once you determine the design and dimensions I would suggest you do what fnieto did and have it cut on a water jet or plasma and have the major portions bent, then weld in the fillers as needed. If you try to do individual pieces and weld all the seems keeping everything in perfect plane and not warping the entire thing is not only difficult but time consuming.
 
OP
S

Sureshot

ALLIANCE MEMBER
Joined
Jan 3, 2011
Messages
3,134
Location
Bridge Creek, OK
The tire carrier drops to the ground for removing spare without braking my back. I used thick delrin pads on the latch system to prevent squeaking. The main channel and custom receiver where powder coated in black while the skin was finished in gun metal grey, a back up camera was also added.
I hope you can use some ideas for your build.

Very nice work.
 
To avoid these ads, REGISTER NOW!
OP
S

Sureshot

ALLIANCE MEMBER
Joined
Jan 3, 2011
Messages
3,134
Location
Bridge Creek, OK
That's pretty slick fnieto, nice job!.

OP I've done a few different one-offers but no pictures to show. What I would suggest is find a look you like and either get some cardboard or heavy craft paper and make a mock up. Once you determine the design and dimensions I would suggest you do what fnieto did and have it cut on a water jet or plasma and have the major portions bent, then weld in the fillers as needed. If you try to do individual pieces and weld all the seems keeping everything in perfect plane and not warping the entire thing is not only difficult but time consuming.

I might do that or use some 4x6 tubing I have. One of my other thoughts is to use some pipe I can then use as an air tank. I have the parking sensors I want to keep as well as add some other things like steps, lights, tow rings, atv ramp holders. Lots of ideas just not sure how many will make the cut.
 

LXCam

ALLIANCE MEMBER
Joined
Apr 23, 2013
Messages
19,090
Location
AZ
I might do that or use some 4x6 tubing I have. One of my other thoughts is to use some pipe I can then use as an air tank. I have the parking sensors I want to keep as well as add some other things like steps, lights, tow rings, atv ramp holders. Lots of ideas just not sure how many will make the cut.

That's a cool idea. Both my son and I took several pictures of various set ups at SEMA this year. He's been wanting to build set of bumpers for his mall crawler so I made him take the pictures for reference. If he ever gets off his *** and starts on it I'll be there to make sure it gets done and done right (well as right as I can make it anyhow) and 'll make a thread. But I got a feeling yours will be long done before he even rips his stockers off.

I'll dig thru my pics and upload them to post here later. There's some pretty trick stuff guys are building now a days.
 

fnieto

Well-known member
Joined
Aug 27, 2013
Messages
1,401
Location
Tucson,Arizona
Not a rear bumper but I did build this front bumper for my 40. Its a pressure vessel that holds 3 extra gallons of air (150psi) that is supplied from the power plant winch. Perhaps you could use some ideas. The QD are tucked away to prevent dirt/damage. It also supplies air to the ARB lockers. Working pressure gauge as well as jumper hot points. Built from commonly found materials. Only thing purchased was the 45's and head caps.

I love SEMA, been there many times and have had great ideas come from it.
 

Attachments

  • IMG_0032.jpg
    IMG_0032.jpg
    137.5 KB · Views: 77
  • IMG_0033.jpg
    IMG_0033.jpg
    143 KB · Views: 73

cg81

Well-known member
Joined
Sep 24, 2013
Messages
221
My friend just bought a diy front bumper kit from a company called Move Bumpers. They offer front and rear for mostly full sized trucks and jeeps. Several options avaliable for winch mounts, openings for lighting, full brush guard, ect. They come prepared cut out and bent mostly ready to weld. The one he did seemed to be of decent quality. I am considering a pair for my next truck.
 
OP
S

Sureshot

ALLIANCE MEMBER
Joined
Jan 3, 2011
Messages
3,134
Location
Bridge Creek, OK
Not a rear bumper but I did build this front bumper for my 40. Its a pressure vessel that holds 3 extra gallons of air (150psi) that is supplied from the power plant winch. Perhaps you could use some ideas. The QD are tucked away to prevent dirt/damage. It also supplies air to the ARB lockers. Working pressure gauge as well as jumper hot points. Built from commonly found materials. Only thing purchased was the 45's and head caps.

I love SEMA, been there many times and have had great ideas come from it.

Very nice clean setup with a lot of functionality.
 
OP
S

Sureshot

ALLIANCE MEMBER
Joined
Jan 3, 2011
Messages
3,134
Location
Bridge Creek, OK
My friend just bought a diy front bumper kit from a company called Move Bumpers. They offer front and rear for mostly full sized trucks and jeeps. Several options avaliable for winch mounts, openings for lighting, full brush guard, ect. They come prepared cut out and bent mostly ready to weld. The one he did seemed to be of decent quality. I am considering a pair for my next truck.

Very cool website. I don't care for the style of rear bumper they sell just from the point of climbing in and out but great ideas.
 

WoodsTruck

Well-known member
Joined
Jan 12, 2013
Messages
1,019
The tire carrier drops to the ground for removing spare without braking my back. I used thick delrin pads on the latch system to prevent squeaking. The main channel and custom receiver where powder coated in black while the skin was finished in gun metal grey, a back up camera was also added.
I hope you can use some ideas for your build.

How do you release the tire carrier so it drops to the ground? I'm assuming it swings back and forth like a normal carrier but has a safe way to keep it from dropping unintended.
 

fnieto

Well-known member
Joined
Aug 27, 2013
Messages
1,401
Location
Tucson,Arizona
How do you release the tire carrier so it drops to the ground? I'm assuming it swings back and forth like a normal carrier but has a safe way to keep it from dropping unintended.

Pill a pin at a heim joint prior to swinging out. Then support the tire and lower using proper back saving technique.
 

Mooreag47

Well-known member
Joined
Jan 2, 2016
Messages
363
Location
Southern Cali
Not a rear but I think it turned out good just need to add some tow points. I used random scrap from the job site I'll post the rear when I get it done
 

Attachments

  • IMG_1899.jpg
    IMG_1899.jpg
    144.6 KB · Views: 19
  • IMG_1902.jpg
    IMG_1902.jpg
    144.2 KB · Views: 18
  • IMG_1898.jpg
    IMG_1898.jpg
    145.5 KB · Views: 19
  • IMG_1885.jpg
    IMG_1885.jpg
    141.7 KB · Views: 18
  • IMG_1883.jpg
    IMG_1883.jpg
    142 KB · Views: 19
  • IMG_1884.jpg
    IMG_1884.jpg
    137.8 KB · Views: 17

Mooreag47

Well-known member
Joined
Jan 2, 2016
Messages
363
Location
Southern Cali
After paint
 

Attachments

  • IMG_1896.jpg
    IMG_1896.jpg
    140.4 KB · Views: 16
  • IMG_1894.jpg
    IMG_1894.jpg
    136.1 KB · Views: 14
  • IMG_1892.jpg
    IMG_1892.jpg
    137.6 KB · Views: 14
Last edited:
To avoid these ads, REGISTER NOW!
Top Bottom