To avoid these ads, REGISTER NOW!

Rebuilding an AFF 200T jack

slowTA

Well-known member
Joined
Mar 18, 2009
Messages
266
Location
Morris County, NJ
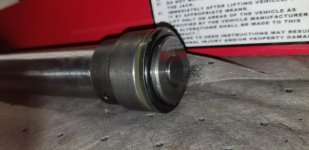
The problem with my jack is that it leaks down while holding a load, quick enough that positioning jack stands is a problem.

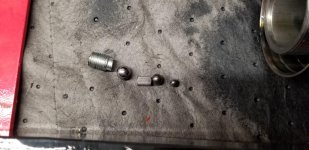
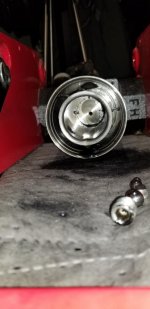
I've read through the jack rebuilding thread on here looking for references to the AFF 200T jack. I found some good information but unfortunately some of the info was incorrect. The incorrect info has to do with the over pressure adjustments. Since this jack has 2 pistons there are 2 sets of over pressure and one way valves. The post said to screw in the adjusters and count the number of turns. On my jack the adjusters were turned all the way in from the factory, so a simple adjustment won't work. Loosening the adjusters caused a substantial leak after about 1 turn.

So since there is no adjustment left (or none to begin with) that makes me think a full rebuild or at least replacing the over pressure and one way guts is required.

I found the rebuild kit online and with shipping it's about $30. I didn't see any successful rebuilds of this jack mentioned yet so it feels like a **** shoot to me.

Do I spend the $30 and cross my fingers, or do I sell it for pennies per pound?

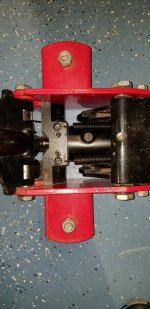
For reference here is a breakdown of the jack.
http://www.affjaxx.com/pdf/200t_sd.pdf
 
To avoid these ads, REGISTER NOW!

Hiball

Well-known member
Joined
Apr 30, 2009
Messages
14,027
Location
Missery
The Jack has two adjustments, one is the safety overload and should never be bottomed out, the other is a High side bypass and should also never be bottomed out, otherwise you would lose the quick lift (piston) side of the jack.

When you say “on your jack the adjusters where turned in all the way from the factory”? Did you take the cover plug off to get to the internal adjustment? Or are you simply trying to bottom out the cover, which should be tight to prevent leaks?

Regardless... the problem probably lies with the Main ram seal, and NO amount of adjusting will bring it back to life.
 
OP
S

slowTA

Well-known member
Joined
Mar 18, 2009
Messages
266
Location
Morris County, NJ
Thanks for the reply, I took out numbers H13 and H30. H13 is a flat head screw which is the cover for the relief valve, I couldn't see anything below that since I didn't drain the fluid yet. H30 is an allen head plug with a deep indent from the ball underneath it, this is the one that spewed jack fluid when I cracked it open since I had the jack in the raised position (I was checking to see if it leaked down with no load on it, after 24+ hours it didn't).

So I'm assuming H11 is the threaded adjuster that shouldn't be messed with? If that's the case I'll rebuild the rest of the jack and only mess with those if I need to later.

The jack is about 10 years old with minimal use over the years.
 

Hiball

Well-known member
Joined
Apr 30, 2009
Messages
14,027
Location
Missery
Thanks for the reply, I took out numbers H13 and H30. H13 is a flat head screw which is the cover for the relief valve, I couldn't see anything below that since I didn't drain the fluid yet. H30 is an allen head plug with a deep indent from the ball underneath it, this is the one that spewed jack fluid when I cracked it open since I had the jack in the raised position (I was checking to see if it leaked down with no load on it, after 24+ hours it didn't).

So I'm assuming H11 is the threaded adjuster that shouldn't be messed with? If that's the case I'll rebuild the rest of the jack and only mess with those if I need to later.

The jack is about 10 years old with minimal use over the years.

H13 is the cover, H11 is a the adjusting plug that increases/decreases seat pressure. It can be removed, but you must count the turns from its current position to completely seated, so you can reset it to factory setting. The above instructions will work for either the safety overload and or the High side relief.

H30 is the valve plug for the working valve, Never open this plug when the Jack is under load/lift arm is elevated as there will be pressurized oil between the bottom of that plug and the upper ball.
 
To avoid these ads, REGISTER NOW!
OP
S

slowTA

Well-known member
Joined
Mar 18, 2009
Messages
266
Location
Morris County, NJ
I ordered the rebuild kit and since I haven't seen any rebuild pics of this jack (correct me if I'm wrong), here they are!

I was barely able to get the tank but off, any idea what it should get torqued to? Not that my monkey wrench skills are that accurate!

However, I noticed that my H3, H4, and H5 parts might be different. Hopefully the new parts still fit!

Also, I noticed that the order of H30 to H34 is different. I don't think its physically possible to get the parts together in the order shown.
 

Attachments

  • 20181127_200515.jpg
    20181127_200515.jpg
    148.2 KB · Views: 44
  • 20181127_200321.jpg
    20181127_200321.jpg
    148.2 KB · Views: 43
  • 20181127_200339.jpg
    20181127_200339.jpg
    52.4 KB · Views: 49
  • 20181127_201051.jpg
    20181127_201051.jpg
    102.7 KB · Views: 40
Last edited:
OP
S

slowTA

Well-known member
Joined
Mar 18, 2009
Messages
266
Location
Morris County, NJ
The rebuild is complete and everything seems to be working now.

I didn't use every part in the rebuild kit since I didn't take out the plungers or the overpressure valve. However I noticed some parts were missing from the rebuild kit I posted above. It didn't matter since I don't think I would have replaced those parts anyway.

In the attached pictures the parts on the paper towel are the used parts I replaced and the other picture is the unused parts.

Bleeding the jack was a bit annoying since I thought I was done but when I put a load on the jack I had fluid leaking out the fill plug with every pump. It stopped doing that eventually, I assume when I got all the air out of the first overpressure valve?

The only small issue I had with the rebuild was that I didn't get the tank back on perfectly right side up so the fill is tilted to one side! It twisted a bit more than I planned on when tightening the tank nut.
 

Attachments

  • 20181202_152137.jpg
    20181202_152137.jpg
    65.3 KB · Views: 31
  • 20181202_152130.jpg
    20181202_152130.jpg
    110.2 KB · Views: 29
  • 20181202_165801.jpg
    20181202_165801.jpg
    77.4 KB · Views: 33
Last edited:
OP
S

slowTA

Well-known member
Joined
Mar 18, 2009
Messages
266
Location
Morris County, NJ
I'm bringing this one up again since the Jack still leaks down. I guess I need to replace the over pressure valve... and cross my fingers again.
 
OP
S

slowTA

Well-known member
Joined
Mar 18, 2009
Messages
266
Location
Morris County, NJ
Unfortunately I have to say this rebuild was a huge fail.

I finally got around to changing the over pressure hardware. I pulled the caps and wiped up whatever spilled out. I counted the number of turns to bottom out the adjusters then removed the adjusters, springs, and valves. I assembled the new parts and immediately noticed that when I backed out the adjusters there was very little if any tension on them. Both sides were like this.

I put everything back together and the jack would lift the saddle... but no load at all. So I took the caps off and screwed the adjusters back in all the way and backed them out half of what I counted... which allowed me to lift a car... but it bled down just as quickly as before I started the rebuild.

Anybody want a cheap jack that needs some fine tuning?
 
Last edited:
To avoid these ads, REGISTER NOW!
Top Bottom