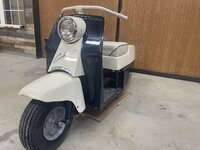
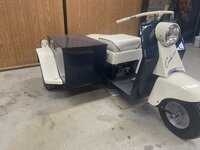
pancholasvegas
Well-known member
- Joined
- Nov 6, 2017
- Messages
- 261
Happy Holiday Season All!
Wanted to share a project that I completed over the last few days during some cold weather and downtime.
Been working on an antique scooter (1950’s Cushman) and got to the finish line a while back, save for the airfilter. Have purchased several that were claimed to fit, along with adapters, but nothing worked. Didn’t desire to run a “Pod,” style filter on the machine either, as everything is still setup factory as far as the rest of the bike / rig.
Ended up stumbling along the correct assembly a couple months ago at a swap meet, but had to purchase the carb and intake assembly. Whatever, seller was nice enough to let me run home with it and check fitment prior to purchase so no complaints.
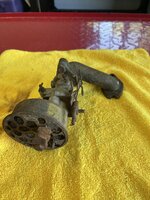
The entire assembly was in sorry shape, but complete. Unfortunately, these old oil bath air cleaners are not meant to have the media replaced, and I certainly didn’t trust it anywhere near the engine. After the media is placed in the air cleaner assembly, it is crimped shut all the way around.

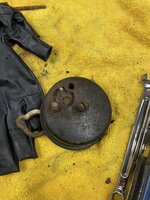
So with some downtime over the holidays, I set to getting this in shape for mounting on the bike. I started by modifying a small flathead screwdriver and using that with a small hammer to begin getting underneath the factory crimp. Not too far, and not prying much, but enough to relieve the crimp. All the way around. Then used some small pliers and began tilting the crimp backwards.

Eventually, the crimp was loosened enough to remove the front plate.
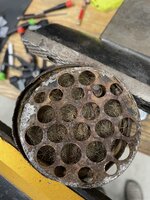
The media was then removed, along with the back screen.
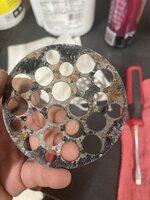
Cleaned off the paint from the front and rear screen. I also deep cleaned the assembly housing. I didn’t manage to get photos, but it was at this point that I replaced the filter media with new material from a modern motorcycle filter. At this stage, the screens and interior of the assembly were prepped and painted.
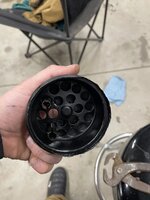
The pinching plier tool you see on the right is a homemade slide-hammer I got from a friend, I used this to grab the stud that was rust-frozen in the air cleaner and remove it. At this point, the media was reinstalled, and we began the crimping process.
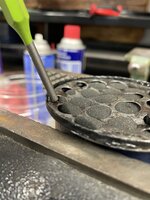
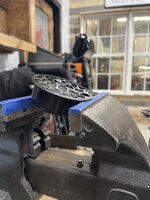
I used a variety of different punches, pliers, visejaws, etc. to crimp the perimeter of the assembly.
I was then able to paint the exterior body and the front screen. The body was carefully masked and painted, the screen took some more creativity and a very fine brush.

Running out of space, so I’ll finish in the following post.
Wanted to share a project that I completed over the last few days during some cold weather and downtime.
Been working on an antique scooter (1950’s Cushman) and got to the finish line a while back, save for the airfilter. Have purchased several that were claimed to fit, along with adapters, but nothing worked. Didn’t desire to run a “Pod,” style filter on the machine either, as everything is still setup factory as far as the rest of the bike / rig.
Ended up stumbling along the correct assembly a couple months ago at a swap meet, but had to purchase the carb and intake assembly. Whatever, seller was nice enough to let me run home with it and check fitment prior to purchase so no complaints.
The entire assembly was in sorry shape, but complete. Unfortunately, these old oil bath air cleaners are not meant to have the media replaced, and I certainly didn’t trust it anywhere near the engine. After the media is placed in the air cleaner assembly, it is crimped shut all the way around.
So with some downtime over the holidays, I set to getting this in shape for mounting on the bike. I started by modifying a small flathead screwdriver and using that with a small hammer to begin getting underneath the factory crimp. Not too far, and not prying much, but enough to relieve the crimp. All the way around. Then used some small pliers and began tilting the crimp backwards.
Eventually, the crimp was loosened enough to remove the front plate.
The media was then removed, along with the back screen.
Cleaned off the paint from the front and rear screen. I also deep cleaned the assembly housing. I didn’t manage to get photos, but it was at this point that I replaced the filter media with new material from a modern motorcycle filter. At this stage, the screens and interior of the assembly were prepped and painted.
The pinching plier tool you see on the right is a homemade slide-hammer I got from a friend, I used this to grab the stud that was rust-frozen in the air cleaner and remove it. At this point, the media was reinstalled, and we began the crimping process.
I used a variety of different punches, pliers, visejaws, etc. to crimp the perimeter of the assembly.
I was then able to paint the exterior body and the front screen. The body was carefully masked and painted, the screen took some more creativity and a very fine brush.
Running out of space, so I’ll finish in the following post.