To avoid these ads, REGISTER NOW!

Rebuilding garage walls

seagull369

Well-known member
Joined
Jan 16, 2013
Messages
227
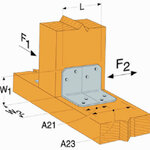
The sole plate in my garage is rotten all the way around as the original builder used non-pressure treated lumber (over open cinder blocks, no less) The wall studs, especially where they connect to the plate are also wasted. I wanted to rebuild the wall a section at a time- including replacing the wall studs completely- and would like to use Simpson Strong Tie hardware in order to connect the studs to the sole plate on the bottom and the (double) top plate up above.

I uploaded pics of the 2 Simpson pieces I'd like to use and wondered if anyone had experience using them before and how it worked out for them. The angled piece is part # a23z and appears to be acceptable for use in the stud-to-sole plate connection. The other piece is part # Sp2
 

Attachments
  • a23z.jpg
    a23z.jpg
    17 KB · Views: 75
  • Sp2.jpg
    Sp2.jpg
    71.4 KB · Views: 59
Last edited:
To avoid these ads, REGISTER NOW!

jack stand

Well-known member
Joined
Feb 29, 2012
Messages
3,362
Location
Lakes Region Maine
If only the bottom of the studs are bad, I'd simply add several bottom plates, PT of course. Even if you end up with 3 1 1/2" of them you will be able to cut off 3" of the bottom of the existing studs. Much simpler and cheaper, probably a better job in the long run also leaving your sheathing and top of the stud/top plate connection intact.
I might use those lower connectors at the corners and maybe every 4' or so, but toe nailing the rest.
 

65ranchero

Well-known member
Joined
Dec 16, 2020
Messages
5,087
Location
Danville, VT left NJ forever
What part of the country are you in?
For me not being a carpenter or structural engineer I kind of think the Simpson ties are a little over kill, why not toe nail the studs top and bottom? And just for piece of mind since the bottom plate is PT maybe use SS nails.
A framing nailer will get you far
 
OP
S

seagull369

Well-known member
Joined
Jan 16, 2013
Messages
227
Many thanks for the quick replies.

There are studs, especially those around an incorrectly installed window, that are rotted along other sections also and absolutely need full replacement. Also, some of the aforementioned stud rot near the bottom plate also extends pretty high up in some areas- well beyond 3"..... Yea, the place was neglected.....The exterior sheathing also is rotted and needs replacing, so I wouldn't be saving myself any work or material there anyway.

I live in NY to answer your questions, Ranchero. I thought about toenailing, but I'm really afraid I'd mess up the angles and/or accidentally split the wood trying to get it in.... I'm a little new to all this stuff.... With the bottom plate sitting right on top of the cinder blocks, there's little margin for error getting the nail in all the way just right, too. The spaces between some of the studs esp. under the window section are also too narrow for me to swing a hammer in. I don't mind using the metal hardware as long as it would make a strong connection.

I came across this other style of stud/plate tie and wondered if it would make a better connection than the angled ones.
 

Attachments

  • sph.jpg
    sph.jpg
    55.3 KB · Views: 70

65ranchero

Well-known member
Joined
Dec 16, 2020
Messages
5,087
Location
Danville, VT left NJ forever
The reason I asked location was to see if it was hurricane or earthquake area.
thus the use of Simpson ties.
One reason wood splits when toe nailing is that the nail has entered too near the end of the cut
Alternative is to use GRK structural Screws
Watch this video
 

Daniel Dudley

Well-known member
Joined
Sep 4, 2009
Messages
3,546
Countersink and drill will make you happy. Simple brackets are also nice, and Simpson makes nice screws to go with those as well.
I don't know what kind of sheathing you have on the outer walls, or if you have siding directly over the studs as is common in older buildings in NY. Use the brackets if there is no sheathing, as sheathing really ties the plate and the studs together. Don't go for the brackets that go under the plate, you will be making it hard for yourself.
 
OP
S

seagull369

Well-known member
Joined
Jan 16, 2013
Messages
227
The reason I asked location was to see if it was hurricane or earthquake area.
The garage is located on a large hill/mini mountain and has seen localized, near-hurricane force winds at times. Something that seems to be getting worse and more frequent as time goes on. There are also a large number of pine trees that surround the structure that don't hold up well particularly well to that kind of wind, esp. when coupled with heavy, sustained rain beforehand.

Thanks for posting the video link. That sounds like something I can manage much more easily than nailing. In the comments, the author mentioned he used #9 x 3" "Power Pro premium interior wood screws" with a star drive head made by Hillman... something I'll need to source if I go that route.

Simple brackets are also nice, and Simpson makes nice screws to go with those as well. I don't know what kind of sheathing you have on the outer walls,

By simple brackets, do you mean the a23z's? I noticed in the product descript Simpson offers #9 x 1-1/2" Strong-Drive SD screws that will work with those, which I was planning on using.
 
OP
S

seagull369

Well-known member
Joined
Jan 16, 2013
Messages
227
I don't know what kind of sheathing you have on the outer walls,
There is just regular plywood on the outer side with wood shingles then nailed to that. I plan on replacing it with OSB and probably vinyl siding of some sort.

Use the brackets if there is no sheathing, as sheathing really ties the plate and the studs together.

Since I'll be using sheathing, do you mean I don't need to use any other means to connect the stud to the bottom plate?
 
To avoid these ads, REGISTER NOW!

jrsavoie

Well-known member
Joined
Jun 4, 2013
Messages
1,496
Location
North east Illinois
The reason I asked location was to see if it was hurricane or earthquake area.
thus the use of Simpson ties.
One reason wood splits when toe nailing is that the nail has entered too near the end of the cut
Alternative is to use GRK structural Screws
Watch this video
Love GRK hardware. Best I've ever used.
 

tjansson

Well-known member
Joined
Apr 25, 2018
Messages
197
Location
Northern Vermont
My extreme solution to this problem was to jack up the whole wall, take down the framing, build a block stem wall, rebuild the framing (I had rotted studs at the windows, etc), reinstall install framing, lower garage, resheath, reside... You don't need brackets or toe nailing if you take the framing down!
 

Attachments

  • IMG_20200919_105044330_HDR.jpg
    IMG_20200919_105044330_HDR.jpg
    603.6 KB · Views: 64
  • IMG_20201003_173506350_HDR.jpg
    IMG_20201003_173506350_HDR.jpg
    425.4 KB · Views: 66
  • IMG_20200920_185252356.jpg
    IMG_20200920_185252356.jpg
    380.3 KB · Views: 79

i4ni

Well-known member
Joined
Jan 23, 2010
Messages
1,015
I think the first thing you need to determine is why the original studs and sole plate are rotten. It is not because of the material that the builder used.
I absolutely agree with the above. You're getting water in where there should none so that indicates you have drainage issues that need to be addressed first and foremost. 6 inches above grade is pretty much the bare minimum norm for a finished wood wall and that's if you have good fall away from the structure. I prefer more if at all feasible because water can easily splash 6 inches. Proper flashing should always be considered also. Good luck p.s. gutters are money well spent in most situations
 

Bretny

Well-known member
Joined
Jul 31, 2017
Messages
3,918
Location
Dutchess county NY
Well if what's there is rotted and still standing I dont think wind on your mountian is a very big issue. I would bother with the metal brackets. Just support the roof, cut the studs rotted section out, scab a piece in, lay your top plate down, secure that and move on.

How do you plan on securing the top plate to the block? Making the strongest wood structure known to man wont help if it's not secured down.

Can you post some pictures of the interior and exterior of the building?
 

Zippercat

Well-known member
Joined
Jul 13, 2013
Messages
828
Location
TN
Can you just replace the bottom sill with PT 2x and the sister a new stud to the rotted stud....nail/screw the two together. You don’t have to remove the damaged stud.
After putting in each sister stud, I’d cut the bottom rot out of the original stud. If you want to keep you nail spacing consistent on the wall you can then nail a replacement for the cut out section to the sister.

Around the windows it sounds like you need to remove and fully replace your framing.
 

adsinnott1

Well-known member
Joined
Feb 16, 2021
Messages
136
Location
Kentucky
You can build a temporary wall a few feet in that will support the ceiling/ roof. Then tear down the rotten wall. I would add some blocks to get the stem wall a bit higher. Then rebuild the wall. Re-use the lumber from the temporary wall to do the other temporary walls. Or just jack them up like suggested earlier. Either way you go just make sure its sturdy as you don't want the roof to move.
 
OP
S

seagull369

Well-known member
Joined
Jan 16, 2013
Messages
227
My apologies regarding the delay in responding here.

Well if what's there is rotted and still standing I dont think wind on your mountian is a very big issue. I would bother with the metal brackets. Just support the roof, cut the studs rotted section out, scab a piece in, lay your top plate down, secure that and move on.

How do you plan on securing the top plate to the block?

Can you post some pictures of the interior and exterior of the building?

When you say top plate, do you mean the bottom (sill) plate? The top plate in the garage is in OK shape. The garage itself is just laying on the blocks with no anchors and has been for some 40 years. I've been filling in the hollow blocks flush with concrete and plan to hammer drill some sort of anchor in there later down the road, but not too worried about that right now. I'll post some pics in the next couple of days.

I think the first thing you need to determine is why the original studs and sole plate are rotten. It is not because of the material that the builder used.
I'm sure you're right there. The siding ends on top of the foundation (doesn't run down in front of it) and is kind of pushed into the mortar that was added to the block (I'll post a pic). No kind of step flashing was used. Be that as it may, the sill plate that was used obviously isn't pressure treated and that's a mistake.

Forgive my ignorance, but does sistering or scabbing mean to add a new, full length wall stud right next to the compromised stud then nailing the 2 pieces (horizontally) together?
 
Last edited:

CraigStu

Well-known member
Joined
May 22, 2014
Messages
4,057
Location
Blacksburg, Va
I may be misunderstanding, but adding up several of your individual sentences it seems to me you are talking about building a whole new wall. Bottom plate of PT, whole studs, osb and vinyl siding doesn't leave much else needed to be a complete wall. So tjannson's pics look about right. BTW a couple of pics would help us out. So my thought would be why not build complete wall sections on the floor. Assuming the roof is trusses you could build two 8ft wide sections and tilt one up into position just inside the old wall to hold up the roof. Rip out the old wall and tilt your second section up from the outside. Make your new sections 1/4 to 1/2 inch shorter than your support wall so you have that 1/4 to 1/2 inch clearance to fit the new wall. You could even make your install sections shorter enough that you could put a flat block on top of your open blocks and then you have something to drill into to screw the wall to the block. Just work all around the garage 8ft at a time. The only somewhat difficult part would be tieing the sections together which is usually done by staggering the top plate. But, I'd overcome that by leaving the osb 16 inches narrower on the first section so you can have the osb on the next section overlap the first section. Also, when all is done nail a 2x4 against the inside of the top plates and overlap the wall sections.
 

jrsavoie

Well-known member
Joined
Jun 4, 2013
Messages
1,496
Location
North east Illinois
My apologies regarding the delay in responding here.


When you say top plate, do you mean the bottom (sill) plate? The top plate in the garage is in OK shape. The garage itself is just laying on the blocks with no anchors and has been for some 40 years. I've been filling in the hollow blocks flush with concrete and plan to hammer drill some sort of anchor in there later down the road, but not too worried about that right now. I'll post some pics in the next couple of days.


I'm sure you're right there. The siding ends on top of the foundation (doesn't run down in front of it) and is kind of pushed into the mortar that was added to the block (I'll post a pic). No kind of step flashing was used. Be that as it may, the sill plate that was used obviously isn't pressure treated and that's a mistake.

Forgive my ignorance, but does sistering or scabbing mean to add a new, full length wall stud right next to the compromised stud then nailing the 2 pieces (horizontally) together?
Personally, I screw everything.

Whatever you end up with for studs should be solid from top to bottom. Either cut the bad off the bottom, replace it and put a longer piece beside it to tie everything together or put a full length stud beside it.
 
OP
S

seagull369

Well-known member
Joined
Jan 16, 2013
Messages
227
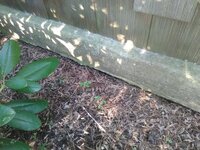
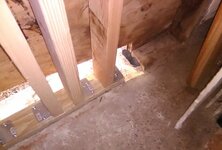
1st pic is (cedar) siding sitting on top of the block on exterior. 2nd shows down below the new bottom plate meeting up with the existing rotten one. You can also see the open foundation block there on the right compared to one I filled in on the left. 2nd pic also shows the angled stud-to-bottom plate ties (a23z) mentioned in original post. 3rd pic is just an overall shot. U can see the opening for the window on the top right. 4th pic shows up above the stud-to-double top plate (SP2) tie. Last pic shows the full extent of how rotten the old bottom plate was/is. The gap you see running along the bottom of the sheathing where sunlight is coming through I cut out so I could better grind the cured concrete down flush. Upper and lower metal ties are screwed in temporarily til I figure out if I should use them or do a toe-nail.

I may be misunderstanding, but adding up several of your individual sentences it seems to me you are talking about building a whole new wall. Bottom plate of PT, whole studs, osb and vinyl siding doesn't leave much else needed to be a complete wall. So tjannson's pics look about right. BTW a couple of pics would help us out. So my thought would be why not build complete wall sections on the floor. Assuming the roof is trusses you could build two 8ft wide sections and tilt one up into position just inside the old wall to hold up the roof.

You're not misunderstanding. That's what I'm doing. It seemed a little easier to do it the way I started it, for one, because there is a garage door track in the way (along with braces) that I didn't want to have to dismantle. If I assembled sections of the new wall on the floor, there also might be height differences between it and the existing top plate once I get it up there, if the foundation and top plate aren't reasonably parallel to each other, I'd have a problem there.
 

Attachments

  • 1.jpg
    1.jpg
    531.9 KB · Views: 28
  • 2.jpg
    2.jpg
    242.9 KB · Views: 27
  • IMG_20210705_183706.jpg
    IMG_20210705_183706.jpg
    324.6 KB · Views: 25
  • 3.jpg
    3.jpg
    240.5 KB · Views: 24
  • 5.jpg
    5.jpg
    433.4 KB · Views: 23
Last edited:
To avoid these ads, REGISTER NOW!
Top Bottom