
Hope its OK I post this here. Looking for some feedback on the recessed lights I just installed in our kitchen. Not technically the garage (all though I have baked some headlights in the oven), but I've been reading through the threads here for recently for electrical tips in the garage and you all have a ton of knowledge. I've attached some pictures along with descriptions of what I did. You won't offend me if I did something incorrect so please let me know.
Notes
- House was built in 1978
- Switched wire leading to the fixture was 14g NM
- Swapping a single 3 bulb fixture @ 13w each for 3 individual HALO wafer lights @ 8.5w each.
- Attic is accessible so able to access any work from above as well.
- Roof truss members are all 2x6 spaced 24" o.c. filled with loose cellulose insulation.
1) First thing I did (after cutting the power) was to remove the old switched wire from the fixture and install it in a junction box. The new fixtures I purchased require 90c rated wire. It was my understanding that NM is only 60c and this was a good way to remedy that. FUN FACT when I disconnected the old fixture the neutral wire was pretty much brown and missing some jacket and the load snapped off .
2) Cut holes for the wafers roughly 3'-9" o.c. for a 7'-6" H ceiling. Used 24" from the cabinets.
3) Ran all new 14g NM-B wire to each of the drop locations leaving about 1' though each hole and back to the junction box to the old switched wire. All wire is secured to the beam using romex staples.
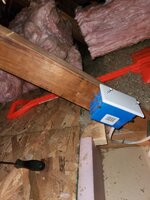
3) Installed the wafer light drivers on the roof beams. All 14g wires are secured the the driver boxes using wire clamps. I attached each driver so you could reach into the light hole and unhook it from the beam if you needed to access the box with enough slack in the 14g wire to do so. I know the directions say you can but, I don't know, something about just laying the driver box on the dry wall doesn't seam right to me.

4a) Boxed in the wafer lights and drivers using 1-1/2" rigid insulation boxes spanning between the studs and sealed with great stuff. Sealed around the wire pass through. Capped of the enclosure by placing another piece of foam across the beams and sealing those to the sides of the insulation box. Last step was to cover the boxes back up with the loose cellulose insulation. Rigid insulation does not contact the wafers or driver boxes.

4b) the last box was too close to the truss webbing so I had to lay batt insulation over the driver and light on that one. The lights are IC rated, but still makes me uneasy doing so. Would appreciate any reassurance on that matter

6) Ran a new 14g NM-B lead from first fixture position back to the junction box. Connected to the old switched wire (push ins) and closed up the box.

5) Result. Still need to patch the old hole up and paint. Pretty straight forward install. Very messy and my knees and back hurt today, but overall happy with the added light. Will see how these work out longer term as the plan is to install 4 in the living room next.

Post install thoughts
- Could have moved the lights closer to the cabinets, but 24" away put them dead center of the aisle.
- Will be installing a dimmer as these things are bright going from 3 2700K compact florescent. Setting to 3000K helped it not be so over whelming.
- Minor glare with these, but knew that going into it.
- Will the use of rigid insulation cause moisture or condensation issues inside the enclosure?
- Any worries about the rigid insulation enclosures causing lights to over heat?
Thanks for reading and appreciate and feedback or advice !
Notes
- House was built in 1978
- Switched wire leading to the fixture was 14g NM
- Swapping a single 3 bulb fixture @ 13w each for 3 individual HALO wafer lights @ 8.5w each.
- Attic is accessible so able to access any work from above as well.
- Roof truss members are all 2x6 spaced 24" o.c. filled with loose cellulose insulation.
1) First thing I did (after cutting the power) was to remove the old switched wire from the fixture and install it in a junction box. The new fixtures I purchased require 90c rated wire. It was my understanding that NM is only 60c and this was a good way to remedy that. FUN FACT when I disconnected the old fixture the neutral wire was pretty much brown and missing some jacket and the load snapped off .
2) Cut holes for the wafers roughly 3'-9" o.c. for a 7'-6" H ceiling. Used 24" from the cabinets.
3) Ran all new 14g NM-B wire to each of the drop locations leaving about 1' though each hole and back to the junction box to the old switched wire. All wire is secured to the beam using romex staples.
3) Installed the wafer light drivers on the roof beams. All 14g wires are secured the the driver boxes using wire clamps. I attached each driver so you could reach into the light hole and unhook it from the beam if you needed to access the box with enough slack in the 14g wire to do so. I know the directions say you can but, I don't know, something about just laying the driver box on the dry wall doesn't seam right to me.
4a) Boxed in the wafer lights and drivers using 1-1/2" rigid insulation boxes spanning between the studs and sealed with great stuff. Sealed around the wire pass through. Capped of the enclosure by placing another piece of foam across the beams and sealing those to the sides of the insulation box. Last step was to cover the boxes back up with the loose cellulose insulation. Rigid insulation does not contact the wafers or driver boxes.
4b) the last box was too close to the truss webbing so I had to lay batt insulation over the driver and light on that one. The lights are IC rated, but still makes me uneasy doing so. Would appreciate any reassurance on that matter
6) Ran a new 14g NM-B lead from first fixture position back to the junction box. Connected to the old switched wire (push ins) and closed up the box.
5) Result. Still need to patch the old hole up and paint. Pretty straight forward install. Very messy and my knees and back hurt today, but overall happy with the added light. Will see how these work out longer term as the plan is to install 4 in the living room next.
Post install thoughts
- Could have moved the lights closer to the cabinets, but 24" away put them dead center of the aisle.
- Will be installing a dimmer as these things are bright going from 3 2700K compact florescent. Setting to 3000K helped it not be so over whelming.
- Minor glare with these, but knew that going into it.
- Will the use of rigid insulation cause moisture or condensation issues inside the enclosure?
- Any worries about the rigid insulation enclosures causing lights to over heat?
Thanks for reading and appreciate and feedback or advice !
