To avoid these ads, REGISTER NOW!

Reclaiming the Garage

ncaddy87

Well-known member
Joined
Mar 25, 2014
Messages
74
Location
Oklahoma
The time has come. I'm fed up with the state of my garage and it's time to take action. I've headed down this path several times over the years without reaching the ultimate goal. Heck, when we bought the house, the garage was going to be worked over before we moved in. Bought the supplies and it didn't happen. Now after getting back into woodworking and other projects, I want my garage back. All the information and inspirational examples on this website have been a big help.

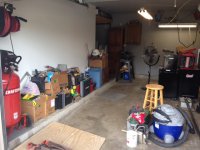
Anyway, seven years after moving in, the garage has been used for classic car storage, woodworking, craft projects, a storage unit, and more. I've made a few changes and a few improvements, but the overall state of the garage has not changed - it's a mess! This is a standard attached 2 car garage built in 1987. We are about 20 miles north of Tulsa, OK.

So here is my plan:
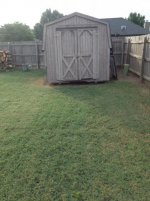
1. Clean up the shed so I have storage room for projects and extras out of the garage during the "remodel"
2. Empty/consolidate the garage, tear down current shelving and work bench
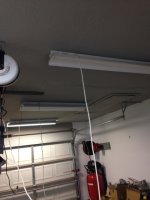
3. Have electrical sub panel added, outlets installed, and lights hooked up (properly)
4. Paint Walls
5. Coat concrete floor with Epoxy
6. Build new shelves
7. Build new work bench

I want to have all these items done by the end of this year, so I'm giving myself plenty of time. After all, I do work two jobs and have a wife and other hobbies/commitments. And as you all know, there will be additional projects to do on the garage, but this will get it to a state of functionality, organization, and the ability to use it without getting hurt!

My goal is to have the electrical done by the end of June. I've already got the bid and the shed is 98% complete. Next step is to empty/consolidate the garage as much as possible.

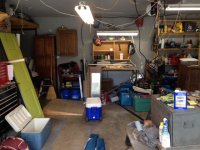
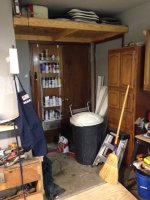
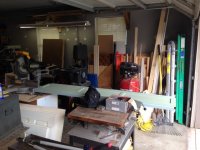
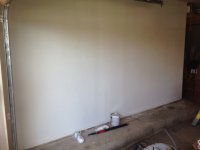
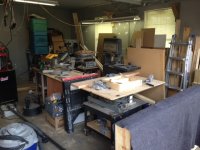
Here is what I started with (about two weeks ago).
 

Attachments

  • Open Garage Pic.jpg
    Open Garage Pic.jpg
    119.9 KB · Views: 406
  • East half of garage pic.jpg
    East half of garage pic.jpg
    130 KB · Views: 328
  • Garage bump out pic.jpg
    Garage bump out pic.jpg
    144.9 KB · Views: 331
  • Southwest corner of garage with shelves pic.jpg
    Southwest corner of garage with shelves pic.jpg
    130.5 KB · Views: 293
  • West wall of garage pic.jpg
    West wall of garage pic.jpg
    128.6 KB · Views: 259
To avoid these ads, REGISTER NOW!
OP
N

ncaddy87

Well-known member
Joined
Mar 25, 2014
Messages
74
Location
Oklahoma
Here is where I started with the shed a little over a week ago. The last four or so show the progress made. For starters, I added a shelf in the back of the shed to add vertical storage. It goes the full length of the shed. Then I added pegboard to the inside of both doors and a sheet of plywood on the bottom half of one door - I think I'll store a few things on it as well. Then I added the Kobalt french cleat system on one wall for the weedeater, shovels, and other long yard tools. I thought about making my own french cleat system, but I was so frustrated, I spent the $50 and bought one I could get hung that night... Then last night I hauled all the trash and old paint out of the shed, including those metal shelves that were in there and I hungh the wheelbarrow up. Swept everything out and called it a night. I've still got to find a place to hang the other 6' green ladder. I've got an 8' ladder hanging along the ceiling of the shed - forgot to take a pic of that. Sorry if some of these are dark - I've done most of the work in the evenings after work and I don't have any lighting in the shed (yet).
 

Attachments

  • Shed shelving pic.jpg
    Shed shelving pic.jpg
    49 KB · Views: 102
  • Shed Exterior pic.jpg
    Shed Exterior pic.jpg
    49.6 KB · Views: 108
  • back of Shed pic.jpg
    back of Shed pic.jpg
    47.6 KB · Views: 105
  • Hung wheelbarrow.jpg
    Hung wheelbarrow.jpg
    141.3 KB · Views: 103
  • Shed french cleats.jpg
    Shed french cleats.jpg
    128.6 KB · Views: 111
  • Shed door pic.jpg
    Shed door pic.jpg
    136.6 KB · Views: 96
  • Shed with shelf.jpg
    Shed with shelf.jpg
    131.3 KB · Views: 106
OP
N

ncaddy87

Well-known member
Joined
Mar 25, 2014
Messages
74
Location
Oklahoma
Thanks! That's one of the reasons for "Why Now" - this site and all the people on it that provide accountability and motivation, even when it gets overwhelming.
 
OP
N

ncaddy87

Well-known member
Joined
Mar 25, 2014
Messages
74
Location
Oklahoma
Thanks! I've got a couple rough sketches (hand drawn) of my future plans for the garage, but haven't gotten into all the electronic drawing options yet. Maybe one of these days I'll sit down when it's too hot to work in the garage and do that...
Have a good one!
 
OP
N

ncaddy87

Well-known member
Joined
Mar 25, 2014
Messages
74
Location
Oklahoma
Thanks for the support! It is very much appreciated. And good advice... I know it will come in handy when the time comes for paint and flooring - definitely dreading those.

Tonight I hung the last ladder in the shed and moved a few projects and supplies from the garage to the shed. That helped make more room in the garage.

I also got my old shelves torn out of the garage. These were built a few years ago when I was unemployed so they were built out of supplies I had laying around, including one shelf out of 1/4" plywood. They were also 12" deep, which is narrower than I prefer. This was to allow room for my 1963 Impala, which I no longer have. :( That thing was a boat and barely fit in the garage.

Anyway, I'm going to rebuild my shelves on the east wall on top of the concrete ledge that is in place. I also moved my welding table from the east side of the back wall to the west end where the shelves were. I'll try to get pics posted tomorrow when I'm at a computer.
 
OP
N

ncaddy87

Well-known member
Joined
Mar 25, 2014
Messages
74
Location
Oklahoma
Here are a couple pics from last night. The first one shows the southwest corner (back wall) of the garage where the shelves used to be. The second shows the same corner with the welding table in place.
 

Attachments

  • Shelves removed.jpg
    Shelves removed.jpg
    94.8 KB · Views: 105
  • Welding table moved.jpg
    Welding table moved.jpg
    104.5 KB · Views: 124
OP
N

ncaddy87

Well-known member
Joined
Mar 25, 2014
Messages
74
Location
Oklahoma
Tonight I got both tool boxes off the ledge and onto the garage floor. Moved some things around and cleared the top of my work bench so it can be taken apart this weekend. It's getting borderline overwhelming and definitely getting messier boxing stuff up and moving it around, but I know that's part of it - things always seem to get messier before they can be cleaner and more organized.
 
OP
N

ncaddy87

Well-known member
Joined
Mar 25, 2014
Messages
74
Location
Oklahoma
Today I tore down my work bench. It was a basic design with 4x4 legs, a shelf, and an MDF top. The most unique part was that the back legs were shorter than the front because of that concrete shelf... Has anyone else ever had to deal with anything like that in their gaarage? I plan to do something a little different next time around.
Also got the shelf and peg board cabinet down.
I also bought some paint and got one wall prepped. Hopefully start painting tomorrow.
 
OP
N

ncaddy87

Well-known member
Joined
Mar 25, 2014
Messages
74
Location
Oklahoma
Today I finished prepping the first wall and put two coats of white, semi-gloss, exterior paint on it. I used Valspar Ultra paint and primer in one. No particular reason for that brand, other than I live close to Lowe's.
I also cut, primed and painted the first board that will be hung on this wall. It will hold my retractable air hose and a retractable extension cord.
After seeing another garage on here where they talked about baseboards, I looked at my walls closer and am leaning toward installing baseboards and painting them a Craftsman red. Any thoughts on this? My secondary color for the shelves and cabinets is gray, so I think it would flow ok.
Also moved my air compressor to its new home.
Pictures to come in the morning when I get to a computer.
 
OP
N

ncaddy87

Well-known member
Joined
Mar 25, 2014
Messages
74
Location
Oklahoma
Here are pictures of the progress from this weekend. Thanks for looking!
 

Attachments

  • garage Air compressor home 2.jpg
    garage Air compressor home 2.jpg
    108.4 KB · Views: 64
  • Garage Fresh paint.jpg
    Garage Fresh paint.jpg
    75.5 KB · Views: 63
  • Garage empty east wall 2.jpg
    Garage empty east wall 2.jpg
    68.7 KB · Views: 69
  • Garage peg board cabinet.jpg
    Garage peg board cabinet.jpg
    95.6 KB · Views: 87
  • garage work bench 2.jpg
    garage work bench 2.jpg
    116.7 KB · Views: 67
OP
N

ncaddy87

Well-known member
Joined
Mar 25, 2014
Messages
74
Location
Oklahoma
Here is what I got done last night. Had to work late, so it's not much, but glad to finally get the air hose hung and added another retractable extension cord. One of the surface mount quad boxes will go right above that board. This is also the first sample of the gray paint color I chose.
 

Attachments

  • Garage compressor with hose reels.jpg
    Garage compressor with hose reels.jpg
    110.5 KB · Views: 119

Mach5

Well-known member
Joined
Apr 30, 2011
Messages
292
Location
Phoenix, AZ
Ncaddy87 - I feel your pain. I'm not a whole lot further along and I "started" my project in April! My garage looked about the same when I started, in terms of clutter. I think going slowly has its benefits...for one, you get to use the garage as you go. Anyway, yours is looking good so far and if you are like me you are probably already much happier just having a clean space.

Sent from my SPH-L710 using Tapatalk
 
OP
N

ncaddy87

Well-known member
Joined
Mar 25, 2014
Messages
74
Location
Oklahoma
You are right my friend! Thanks for the comments and I'm glad I'm not alone in this battle. One step at a time...

So do you have a post going for your garage? I'd love to see it if you do.
 
To avoid these ads, REGISTER NOW!

gdallasc

New member
Joined
Jun 3, 2014
Messages
1
Hey, I know that garage! :) I should, Ncaddy87 is my son. He kept talking about how much he enjoys garagejournal.com and I had to join to see what it's about. I know he appreciates all the comments and support. Helps keep a person motivated when you're trying a major move from chaos to organized work space.

One thing Ncaddy87 didn't mention is he had a fiarly major wood project for me that took between five and six months (on occasional weekends). We finiaally got it to the point I could take it home ffor staining and sealing. It turned out really nice and I'm sure that was the straw that got him moving to get his garage like he wants it.

He's makinig great progress and is determined to see it through!

It's good meeting all of you via your posts!
 
OP
N

ncaddy87

Well-known member
Joined
Mar 25, 2014
Messages
74
Location
Oklahoma
Well I finally made it back in the garage tonight. Mostly stored more things in the shed, attic, and stacked things out of the way for the electrician to start tomorrow. I'm so excited!!! Once the electrical is complete, I'll get back to the painting and finishing the floor and then the part I'm most excited about - building new shelves and getting things off the floor.
 
OP
N

ncaddy87

Well-known member
Joined
Mar 25, 2014
Messages
74
Location
Oklahoma
Here are pics of where I left off Monday night plus what we got done last night. The electrician did get started by mounting the sub panel and most of the conduit and quad boxes on the walls. Still have a couple more wall mounts to go in and then the boxes on the ceiling for the lights. I mounted three more of my light fixtures so tonight we will have the conduit finished and hopefully all of the lights mounted. Exciting stuff!
 

Attachments

  • Garage outlet.jpg
    Garage outlet.jpg
    91.7 KB · Views: 84
  • Garage Lights 2.jpg
    Garage Lights 2.jpg
    102.4 KB · Views: 88
  • Garage Sub Panel.jpg
    Garage Sub Panel.jpg
    77.3 KB · Views: 91
  • garage update 3.jpg
    garage update 3.jpg
    133.4 KB · Views: 102
  • garage update 2.jpg
    garage update 2.jpg
    127 KB · Views: 106
  • Garage update.jpg
    Garage update.jpg
    121.7 KB · Views: 109
OP
N

ncaddy87

Well-known member
Joined
Mar 25, 2014
Messages
74
Location
Oklahoma
I am hot! I mean... my outlets are hot. I officially went from three outlets with six plug ins in the garage (including the one in the ceiling for the garage door opener) to 8 quad boxes with 4 outlets each. That's right, I've now got 32 outlets in my garage and we are still not done. Should finish the boxes on the ceiling for lights on Monday. I got two more fixtures mounted tonight which leaves two to go.

I'm thinking about hooking up some under cabinet lights on my shelving when I get it built. Has anyone done this in their garage? Was it beneficial? What did you use? Me shelves will be approximately 20" deep...
 
OP
N

ncaddy87

Well-known member
Joined
Mar 25, 2014
Messages
74
Location
Oklahoma
Well thanks to my dad's help (I swear it was his idea to work in my garage for father's day :headscrat
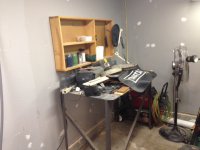
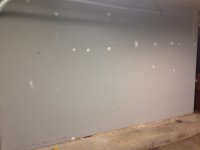
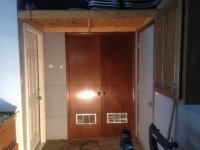
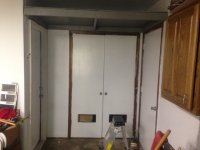
), we got some more painting done. Here are the pics of before and after. We went from three different colors on the doors to one. I still need to paint the trim and put hardware back up, but for the most part, this corner is done.

P.S. Happy father's day to all the GJ father's out there!
 

Attachments

  • Garage Nook Before.jpg
    Garage Nook Before.jpg
    90.6 KB · Views: 57
  • Garage Nook After.jpg
    Garage Nook After.jpg
    91.3 KB · Views: 56
OP
N

ncaddy87

Well-known member
Joined
Mar 25, 2014
Messages
74
Location
Oklahoma
This weekend I got to work on the garage - cleaned, prepped, and painted the first section of garage floor. Then yesterday we were already making sawdust on it building some shelves for my wife's craft room.

a9azahag.jpg
utu5a3u5.jpg
adape4es.jpg


Sent from my iPhone using Tapatalk
 
OP
N

ncaddy87

Well-known member
Joined
Mar 25, 2014
Messages
74
Location
Oklahoma
Thanks 1/2 cup! I appreciate it and very happy with it. In one of the pics you can actually see where the line is from original condition to a clean section and then the paint. I was impressed with how well that etching chemical cleaned off almost thirty years of dirt.


Sent from my iPhone using Tapatalk
 

1/2 Cup

Member Emeritus
Joined
Apr 28, 2012
Messages
19,283
Location
Shepparton. Victoria. Australia
Down the track I really need to do some thing with mine, I can relate to the thirty years of dirt and oil stains. The issue I have is that there is no vapour barrier under the concrete. so I am looking at all options.

Regards
 
OP
N

ncaddy87

Well-known member
Joined
Mar 25, 2014
Messages
74
Location
Oklahoma
That's good. It's definitely worth looking at the options - and there are a lot of them today. I really like the Race Deck type options, but couldn't justify the cost right now and electrical work was more important to me. Maybe somewhere down the line.

Good luck! I'll be anxious to see what you go with.
 
OP
N

ncaddy87

Well-known member
Joined
Mar 25, 2014
Messages
74
Location
Oklahoma
The electrician is coming back today to hopefully start wrapping up the project. Due to scheduling challenges, it has dragged out, which has been fine with me seeing as how I'm working on other pieces of the garage as we go.

Anyway, we will be drilling through sandstone rock on the house to install two outside lights on the garage. Does anyone have any suggestions for the best way to do this? I was just planning on a hammer drill with a masonry bit, but I'm open to ideas.

Thanks in advance!
 
OP
N

ncaddy87

Well-known member
Joined
Mar 25, 2014
Messages
74
Location
Oklahoma
Finished up the wiring last night and got the outside garage lights installed. It looks so much better inside and out. My wife loves it! She said, "Good investment!" Man, that makes a guy feel good when his wife buys into a garage project. It was definitely worth it to add those to scope of work.

Drilling through the rock went much easier than I expected. No complaints there.

I have a few minor things to tie up on the wiring this week, but then it is time to move on to trim and shelving.

The electrician noticed last night that I have T12 light fixtures inside my garage. He said they don't make those fixtures or bulbs any more. So it sounds like I'll have to replace the fixtures as these bulbs burn out. Any suggestions there?
 

Attachments

  • Garage Lights.jpg
    Garage Lights.jpg
    137.4 KB · Views: 47
  • Garage lights 2.jpg
    Garage lights 2.jpg
    139.6 KB · Views: 37
  • Without Garage Lights.jpg
    Without Garage Lights.jpg
    132 KB · Views: 35

Rhyno

Well-known member
Joined
May 21, 2013
Messages
327
Location
Salt on the left, Mormons on the right, Yup, "This
........
The electrician noticed last night that I have T12 light fixtures inside my garage. He said they don't make those fixtures or bulbs any more. So it sounds like I'll have to replace the fixtures as these bulbs burn out. Any suggestions there?

Yeah I have them, too.... I wouldn't spend a bunch of money to replace them, though.

When the bulbs/tubes burn out, just replace them with the newer, smaller diameter, brighter, and lower wattage tubes. The ballast will handle the new bulbs. The old fixtures will accept all bulbs but the new fixtures will only accept the smaller diameter tubes. The pins are the same.

I suspect that your "electrician" was trying to get your service ticket to a higher $$$.

The data is on the bulbs and packaging.....compare the values to verify my words.

I doubt that you will find anyone at the "Big Box" store that'll give you the same advice. When I was asking questions, they quickly got sidetracked by what they were told......."That Style bulb and fixture is now Illegal....."........(they're idiots!!!)

Back to your old fixtures,... when the ballast dies, replace the fixture..... I haven't been able to find cheap ballasts, yet.....(Then I'd keep all of the old fixtures):thumbup:

Good luck......

Let me know if you look into this further.... :)
 

madoc1

Well-known member
Joined
Dec 11, 2012
Messages
1,242
Location
spicewood, tx
t12s are still available at lowes here but I found some t8s on cl and they are brighter. if I had the money I would go to t5s, but t8s are still very good. if you were closer I would give you my spare t12s!

jim
 
OP
N

ncaddy87

Well-known member
Joined
Mar 25, 2014
Messages
74
Location
Oklahoma
Thanks for the info guys! That is very helpful. I looked at my local Lowes today and they did have 4' T12 bulbs so I am ok for now but I'm sure I will revisit this at a later date to get something a little brighter.


Sent from my iPhone using Tapatalk
 
OP
N

ncaddy87

Well-known member
Joined
Mar 25, 2014
Messages
74
Location
Oklahoma
Well, it's been a while since I've posted any progress. Partially because we've been focused on my wife's shelves for her craft room which I'm excited to say, are finished!!! This was a copy off something she found on Pinterest. I helped her cut and drill the boards and start staining and then I was in charge of the pipe - assembly, primer, paint, etc. She finished the sanding, staining, and poly and did an awesome job in my opinion. To sum it all up - my wife has actually spent more time in the garage the last couple weeks than I have. That's a little bittersweet. With all that said, now I get to move onto my shelves this weekend and I'm taking a long weekend to get as far as I can on the garage and a few other household projects.
 

Attachments

  • AJ's Shelves.jpg
    AJ's Shelves.jpg
    120.7 KB · Views: 71
  • AJ's Shelves 2.jpg
    AJ's Shelves 2.jpg
    94.5 KB · Views: 67
  • AJ's Shelves Full.jpg
    AJ's Shelves Full.jpg
    122.5 KB · Views: 61
OP
N

ncaddy87

Well-known member
Joined
Mar 25, 2014
Messages
74
Location
Oklahoma
We're happy with it. It's pretty simple to build and customize, but I won't say it's cheap. My wife loves doing projects like that with wood and pipe. I've got to learn where to buy cheaper and then get some cutting and threading tools for 1/2"-1" galvanized pipe. If anyone has suggestions, please let me know - I'm all ears.
 
To avoid these ads, REGISTER NOW!
Top Bottom