To avoid these ads, REGISTER NOW!

Record 23 Vise/Vice

GarageNoob

Member
Joined
Apr 20, 2015
Messages
19
Location
Derbyshire, UK
This is log of my little restoration project.

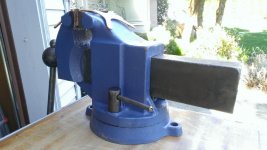
I recently acquired a Record #23 vice and it needed some TLC.

The first thing i did was to see if the vice fully opened - which it didnt.

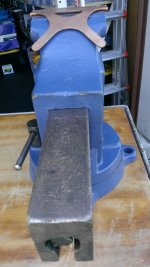
The previous owner had used the back of the slide to pound on and it has mushroomed slightly.

So i used a file to make the edges square again - i left the back bit as it gave it a nice character.

I am not going to do one of those restoration project where they make something old look like something new - NO - i dont want to mask the character, patina and life that this old vice has had. I want it to look like it has been used, but looked after.

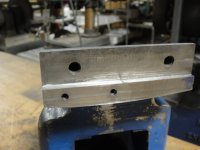
Anyway, the first few hours were just spent using turps to loosen the grime, grease, surface rust and old filings.

My tools were: old sponge soaked with turps, a wire scourer, and a cloth - all things from the kitchen.


(ignore the date on the images, the camera is set up wrong :p)


Ive left her with a coating of oil so she doesnt rust further.

I will also be getting an angle grinder with a wire wheel soon.

I want to clean up: the slide, the jaws, the bolt area and the handle.

And then apply beeswax to the shiny parts

Finally to lube with lithium grease.

And im also looking for someone on the forum to discuss new jaws.
 
Last edited:
To avoid these ads, REGISTER NOW!

Mark in Indiana

Well-known member
Joined
Aug 11, 2010
Messages
3,057
Location
Southern Indiana
Welcome to the group.

Pictures?

If you don't know, you can check the Vises of GJ and Vise Repair 101 threads for information and entertainment.

Edit: Sorry about my pictures question. I guess they were uploading when I originally replied. There are some guys on the Vises of GJ thread that do great work for your parts.

How do you plan to address the crack on the stationary jaw?
 
Last edited:

drivesitfar

Well-known member
Joined
Oct 23, 2013
Messages
36,028
Location
Pacific Northwest
GN: great pictures of your Record 23. i also wonder how you might want to address the crack on the static jaw support. Might i suggest you buying some 6 inch Wilton copper jaw covers that will give you plenty of grip so you don't have to take the existing jaws off?

here's a picture of my copper jaws sitting on top of my Rock Island 577 that is a 6 inch vise that weighs 150 pounds.

good luck and again very nice pictures and welcome to our forum.
 

Attachments

  • WP_20150215_007.jpg
    WP_20150215_007.jpg
    144.4 KB · Views: 34
  • WP_20150215_006.jpg
    WP_20150215_006.jpg
    143.5 KB · Views: 28
  • WP_20150215_004.jpg
    WP_20150215_004.jpg
    149.2 KB · Views: 22
OP
G

GarageNoob

Member
Joined
Apr 20, 2015
Messages
19
Location
Derbyshire, UK
How do you plan to address the crack on the stationary jaw?

i also wonder how you might want to address the crack on the static jaw support. Might i suggest you buying some 6 inch Wilton copper jaw covers that will give you plenty of grip so you don't have to take the existing jaws off?

Would taking the existing jaws off make the crack worse?

The shape of the crack seems to be coming back out of the steel and if it were to crack further then that small chunk of steel would come off. The shape of the crack suggests to me that if it were to worsen, it wouldnt go into the main body of the vice.
 

Mark in Indiana

Well-known member
Joined
Aug 11, 2010
Messages
3,057
Location
Southern Indiana
Would taking the existing jaws off make the crack worse?

No. The crack will grow when you clamp a workpiece in the vise and stress the jaws.


The shape of the crack seems to be coming back out of the steel and if it were to crack further then that small chunk of steel would come off. The shape of the crack suggests to me that if it were to worsen, it wouldnt go into the main body of the vice.

From what I see in your pictures, the crack would grow until the bottom section of the stationary jaw breaks off. I've seen that happen.

I'm no expert, but if I had your problem, I would remove the jaw face, gouge out the crack, drill some small holes at each end of the crack, solder it with flux core silver solder or braze and sand to finish. You will need access to an oxyacetylene torch with a small tip. I've made those repairs, but on cracked bases.
 
OP
G

GarageNoob

Member
Joined
Apr 20, 2015
Messages
19
Location
Derbyshire, UK
From what I see in your pictures, the crack would grow until the bottom section of the stationary jaw breaks off. I've seen that happen.

Yes, that is what it looks like to me too. The crack will grow until the shelf the jaw sits on will break off.

I'm no expert, but if I had your problem, I would remove the jaw face, gouge out the crack, drill some small holes at each end of the crack, solder it with flux core silver solder or braze and sand to finish. You will need access to an oxyacetylene torch with a small tip. I've made those repairs, but on cracked bases.

That sounds like a good idea to repair the jaw. Unfortunately I dont possess any of those tools and i wouldnt know how to use them either. :dunno:
 

exmaxima1

Well-known member
Joined
Jun 25, 2011
Messages
6,341
Location
Midwest
Would taking the existing jaws off make the crack worse?

The shape of the crack seems to be coming back out of the steel and if it were to crack further then that small chunk of steel would come off. The shape of the crack suggests to me that if it were to worsen, it wouldnt go into the main body of the vice.

Doubtful that it would go thru the jaw. When I got my Record 23 it had a similar broken jaw. I milled a pocket and fixed a steel slug with JB Weld epoxy and a pair of steel pins. Since you still have the cracked piece, you might try just the pins to support it. If it is cracked all the way thru, try the epoxy and pins.
 

Attachments

  • record1.JPG
    record1.JPG
    134.4 KB · Views: 45
  • record2.JPG
    record2.JPG
    135.5 KB · Views: 37
Last edited:

drivesitfar

Well-known member
Joined
Oct 23, 2013
Messages
36,028
Location
Pacific Northwest
GN: to answer your question yes you might make the crack worse by taking off the jaw because i'm guessing the jaw will need a little help to get it off. if you have a handy vise repair guy handy like Crazy Wrabbit or one of the other guys then you might be in luck.
 

Mark in Indiana

Well-known member
Joined
Aug 11, 2010
Messages
3,057
Location
Southern Indiana
That sounds like a good idea to repair the jaw. Unfortunately I dont possess any of those tools and i wouldnt know how to use them either. :dunno:

That's not an impossible challenge. If you have a friend with access to those tools, I'm sure he'd help you out. It's not rocket science.
Go to the Vise Repair 101 thread. Page 18 will have some good posts about it. I also have some crack repair pictures, separately on post #168 of the same thread.
 
OP
G

GarageNoob

Member
Joined
Apr 20, 2015
Messages
19
Location
Derbyshire, UK
Doubtful that it would go thru the jaw. When I got my Record 23 it had a similar broken jaw. I milled a pocket and fixed a steel slug with JB Weld epoxy and a pair of steel pins. Since you still have the cracked piece, you might try just the pins to support it. If it is cracked all the way thru, try the epoxy and pins.

Although the pins would help support it, the crack may still worsen. By milling the pocket out of it, like you did, then you remove the material which contains the line of weakness.

@Mark in Indiana suggested to drill a hole at the end of the crack which is the standard solution because cracks concentrate the force but by opening it up and dispersing the force around the drilled hole, it can stop the crack (depending on the force and size of drilled hole).

GN: to answer your question yes you might make the crack worse by taking off the jaw because i'm guessing the jaw will need a little help to get it off. if you have a handy vise repair guy handy like Crazy Wrabbit or one of the other guys then you might be in luck.

Yeah, you may be right - the screws holding the jaw dont seem too easy to budge and im terrified of breaking/stripping the screw :shocking:

Crazy Wrabbit is a little far from me, especially as i have no transport - but i appreciate the offer he gave me :)

That's not an impossible challenge. If you have a friend with access to those tools, I'm sure he'd help you out. It's not rocket science.
Go to the Vise Repair 101 thread. Page 18 will have some good posts about it. I also have some crack repair pictures, separately on post #168 of the same thread.

It isnt an impossible challenge, no, but i dont know anybody who has tools even close to what you are describing.

I will have a look at page 18, thanks
 

Mark in Indiana

Well-known member
Joined
Aug 11, 2010
Messages
3,057
Location
Southern Indiana
Although the pins would help support it, the crack may still worsen. By milling the pocket out of it, like you did, then you remove the material which contains the line of weakness.

@Mark in Indiana suggested to drill a hole at the end of the crack which is the standard solution because cracks concentrate the force but by opening it up and dispersing the force around the drilled hole, it can stop the crack (depending on the force and size of drilled hole).


Yeah, you may be right - the screws holding the jaw dont seem too easy to budge and im terrified of breaking/stripping the screw :shocking:

Jaw face screws can be a challenge also. You can try these steps:

1. Positioning the jaw so the screws face up. Soak the screws with penetrating oil for a day (I use a 50/50 mixture of ATF and acetone for my oil). You can try to work the screws out carefully.

2a. Drill out just the screw heads with a 1/4" drill bit. It would be best to do this with a drill press, but a hand held powered drill will do. The screw heads should come out on the drill bit.

2b. Carefully work the jaw face off the jaw body. You should have enough of the screw stud to remove them with a small pair of pliers.
 

CwazyWabbit

Well-known member
Joined
Jan 9, 2015
Messages
1,189
Location
Surrey, UK
The cracked jaw perch/shelf is the result of enthusiastic hammering on a cast iron vice. I'd be looking at solving that issue before spending money on replacement jaw inserts, if truth be told your jaw inserts don't look too bad.

Looking on eBay the No.23 seems to regularly sell for around £40, I'd have a good think about looking for a vice without any cracks unless you or a friend are capable of repairing that crack.

Not trying to put a downer on the project at all, just sometimes it's worth finding a better condition vice to start with.
 

drivesitfar

Well-known member
Joined
Oct 23, 2013
Messages
36,028
Location
Pacific Northwest
GN: one of your English neighbors Fretters used a hand/breast drill to remove his screw heads on a stubborn set of screws he had in a vice a while back. He posted pictures and a description in post # 271 in the Vise Repair 101 thread and here's a link that might get you to that page.

http://www.garagejournal.com/forum/showthread.php?p=4239441&highlight=drill+screw+heads#post4239441

or the link to that 101 thread is in my signature. if you do end up taking the jaws off i'd still try Mark's ideas and maybe use some penetrating oil/mix on the jaw's faces if you can get any in the cracks so it might come off without having to hit the jaw.

cheers and good luck
 
OP
G

GarageNoob

Member
Joined
Apr 20, 2015
Messages
19
Location
Derbyshire, UK
The cracked jaw perch/shelf is the result of enthusiastic hammering on a cast iron vice. I'd be looking at solving that issue before spending money on replacement jaw inserts, if truth be told your jaw inserts don't look too bad.

Looking on eBay the No.23 seems to regularly sell for around £40, I'd have a good think about looking for a vice without any cracks unless you or a friend are capable of repairing that crack.

Not trying to put a downer on the project at all, just sometimes it's worth finding a better condition vice to start with.

The jaw inserts dont look too bad? thats good news :)

So my focus should be on fixing the crack as oppose to replace jaws.

I wont be using the vice to hammer on and i can just avoid using the side with the crack for the time being until i can source someone with the required tools to fix the crack.

I actually know someone who used to work on repairing steel bridges and i might ask what he suggests... :)

GN: one of your English neighbors Fretters used a hand/breast drill to remove his screw heads on a stubborn set of screws he had in a vice a while back. He posted pictures and a description in post # 271 in the Vise Repair 101 thread and here's a link that might get you to that page.

http://www.garagejournal.com/forum/showthread.php?p=4239441&highlight=drill+screw+heads#post4239441

or the link to that 101 thread is in my signature. if you do end up taking the jaws off i'd still try Mark's ideas and maybe use some penetrating oil/mix on the jaw's faces if you can get any in the cracks so it might come off without having to hit the jaw.

Ah, right, so try to make it as easy as possible to get the jaws off so that no undue stress is put on the crack :)

I dont have a drill press or anything, just a standard handheld drill (I am but a lowly student at the moment :p)
 
Last edited:

drivesitfar

Well-known member
Joined
Oct 23, 2013
Messages
36,028
Location
Pacific Northwest
GN: i still think leaving the jaws in place and getting some copper, aluminum or other type jaw covers might be the answer. then just clean it up, re grease it and mount it to your bench to go to work. then look for it's replacement as you will have plenty of time with a working vice on your bench already like CW suggested.

also good idea to talk to friends that have some skills to let them know you might be interested in learning some skills yourself.
 

CwazyWabbit

Well-known member
Joined
Jan 9, 2015
Messages
1,189
Location
Surrey, UK
It's possible to repair anything with the right tools and a bit of thought. The problem with that crack is that it's in a thick part of the casting but also near the edge.

The main options are Brazing or Welding, with welding you would need to V out the crack so you can reach the bottom of it, this will leave hardly any of the cracked lump remaining so it would be easier to just remove it and build it up with weld then reshape it. With brazing you'll also want to V it out as well tbh, maybe not to the same extent.

Welding rods for cast iron aren't cheap.

Here's a little cosmetic repair to a vice jaw, it shows how much extra space you need to make to get to the bottom of the repair. Someone had cut it with a plasma cutter, you can see how wide the braze ended up.

2015-04-01 22.17.32.jpg

2015-04-18 21.06.43.jpg
 
Last edited:
OP
G

GarageNoob

Member
Joined
Apr 20, 2015
Messages
19
Location
Derbyshire, UK
It's possible to repair anything with the right tools and a bit of thought. The problem with that crack is that it's in a thick part of the casting but also near the edge.

The main options are Brazing or Welding, with welding you would need to V out the crack so you can reach the bottom of it, this will leave hardly any of the cracked lump remaining so it would be easier to just remove it and build it up with weld then reshape it. With brazing you'll also want to V it out as well tbh, maybe not to the same extent.

Welding rods for cast iron aren't cheap.

Considering the crack is going to need to be Ved out in both situations, it may be less effort to go with what exmaxima1 recommended and just get rid of that material all together and simply replace it.

GN: i still think leaving the jaws in place and getting some copper, aluminum or other type jaw covers might be the answer. then just clean it up, re grease it and mount it to your bench to go to work. then look for it's replacement as you will have plenty of time with a working vice on your bench already like CW suggested.

I think this is probably what will end up happening. I imagine she will be restored to a position where she can be used (jaw covers, greasing, waxing, etc) and then ill keep my eye out for a replacement body.

also good idea to talk to friends that have some skills to let them know you might be interested in learning some skills yourself.

Yep, that'll be the next thing on my list - ask around for someone who knows about welding/brazing/milling, etc :)
 

Fretters

Well-known member
Joined
Jan 25, 2014
Messages
4,217
Location
South Yorkshire, England
Just drill some 5mm holes at a 45 degree angle to horizontal through that shelf and the rear jaw, making sure you have them clamped together tightly first, and then run a 1/4" BSW tap through the holes and put some 1/4" grub screws or countersunk screws in there. It'll pull the pieces together and be sturdy enough. The shelf is rarely loaded to any degree through general use, so drill, tap & screw would be ample.
 
OP
G

GarageNoob

Member
Joined
Apr 20, 2015
Messages
19
Location
Derbyshire, UK
Just drill some 5mm holes at a 45 degree angle to horizontal through that shelf and the rear jaw, making sure you have them clamped together tightly first, and then run a 1/4" BSW tap through the holes and put some 1/4" grub screws or countersunk screws in there. It'll pull the pieces together and be sturdy enough. The shelf is rarely loaded to any degree through general use, so drill, tap & screw would be ample.

Good idea,

Are the holes being drilled to stop the crack or to hold the pieces together? :)
 
To avoid these ads, REGISTER NOW!

Fretters

Well-known member
Joined
Jan 25, 2014
Messages
4,217
Location
South Yorkshire, England
Are the holes being drilled to stop the crack or to hold the pieces together? :)


The holes are what you'll run the tap through to screw the cracked parts together. :) I believe the exact tap drill size size in metric for 1/4" BSW is 5.1mm, but a 5mm bit will be fine, especially when using a hand drill, and with the fact it's into cast/malleable iron. You can drill and tap to whatever size you prefer. Doesn't have to be 1/4" BSW, btw.

You'd be hard pushed to drill a hole to stop that crack, as you'd have to drill a hole which exactly followed the angle of the end of the crack through the cast, and seeing as that's likely a bit of a blind crack and not just through a piece of thin cast or such, you'd be unlikely to stop it that way. I'd just tap and screw along the full width of the jaw, using say four holes/screws. Even if the crack does progress further, the bits are already screwed together so it will be of no detriment. You want to drill blind holes for the screws, btw, and not completely through the top of the rear jaw.

Brazing would be the best option, but for simplicity with minimal tools, drilling, tapping and screwing will work fine.
 

Fretters

Well-known member
Joined
Jan 25, 2014
Messages
4,217
Location
South Yorkshire, England
and i preferred the look of the vice before it got painted - that is all i meant :)

They're just winding you up. Don't worry. :D Nowt wrong with leaving something in its original state. That vice of yours is in plenty good enough condition as is. :) I used a similar stance with a Parkinson recently. Each piece requires different handling. Some only need minimal work, some pretty much need a complete overhaul. Yours is fine as is.
 

CwazyWabbit

Well-known member
Joined
Jan 9, 2015
Messages
1,189
Location
Surrey, UK
This No.6 has a lump cracked off in the same place (as well as many others) and shows the direction I personally think the crack will go allowing the lump to drop off.

10.JPG

Picture is from the amusingly titled slight damage vice that was on eBay
 
OP
G

GarageNoob

Member
Joined
Apr 20, 2015
Messages
19
Location
Derbyshire, UK
The holes are what you'll run the tap through to screw the cracked parts together. :) I believe the exact tap drill size size in metric for 1/4" BSW is 5.1mm, but a 5mm bit will be fine, especially when using a hand drill, and with the fact it's into cast/malleable iron. You can drill and tap to whatever size you prefer. Doesn't have to be 1/4" BSW, btw.

You'd be hard pushed to drill a hole to stop that crack, as you'd have to drill a hole which exactly followed the angle of the end of the crack through the cast, and seeing as that's likely a bit of a blind crack and not just through a piece of thin cast or such, you'd be unlikely to stop it that way. I'd just tap and screw along the full width of the jaw, using say four holes/screws. Even if the crack does progress further, the bits are already screwed together so it will be of no detriment. You want to drill blind holes for the screws, btw, and not completely through the top of the rear jaw.

This seems like the best solution because its all things i can do and have the tools to do. Ill get myself a new tap though so its nice and sharp :)

This No.6 has a lump cracked off in the same place (as well as many others) and shows the direction I personally think the crack will go allowing the lump to drop off.

10.JPG

Yes, that is exactly how i imagine mine would go if i let it - that whole edge section would just fall off.
 

zeet

Well-known member
Joined
Jun 13, 2013
Messages
196
Location
Southern California
Here's one for ya....

Last year someone burglarized our shop and stole, among many other things (and I truly can't imagine why!) the mainscrew from our old "Made in England" No 24 Quick-Release Record vise... WTF???

So here I am finally trying to locate the part to repair that great old vise and I find this thread. I've got an email in to Irwin, even though they don't list the No 24 on their website, in hopes that a mainscrew from a 23 or 25, both of which they do list, might be interchangeable.... Any other ideas for a parts source?
 
Last edited:

CwazyWabbit

Well-known member
Joined
Jan 9, 2015
Messages
1,189
Location
Surrey, UK
The No23/24/25 all open by a different amount 6"/7"/8" so I'd say the main screws are a different length.

However if the No.25 main screw is the same diameter as the No.24 then it would be simple enough to shorten and remove a few threads from the end.

I suspect the No.24 and No.25 use different sized main screws though as if you look earlier in this thread you can see the marking on the half nut for this No.23 has 23/24 marked on it meaning it is interchangeable between the No.23 and No.24.

I suppose you could buy a No.23 main screw and have an inch of extra length welded to it, that end won't see much pressure so it would work fine, except at full opening when I suspect only half the half nuts threads would be engaged.
 
Last edited:

dutchgray

Well-known member
Joined
Sep 28, 2014
Messages
6,467
Location
Dorset. England.
Zeet
Over here you would just look for a busted one to nick the screw from, for you that's not going to be so easy. I doubt they still make one that would fit as the different No's are different sizes so have different lengths screws, but unless someone with a lot of Record's compares the screws your not going to know.
 

bubinga

Well-known member
Joined
Jul 26, 2014
Messages
12,744
Location
Bridgeport Ohio. (Across River From Wheeling WV)
Just drill some 5mm holes at a 45 degree angle to horizontal through that shelf and the rear jaw, making sure you have them clamped together tightly first, and then run a 1/4" BSW tap through the holes and put some 1/4" grub screws or countersunk screws in there. It'll pull the pieces together and be sturdy enough. The shelf is rarely loaded to any degree through general use, so drill, tap & screw would be ample.
l like that ldea.
l have a Ox/Acell torch, but I'm not saying I am good at gas welding and/or brazing, but If I had that vise, and fretters suggested that repair, I think that's what l would do.
FWIW.
 

exmaxima1

Well-known member
Joined
Jun 25, 2011
Messages
6,341
Location
Midwest
The No23/24/25 all open by a different amount 6"/7"/8" so I'd say the main screws are a different length.

However if the No.25 main screw is the same diameter as the No.24 then it would be simple enough to shorten and remove a few threads from the end.

I suspect the No.24 and No.25 use different sized main screws though as if you look earlier in this thread you can see the marking on the half nut for this No.23 has 23/24 marked on it meaning it is interchangeable between the No.23 and No.24.

I have a No. 24 (and used to have a No.23), I thought the screws are different diameter. As best as I can measure the screw without taking it all apart, the No. 24 is 1.187" diameter. Further, the head (where the handle slips thru) is 1.66" diameter which is bigger than the No. 23
 

Fretters

Well-known member
Joined
Jan 25, 2014
Messages
4,217
Location
South Yorkshire, England
Just checked the leadscrew on a 23, and the diameter of the leadscrew is around 15/16". Not exact, as it's awkward to get the caliper in under the leadscrew, but definitely under 1".
 
OP
G

GarageNoob

Member
Joined
Apr 20, 2015
Messages
19
Location
Derbyshire, UK
Ive given her some wire wheel treatment,

waxed all the outside parts with beeswax and then buffed

The main screw, quick release mechanism was greased with lithium grease

re-assembled and all working beautifully :D

Do you guys know what size hole the mounting holes are? I bought some M10 bolts but they are too thin...


Let me remind you what it looked like when it started:

 
Last edited:
To avoid these ads, REGISTER NOW!
Top Bottom