To avoid these ads, REGISTER NOW!

Recreating that old weathered wood look.

LXCam

ALLIANCE MEMBER
Joined
Apr 23, 2013
Messages
19,200
Location
AZ
Hey all I could sure use a couple pointers from you crafty guys n gals. I recently remodeled a bathroom and the queen wants me to build a light fixture, some wall shelves and a dang towel rack ladder out of some reclaimed wood.

First minor issue was getting the materials without spending any coin. Fortunately our good friends have a orange ranch that's been in business since dirt was new. So this morning I wandered over and filled up the truck with **** I figured might provide enough good pieces to do something with.
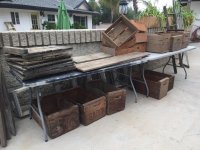
IMG_7648.jpg

IMG_7649.jpg

My first question is I'll be needing to cut a bunch of this stuff to size. How can I reproduce that weathered look on any of the exposed raw edges?

The next one I think I have a solution for but maybe there's a better way. I'm going to seal all of it to eliminate both the cleaning aspect and to stop splinters and snag points. I was planning on using a flat clear with several coats. I also have access to all kinds of epoxies to literally fill all the voids on the shelfs. The downside is experimenting until I find the right solution.

There's one thing I can always count on with this forum. The collected knowledge is an amazing resource so I'd be greatly appreciative being able tapping a bit of it.

Thanks all :beer:
 
To avoid these ads, REGISTER NOW!

ilovevocs

Well-known member
Joined
Jun 26, 2009
Messages
1,966
Location
Toledo, Ohio
I’ll share what I have experimented with beyond stains, dyes, oils, poly.

Stain, chalk paint, sand Chalk paint then colored wax works well. But your left with a wax finish.

Wife has some vodo magic with Acrylic paints and polycrylic mix that she ends with a similar aesthetic..

Basic;

Wire brush, the synthetic type too.
Strong coffee
Torch
Nails on board for pounding
Chain
Spray paint (mostly for splatter or dry spray) and sand paper (for layer paint)


Mostly what I prefer are concealed cuts behind old edges.

If your real committed I have seen some pieces where the board was ripped down the center, sized, then the cut seam glued.

I’ve been looking at details on work like this for a while because it is an aesthetic my wife enjoys.

You need some of these!!!
https://www.rockler.com/wrought-hea...MInsaNkMDX3wIVF3ZeCh3_Kg0-EAQYASABEgIsMvD_BwE
 
Last edited:
OP
L

LXCam

ALLIANCE MEMBER
Joined
Apr 23, 2013
Messages
19,200
Location
AZ
I’ll share what I have experimented with beyond stains and dyes.

Wire brush, the synthetic type too.
Strong coffee
Torch
Nails on board for pounding
Chain
Spray paint (mostly for splatter or dry spray) and sand paper (for layer paint)


Copy that vocs. I do have a question though, whatta ya mean by nails on the board. I assume you mean for distressing the wood right?

Years ago me and a buddy did a tic over 4000sqft of TnG rough sawn ceiling for a house. We were going to stain it ourselves but my buddy decided to use his painter for that part. So he brings over several samples of the tinted base color for her to choose from. She just happened to pick a golden rod base that had a heaving dose of dark walnut stain mixed in. Well that ******* didn't keep the mix stirred during the application. He started in the master bedroom which started out ok, but you could see the stain getting darker and darker as he worked his way out of the room. The next area was the huge cathedral ceiling over the second floor landing and living room. By the time he ran out of stain he had sprayed close to half of that area........now dark brown.

Holy hell what a disaster. He also refused to fix it. So we started sanding but that lasted maybe an hour before we gave in. You couldn't get into the V grove plus recreating the rough sawn look wasn't working. We then hired a sand blaster guy to come in and deal with it. The end result looked totally awesome as the media created a killer texture and it turned the wood a lite gray. If it were me I'd have sealed it and called it a day it looked so good. However, we didn't luck out with her.

So to land this plane and why I shared that story of misery. I was considering finding a media (if possible) that color matches or as close as possible and sandblasting any of the exposed fresh cuts.

Thanks for the input :beer:


Btw, I saw your suggestion about splicing the boards after posting. That's a great idea, I'll certainly look at doing it that way.
 
Last edited:

sixleaker

Active member
Joined
Dec 13, 2012
Messages
41
Location
Chico, CA
Wire wheel on a grinder makes quick work of adding the weathered texture as well


Sent from my iPhone using Tapatalk
 

PugetDude

ALLIANCE MEMBER
Joined
Mar 13, 2013
Messages
22,464
Location
Superstition Mountains, AZ
Weathering stain. Speeds up the natural weathering process.
Mix a few subtle shade differences and experiment on some scrap first.
Water or alcohol- based transparent wood dyes will also work for the base coat.
Stay away from paint or heavily pigmented solid stains.
 
OP
L

LXCam

ALLIANCE MEMBER
Joined
Apr 23, 2013
Messages
19,200
Location
AZ
Wire wheel on a grinder makes quick work of adding the weathered texture as well


Sent from my iPhone using Tapatalk

Getting the texture is the easy one for me. I'm a pro at doing a ****** job. :headscrat

Weathering stain. Speeds up the natural weathering process.
Mix a few subtle shade differences and experiment on some scrap first.
Water or alcohol- based transparent wood dyes will also work for the base coat.
Stay away from paint or heavily pigmented solid stains.

It's the finish color I'm at a loss on. I haven't ever heard about a weathering stain, I'll have to check that out. And if she wants it painted, I'll let her do her chalk paint creation ****. Thanks for the suggestion PD. :beer:
 

PugetDude

ALLIANCE MEMBER
Joined
Mar 13, 2013
Messages
22,464
Location
Superstition Mountains, AZ
Last edited:

lilredex

Well-known member
Joined
Apr 29, 2006
Messages
5,956
Location
Toronto
I use gray paint, Varsol (paint thinner), and BLO in equal parts to get that weathered look....helps to leave it out in the sun for a while too. Paint can be any colour you want.
 

Attachments

  • Rae Vise 1B.jpg
    Rae Vise 1B.jpg
    153.1 KB · Views: 81
  • Lean To 1A.jpg
    Lean To 1A.jpg
    145.3 KB · Views: 76
  • Lean To 1B.jpg
    Lean To 1B.jpg
    146.4 KB · Views: 79
  • Lean To Footing.jpg
    Lean To Footing.jpg
    142.1 KB · Views: 78

-Brent-

Well-known member
Joined
Dec 23, 2009
Messages
4,709
Location
Utah
I can tell you that vinegar/steel wool mixture will stain. My dad knocked over a mixture of the brew on my shop floor and it was there until I ground and sealed it. Haha.

One thing I noticed on weathering some pallet wood was that the vinegar/rust solution looked too much like a die/stain on smooth sawn edges. You absolutely need to take the extra time to make the edges (that will be seen) rough and worn like the neighboring sides.

A wire brush or wire cup held in your hand work well. If you want to wear it further, ding it with a hammer and scratch it with a screwdriver blade, first. Then go at it with the wire, after.

Probabaly doesn't need to be mentioned, but run the wire lengthwise on the edge so it looks authentic and matches the other sides of the board.

5175_zpsajexz5vd.jpg
 

PugetDude

ALLIANCE MEMBER
Joined
Mar 13, 2013
Messages
22,464
Location
Superstition Mountains, AZ
I've also heard that using an old saw blade with (1)deliberately offset tooth (offset to the finished side of the cut) will give you a fairly ragged cut; similar to what you'd get with an old circular saw. Haven't tried it, just throwing the idea out there.
 

turbowoodworker

Well-known member
Joined
Mar 18, 2012
Messages
3,548
Location
Apex NC
In the Woodworking 101 thread, I posted several times about this very topic using a Varathane product for weathering wood. Starts at post number 4303.
 
To avoid these ads, REGISTER NOW!

jabberwoki

Well-known member
Joined
May 1, 2009
Messages
6,476
Location
puyallup wa usa
Sandblast the wood, then bleach it.
A brand new piece of wood will look like it`s been washed up on the beach for years in less than 4 hrs.
 
OP
L

LXCam

ALLIANCE MEMBER
Joined
Apr 23, 2013
Messages
19,200
Location
AZ

Very cool, thanks for the links. :beer:

I use gray paint, Varsol (paint thinner), and BLO in equal parts to get that weathered look....helps to leave it out in the sun for a while too. Paint can be any colour you want.

I've never messed with BLO, only read about it here but maybe it's time to try it out. But your project turned out just incredible looking. Great job!!

1- gallon of vinegar, a few rolls of 0000 steel wool soaked for a week. And an equal amount of water. If it’s too dark, dilute with more water.

Ray

https://www.google.com/search?q=agi...hVIDq0KHekODukQ_AUoAXoECBAQAQ&biw=768&bih=954

:thumbup:

I can tell you that vinegar/steel wool mixture will stain. My dad knocked over a mixture of the brew on my shop floor and it was there until I ground and sealed it. Haha.

One thing I noticed on weathering some pallet wood was that the vinegar/rust solution looked too much like a die/stain on smooth sawn edges. You absolutely need to take the extra time to make the edges (that will be seen) rough and worn like the neighboring sides.

A wire brush or wire cup held in your hand work well. If you want to wear it further, ding it with a hammer and scratch it with a screwdriver blade, first. Then go at it with the wire, after.

Probabaly doesn't need to be mentioned, but run the wire lengthwise on the edge so it looks authentic and matches the other sides of the board.

5175_zpsajexz5vd.jpg

:thumbup:

I've also heard that using an old saw blade with (1)deliberately offset tooth (offset to the finished side of the cut) will give you a fairly ragged cut; similar to what you'd get with an old circular saw. Haven't tried it, just throwing the idea out there.

I've played with that in the past to create a rough sawn look but it only turned out ok.

In the Woodworking 101 thread, I posted several times about this very topic using a Varathane product for weathering wood. Starts at post number 4303.

I've never seen that thread. I used to do a **** load of wood work years ago. But once I got into metal I only did what needed to be done. However I will be looking that up and doing some reading. Thanks turbo :beer:

Sandblast the wood, then bleach it.
A brand new piece of wood will look like it`s been washed up on the beach for years in less than 4 hrs.

Like I mentioned I know the sandblasting works but never tried bleach. I'm sure the wife won't mind me pilfering the laundry supply. :p


Thanks again everyone. This is new territory for me so I need all the help I can beg for. :bowdown:
 

Whiskeymike

Well-known member
Joined
Oct 31, 2013
Messages
775
Location
Austin, TX
Wonder if you could use a pressure washer with the sandblasting attachment. I’ve used a power washer on patio chairs made of cedar and it damaged/weathered the ends unintentionally.
 

Farmallgray

Well-known member
Joined
Nov 30, 2007
Messages
95
Location
Spring Mills, Pa
About 10 years ago I built a TV stand out of used pallets and I wanted it to look like an old barn or shed. I just used gray enamel paint and thinned it way down with thinner and used it like stain. After it dried I used a dry brush technique and added streaks of various mixtures of gray and black.
 
OP
L

LXCam

ALLIANCE MEMBER
Joined
Apr 23, 2013
Messages
19,200
Location
AZ
Wonder if you could use a pressure washer with the sandblasting attachment. I’ve used a power washer on patio chairs made of cedar and it damaged/weathered the ends unintentionally.

That's a good idea but I love my landa hot water unit far to much to even think about that. :shocking:

https://www.garagejournal.com/forum/showpost.php?p=6933434&postcount=4303

Here’s the link for the Varathane. Scroll down a few posts.

Awesome, thanks again turbo.

About 10 years ago I built a TV stand out of used pallets and I wanted it to look like an old barn or shed. I just used gray enamel paint and thinned it way down with thinner and used it like stain. After it dried I used a dry brush technique and added streaks of various mixtures of gray and black.

That sounds really artsy, unfortunately I'm just not good at stuff like that. I do well at set in stone designs but anything that requires that unique artistic flare, I fall flat on my face. However the wife does good with that kind of stuff. If I can't get my act together maybe I'll just pawn off the finish on her.


/me goes and fluffs up the coach pillows, that should be comfy for the next month. :(
 

The Cobbler

Super Moderator
Staff member
Joined
Oct 24, 2013
Messages
25,967
Location
Niagara Region, Ontario, Canada

rattle_snake

Well-known member
Joined
Jun 25, 2015
Messages
5,230
Location
Chandler, AZ
I've tried several techniques, different types of wood and even different pieces of the same wood will give unique results. Scuffing the surface (wire/nylon wheel) will allow more of any 'stain' to take hold more and intensify the effect. Might take several applications of the same stuff to get the color you want. The sealer will alter the result significantly. just have to experiment.

Sometimes, making something the 'queen' approves of can be difficult regardless of things you can control. Good luck!
:)
 
OP
L

LXCam

ALLIANCE MEMBER
Joined
Apr 23, 2013
Messages
19,200
Location
AZ
I agree on this. experiment with dilutions to obtain the look you want. there's few threads on here about it. some in my build thread too

I've tried several techniques, different types of wood and even different pieces of the same wood will give unique results. Scuffing the surface (wire/nylon wheel) will allow more of any 'stain' to take hold more and intensify the effect. Might take several applications of the same stuff to get the color you want. The sealer will alter the result significantly. just have to experiment.

Sometimes, making something the 'queen' approves of can be difficult regardless of things you can control. Good luck!
:)

Thanks again for the tips guys.

Rattle snake. I told her I'll build whatever she wants just show me what you want it to look like. She's not getting that concept.

So right in the middle of typing this response she comes out to the shop to ask me if it was ok for that stuff to be outside in the rain :wtf:

You wanted weathered didn't you :headscrat

And yet again I had to explain to her that once she picks out the pieces I need to pressure wash them off. Why do I offer to do stuff like this, I'll never learn.
 

tarbellb

Well-known member
Joined
Apr 17, 2011
Messages
5,776
Location
Oregon
Ive done a bit of reclaim and distressing, I will elaborate on a few tips that have been mentioned.

_ for a "rough sawn" look, used a old ****** blade in your circ saw and pull it backwards as opposed to your typical direction, with the front of the saw at a slight angle. It will just barely catch the wood but not cut.

_ steel wool and vinegar are excellent for staining, def experiment, and other stuff to get the color right.

_ veneer or edgeband when possible, because matching "reclaim" is a headache...

Good luck.
 
To avoid these ads, REGISTER NOW!
Top Bottom