I was recently gifted a Reed 206B vise after telling a friend I was in the market for a large vise. He said a client of his gave him one, but it was too big for his shop and so he gave it to me. The vise needs some minor restoration, so I watched some YouTube videos and immediately started disassembling. It is now completely disassembled, BUT in the process I cracked in half the threaded spanner-type collar that retains the main screw. Apparently that part serves a very important function!!! Can anyone drop some wisdom on me about how to replace or repair this broken part?

You are using an out of date browser. It may not display this or other websites correctly.
You should upgrade or use an alternative browser.
You should upgrade or use an alternative browser.
Reed 206B Vise
- Thread starter BlackBert
- Start date
Beerhippie
Well-known member
Pictures? "threaded spanner-type collar that retains the main screw" means little to me.
I think you need 5 posts before you can post pictures.
I think you need 5 posts before you can post pictures.
RTM
Well-known member
Don’t worry, it’s supposed to be that way. My Reed 203.5 is the same, good reading here beforehand warned me.BUT in the process I cracked in half the threaded spanner-type collar that retains the main screw.
First of all, apologies for getting the model wrong. After some rust clean-up I can see this is a 206R, not a 206B. Not even sure if 206B is a thing...I was recently gifted a Reed 206B vise after telling a friend I was in the market for a large vise. He said a client of his gave him one, but it was too big for his shop and so he gave it to me. The vise needs some minor restoration, so I watched some YouTube videos and immediately started disassembling. It is now completely disassembled, BUT in the process I cracked in half the threaded spanner-type collar that retains the main screw. Apparently that part serves a very important function!!! Can anyone drop some wisdom on me about how to replace or repair this broken part?
Shiftless
Well-known member
You got a Reed 206 R free?
You owe your buddy big time for that!
RTM is right. That split retainer has fooled many guys. When you think about it, being split in half like that is the only way it could be installed. That feature which provided a means of adjustment to compensate for wear was patented by Reed. Many of us vise aficionados consider the Reeds with that feature to be just about the best bench vises ever made.
Beerhippie
Well-known member
I guess I was confused as to the the split nut, as I've only worked on pre-R Reeds.
I'm new to this forum, so hopefully these pictures I tried to attach come through. The collar that cracked is cast iron. I considered welding it, but my welding skills hover between novice and amateur and I never welded cast iron before, so I did what everyone seems to do these days and asked ChatGPT - I've inserted the response I got below. I'm leaning towards Option 3, but I'm a little suspect about ChatGPT setting me up for disappointment by quoting me $60-$100 for fabrication of a new collar. What do y'all think?
| "...Since your collar is cast iron, you’ll need to approach repair very differently than if it were steel. Cast iron can absolutely be repaired, but it’s brittle, and normal welding often makes it worse unless done carefully. Here’s exactly what you need to know and do: Why you can’t just weld it normally:
Option 1 — Brazing (best DIY option) This is the most reliable and safest method if you’re not set up for professional cast welding. Steps include:
Option 2 — Nickel Welding (for professionals) If you have or can access a nickel rod (Ni-99 or Ni-55) and a stick welder:
Option 3 — Machine Shop Fix If you want reliability:
|
Attachments


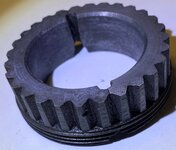
I'm definitely not a vise enthusiast, so I didn't know what he was offering. And he brought it over and it took both of us to heft it from his truck to my workbench, I still didn't know - I was just like "wow, this is a BFV!" Now that I'm doing the research, you're absolutely right, I do owe him big time, which is why when this collar broke, I felt 1000% determined to make it right. Check out the pictures I sent. This thing is for sure cracked, not split. Maybe I've described the whole thing wrong.You got a Reed 206 R free?
You owe your buddy big time for that!
RTM is right. That split retainer has fooled many guys. When you think about it, being split in half like that is the only way it could be installed. That feature which provided a means of adjustment to compensate for wear was patented by Reed. Many of us vise aficionados consider the Reeds with that feature to be just about the best bench vises ever made.
Beerhippie
Well-known member
Read the replies more carefully before you attempt to weld/braze that retainer!
Everyone except me--and that due to ignorance--is saying that the retainer is split intentionally from the factory.
Everyone except me--and that due to ignorance--is saying that the retainer is split intentionally from the factory.
Beerhippie
Well-known member
The way split retainers like this are made is to machine them as a single piece, then intentionally split them, guaranteeing that they fit as machined. That's how it's supposed to look.I'm definitely not a vise enthusiast, so I didn't know what he was offering. And he brought it over and it took both of us to heft it from his truck to my workbench, I still didn't know - I was just like "wow, this is a BFV!" Now that I'm doing the research, you're absolutely right, I do owe him big time, which is why when this collar broke, I felt 1000% determined to make it right. Check out the pictures I sent. This thing is for sure cracked, not split. Maybe I've described the whole thing wrong.
Some engine connecting rod big ends are made the same way--precision machined, then intentionally split in half.
Oh Jeez - you guys are so right. I assumed when you were all saying "split" that it would be a clean, machined split, but it is quite literally cracked intentionally by the factory. For mistaking that part of this, I think I should be forgiven, but not realizing that if it were a complete one-piece circle it would be impossible to install, for THAT part I am well and truly a doofus... looking a face slap emoji. I won't be hard on myself for too long though. I got a free 206R!!! I'll post pictures when it's all restored.You got a Reed 206 R free?
You owe your buddy big time for that!
RTM is right. That split retainer has fooled many guys. When you think about it, being split in half like that is the only way it could be installed. That feature which provided a means of adjustment to compensate for wear was patented by Reed. Many of us vise aficionados consider the Reeds with that feature to be just about the best bench vises ever made.
Last edited:
RTM
Well-known member
And obviously ChatGPT doesn't know $#it about Reed split collars either.Read the replies more carefully before you attempt to weld/braze that retainer!
Everyone except me--and that due to ignorance--is saying that the retainer is split intentionally from the factory.
(Pro tip to the OP, many of us don't trust it very far, especially for anything older than the Chat GPT availability to the general public, so maybe for how to fix your Windows 11 questions)
Split in pieces, cracked in pieces, all semantics that the collar is intended to be in 2 pieces.
Thanks again for the advice everyone. Here's the finished product. I decided against painting it. After degreasing, I media-blasted with 80-grit glass bead, then worked it over with wire wheels. Blew it out with compressed air, wiped it down with acetone, greased the wear surfaces and paste-waxed the rest of it. Before, during, and after I wire-wheeled it, I tried really hard to find anything resembling a stamped date, but couldn't find it. Does the brass tag essentially serve the same purpose as stamping the date directly into the cast iron movable jaw? Can anyone decode the "137" for me?
Thanks,
Now I just need to get it mounted to my workbench...

Thanks,
Now I just need to get it mounted to my workbench...
1Bad55Chevy
Well-known member
- Joined
- Feb 20, 2025
- Messages
- 623
Sorta jealous over here....
Beerhippie
Well-known member
The date code should be on the other side of the dynamic and static jaws.Thanks again for the advice everyone. Here's the finished product. I decided against painting it. After degreasing, I media-blasted with 80-grit glass bead, then worked it over with wire wheels. Blew it out with compressed air, wiped it down with acetone, greased the wear surfaces and paste-waxed the rest of it. Before, during, and after I wire-wheeled it, I tried really hard to find anything resembling a stamped date, but couldn't find it. Does the brass tag essentially serve the same purpose as stamping the date directly into the cast iron movable jaw? Can anyone decode the "137" for me?
Thanks,
Now I just need to get it mounted to my workbench...
Like this:


The 36 is an assembly #. The faint and usually crooked 711 below is the date--July 1911 in this case.
I'm thinking the brass tag is an inventory # from the plant where the vise was originally used.
Beautiful vise you got there! I like the bare metal look. I finished mine with BLO.