To avoid these ads, REGISTER NOW!

Reed 2C vise for restoration

Corvette Mark

Active member
Joined
Dec 24, 2022
Messages
36
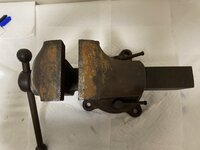
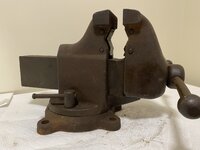
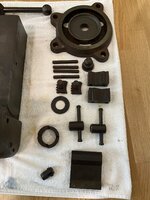
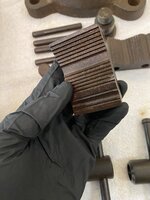
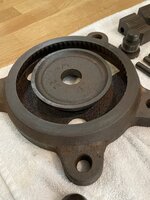
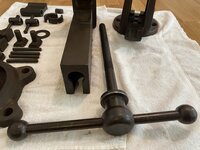
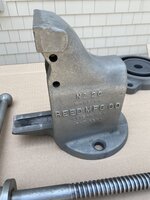
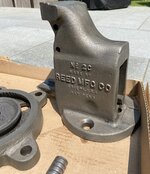
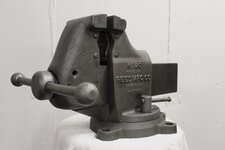
Recently picked up this Reed 2C vise for restoration. Came out of a machine shop and overall appears to be in great condition. It is greasy, but not overly rusted or pitted.

What should I know about this vise? And does it all appear original?

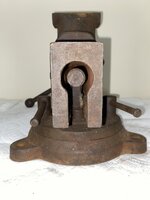
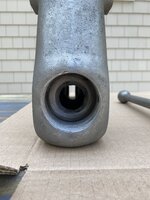
One of the swivel locks is bent but that is an easy fix. The main handle has a small bend which I need a press to fix, but it slides fine through the hockey puck. Other than a couple nicks here and there, everything seems in good shape. The main nut is the hex style (not round like other reeds) and the slide is very clean… doesn’t appear anyone ever used it as an anvil.

The non-removable jaws appear in good shape for its age. The pipe jaws also look good, though I noticed they have a little play on them along with the pins.

I am planning to clean it up, put it in Evaporust, wire wheel, and finish with BLO and wax. Did these vises come painted from the factory?

The date code is “1157” which I believe means November 1957.

Mark.
 

Attachments

  • 6A657AF5-7A5B-457B-8FA2-D34B1EABED47.jpeg
    6A657AF5-7A5B-457B-8FA2-D34B1EABED47.jpeg
    501.4 KB · Views: 106
  • 384D6ADD-05D4-4104-9BA7-57522AF0A566.jpeg
    384D6ADD-05D4-4104-9BA7-57522AF0A566.jpeg
    493.1 KB · Views: 98
  • 73D0F349-A320-4758-919D-C90B15CF0AEF.jpeg
    73D0F349-A320-4758-919D-C90B15CF0AEF.jpeg
    916.7 KB · Views: 101
  • 24F61078-C954-4B0A-B457-07F691F22037.jpeg
    24F61078-C954-4B0A-B457-07F691F22037.jpeg
    1.2 MB · Views: 87
  • 7D2D69CC-AE7C-4613-94BF-D23D6A43F8F6.jpeg
    7D2D69CC-AE7C-4613-94BF-D23D6A43F8F6.jpeg
    568.7 KB · Views: 86
  • D0A2A4CE-E0E8-4FC8-AF22-350E68EA627B.jpeg
    D0A2A4CE-E0E8-4FC8-AF22-350E68EA627B.jpeg
    372.9 KB · Views: 85
  • C10252BB-DA6E-4D2A-B0A3-2DED4B63372A.jpeg
    C10252BB-DA6E-4D2A-B0A3-2DED4B63372A.jpeg
    615.5 KB · Views: 85
  • 1ED9BC9C-DFC6-4FCA-ACDF-E69D447CE30A.jpeg
    1ED9BC9C-DFC6-4FCA-ACDF-E69D447CE30A.jpeg
    682.4 KB · Views: 82
  • 79496981-CE76-455F-BEF1-899606DBCC6F.jpeg
    79496981-CE76-455F-BEF1-899606DBCC6F.jpeg
    402.3 KB · Views: 79
  • 791FF534-5ED2-488E-AC32-4A593205C1F4.jpeg
    791FF534-5ED2-488E-AC32-4A593205C1F4.jpeg
    754.3 KB · Views: 83
To avoid these ads, REGISTER NOW!

Shiftless

Well-known member
Joined
Mar 9, 2014
Messages
14,730
Location
East Bay SFO
Yeah, just scrub it clean, dry thoroughly and apply a thin coat of BLO and let it cure in a warm place. When I apply BLO, I preheat the vise to a temp where it is almost too hot to touch, That helps thin out the BLO and let it better soak in to the cast iron.
 

wrenchr

Super Moderator
Staff member
Joined
Jul 29, 2007
Messages
11,603
Location
Michigan
That looks to be in very good shape. Every time I come across one of those reeds they are beat to hell and they still want a lot of money for them.
 

thehorse13

Well-known member
Joined
Mar 15, 2015
Messages
3,484
Location
Jefferson County, WV
This is an outstanding grab. The most important parts are still in great condition, such as the pipe jaws. You do not need a press to take the bend out of the handle. You can do this with proper leverage, a few blocks of wood and a big hammer. This method leaves zero marks and is just one of many ways to make that handle perfectly straight again without a press.

A few things that I warn people about with old vises is to inspect for cracks, welds or repairs. Inspect the condition of all spindle handles for signs of sustained abuse. Also, if you can remove the dynamic jaw and inspect the condition of the spindle threads and main nut, you'll be far less likely to get burned on a vise purchase.
 
OP
C

Corvette Mark

Active member
Joined
Dec 24, 2022
Messages
36
You do not need a press to take the bend out of the handle. You can do this with proper leverage, a few blocks of wood and a big hammer. This method leaves zero marks and is just one of many ways to make that handle perfectly straight again without a press.

Can you elaborate on this method? Are you saying to use a few blocks of wood to support the handle with the bend facing up and then using a hammer and another block, hit the bend?
 

thehorse13

Well-known member
Joined
Mar 15, 2015
Messages
3,484
Location
Jefferson County, WV
Can you elaborate on this method? Are you saying to use a few blocks of wood to support the handle with the bend facing up and then using a hammer and another block, hit the bend?
I first use a straight edge to find and mark where the hammer needs to hit. Second, I take two pieces of wood and place them in a way that allows me to smash and bend the handle back to form. I use a Plomb brass hammer so that I do not mar the metal. I have one similar to this. Use the straight edge to monitor your progress until the metal is straight as an arrow.

1674402469431.png
 
OP
C

Corvette Mark

Active member
Joined
Dec 24, 2022
Messages
36
One additional question on mounting: my workbench has a 3/4” plywood top. Would adding a 12” x 12” piece of 1/4” thick steel plate under the plywood be sufficient? I wont be doing anything too heavy duty on the vise. The alternate would be to double up on plywood and use some 2x4s.
 

thehorse13

Well-known member
Joined
Mar 15, 2015
Messages
3,484
Location
Jefferson County, WV
One additional question on mounting: my workbench has a 3/4” plywood top. Would adding a 12” x 12” piece of 1/4” thick steel plate under the plywood be sufficient? I wont be doing anything too heavy duty on the vise. The alternate would be to double up on plywood and use some 2x4s.
I'd say that's more than sufficient for home use.
 

Maui

Well-known member
Joined
Sep 16, 2012
Messages
2,914
Location
Upstate NY
I bought a Reed 2C and completely tore it down and restored it several years ago. You can see pictures of the finished vise in this discussion:


There were two areas where I ran into trouble. The large bolt that holds the swivel base on mine had never been removed, and it was stuck. And I mean STUCK. The only way I was able to break it free was by using a drag link on an impact wrench, and even then it barely broke free. The holes for the pins that hold the pipe jaws in place were not machined all the way through the vise from one side; apparently at Reed they drilled half way through the vise and then flipped it over and drilled through the other side, but didn’t line the holes up properly so there was an offset about half way in. And when I used a punch to remove the pins they did NOT want to come out. When I was finally able to remove them some metal shavings came out as well. I had to set up the vise on a milling machine and ream the holes so that the pins would fit properly. That was a pain. But I am happy with the finished product. The vise is a great piece of engineering, and I have used it for years without a problem.
 

fishwatcher

Well-known member
Joined
Jan 26, 2023
Messages
761
Recently picked up this Reed 2C vise for restoration. Came out of a machine shop and overall appears to be in great condition. It is greasy, but not overly rusted or pitted.

What should I know about this vise? And does it all appear original?

One of the swivel locks is bent but that is an easy fix. The main handle has a small bend which I need a press to fix, but it slides fine through the hockey puck. Other than a couple nicks here and there, everything seems in good shape. The main nut is the hex style (not round like other reeds) and the slide is very clean… doesn’t appear anyone ever used it as an anvil.

The non-removable jaws appear in good shape for its age. The pipe jaws also look good, though I noticed they have a little play on them along with the pins.

I am planning to clean it up, put it in Evaporust, wire wheel, and finish with BLO and wax. Did these vises come painted from the factory?

The date code is “1157” which I believe means November 1957.

Mark.
This looks awesome and I hope you post your restore effort here. Glad I read this post as I needed the tips on straightening handles for a couple of old vises I recently bought.
 
OP
C

Corvette Mark

Active member
Joined
Dec 24, 2022
Messages
36
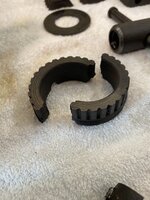
Disassembled and degreased (Simple Green soak). Wiped down with 3in1 oil to prevent flash rust. Will soak in Evaporust next and then reassembly. Came apart fairly easily… the pins that hold the pipe jaws in all have a slight bend which I imagine is from repeated clamping. I put a couple knicks in the split but when disassembling… it was really stuck and I had to whack it with a long pin punch. Overall everything seems to be in pretty good condition.
 

Attachments

  • 3E6CE179-B869-4457-AB40-B7BD636E669A.jpeg
    3E6CE179-B869-4457-AB40-B7BD636E669A.jpeg
    683.2 KB · Views: 52
  • 7B73ED4F-95D3-47A9-9F29-66E1E0AA4510.jpeg
    7B73ED4F-95D3-47A9-9F29-66E1E0AA4510.jpeg
    734.6 KB · Views: 51
  • E66C2C9D-2F4C-4049-A359-15A31D8A2BDE.jpeg
    E66C2C9D-2F4C-4049-A359-15A31D8A2BDE.jpeg
    914 KB · Views: 53
  • 3EB094DD-222B-48C7-9DF6-2BF9AD58FE83.jpeg
    3EB094DD-222B-48C7-9DF6-2BF9AD58FE83.jpeg
    1.1 MB · Views: 51
  • 448D1D19-F6D3-4DAE-9568-ED014166F69C.jpeg
    448D1D19-F6D3-4DAE-9568-ED014166F69C.jpeg
    765.3 KB · Views: 47
  • 12E88C7D-44B9-4CE5-8B3C-129132E18346.jpeg
    12E88C7D-44B9-4CE5-8B3C-129132E18346.jpeg
    868.7 KB · Views: 45
  • 9D6A4B83-02AB-4C94-A419-1B85E45AD8D6.jpeg
    9D6A4B83-02AB-4C94-A419-1B85E45AD8D6.jpeg
    795.7 KB · Views: 47
  • 99FC8454-AE89-45C8-9B01-5BDDB070933C.jpeg
    99FC8454-AE89-45C8-9B01-5BDDB070933C.jpeg
    841.2 KB · Views: 49
  • 3D15343E-F298-45A8-B626-F0997BDDE0D9.jpeg
    3D15343E-F298-45A8-B626-F0997BDDE0D9.jpeg
    796.8 KB · Views: 49
  • EA08226E-EF00-4BBD-85A6-7E54AF5D6346.jpeg
    EA08226E-EF00-4BBD-85A6-7E54AF5D6346.jpeg
    690.9 KB · Views: 50
To avoid these ads, REGISTER NOW!
OP
C

Corvette Mark

Active member
Joined
Dec 24, 2022
Messages
36
IMG_3419.jpegIMG_3420.jpegIMG_3422.jpegIMG_3424.jpegIMG_3423.jpeg

A couple updates: first few photos are post-Evaporust and brass wire brush. I just used a handheld brass brush as opposed to a wire wheel/ bench grinder because I did not want to ‘polish’ the metal. The second batch of photos is after one coat of boiled linseed oil. Once it dries, I’ll put a second coat of boiled linseed oil and then reassemble.
 

fishwatcher

Well-known member
Joined
Jan 26, 2023
Messages
761
IMG_3419.jpegIMG_3420.jpegIMG_3422.jpegIMG_3424.jpegIMG_3423.jpeg

A couple updates: first few photos are post-Evaporust and brass wire brush. I just used a handheld brass brush as opposed to a wire wheel/ bench grinder because I did not want to ‘polish’ the metal. The second batch of photos is after one coat of boiled linseed oil. Once it dries, I’ll put a second coat of boiled linseed oil and then reassemble.
This is such a clean vise! You did a great job and I look forward to seeing the assembled vise!
 
OP
C

Corvette Mark

Active member
Joined
Dec 24, 2022
Messages
36
Well, here is the finished product. I gave everything a coat with boiled linseed oil (opposed to painting). It gives the cast iron a darker appearence and will help protect against rust. I do like painted vises, but as a utility item, I know the paint would always be taking a beating. I used RedNTacky on the swivel base, spindle/ nut, and thrust washer. It is super smooth now. It reassembled pretty easily… I used some anti seize on the split nut and swivel base bolt.

IMG_3570.jpegIMG_3574.jpegIMG_3569.jpegIMG_3559.jpegIMG_3554.jpeg
 

PSCo1867

Well-known member
Joined
Nov 11, 2020
Messages
306
Location
PA
Well, here is the finished product. I gave everything a coat with boiled linseed oil (opposed to painting). It gives the cast iron a darker appearence and will help protect against rust. I do like painted vises, but as a utility item, I know the paint would always be taking a beating. I used RedNTacky on the swivel base, spindle/ nut, and thrust washer. It is super smooth now. It reassembled pretty easily… I used some anti seize on the split nut and swivel base bolt.

IMG_3570.jpegIMG_3574.jpegIMG_3569.jpegIMG_3559.jpegIMG_3554.jpeg
Well, I would have preferred phosphorescent magenta, zebra stripes, and mutant-ninja-turtles decals, :ROFLMAO:. Nice job, and great presentation of this timeless classic!
 

Mike the mechanic

New member
Joined
Sep 30, 2025
Messages
4
Hello all! Thanks for the add. first time posting.
In the garage of a new house I found this monster of a vise.
A vintage Reed 2C
It was rusted and frozen .... a few minutes with some penetrant and I got it moving.
I'm normally a Wilton fan but since this one is there ... it's worth restoring.
So my first questions are should I degrease it before putting it in Evaporust & should I disassemble it first???

I see a lot of people leave it natural and oiled .... I was thinking of glass beading & powder coating??

Or sell & buy a new Wilton?? Sometimes I don't like "restomodding" vintage stuff!

Last question .... where do I find the date code??

Thanks
 

fishwatcher

Well-known member
Joined
Jan 26, 2023
Messages
761
Hello all! Thanks for the add. first time posting.
In the garage of a new house I found this monster of a vise.
A vintage Reed 2C
It was rusted and frozen .... a few minutes with some penetrant and I got it moving.
I'm normally a Wilton fan but since this one is there ... it's worth restoring.
So my first questions are should I degrease it before putting it in Evaporust & should I disassemble it first???

I see a lot of people leave it natural and oiled .... I was thinking of glass beading & powder coating??

Or sell & buy a new Wilton?? Sometimes I don't like "restomodding" vintage stuff!

Last question .... where do I find the date code??

Thanks
Disassemble, degrease, Evaporust, then wire wheel. All pretty easy. The cost of a new Wilton that is equivalent to a Reed is pretty high. Esp if you’re looking for made in USA.

Date code should be on the bottom of the dynamic, on the steel slide (can’t remember the proper name).
 

Mike the mechanic

New member
Joined
Sep 30, 2025
Messages
4
Quick update
I've got the jaw moving and 1 of the swivel locks so far
Its still up at the country house .... not looking forward to hauling this beast out of the basement and into my truck to bring back to the shop!
Once I get it there I'll have much more ability to work on it
 

Beerhippie

Well-known member
Joined
Oct 13, 2023
Messages
10,270
Location
Far NE Oregon
Quick update
I've got the jaw moving and 1 of the swivel locks so far
Its still up at the country house .... not looking forward to hauling this beast out of the basement and into my truck to bring back to the shop!
Once I get it there I'll have much more ability to work on it
For moving a vise from the basement, first take the dynamic jaw out--now you have two, lighter parts. Second, bet the neighbor's teenage son he can't carry it up the stairs by himself.

Open beer, supervise.
 
To avoid these ads, REGISTER NOW!
Top Bottom