To avoid these ads, REGISTER NOW!

Refreshing a Wilton 450 Vise

Catalyze

Well-known member
Joined
Feb 7, 2011
Messages
1,369
Location
New Mexico
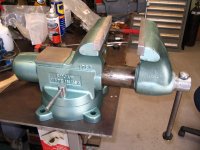
Hello to everyone...especially those of you who have caused me to start down the path of refreshing American vises. I started out reading the Everything You Need to Know About Vises and realized that I didn't know anything except how to turn the handle. I heard the Siren's call and had to find a vise. This is where it turned into a situation like finding a prom date years ago. The really interesting ones were pricey (dinner....movie...flowers) and the cheap ones were not worth having (hey big boy....want some company?) Then an epiphany hit me....more vises are not out West where we have only cows and corn in our history. They are back east and upper midwest where manufacturing was in full swing for over a century. So like I usually do, I whined to my wife "I want a vise and can't find one to play with me." My wife did what she always does...."Sure, I will look for one" and basically told me to calm down. Saturday she called me at work and told me she had found a vise I might want to look at. I thought "Oh boy....a cheap Oriental vise from HF....this is not good." She then told me that she took a picture of it on her phone. She said it had.......wait for it.......Wilton on the side. Now I sat up. After work, we headed over to the fellow's shop behind his house. I am thinking...."It's probably a Chinese Wilton" and sure enough on his work bench was a Chinese Wilton vise. I tried to be nice and told him that it was a great vise, but I was looking for an American vise. "Well then, look at your feet." There on the floor under a bunch of "stuff" was a Wilton 450S vise in all its faded glory! He asked $85.00 for it and that was that. I looked up Disassemble Wilton Vise on Google and found a nice photo tour of what was involved. After a few hours scrubbing in the parts washer, I began to see that this vise is in fantastic condition. 4 1/2" jaws and swivel base all in great shape....only one hold down nut missing (ordered from Wilton today....$35.00..ouch). I will post the photos as it gets 'refreshed". I won't even call it restored since most of the vise threads are nothing like this endevour. This is the perfect first vise to work with....my perfect prom date.
Craig
 
To avoid these ads, REGISTER NOW!

airbuff101

Well-known member
Joined
Oct 31, 2006
Messages
728
Very Nice Find Cat!

Could you just rub it down with oil and keep that manly industrial look? Wouldn't be too prone to rust in New Mexico would it?

Rob
 

autopts

Well-known member
Joined
Jul 4, 2009
Messages
2,268
Thats a great find and a nice cleanup! Personally, if your going to turn it for money, repaint it. If its for your own use, spray it down with penetrating rust preventive oil and leave it.
 

Ign

Well-known member
Joined
Jul 7, 2006
Messages
12,769
Location
Butte Peak ND
Nice. I gave $200 for an identical model, but it was in excellent condition and hardly even needed to be wiped clean.
 

SweetD

Well-known member
Joined
Feb 8, 2010
Messages
3,265
Location
Rhode Island
Thats a great find and a nice cleanup! Personally, if your going to turn it for money, repaint it. If its for your own use, spray it down with penetrating rust preventive oil and leave it.

That would be my take as well. NICE VISE!
 

slip knot

Well-known member
Joined
Mar 22, 2010
Messages
2,861
Location
Texas gulf coast
I'd give it a good coating with boiled linseed oil and let it cure for a couple of days. It'll harden up and have a nice semi gloss protecive covering. I've used it for years on hammer heads and it works great. Be careful with soiled rag disposal tho as it can be pretty volatile stuff until it dries.

BTW, nice vice score.
 
OP
C

Catalyze

Well-known member
Joined
Feb 7, 2011
Messages
1,369
Location
New Mexico
Thanks for all the thoughts and ideas!
1. I didn't make the lizard in the back yard, but in NM lots of landscape folks have them
2. Nothing rusts where I live....it's not uncommon to go 6 months with no precipitation and have days with 5% humidity
3. If I had common sense, I would put a clear type of finish on the vise, but I am an idiot...so it will be painted in a totally foolish manner......and it won't be sold until my estate goes to auction (after all, my wife found this vise....it's sort of Tool Romance)
I am going to use a graphite coating on the dynamic jaw "slide" which I have used on exhaust manifolds/headers several times (for looks and protection) and have used it on my hedge trimmers to keep a nice slick finish. I am changing the retention pin that holds the lead screw nut in the vise to something a bit more secure (1 pin holding 1 side) that can be removed easily. I do hobby pinstriping for fun so I am going to try and add a tiny "touch" that makes the vise fun. I have been around shop vises for most of my life, but until I started reading the posts on this forum, I never really appreciated a vise for it's attributes. Those of you who work on them and understand why they have certain designs, are like keepers of a portion of our history. Too many historical items are only for books and museums. It's nice to be able to look at something designed to do a job 100 years ago and then go out and let it still do that same job today. More photos and foolish thoughts tomorrow.
Craig
 

autopts

Well-known member
Joined
Jul 4, 2009
Messages
2,268
After a few hours scrubbing in the parts washer, I began to see that this vise is in fantastic condition. 4 1/2" jaws and swivel base all in great shape....only one hold down nut missing (ordered from Wilton today....$35.00..ouch).


Were you able to order that hold down directly from WMH? Its too bad some of us didn't know you just needed the carriage bolt. I've probably got a few of them myself.
 
OP
C

Catalyze

Well-known member
Joined
Feb 7, 2011
Messages
1,369
Location
New Mexico
Thanks Autopts! I needed the nut with handle for my vise...somehow the original owner kept the bolt and lost the nut...LOL. Yes, I called up Wilton and dug through their phone tree and ordered directly from them.
 
To avoid these ads, REGISTER NOW!
OP
C

Catalyze

Well-known member
Joined
Feb 7, 2011
Messages
1,369
Location
New Mexico
I didn't really like the single pin holding the lead screw nut into the outer casting. I understand that you can take a pin punch and just tap it out from the other side but you have to have a long pin punch or use a nail/etc to span the gap. I took a socket head (header bolt) 1/4" bolt and cut it to the correct length. I wrapped a solid piece of copper wire around a few threads and just tapped it into the outer case. I really didn't want to drill and tap the outer case. Too much chance for someone like me to mess up since the body was already painted. I did the same for the other side and they work very nicely. The copper will deform and make a nice tight seal and you can always just take a pair of Vicegrips and pull them out if needed. They do stick out a touch, but I am not too worried about snagging anything on them.
Craig
View media item 8146View media item 8147More photos to follow after dinner.
Craig
 
OP
C

Catalyze

Well-known member
Joined
Feb 7, 2011
Messages
1,369
Location
New Mexico
I have used a graphite product in the past called Slip Plate. It is a spray on coating and has been on my El Camino exhaust manifolds for almost a year with no flaking or peeling. I also put it on my hedge trimmer blades for the friction reduction where they pass over each other. It lasts very well there, too. Here is the slide before coating and getting ready to mask the key in the slide. I didn't want to coat it and have it bind up due to increased thickness.
View media item 8148
And here is the slide coated. I waited overnight and the next morning (after my wife left for work) I put it in the oven on 250 degrees for an hour to bake it. Hopefully, it will help it to harden and last longer.
View media item 8149
Craig
 
OP
C

Catalyze

Well-known member
Joined
Feb 7, 2011
Messages
1,369
Location
New Mexico
Greetings again!
Here is the final product. I used a Rustoleum primer after a lacquer thinner wipe down. According to the instructions on the primer, it said to top coat within an hour or wait 48 hours. Having the control of a 9 year old in a toy store, I chose to top coat it right then. I used a Rustoleum Hammered Copper top coat. I wanted the vise to look different than a blue/gray/red but I really like the hammered appearance. It may not be the practical shop appearance, but this is just one of those personal appearance things. I still need to pinstripe the "Born 8 -93" into the inset where the Wilton decal was on the dynamic jaw.
View media item 8151View media item 8152
The slide coated.
View media item 8150
And every prom date has a Birthday.....here is mine:
View media item 8145
And the final weight of the vise.
View media item 8153
Thanks to all who helped me by writing previous threads about Vises!
Craig
 

gilbo

Well-known member
Joined
Feb 1, 2010
Messages
717
Greetings again!
Here is the final product. I used a Rustoleum primer after a lacquer thinner wipe down. According to the instructions on the primer, it said to top coat within an hour or wait 48 hours. Having the control of a 9 year old in a toy store, I chose to top coat it right then. I used a Rustoleum Hammered Copper top coat. I wanted the vise to look different than a blue/gray/red but I really like the hammered appearance. It may not be the practical shop appearance, but this is just one of those personal appearance things. I still need to pinstripe the "Born 8 -93" into the inset where the Wilton decal was on the dynamic jaw.
View media item 8151

that resto came out great, great color too
 

5-0stank

Well-known member
Joined
Feb 5, 2011
Messages
260
Location
PA
Looks good. Once I make enough room for a workbench, I'll be in the market for a quality vise. I just love the styling of these bullets.
 

Steen27

Well-known member
Joined
Jan 22, 2011
Messages
75
Awesome restoration - and I like the color too :) Different but cool at the same time.

Ummm you mentioned an El Camino back there - details/pics please... lol

Great job once again!
 

kc-steve

Well-known member
Joined
Jun 22, 2010
Messages
4,240
Location
Kansas City
Normally, I'm an "original restorer" kind of guy, but your vise is ready for the custom auto show and looks GREAT. Howz about a hood scoop and side vents? :D

Thanks,
Steve
 

asp

Well-known member
Joined
Nov 24, 2010
Messages
186
Location
Westport, MA
Very nicely done. Again, not what I'd have picked or have done, but it's quite clean.

I end up beating on my vise(s) too much for a paint job like that to last.
 

Jeep Monkey RTR

Well-known member
Joined
Oct 15, 2012
Messages
169
Location
Birmingham, AL
I know this is an old thread and I hate to revive but I had a question. I just picked up an identical 450 and am trying to break it down to refurbish. I can't seem to get the back cap or the pins out of the spindle side of the vise. I've read this thread and multiple others but have not found exactly what I'm looking for.

On the subject if the pins, I used a punch and hammered one side in but in doing so, I expected the other side to push out. Nothing. The opposite side is still flush. Is this correct?Not really sure what to do now. Any tips are appreciated.

Also, sweet vise. It looks amazing.
 

autopts

Well-known member
Joined
Jul 4, 2009
Messages
2,268
I know this is an old thread and I hate to revive but I had a question. I just picked up an identical 450 and am trying to break it down to refurbish. I can't seem to get the back cap or the pins out of the spindle side of the vise. I've read this thread and multiple others but have not found exactly what I'm looking for.

On the subject if the pins, I used a punch and hammered one side in but in doing so, I expected the other side to push out. Nothing. The opposite side is still flush. Is this correct?Not really sure what to do now. Any tips are appreciated.

Also, sweet vise. It looks amazing.

Omitt that part, its not worth the trouble and you run the risk of cracking that cast back housing that has been Obsoleted. for years now.
 

Jeep Monkey RTR

Well-known member
Joined
Oct 15, 2012
Messages
169
Location
Birmingham, AL
Omitt that part, its not worth the trouble and you run the risk of cracking that cast back housing that has been Obsoleted. for years now.

Omit the removal of the back cap and/ or the pins? No problem on the cap but I already pushed one of the pins into the casing? Need to at least get that back to where I began.

Thanks for the response. I'm new to this forum and vises
 

orchidlane

Well-known member
Joined
Jan 9, 2014
Messages
126
Location
Chandler AZ
Hi, Beautiful Monster Vise, like the highlights on the letters .. well done
 

Attachments

  • Picture 1754.jpg
    Picture 1754.jpg
    141.8 KB · Views: 196

alpinewhite

Well-known member
Joined
Aug 4, 2012
Messages
1,315
Location
Orange County, California, USA
Hi, Beautiful Monster Vise, like the highlights on the letters .. well done
attachment.php
What's inside the gray Vidmar in the background?
 
To avoid these ads, REGISTER NOW!
Top Bottom