
You are using an out of date browser. It may not display this or other websites correctly.
You should upgrade or use an alternative browser.
You should upgrade or use an alternative browser.
Remline boxes, pics if you got them.
- Thread starter TheGrooveking
- Start date


Gunfighter556
Well-known member
The handles look correct to be a later Remline, However the drawer slides look more like craftsman ie. the clips. Plus the gap between the drawers looks pretty large for Remline.
RAS61
Well-known member
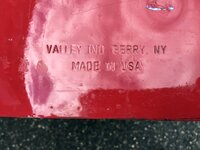
Looks like it's a Valley and not a Remline; a well made copy?found this middle box the other day for pretty cheap. No markings but it's been suggested it was a RemLine. Anyone seen one like this before, it's bigger than any of the other mid boxes I've seen?
Attachments
So this is my first post ever after a longggg… time lurking but doing a purge of pics on my phone and found these of my box refurb from a few years ago.
 Picked up this stack at an auction for a decent deal. The chrome on the handles was destroyed on most so I went just for a muted black. The red paint is “Cardinal Red” from rusteloum. Sorry if the pics are messed up, just uploading from my phone.
Picked up this stack at an auction for a decent deal. The chrome on the handles was destroyed on most so I went just for a muted black. The red paint is “Cardinal Red” from rusteloum. Sorry if the pics are messed up, just uploading from my phone.Attachments

I just looked and I took these photos in 2019. The red has darkened up considerably. Looks better in personSo this is my first post ever after a longggg… time lurking but doing a purge of pics on my phone and found these of my box refurb from a few years ago.

Gunfighter556
Well-known member
Nicely done North, When I redid mine the handles were also pretty rough. I nickel plated them myself and was pretty happy with the end result.

harley jim
Well-known member
That's just like the box I have of my Fathers, he was a local truck driver and bought his at the remline plant in yorkville Il. (Chicago) He paid $5.00 for it. It was in there scratch and dent sale, it would have been very early 70s I borrowed it from him around 1975 when I went to work at the local Toyota dealership.Well, I dug up this old thread looking for info on RemLine tool boxes, and so I thought I'd post the one I picked up tonight...
Great condition, the "kid" that sold it to me said his father in law had left in the house when they moved south, and he just wanted to get rid of it as it was "taking up room".
It was listed on c-list locally, and the first thing the kid said to me was "I probably should have asked more for it because I got a ton of calls right away, but you were first in line". He actually held it for me for a day and met me after work at a commuter parking lot to make the deal - how cool is that?
The tag says "RemLine Chicago 60650 Serial No. AAL-4438"
Even has the key. Perfect working condition and great paint. I have not dusted it off yet...dimensions are about 26"W x 13"D x 20"H
Gave $75...any idea on its age? I'm guessing 1970's? Anyone have one like it?
Dave


Nice box you got sir.
Those turned out great! In the interest of time I was just happy with the rattle can black. Not a show piece for sure.Nicely done North, When I redid mine the handles were also pretty rough. I nickel plated them myself and was pretty happy with the end result
Username already in use
Well-known member
Crosspost from the vintage toolbox thread:
It started a few years ago with a Remline 3D top box. Then back in August of this year, I spied a Remline center/intermediate box from a FB Marketplace ad.
I was building this stack from the top down, it would seem.
Yesterday, I'm browsing Marketplace.... (I should really stop doing that), and I spied a Remline bottom box for $20! Needless to say, it's followed me home.
I was hoping for a Remline bottom box with more drawers, but for $20, I'm not going to complain!
Here's the top two boxes again.

And the roller with the crappy repaint. Hopefully, one day, it will look as nice as @Gunfighter556 's box.


It started a few years ago with a Remline 3D top box. Then back in August of this year, I spied a Remline center/intermediate box from a FB Marketplace ad.
I was building this stack from the top down, it would seem.
Yesterday, I'm browsing Marketplace.... (I should really stop doing that), and I spied a Remline bottom box for $20! Needless to say, it's followed me home.
I was hoping for a Remline bottom box with more drawers, but for $20, I'm not going to complain!
Here's the top two boxes again.
And the roller with the crappy repaint. Hopefully, one day, it will look as nice as @Gunfighter556 's box.
Last edited:
Crosspost from the vintage toolbox thread:
It started a few years ago with a Remline 3D top box. Then back in August of this year, I spied a Remline center/intermediate box from a FB Marketplace ad.
I was building this stack from the top down, it would seem.
Yesterday, I'm browsing Marketplace.... (I should really stop doing that), and I spied a Remline bottom box for $20! Needless to say, it's followed me home.
I was hoping for a Remline bottom box with more drawers, but for $20, I'm not going to complain!
Here's the top two boxes again.
And the roller with the crappy repaint. Hopefully, one day, it will look as nice as @Gunfighter556 's box.
I‘m curious if you’ve found a date on the roller. Those casters appear pretty old.
Provincial
Well-known member
The "flying saucer" rollers were optional. They lowered the box by about an inch.
The roller cabinet is older than the other two parts of the stack. It has the earlier nameplate. I have one that is identical, except it is very rusty.
The roller cabinet is older than the other two parts of the stack. It has the earlier nameplate. I have one that is identical, except it is very rusty.
thehorse13
Well-known member

Gunfighter556
Well-known member
Nice score User, I love the flying saucer casters and the old school badge is just awesome. Citrustrip works fantastic at taking off old paint if you dont have access to a sandblaster.Crosspost from the vintage toolbox thread:
It started a few years ago with a Remline 3D top box. Then back in August of this year, I spied a Remline center/intermediate box from a FB Marketplace ad.
I was building this stack from the top down, it would seem.
Yesterday, I'm browsing Marketplace.... (I should really stop doing that), and I spied a Remline bottom box for $20! Needless to say, it's followed me home.
I was hoping for a Remline bottom box with more drawers, but for $20, I'm not going to complain!
Here's the top two boxes again.
And the roller with the crappy repaint. Hopefully, one day, it will look as nice as @Gunfighter556 's box.
Provincial
Well-known member
I picked up a very rusty Remline stack last Summer as part of a garage cleanout sale. I took the drawers out to move it, and hadn't put them back in. I finally got a chance to put things away, and had to address an issue with the top box to get the drawers back in.
The top box is a 10-drawer, with a deep drawer on the right side, three narrow drawers on the left side, three drawers in the middle, and three full-width drawers on the bottom. The narrow drawers would not close all the way, and I determined that it was because the rails were too close together at the back end.
The outside dimensions of the box seem normal, and the problem seemed to be the rear support column at the corner of the box. Either the column, the fixed rail, or both had "grown" from rust. Since the corners of the box were so rusted, and in spots, rusted out, I decided to just push the outside rail into the proper position and let the outside of the box move wherever it had to.
I measured the distance between the fixed rails at the front, where it worked properly, and it came out to 6-1/16". I took a piece of 1/4" rod and made a gauge that long. I then set up to push the outer rails into position. I have a small hydraulic ram for my porta-power set that fit between the rails. I found scraps of 1/4" steel narrow enough to fit in the recess of the rails, allowing the ram to push on the bottom of the rails and not distort the working part of the rails. Now the question was how to keep the ram from moving the center rail support while I was pushing on the outer corner support.
I noticed that there was a structure spot welded to the back of the box for the drawer lock mechanism. I used wood and metal blocks to fill the gap between this structure and the center drawer rails. The wood piece closest to the rails was tall enough to extend past the front face of the box. With the gutted box on it's back laid on a thick steel table, I was able to use a large shipbuilding clamp to firmly clamp this block, trapping the back skin of the box against the table and using friction to keep the block attached to the back skin. Now all the pressure was trying to stretch the back skin, which is very strong.
I used the ram to carefully push the outer support away, checking it often with the gauge rod. I had to work on each pair of rails individually. I was able to move all three rails into a position that is the proper distance from the center rails, and the same front-to-back. Now the drawers move without binding.
I also had to use the ram to correct a problem with the center rail supports sagging. They are spot welded to the floor of the top bin, and with that floor weakened by rust, the weight of the tools in the drawers had caused the floor to sag. Careful use of the ram with a wood block on the floor of the box and bar clamps holding the front top corners of the box to the table allowed me to correct the sag and move the drawers back into their original position.
This box is a mess, but still functional. It will never be presentable, but will hold tools just fine. I won't be putting any weight in the top bin because of the structural weakness, I may beef up the structure so I can load the upper center drawers, but that will be another project.
Clamped to the table:

Blocking and shims:

Jacking the structure:

The top box is a 10-drawer, with a deep drawer on the right side, three narrow drawers on the left side, three drawers in the middle, and three full-width drawers on the bottom. The narrow drawers would not close all the way, and I determined that it was because the rails were too close together at the back end.
The outside dimensions of the box seem normal, and the problem seemed to be the rear support column at the corner of the box. Either the column, the fixed rail, or both had "grown" from rust. Since the corners of the box were so rusted, and in spots, rusted out, I decided to just push the outside rail into the proper position and let the outside of the box move wherever it had to.
I measured the distance between the fixed rails at the front, where it worked properly, and it came out to 6-1/16". I took a piece of 1/4" rod and made a gauge that long. I then set up to push the outer rails into position. I have a small hydraulic ram for my porta-power set that fit between the rails. I found scraps of 1/4" steel narrow enough to fit in the recess of the rails, allowing the ram to push on the bottom of the rails and not distort the working part of the rails. Now the question was how to keep the ram from moving the center rail support while I was pushing on the outer corner support.
I noticed that there was a structure spot welded to the back of the box for the drawer lock mechanism. I used wood and metal blocks to fill the gap between this structure and the center drawer rails. The wood piece closest to the rails was tall enough to extend past the front face of the box. With the gutted box on it's back laid on a thick steel table, I was able to use a large shipbuilding clamp to firmly clamp this block, trapping the back skin of the box against the table and using friction to keep the block attached to the back skin. Now all the pressure was trying to stretch the back skin, which is very strong.
I used the ram to carefully push the outer support away, checking it often with the gauge rod. I had to work on each pair of rails individually. I was able to move all three rails into a position that is the proper distance from the center rails, and the same front-to-back. Now the drawers move without binding.
I also had to use the ram to correct a problem with the center rail supports sagging. They are spot welded to the floor of the top bin, and with that floor weakened by rust, the weight of the tools in the drawers had caused the floor to sag. Careful use of the ram with a wood block on the floor of the box and bar clamps holding the front top corners of the box to the table allowed me to correct the sag and move the drawers back into their original position.
This box is a mess, but still functional. It will never be presentable, but will hold tools just fine. I won't be putting any weight in the top bin because of the structural weakness, I may beef up the structure so I can load the upper center drawers, but that will be another project.
Clamped to the table:
Blocking and shims:
Jacking the structure:
Oldtuleguy
Well-known member
- Joined
- Nov 4, 2017
- Messages
- 10,461
A valiant effort
Gunfighter556
Well-known member
Anytime you can rescue an old treasure it is well worth the effort.
Provincial
Well-known member
I'm not sure if I want to go much further down this rabbit hole. I'll have to replace the floor of the top compartment in order to restore structural integrity.
d42jeep
Well-known member
Do you guys think that my Powr-Kraft box was made by Rem Line? I’ve always wondered. It’s a well made box.
-Don


-Don
Username already in use
Well-known member
Oh, for sure. Those handles/pulls are a dead giveaway. Nice clean box.Do you guys think that my Powr-Kraft box was made by Rem Line? I’ve always wondered. It’s a well made box.
Provincial
Well-known member
As are the latch, inside lid reinforcement, locking system and the layout of the top bin! Nice box!!
d42jeep
Well-known member
Thanks, guys. That box is what got me started collecting Powr-Kraft. I couldn’t leave it empty.
-Don
-Don
Tynee
Well-known member
I'm curious. Did Rem-Line ever build an 11-drawer roller? Drawers all the way down instead of the lower storage, with the top drawer split like the 7-drawer? Would you have to have bought the 7-drawer plus the drawer insert kit?
Gunfighter556
Well-known member
To my knowledge the biggest roller that Rem Line made was a ten drawer and all drawers were full width.I'm curious. Did Rem-Line ever build an 11-drawer roller? Drawers all the way down instead of the lower storage, with the top drawer split like the 7-drawer? Would you have to have bought the 7-drawer plus the drawer insert kit?


donoradvocate
New member
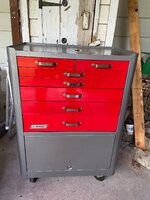
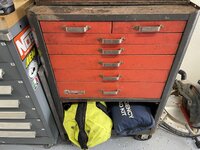
The bottom cart is a Montgomery Ward, the main difference being that it has plain, non-stamped drawer pulls. The 1972 MW catalog features the same cart & matching components. They also made a side cabinet.
I can't make up my mind if Remline was rebranded Craftsman, or vice versa because while the drawer slides are similar, the locking mechanism system is quite different and more elaborate than Craftsman. Remline drawers also have a metal tab on the sides to engage the internal locking mechanism. The steel thickness of a Remline box is comparable to Craftsman box, and while not as robust as a Snap-on or Mac, etc., the older Remline boxes have still withstood the test of time quite nicely. A 3/8 inch wide piece of metal banding approx 10 - 12 inches long and filed to a point works well as a shim to remove the drawers,
I can't make up my mind if Remline was rebranded Craftsman, or vice versa because while the drawer slides are similar, the locking mechanism system is quite different and more elaborate than Craftsman. Remline drawers also have a metal tab on the sides to engage the internal locking mechanism. The steel thickness of a Remline box is comparable to Craftsman box, and while not as robust as a Snap-on or Mac, etc., the older Remline boxes have still withstood the test of time quite nicely. A 3/8 inch wide piece of metal banding approx 10 - 12 inches long and filed to a point works well as a shim to remove the drawers,
Attachments


Gunfighter556
Well-known member
Rem Line was the house brand for the Advertising Metal Display Company. AMD built boxes for Sears under the Craftsman line and Montgomery Ward under the Powr Kraft label. All well built boxes.The bottom cart is a Montgomery Ward, the main difference being that it has plain, non-stamped drawer pulls. The 1972 MW catalog features the same cart & matching components. They also made a side cabinet.
I can't make up my mind if Remline was rebranded Craftsman, or vice versa because while the drawer slides are similar, the locking mechanism system is quite different and more elaborate than Craftsman. Remline drawers also have a metal tab on the sides to engage the internal locking mechanism. The steel thickness of a Remline box is comparable to Craftsman box, and while not as robust as a Snap-on or Mac, etc., the older Remline boxes have still withstood the test of time quite nicely. A 3/8 inch wide piece of metal banding approx 10 - 12 inches long and filed to a point works well as a shim to remove the drawers,
Gunfighter556
Well-known member
Picked up another middle box for my stack. Its a 1965 and going to need a lot of work. I have no idea why the two drawers were swapped around. But just happy to have it.
Hello gentlemen, I was given my grandfather’s old Remline top and bottom toolboxes and I was wondering if I could pick your brains on paint matching this tool box? I’m in the middle of restoring it and I am getting close to being able to paint this and I want to get as close of a match as possible.
Attachments

Hoorn
Well-known member
Gunfighter556
Well-known member
I use Rustoleum hammered black for the box and Rustoleum Gloss Apple Red for the drawers. I am happy with the end result. Also a good gloss clear coat afterwards.I’m stripping the paint to take some rust off the box and I was wondering what paint I can buy that would match the original.
How many coats of each did it take you?I use Rustoleum hammered black for the box and Rustoleum Gloss Apple Red for the drawers. I am happy with the end result. Also a good gloss clear coat afterwards.
Gunfighter556
Well-known member
Kind of hard to say because I was shooting very light coats and I am extremely picky, Also ensure you have a good primer coat, I used Rustoleum self etching primer. If you look back at some of my other post you can see how it turned out.How many coats of each did it take you?
harley jim
Well-known member
I really like how the hammered paint looks, but there is a learning curve if you are not familiar with it.
It helps if your project is warm, set it in the sun for a bit.
Do a practice run on something not as important first.

I will get to my Remline box someday, someday!
It helps if your project is warm, set it in the sun for a bit.
Do a practice run on something not as important first.
I will get to my Remline box someday, someday!
Wow your box looks amazing, hoping for the same result with mine. Thank you for the tipsKind of hard to say because I was shooting very light coats and I am extremely picky, Also ensure you have a good primer coat, I used Rustoleum self etching primer. If you look back at some of my other post you can see how it turned out.
Gunfighter556
Well-known member
Glad to help, I have received a lot of tips from other folks on this forum.Wow your box looks amazing, hoping for the same result with mine. Thank you for the tips
Gunfighter556
Well-known member
Got the drawers done on my middle box resto. Just need to cut cork liners for them. Now working on the box itself.
Hoorn
Well-known member
Got the drawers done on my middle box resto. Just need to cut cork liners for them. Now working on the box itself.
You put in the time on those drawers, nice job brother.