
You are using an out of date browser. It may not display this or other websites correctly.
You should upgrade or use an alternative browser.
You should upgrade or use an alternative browser.
Removing Hein Werner Jack Handle
- Thread starter paulsomlo
- Start date
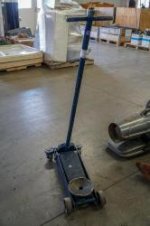
The lower handle assembly has pins that secure the handle to the frame, on top of the assembly there are verticals levers that allow you to slide them inward to clear the frame. With all that said.... take a big punch/hammer because if the pins are seized you won’t move them from the top side, you will need to drive them inward from the outside. It appears based off the the color that’s is branded under the walker family, should be a 883 if memory serves.
Last edited:
Thanks a bunch, Hiball. I looked at the drawing again, now I understand. The pins must be spring loaded and the levers must move in slots in the yoke. The handle and yoke come off as one assembly, apparently.
If that fails, can I remove the gear on the handle? It appears there's a nut holding it to the end of the release rod, and maybe a self tapping screw holding the handle in the yoke?
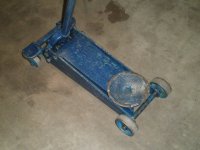
On inspection, the jack lifted, but the release was stuck at the hydraulics, so I've got some "unstucking" to do. The casters seemed OK, nothing else appeared broken or abused. A small gamble for $26.91, including auction fees and tax. My version of playing the slots, and a better potential payoff.
If that fails, can I remove the gear on the handle? It appears there's a nut holding it to the end of the release rod, and maybe a self tapping screw holding the handle in the yoke?
On inspection, the jack lifted, but the release was stuck at the hydraulics, so I've got some "unstucking" to do. The casters seemed OK, nothing else appeared broken or abused. A small gamble for $26.91, including auction fees and tax. My version of playing the slots, and a better potential payoff.
Thanks a bunch, Hiball. I looked at the drawing again, now I understand. The pins must be spring loaded and the levers must move in slots in the yoke. The handle and yoke come off as one assembly, apparently.
If that fails, can I remove the gear on the handle? It appears there's a nut holding it to the end of the release rod, and maybe a self tapping screw holding the handle in the yoke?
On inspection, the jack lifted, but the release was stuck at the hydraulics, so I've got some "unstucking" to do. The casters seemed OK, nothing else appeared broken or abused. A small gamble for $26.91, including auction fees and tax. My version of playing the slots, and a better potential payoff.
I’ve never encountered one that couldn’t be removed by driving the pins inward, once you move them initially you can generally manipulate them by hand. It’s possible to get to where you need to by by dismantling the handle/knob/gear, but that’s a lot of work and comes with its own set of issues without a Vise to keep things from moving.
Yep, a couple of taps with a hammer and a steel rod got the pins moving and the handle off. I've got the hydraulics off and mostly disassembled. The tank has "scars" on both sides, the result of the "drag link pins" becoming loose and rubbing - one of the pins fell out upon disassembly. I guess they're just peened over for retention. I think there's enough meat on the tank still to be serviceable.
Surprisingly, the packing nut was barely hand tight - without any tools, it unthreaded easily. Same for the pump guide - it unthreaded by hand as I was removing the pump piston. I still can't get the plug at the bottom of the pump cylinder out. It unthreads about 1 turn or so, then stops. Either some debris got in the threads or they're buggered - it may end up staying in.
I don't suppose I could get away with not removing the tank nut? The usual hydraulic fluid and black sludge came out of this beast, and I'm skeptical as to whether I can adequately flush it with the tank in place. That begs the question - after reading pages of WS rebuild threads, I'm still not sure what the preferred tool is for tank nut removal - adjustable hook spanner? What do you use, Hiball, and also, wondering if Hein Werner made a special tool and if so, what it looked like? The tank nut is pristine - it doesn't appear that it's ever been off; I'm not keen to take a pipe wrench to it.
Both cylinders look good, no pitting or corrosion, and the rod looks good - I'll proceed as planned.
By the way, the original color was green, the blue appears to be added later.
Surprisingly, the packing nut was barely hand tight - without any tools, it unthreaded easily. Same for the pump guide - it unthreaded by hand as I was removing the pump piston. I still can't get the plug at the bottom of the pump cylinder out. It unthreads about 1 turn or so, then stops. Either some debris got in the threads or they're buggered - it may end up staying in.
I don't suppose I could get away with not removing the tank nut? The usual hydraulic fluid and black sludge came out of this beast, and I'm skeptical as to whether I can adequately flush it with the tank in place. That begs the question - after reading pages of WS rebuild threads, I'm still not sure what the preferred tool is for tank nut removal - adjustable hook spanner? What do you use, Hiball, and also, wondering if Hein Werner made a special tool and if so, what it looked like? The tank nut is pristine - it doesn't appear that it's ever been off; I'm not keen to take a pipe wrench to it.
Both cylinders look good, no pitting or corrosion, and the rod looks good - I'll proceed as planned.
By the way, the original color was green, the blue appears to be added later.
Attachments
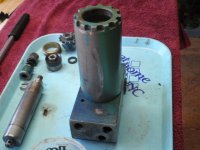
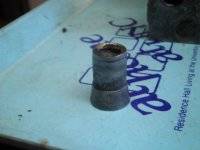
Yep, a couple of taps with a hammer and a steel rod got the pins moving and the handle off. I've got the hydraulics off and mostly disassembled. The tank has "scars" on both sides, the result of the "drag link pins" becoming loose and rubbing - one of the pins fell out upon disassembly. I guess they're just peened over for retention. I think there's enough meat on the tank still to be serviceable.
Surprisingly, the packing nut was barely hand tight - without any tools, it unthreaded easily. Same for the pump guide - it unthreaded by hand as I was removing the pump piston. I still can't get the plug at the bottom of the pump cylinder out. It unthreads about 1 turn or so, then stops. Either some debris got in the threads or they're buggered - it may end up staying in.
I don't suppose I could get away with not removing the tank nut? The usual hydraulic fluid and black sludge came out of this beast, and I'm skeptical as to whether I can adequately flush it with the tank in place. That begs the question - after reading pages of WS rebuild threads, I'm still not sure what the preferred tool is for tank nut removal - adjustable hook spanner? What do you use, Hiball, and also, wondering if Hein Werner made a special tool and if so, what it looked like? The tank nut is pristine - it doesn't appear that it's ever been off; I'm not keen to take a pipe wrench to it.
Both cylinders look good, no pitting or corrosion, and the rod looks good - I'll proceed as planned.
By the way, the original color was green, the blue appears to be added later.
I'd definitely remove the tank nut, it was a HW specialty tool. I always use a pipe wrench, but my customers where looking for functionality versus appearance. I do recall a member taking some round stock and fitting the grooves and letting the pipe wench ride on them versus the tank nut.
Did your jack carry the walker badging? They used that blueish green color on the early models.
Edit... I was thinking about my earlier comment about it being a 883, after thinking about it a little bit, I don't remember Walker rebadging the WS. The 883 was OS, so that would have been the 1 1/4 ton model.
Last edited:
I think that may have been me, on my SJ2 rebuild. But on the SJ2, the flutes on the tank nut are longer, easier to fit the round stock.I do recall a member taking some round stock and fitting the grooves and letting the pipe wench ride on them versus the tank nut.
Did your jack carry the walker badging? They used that blueish green color on the early models.
Actually, the nameplate is missing - I can see where it once was, but they must have removed it when they painted it, and never put it back on again.
Here is a picture of a OS 1.25 Ton Mopar jack, but I don't recall ever seeing a WS model.

In regards to The Vintage HW unit, off the top of my head they where sold under Walker (883), Montgomery Wards, Mopar and obviously HW.
(Photo courtesy of GJ member Floyd)
In regards to The Vintage HW unit, off the top of my head they where sold under Walker (883), Montgomery Wards, Mopar and obviously HW.
(Photo courtesy of GJ member Floyd)
Last edited:
That shade of green pretty much matches what's still visible on my jack. Mine is definitely 1 1/2 tons though - it's cast into the lift arm.
I’ll grab a picture of the old Walker color tomorrow, it looks like a closer match based off your picture.
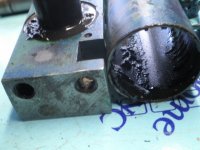
Taking off the tank nut was the right call - the reservoir was filled with sludge. I picked up a 3' pipe wrench off CL, lashed a jack handle to it, for about 5ft of lever, and it was still a challenge to get the tank nut off. I did use some 3/8" dia. stock in the flutes, to keep from chewing up the tank nut. Not as easy as on the SJ2, since the flutes are shorter and the round stock doesn't want to stay put. I used some auxiliary pieces to keep the round stock in place - I didn't get a picture, but hope to when I put it back together.
What are you using to flush the hydraulics?
What are you using to flush the hydraulics?
Attachments
Last edited:
Flushed it with some kerosene, followed by a rinse of acetone.
I removed the plug at the bottom of the pump bore, threads in the block were good, threads on the plug not so good, didn't come out easy.
I noticed that there doesn't seem to be any provision for preventing over extension - no pinholes in the cylinder, nothing associated with the rod. Is there something I'm not seeing?
I removed the plug at the bottom of the pump bore, threads in the block were good, threads on the plug not so good, didn't come out easy.
I noticed that there doesn't seem to be any provision for preventing over extension - no pinholes in the cylinder, nothing associated with the rod. Is there something I'm not seeing?
Flushed it with some kerosene, followed by a rinse of acetone.
I removed the plug at the bottom of the pump bore, threads in the block were good, threads on the plug not so good, didn't come out easy.
I noticed that there doesn't seem to be any provision for preventing over extension - no pinholes in the cylinder, nothing associated with the rod. Is there something I'm not seeing?
It wasn’t that uncommon on some early jacks to not utilize a weep hole or over extension pin/valve on smaller tonnage jacks. It was a different time back then, I guess they figured that the tank nut/threads where capable of holding the 3000lbs of force that the overload would allow, if some monkey did attempt to permanently over extend the jack.
So, the heel plate just bangs into the washer/packing? Yikes!It wasn’t that uncommon on some early jacks to not utilize a weep hole or over extension pin/valve on smaller tonnage jacks. It was a different time back then, I guess they figured that the tank nut/threads where capable of holding the 3000lbs of force that the overload would allow, if some monkey did attempt to permanently over extend the jack.
I noticed that there's a seal at the base of the cylinder, which appears to be an oring. Does this mean that the cylinder is not torqued to a bazillion foot pounds, for a metal to metal seal? I notice that the marks on the outside of the cylinder are faint, whereas, on my SJ2, it's obvious that the factory really grabbed that sucker. Reason I ask is two fold - If that oring is easily replaceable, I'd like to do so. And, I've got some light scoring in the cylinder wall that I'd like to address, might be easier to deal with if I could remove the cylinder.
So, the heel plate just bangs into the washer/packing? Yikes!
I noticed that there's a seal at the base of the cylinder, which appears to be an oring. Does this mean that the cylinder is not torqued to a bazillion foot pounds, for a metal to metal seal? I notice that the marks on the outside of the cylinder are faint, whereas, on my SJ2, it's obvious that the factory really grabbed that sucker. Reason I ask is two fold - If that oring is easily replaceable, I'd like to do so. And, I've got some light scoring in the cylinder wall that I'd like to address, might be easier to deal with if I could remove the cylinder.
It still needs to be torqued down considerably, not nearly as much as as the jacks that don’t utilize a seal, but you won’t grab it with a pair of channel locks and remove it. Depending on where the damage is at, it can sometimes be easier to remove the cylinder. If it’s middle of the road, I’ll hit it with my flexhone’s In place, Near the base and it gets removed.
It still needs to be torqued down considerably, not nearly as much as as the jacks that don’t utilize a seal, but you won’t grab it with a pair of channel locks and remove it. Depending on where the damage is at, it can sometimes be easier to remove the cylinder. If it’s middle of the road, I’ll hit it with my flexhone’s In place, Near the base and it gets removed.
There's one "score" in particular that I should address, it stops about an inch from the bottom. What grit flexhone do you use? And can I get that far down the cylinder with one?
Also, can I replace that oring at the base of the cylinder without taking the cylinder out?
There's one "score" in particular that I should address, it stops about an inch from the bottom. What grit flexhone do you use? And can I get that far down the cylinder with one?
Also, can I replace that oring at the base of the cylinder without taking the cylinder out?
I worked carefully with brush research when I acquired my flex hones, I generally start 120/240 depending on condition and finish out at 320/400 grit. The main thing to remember on well used jacks is that they will have some glaze that you need to get thru, if you don’t get to the metal you will chase your tail trying to clean up the glaze. It’s a balancing act on what finish you want, too rough and it will eat up your seals, too fine and they won’t seal. I’ve found that 320/400 is a sweet spot for durability and sealing properties. Another thing about flex hones, is by design they require the proper RPM to work correctly along with honing oil and are only used for surface prep, they aren’t designed to remove a lot of material, but will clean up sharp edges on cylinder wall imperfections. I would probably try it at a inch from the base, but it would do a better job if it was out.
The cylinder will need to be removed to replace the seal.
I haven't abandoned the project - the cylinder came out relatively easy; a 3' pipe wrench, no cheater necessary. Wondering what they used to tighten it at the factory, as the "teeth" marks on it were very faint.
I see what you mean about the glaze - it's pretty polished in there. I may end up ordering a 400 grit flexhone. I really can't justify more than one grit, so that's going to have to do it. It's notable that the original finish, where the piston cup didn't touch, is a very smooth, dull grey - no crosshatch visible to the naked eye. I've seen the charts of grit vs. Ra on the Sunnen site, so I don't doubt that 400 grit is adequate, but it appears that Hein Werner may have gone a bit further.
I see what you mean about the glaze - it's pretty polished in there. I may end up ordering a 400 grit flexhone. I really can't justify more than one grit, so that's going to have to do it. It's notable that the original finish, where the piston cup didn't touch, is a very smooth, dull grey - no crosshatch visible to the naked eye. I've seen the charts of grit vs. Ra on the Sunnen site, so I don't doubt that 400 grit is adequate, but it appears that Hein Werner may have gone a bit further.
Attachments
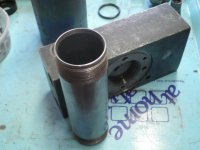
I haven't abandoned the project - the cylinder came out relatively easy; a 3' pipe wrench, no cheater necessary. Wondering what they used to tighten it at the factory, as the "teeth" marks on it were very faint.
I see what you mean about the glaze - it's pretty polished in there. I may end up ordering a 400 grit flexhone. I really can't justify more than one grit, so that's going to have to do it. It's notable that the original finish, where the piston cup didn't touch, is a very smooth, dull grey - no crosshatch visible to the naked eye. I've seen the charts of grit vs. Ra on the Sunnen site, so I don't doubt that 400 grit is adequate, but it appears that Hein Werner may have gone a bit further.
If you finish at 400 at the correct Rpm with some honing oil/lube your not going to see a heavy cross hatch, at least not something you would find on a Engine block. The fine cross hatch is there to aid in keeping the seal lips lubed to combat premature wear. I would keep a eye on EBay, I've scored some great deals on flex hones over the years.
Cheapest I found it was here: http://www.enginehones.com/bc112400sc.html
$30 and about $5 shipping USPS. I did look at ebay a few days ago, didn't see anything cheaper, but I'll keep checking.
You're up late - thanks Hiball
$30 and about $5 shipping USPS. I did look at ebay a few days ago, didn't see anything cheaper, but I'll keep checking.
You're up late - thanks Hiball
Haven't abandoned the project, just getting back to it now.
Hiball - we didn't talk about it, but I'm assuming you hone the pump cylinder as well? Mine is pretty polished from wear.
Everything is always “as needed” in the case is the OS/Oboy/WS the pump piston cylinders where susceptible to wear due to worn guides, so much so that oversized piston seals where common replacements. If the bore looks good, I definitely wouldn’t get aggressive with it for the above stated reasons.
The pump bore looks good - maybe too good. It's pretty polished, a marked difference from the dull grey area where the seal doesn't touch. I measured the bore throughout it's length with a gage, and it's within a few tenths top to bottom.Everything is always “as needed” in the case is the OS/Oboy/WS the pump piston cylinders where susceptible to wear due to worn guides, so much so that oversized piston seals where common replacements. If the bore looks good, I definitely wouldn’t get aggressive with it for the above stated reasons.
Well, a year later, and I'm finally back at it.
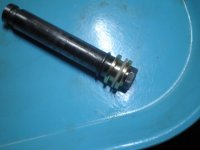
I decided to make an adapter, same as I did on my SJ-2, to accommodate a poly ucup. I had an extra seal laying around that I purchased for the Blackhawk, and the SJ-2 and WS cylinders are about the same ID. The loaded ucup was a little tight in the WS bore, so I took out the "energizer", which gave an acceptable fit. The adapter is threaded 1/2-20 to match the stud on the ram. I gave the threads and the interface between adapter and ram a coating of Loctite 518 to seal against any bypass. Ignore the aluminum washer at the base of the adapter - I was off a little bit when I machined the part, and it was easier to make a spacer, than to make a new part.
I also decided to make an adapter for the pump piston, so I could use an oring and backup, vs. the rare and expensive original piston cup. I turned it out of brass and ended up making the backup ring. It's not that I was averse to spending 10 cents for the backup, but the minimum order at Rocket Seals is $10. And I was able to get the oring at the local hardware for 50 cents. A few minutes on the lathe with a piece of nylon, then I cut a scarf joint with a utility knife. The adapter has a through hole - only because I didn't want to buy a 1/4-28 tap and the drill bit to go along with it. All the threads and interfaces are sealed with 518.
I did end up honing the cylinder - I used a 320 flex hone, which really wasn't aggressive enough, but did clean things up fairly well; hopefully, well enough.
The only other seal that I replaced, was the oring at the base of the cylinder. The cylinder threads, cylinder base, and tank ends all got a coat of 518 on assembly. The hydraulic unit is sitting on the bench now, I haven't filled it yet; if it leaks, it'll probably be from the packing nut. One of the packing seals is in good shape, the other is compromised - it's basically acting as a spacer.
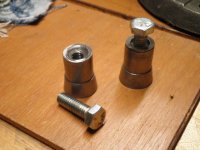
As I mentioned earlier, the drag link studs that join the lift arm to the the short linkages were loose - one was falling out, and the tank was heavily scarred from rubbing against them - clearances in that area are tight. So, I used a dremel to remove the remaining shoulder on the one that was still intact. I drilled and tapped each one to 5/16-18; the plan, is to cut the head off a hardware store bolt, loctite it in as a threaded stud, and use a washer and nylock to secure the whole thing. The force on the drag link stud is mostly side to side and not axial, so I'm fairly confident that it'll hold.
Also, at some point, a previous owner must have gotten frustrated with the push nuts that hold the axle in the yoke of the casters - they welded the ends, to secure them. Not being able to remove the axle, means not being able to clean and grease the caster bearings. I used the dremel with a cutoff wheel to undo the mischief - the picture was taken part way into the process. I decided to take the easy way out - I drilled holes for cotter pins. The bearings and raceways were good enough - the loose raceway had some hairline cracks, but, since they don't seem to be readily available as replacements, they'll have to do. After reassembling, things seem nice and smooth, although I haven't applied any weight to it yet.
Almost forgot - to reassemble the pump piston, I used an automotive spring compressor to hold everything down, while I reinstalled the retaining ring, cutting down the frustration level considerably. I've done this on my SJ-2, trying to compress the spring with one hand, while trying to install the ring with the other, hoping that things don't let loose, putting a dent in my forehead.
I'll report back when I get some fluid in this thing and give it a workout. In the meantime, here's some pictures:
I decided to make an adapter, same as I did on my SJ-2, to accommodate a poly ucup. I had an extra seal laying around that I purchased for the Blackhawk, and the SJ-2 and WS cylinders are about the same ID. The loaded ucup was a little tight in the WS bore, so I took out the "energizer", which gave an acceptable fit. The adapter is threaded 1/2-20 to match the stud on the ram. I gave the threads and the interface between adapter and ram a coating of Loctite 518 to seal against any bypass. Ignore the aluminum washer at the base of the adapter - I was off a little bit when I machined the part, and it was easier to make a spacer, than to make a new part.
I also decided to make an adapter for the pump piston, so I could use an oring and backup, vs. the rare and expensive original piston cup. I turned it out of brass and ended up making the backup ring. It's not that I was averse to spending 10 cents for the backup, but the minimum order at Rocket Seals is $10. And I was able to get the oring at the local hardware for 50 cents. A few minutes on the lathe with a piece of nylon, then I cut a scarf joint with a utility knife. The adapter has a through hole - only because I didn't want to buy a 1/4-28 tap and the drill bit to go along with it. All the threads and interfaces are sealed with 518.
I did end up honing the cylinder - I used a 320 flex hone, which really wasn't aggressive enough, but did clean things up fairly well; hopefully, well enough.
The only other seal that I replaced, was the oring at the base of the cylinder. The cylinder threads, cylinder base, and tank ends all got a coat of 518 on assembly. The hydraulic unit is sitting on the bench now, I haven't filled it yet; if it leaks, it'll probably be from the packing nut. One of the packing seals is in good shape, the other is compromised - it's basically acting as a spacer.
As I mentioned earlier, the drag link studs that join the lift arm to the the short linkages were loose - one was falling out, and the tank was heavily scarred from rubbing against them - clearances in that area are tight. So, I used a dremel to remove the remaining shoulder on the one that was still intact. I drilled and tapped each one to 5/16-18; the plan, is to cut the head off a hardware store bolt, loctite it in as a threaded stud, and use a washer and nylock to secure the whole thing. The force on the drag link stud is mostly side to side and not axial, so I'm fairly confident that it'll hold.
Also, at some point, a previous owner must have gotten frustrated with the push nuts that hold the axle in the yoke of the casters - they welded the ends, to secure them. Not being able to remove the axle, means not being able to clean and grease the caster bearings. I used the dremel with a cutoff wheel to undo the mischief - the picture was taken part way into the process. I decided to take the easy way out - I drilled holes for cotter pins. The bearings and raceways were good enough - the loose raceway had some hairline cracks, but, since they don't seem to be readily available as replacements, they'll have to do. After reassembling, things seem nice and smooth, although I haven't applied any weight to it yet.
Almost forgot - to reassemble the pump piston, I used an automotive spring compressor to hold everything down, while I reinstalled the retaining ring, cutting down the frustration level considerably. I've done this on my SJ-2, trying to compress the spring with one hand, while trying to install the ring with the other, hoping that things don't let loose, putting a dent in my forehead.
I'll report back when I get some fluid in this thing and give it a workout. In the meantime, here's some pictures:
Attachments




Last edited:
Nice job... I always use a small pair of vice grips to hold the spring compressed (clamped on the pump piston) and then remove after the retaining ring is in place, same method for Walker/Lincoln/HW small frame models.
Lemme know how the Oring works on the pump piston, I would worry about how well the guide is worn and keeping it centered in the bore once the handle roller makes contact + any additional wear it might cause as there is a reason a lot of older jacks used brass as a guide. On the plus side, you obvious have the skill set to remedy or make adjustments down the road... Again Nice Job!
Lemme know how the Oring works on the pump piston, I would worry about how well the guide is worn and keeping it centered in the bore once the handle roller makes contact + any additional wear it might cause as there is a reason a lot of older jacks used brass as a guide. On the plus side, you obvious have the skill set to remedy or make adjustments down the road... Again Nice Job!
Lemme know how the Oring works on the pump piston, I would worry about how well the guide is worn and keeping it centered in the bore once the handle roller makes contact + any additional wear it might cause as there is a reason a lot of older jacks used brass as a guide. On the plus side, you obvious have the skill set to remedy or make adjustments down the road... Again Nice Job!
Yep, I have the same concerns. I turned the pump adapter OD about 0.003" under the pump bore ID, but by necessity, it's much shorter than I would have liked - more length would have stabilized the piston in the bore. Between the guide and the threaded cap at the bottom of the bore, there just wasn't room to make the adapter any longer, without modifying the original parts. I don't recall there being an inordinate amount of slop in the guide, so I'll cross my fingers.
Teufelshund1097
Active member
Nice work Paulsomlo. That seems like a lot of work to avoid using the original seals. Was that the only motivation behind it? The reason I ask is that I have a rebuild in my immediate future and if there are any “gotchas” where the pump piston is concerned I’d like to keep my eyes open for them.
Sent from my iPhone using The Garage Journal mobile app
Sent from my iPhone using The Garage Journal mobile app
Nice work Paulsomlo. That seems like a lot of work to avoid using the original seals. Was that the only motivation behind it? The reason I ask is that I have a rebuild in my immediate future and if there are any “gotchas” where the pump piston is concerned I’d like to keep my eyes open for them.
Sent from my iPhone using The Garage Journal mobile app
When I rebuilt my Blackhawk, I bought a seal kit locally, some outfit in Denver. Despite soaking the leather cup for days, it never softened enough, and it leaked down slowly under load. I also had trouble with the pump cup ingesting air, having to constantly bleed the jack. I wasn't about to spend another $36 for seals, so I modified that jack same way as this WS. Those adapters are easy to turn out on a lathe, not much to them. The poly ucup goes for about $3.50, the oring on the pump cost 50 cents. I'm not saying there's anything wrong with buying seal kits, as long as the seller is reputable - I think mine had been on the shelf for 30 years. The vast majority of guys on here buy seal kits and never have a problem.
As far as your pump piston, I don't see any "gotchas". You may have some mushrooming on the end of the piston, and may have to do some filing to get it out of the spring cover. Other than that, you may need to modify a socket to remove the pump guide. Hiball could probably weigh in here - he's been in a hundred of these things, to my one.
Teufelshund1097
Active member
Understood. Must be nice to have a lathe to turn parts out; way beyond my capabilities... I had my pump piston apart for cleaning. It wasn’t actually leaking afaik - I’m just figuring these things out. Anyway, I ended up ordering a whole rebuild kit because the jack leaked elsewhere. I was unable to source anything locally due to the Covid response. [emoji13]After looking at the inside of many of these jacks in the rebuild threads - I don’t think a complete overhaul will hurt.
Sent from my iPhone using The Garage Journal mobile app
Sent from my iPhone using The Garage Journal mobile app
Got 'er all back together, got it under a vehicle. Jacked the front wheels a few inches off the ground and left it overnight with a yard stick up against the license plate. Dropped a little less than 1/4" over 12 hours, so I guess I can declare victory - and no puddles.
Along the way, I made some new washers to retain the two saddle pins, replacing a conglomeration of wrong sized washers, an oversized e-clip, and a hex head 1/4-28 screw that had been hacked to length (and didn't match the original round head screw on the other side). Couldn't find any 1/4-28 screws with a round head in that length, so I used button head cap screws.
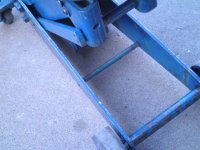
One of the front axle bushings was loose - not pinned to the axle, not crimped to the frame. Wouldn't have mattered though, as the frame was bent, and the bushing wouldn't sit in the frame anyway, if it were pinned to the axle. Straightening the frame without grinding away the heads on four rivets was an adventure that involved a steel u-channel, spacers and c-clamps. I reattached the bushing to the frame with a crimping die that I turned on the lathe, using the shop press. I didn't want to order 100 rivet pins from McMaster-Carr, so I improvised; the pins are 3/16", so I used #10 socket head cap screws that just happened to be around the right length. The heads on shcs fasteners are small enough diameter-wise to fit. One had a matching hex nut that was magically undersized on the outside, the other nut had to be ground down to clear the frame.
My fix for the two drag link studs worked out well, although I did have to use a spreader clamp to keep them from spinning as I tightened down the nylocks. The two washers were turned on the lathe.
The only thing that's not quite right, is the release; it's really "notchy". It looked like some of the teeth were bottoming out when meshed, so I loosened up the bolts holding the hydraulic block, and pulled the block back away from the release with a prybar, while tightening the bolts up. That made a slight improvement, but I still don't like the way it feels. I wonder if I need to dress the teeth a little with a file?
No stripping, no painting - I've put about as much time into this thing as I care to, and there are 17 other projects beckoning. At least what's on there will keep the rust at bay.
Along the way, I made some new washers to retain the two saddle pins, replacing a conglomeration of wrong sized washers, an oversized e-clip, and a hex head 1/4-28 screw that had been hacked to length (and didn't match the original round head screw on the other side). Couldn't find any 1/4-28 screws with a round head in that length, so I used button head cap screws.
One of the front axle bushings was loose - not pinned to the axle, not crimped to the frame. Wouldn't have mattered though, as the frame was bent, and the bushing wouldn't sit in the frame anyway, if it were pinned to the axle. Straightening the frame without grinding away the heads on four rivets was an adventure that involved a steel u-channel, spacers and c-clamps. I reattached the bushing to the frame with a crimping die that I turned on the lathe, using the shop press. I didn't want to order 100 rivet pins from McMaster-Carr, so I improvised; the pins are 3/16", so I used #10 socket head cap screws that just happened to be around the right length. The heads on shcs fasteners are small enough diameter-wise to fit. One had a matching hex nut that was magically undersized on the outside, the other nut had to be ground down to clear the frame.
My fix for the two drag link studs worked out well, although I did have to use a spreader clamp to keep them from spinning as I tightened down the nylocks. The two washers were turned on the lathe.
The only thing that's not quite right, is the release; it's really "notchy". It looked like some of the teeth were bottoming out when meshed, so I loosened up the bolts holding the hydraulic block, and pulled the block back away from the release with a prybar, while tightening the bolts up. That made a slight improvement, but I still don't like the way it feels. I wonder if I need to dress the teeth a little with a file?
No stripping, no painting - I've put about as much time into this thing as I care to, and there are 17 other projects beckoning. At least what's on there will keep the rust at bay.
Attachments

Last edited: