To avoid these ads, REGISTER NOW!

Removing paint from old steam radiators

branimal

Well-known member
Joined
May 31, 2016
Messages
1,943
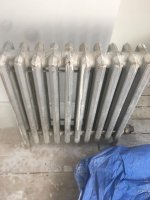
I've got 5 old steam radiators that have multiple layers of paint on them. I've read you can remove the paint using a lye aka caustic soda bath.

Can I plug the holes and drop them into a large plastic cement mixer bin with water and caustic soda? Flip them after some time and scrub with a wire brush. Then wash them off in another mixing bin?

Now can this be done inside in a construction site? One of the radiators is a beast. 30 x 20 x 11. gotta be over 200lbs. (Not sure i can get them safely downstairs -2 steep stairs with turns - with handtruck and ratchet straps.)

After that I was going to paint them with an hvlp sprayer and high heat paint.


Is this plan reasonable?
 

Attachments

  • IMG_7630.jpg
    IMG_7630.jpg
    99.3 KB · Views: 120
To avoid these ads, REGISTER NOW!

The J

Well-known member
Joined
Mar 4, 2010
Messages
152
Moving the large radiators is not going to be feasible for what you’re looking to do.

Why not try aircraft remover to strip the paint? This lifts paint so you can scrape off. It’s strong stuff and the process is messy. Paint it on, wait for bubbling and scrape off. Mask the surroundings and keep area well ventilated and wear necessary PPE.

It will get most of it off. I think you’ll find some spots between fins that won’t be easily removed. Just be realistic with the process and what your end goal is.

I’d paint them white or grey/silver. You can use a hammered paint to leave a texture and cover up some of those stubborn paint spots.

Once that’s done, go and build some nice covers for them!

Good luck!
 

Sweetcorn

Well-known member
Joined
Feb 14, 2018
Messages
676
Location
North Central Ohio
I'd use a chemical stripper with windows open and plastic put down on the floor below it. Mask, gloves, etc. Probably a small fan in a window to draw out fumes as well.
 

fteufert

Well-known member
Joined
Oct 24, 2013
Messages
382
Location
Near Scranton, PA
Remove the long threaded rod and you can blast them individually.

I used silicone to seal them back up when I did it years ago.

Simple to disassemble
 

Squashfest81

Well-known member
Joined
Jan 14, 2012
Messages
1,475
Location
MA
If not completely covered in rusty, peeling, run covered paint, which they don’t look to be, if just go at them with a wire wheel. Most of a radiator you really don’t see. I redid a house full of those a few houses back by wire wheel, quick sanding, and a spray with hammered bronze. They looked amazing.
Can’t beat the coziness of sitting next to hundreds of pounds of warm steel!
 

aar_man

Well-known member
Joined
Apr 28, 2012
Messages
110
Location
Pennsylvania
What was the heating system the radiators came out of? Was it a steam system or hot water?
With the connection across the top, they can be used either way. If it was steam and you want to use them in a hot water system, remember to flush them.
Also, plug the steam vent and loosen the screw at the top corner to install a hot water vent(key). While you could disassemble, not sure I would. Unless you pressure test after disassemble/reassemble.
 

Shiftless

Well-known member
Joined
Mar 9, 2014
Messages
14,551
Location
East Bay SFO
If you’re thinking of chemical paint remover, good luck finding the old “aircraft” paint remover that was Methylene Chloride based. That stuff was pulled off the general market. Too dangerous they said. :(

It might be available retail to professionals. There is some on eBay at much higher prices than we used to pay for the stuff.
 

nh_yota

Well-known member
Joined
Mar 10, 2015
Messages
4,077
Location
Seacoast New Hampshire
Radiators weigh a ton (I have them) and sometimes you can open a whole can of worms if you disconnect and move them so I would try to leave them in place if possible.

Clean the dust and grime from between the sections as best as you can and then use a liquid paint stripper if needed.

Honestly that one looks in pretty good shape so I would clean it well and then paint it without stripping off the old paint.
 
To avoid these ads, REGISTER NOW!
OP
B

branimal

Well-known member
Joined
May 31, 2016
Messages
1,943
Sandblasting is quite expensive. $300/radiator.

Paint stripper is an option. I just don’t like the idea of working into all those nooks and crannies. Guess as others have stated - no one is going to look into those areas.

Wire wheel / sanding is another option. Wire wheel on a grinder or just a cordless drill?

It’s a steam radiator - I’ve got the plumbing fittings to plug up the air vent and steam valve.

The rads probably have multiple layers of paint on them. And considering the house was built in 1920, I’m sure there will be lead in some of those layers. Will stripping lead paint with a paint stripper or lye bath be dangerous to me? I’m going to ventilate the area well. Windows and a couple of fans.

Did some reading on lye and mixing it with room temperature (70F) water will bring the solution to 180F.

Another issue with using lye is how am I going to get rid of it? I think vinegar could neutralize it.

Thanks for all the responses.
 
Last edited:

dogdog

Well-known member
Joined
Nov 15, 2011
Messages
12,711
Electrolysis... I have done about 8 so far, 4 electrolysis, and 4 with the old acid paint remover ( not fun and acid burns) . take about 7 days each on electrolysis, so if you have 2 tubs setup time would cut in 1/2 for 4 radiators. Cost wise it's about the same as acid vs electricity cost.


I have pic of them came out very nicely on one of the electrolysis threads.
 

gunguy

Well-known member
Joined
Aug 2, 2007
Messages
730
Location
Currituck Co. NC
No matter how they are stripped, it will make a mess. If you strip them in place by wire wheel, you'll have dust everywhere. if you chemically strip them, you'll have a soupy mess to get rid of. I'd pull them and get them dipped especially if they test positive for lead.

Get a lead test kit from Lowes or HD and check all of them.
https://www.lowes.com/pd/PRO-LAB-Lead-Surface-Test-Kit-Lead-Test-Kit/1000347969

To move them down/up the stairs, rent a powered stair climbing appliance dolly.


Good luck with whatever you decide to do.

Jim
 
OP
B

branimal

Well-known member
Joined
May 31, 2016
Messages
1,943
I started stripping them in a lye bath. 1lb lye to 6 gallons of water. 1st one came out great. Just needed a quick hose down in a separate washing bin.

I dropped another rad in and its working -albeit a little less quickly. I sprinkled in some more lye.

The lye bath might have lost some of its alkalinity from reacting with the paint and over time. I'm not sure.

In any case I'd like to continue using the same bath as disposing of this soupy bath water is going to be tricky. So I'd rather not make a 2nd bath batch until I need to.

@dogdog - you've got me interested in electrolysis to remove some of the remaining rust b/w the fins and other hard to reach areas. It's not easy finding a true manual charger these days. I've also read the electrolysis process goes faster if the rads have undergone a lye bath first to strip the paint.

Some pics.
 

Attachments

  • IMG_7698.jpg
    IMG_7698.jpg
    74.1 KB · Views: 48
  • IMG_7722.jpg
    IMG_7722.jpg
    117.5 KB · Views: 49
  • 61184808154__D208E2E6-6EB5-414E-9C9C-426E4FC7D620.jpg
    61184808154__D208E2E6-6EB5-414E-9C9C-426E4FC7D620.jpg
    62.4 KB · Views: 52
Last edited:

dogdog

Well-known member
Joined
Nov 15, 2011
Messages
12,711
I started stripping them in a lye bath. 1lb lye to 6 gallons of water. 1st one came out great. Just needed a quick hose down in a separate washing bin.

I dropped another rad in and its working -albeit a little less quickly. I sprinkled in some more lye.

The lye bath might have lost some of its alkalinity from reacting with the paint and over time. I'm not sure.

In any case I'd like to continue using the same bath as disposing of this soupy bath water is going to be tricky. So I'd rather not make a 2nd bath batch until I need to.

@dogdog - you've got me interested in electrolysis to remove some of the remaining rust b/w the fins and other hard to reach areas. It's not easy finding a true manual charger these days. I've also read the electrolysis process goes faster if the rads have undergone a lye bath first to strip the paint.

Some pics.

any 12v or 24V power supply will be fine, you don't have to use car charger. I have 12V for normal stuff, and 24V for stubborn stuff. I used scrap steel metal (regular steel not stainless) as anode or rebar. Just leave it on and clean your anode occasionally.. flip over when one side is done. You can use mutiple anode just don't short your POS to NEG, fun things happen :)

My radiators are a lot bigger. can't fit into that larger size cement mixing tub at all.

***few thing to add Have to be DC source for it to work. THe higher the voltage (not amp), the more potential, faster but you will risk of damaging the steel/iron piece you are trying to de-rust. Something about hydrogen embrittlement . So 24v is all I go. I have tried 36/48V and the amount of hydrogen gas generated is scary.
 
Last edited:

macdabs

Well-known member
Joined
Sep 22, 2007
Messages
195
Just sandblast with a cheap pot blaster and 8.00 dollar bag of fine play sand from a box store . I had one I did over winter that had three layers of paint. The only way you can get the paint off and prepped in the cracks is with a blaster. You will have a day messing around with paint remover and chemicals. If you blast it just take some Dx 330 wax ang grease remover wipe it down and buy a spray bomb of rusteloum paint. I used pewter hammer grey. .
 

Attachments

  • 5BF17AC0-6EBB-4821-BA98-6BFDBEDCCA6F.jpeg
    5BF17AC0-6EBB-4821-BA98-6BFDBEDCCA6F.jpeg
    115.2 KB · Views: 30
OP
B

branimal

Well-known member
Joined
May 31, 2016
Messages
1,943
dogdog; said:
any 12v or 24V power supply will be fine, you don't have to use car charger. I have 12V for normal stuff, and 24V for stubborn stuff. I used scrap steel metal (regular steel not stainless) as anode or rebar. Just leave it on and clean your anode occasionally.. flip over when one side is done. You can use mutiple anode just don't short your POS to NEG, fun things happen :)

My radiators are a lot bigger. can't fit into that larger size cement mixing tub at all.

***few thing to add Have to be DC source for it to work. THe higher the voltage (not amp), the more potential, faster but you will risk of damaging the steel/iron piece you are trying to de-rust. Something about hydrogen embrittlement . So 24v is all I go. I have tried 36/48V and the amount of hydrogen gas generated is scary.

Power supply like this with alligator clips attached to + and - nodes:

https://www.amazon.com/dp/B0146IAXYO/?tag=atomicindus08-20

I have a couple large rads i need to work. ~ 24" x 34" x 11". When you did your large rads, did you build a tub with a shower pan liner and 2x10s or similar lumber?

Thanks.
 
Last edited:
OP
B

branimal

Well-known member
Joined
May 31, 2016
Messages
1,943
macdabs; said:
Just sandblast with a cheap pot blaster and 8.00 dollar bag of fine play sand from a box store . I had one I did over winter that had three layers of paint. The only way you can get the paint off and prepped in the cracks is with a blaster. You will have a day messing around with paint remover and chemicals. If you blast it just take some Dx 330 wax ang grease remover wipe it down and buy a spray bomb of rusteloum paint. I used pewter hammer grey. .

Nice job! I would consider sandblasting but 2 out of 5 of my rads are too big to bring down from the 3rd floor so I can safely blast outside.

When I work on the first floor apartment, I might consider sand blasting.
 

dogdog

Well-known member
Joined
Nov 15, 2011
Messages
12,711
Power supply like this with alligator clips attached to + and - nodes:

https://www.amazon.com/dp/B0146IAXYO/?tag=atomicindus08-20

I have a couple large rads i need to work. ~ 24" x 34" x 11". When you did your large rads, did you build a tub with a shower pan liner and 2x10s or similar lumber?

Thanks.

yes I am using something like that (but I don't know the quality of that unit)... mine is some used medical power supply 24V 10A off ebay works fine, the other one is some Mean-well brand , the 12V are the HF and sears battery charger or what ever I get in my parts bin. basically which ever one convenient at hand

I would put a fuse in between the leads on the NEG, Yes alligator clips. Something like these.. Autozone have them also, but not as nice function the same. (https://www.amazon.com/dp/B07LCPHWK7/?tag=atomicindus08-20)


for large radiator I couldn't fit into the largest concrete/mortar plastic tub I just do 1/2 at a time. lean it a little, the weight of the radiator is on block of something but not on the plastic edge of the tub. Block of something is what ever I find in my view :).

I used multiple sacrificial anode on different point of the tub to make work faster.. all connected by alligator clips to POS, clean the electrodes once a day. take caution not to short them while cleaning or placing. Risk I take, and caution. more anodes, a bit more current will be drawn.

It's really simple to do, just take precaution not to short out the leads POS and NEG that is. I think that is how some people blow out their batteries. on those battery / smart charger setups.

I have 3 radiator to get re-done.. will try and see if I can take pics.
 
Last edited:

dogdog

Well-known member
Joined
Nov 15, 2011
Messages
12,711
These are the power supply I have used. and redoing the radiators for repainting.

The wiring is any spare wiring, with an alligator clips on the ends.
 

Attachments

  • E_powersupplies.jpg
    E_powersupplies.jpg
    72.5 KB · Views: 16
  • Radiators.jpg
    Radiators.jpg
    133 KB · Views: 21
To avoid these ads, REGISTER NOW!
Top Bottom