To avoid these ads, REGISTER NOW!

Repairing a Drill Press Head

Rick_Br

Well-known member
Joined
Apr 8, 2014
Messages
412
Location
Winston Salem, NC
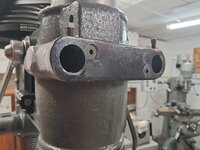
This WT drill [press head came to me with a broken pocket where the motor mount stud slides in. I have made a support bracket/strap that will span across the two holes on the back of the head. Now that I have a tentative plan for providing adequate support for the motor mount plate - I want to discuss the aesthetic repair piece of this.
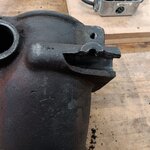
Broken Motpor Mount Pocket.jpg

I would like to fill in the broken area shown in the picture. Unfortunately I don't have the broken piece. My first thought was to insert a dummy rod in the broken socket that will be coated with something to prevent material from sticking to it - material being JB Weld, Bondo, Devlon steel epoxy or something else you smart folks are going to suggest. The dummy rod would be removed as the material hardens. I have some doubts that any of those would hold up over a wide span like I have. Thoughts?

Rick

 
To avoid these ads, REGISTER NOW!

slowtwitch73

Well-known member
Joined
Apr 18, 2019
Messages
5,876
Location
Hellgate
I would mill it out to a uniform shape. That would make a fill piece easier to make, give you clean edges to braze to, and get rid of the pointy stress riser at bottom of break.
 

alfadan

Well-known member
Joined
Mar 9, 2007
Messages
2,114
Location
Augusta, ks
If it's just cosmetic, that two part epoxy in a tube that you knead together works great and is easy to form around a dowel as you plan. I filled in the cuts on the top cover of my Delta sander with it. Much less hassle than liquid epoxy.
 
OP
R

Rick_Br

Well-known member
Joined
Apr 8, 2014
Messages
412
Location
Winston Salem, NC
If it's just cosmetic, that two part epoxy in a tube that you knead together works great and is easy to form around a dowel as you plan. I filled in the cuts on the top cover of my Delta sander with it. Much less hassle than liquid epoxy.
Do you happen to recall a name? Devcon steel epoxy is the one I have heard can be molded as you describe but maybe there is another?
Rick
 

alfadan

Well-known member
Joined
Mar 9, 2007
Messages
2,114
Location
Augusta, ks
It had steel in the name for sure. I thought it was a jbweld product, but I'm sure they're all the same.

Edit: jbweld steelstik
 

mark-NJ

Well-known member
Joined
Apr 1, 2019
Messages
773
Location
new jersey
Do you need that broken-through threaded hole? If so, I would grind it clean & TIG braze a nut into that position
 
To avoid these ads, REGISTER NOW!

The Cobbler

Super Moderator
Staff member
Joined
Oct 24, 2013
Messages
25,933
Location
Niagara Region, Ontario, Canada
if you have a bracket mad to span the posts, and the one post is trapped by the original hole so it can;t flex outwards, I think any of your mentioned repairs would work alright. the worst case scenario, it cracks & you have to re do it .
I would try bondo or epoxy and see how it works. it's nit like you can;t re do it of you don't like the results
 

Snip's

Well-known member
Joined
Apr 29, 2017
Messages
1,859
Location
Ohio
Get a short length of thin wall DOM alloy tubing that matches the diameter of the casting hole...
Turn down the one corresponding shaft on the motor mounting plate to get a slide fit into the DOM tubing...
Use the motor mount rod to hold position with the DOM tube in place while epoxy sets up...
 
OP
R

Rick_Br

Well-known member
Joined
Apr 8, 2014
Messages
412
Location
Winston Salem, NC
Get a short length of thin wall DOM alloy tubing that matches the diameter of the casting hole...
Turn down the one corresponding shaft on the motor mounting plate to get a slide fit into the DOM tubing...
Use the motor mount rod to hold position with the DOM tube in place while epoxy sets up...
Not a terrible idea and I may use that as an option if my current approach fails.

Rick
 
OP
R

Rick_Br

Well-known member
Joined
Apr 8, 2014
Messages
412
Location
Winston Salem, NC
Another idea would be to look on Old Wood Working Machines and find a replacement.
Owwm.org
Already did that several months ago. I actually did find one but it had a couple of breaks in the front belt cover hood. The owner welded them up - very nice weld - however when I was assembling I discovered the top bearing retainer didn't align properly with the top spindle bearing. Apparently that hole had moved - either from the welding or an original fall. That bearing retainer hole is line bored to align precisely all the way down the quill hole. That's why I went back to the original head and am trying to repair it.

Rick
 

MoonRise

Well-known member
Joined
Nov 5, 2010
Messages
4,030
Location
NJ
Hmmm, old machinery piece and it sure looks like cast iron.

Options, in order from easiest to hardest which also is pretty much 'worst' to 'best' IMHO:

- do nothing. Easy, because you did nothing but also worst because you did nothing.

- epoxy putty type repair. Can make it look OK if you do a good molding and shaping job with the epoxy putty and paint it all to blend in. May or may not hold up to use.

- braze repair. Not so easy to build up ALL the missing metal with brazing. May require massive preheat to the entire piece, as in preheat slowly to 700F or more. May distort the piece because of all the heat involved. And that's a lot of missing metal to build up.

- weld repair. Again, not so easy to build up ALL the missing metal and then there is the aspect that welding cast iron is often tricky or a flat-out pain in the A$$. Usually involves copious amounts of preheat to the entire piece, about 700-1100F and then welding with $$$$$ high-nickel electrodes ($$$ as in $5 PER stick electrode) and then s-l-o-w cooling (slow as in ~100F per HOUR cooling rate, so about 12 hours to cool from 1200F back down to room temperature). May distort the piece because of all the heat involved, more so than brazing because welding temperatures are much hotter than brazing temperatures. And again, that is a lot of missing metal to build up.

You might take a hybrid approach and fabricate some steel parts/pieces (one part for the threaded boss and another part for the rod support area) to replace some of the missing metal and then braze or weld those to the casting for structure and then braze or weld or use epoxy putty to built up any missing areas. And then hide it all with paint.

Hmmm, maybe make a steel tube for the rod pocket. Weld a steel threaded boss onto that tube. Cut out most of the broken casting section of the rod pocket and then fit the steel tube+boss to the casting and cut that to match your cut lines on the casting. Weld or braze your steel replacement tube+boss to the casting. Paint. Advantage is that you can make your replacement rod pocket and the threaded boss out of steel as needed and fit all that together and weld or braze it all together on a workbench. Then 'just' attach it to the broken casting.
 
OP
R

Rick_Br

Well-known member
Joined
Apr 8, 2014
Messages
412
Location
Winston Salem, NC
Thanks for your thoughts moonrise - unfortunately anything after option 2 are eliminated because I can't weld or braze
Rick
 
OP
R

Rick_Br

Well-known member
Joined
Apr 8, 2014
Messages
412
Location
Winston Salem, NC
I completed the repair of the broken motor mount today.

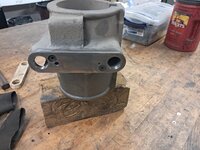
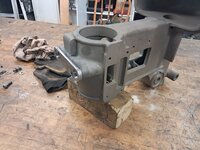
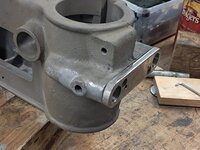
Step 1 was to get the support bracket and head drilled and tapped for two 1/4-20 flat head machine screws. Started out as #10 but after I busted the tap I moved up a size. It took some fiddling to get the bracket installed and still be able to have the studs move easily but I eventually got there.

Support Bracket Install;ed.jpg

Suppoort Bracket Installed 2.jpg

Support Bracket with Stud Installed.jpg

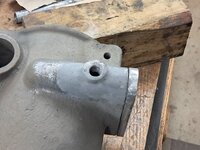
Then I needed to address the actual break - decided my first attempt would be with JB Weld steelstik - worked like a charm

Pocket Break Fixed.jpg

Pocket Break Fixed 2.jpg


I may need to do a little more sanding - not sure yet. I was also able to drill and tap the 1/2-13 hole for the locking set screw. This stuff is fully workable after 60 minutes.

Now I need to get back to normal business of painting the head.

I appreciate all the help and suggestions

Rick
 
OP
R

Rick_Br

Well-known member
Joined
Apr 8, 2014
Messages
412
Location
Winston Salem, NC
Well for posterity sake the threads did not hold up when the set screw was installed

Set Screw Failure.jpg

I went back and put two 1/4-20 set screws in the top of the new support bracket. I used square head because they look more period correct to me.

New Motor Mount Set Screw.jpg
 
To avoid these ads, REGISTER NOW!
Top Bottom