Repairing / Reinforcing Sagged Roof
Hello guys, I'll try to keep this post minimal
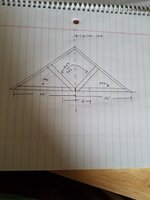
My mother purchased a home and I guess the inspector missed some damage in the garage. I guess the guy who owned it before put like thousands of lbs worth of stuff over the "bottom chords", and it sagged the roof quite a bit.
Now I'm tasked with taking on this repair. I ordered some 28' length boards to put on each side of the existing bottom chords then tie together with some SPAX. Then I was thinking of removing the existing bracing and jacking up the roof to install some new webbing to support the roof in what should be it's original position
What are your thoughts?
My biggest concern is getting the lower chords over the wall plates, the existing rafters are about 16" OC
Hello guys, I'll try to keep this post minimal
My mother purchased a home and I guess the inspector missed some damage in the garage. I guess the guy who owned it before put like thousands of lbs worth of stuff over the "bottom chords", and it sagged the roof quite a bit.
Now I'm tasked with taking on this repair. I ordered some 28' length boards to put on each side of the existing bottom chords then tie together with some SPAX. Then I was thinking of removing the existing bracing and jacking up the roof to install some new webbing to support the roof in what should be it's original position
What are your thoughts?
My biggest concern is getting the lower chords over the wall plates, the existing rafters are about 16" OC
Last edited: