
You are using an out of date browser. It may not display this or other websites correctly.
You should upgrade or use an alternative browser.
You should upgrade or use an alternative browser.
Replacing obsolete parts
- Thread starter vette-kid
- Start date
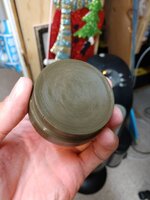
Ok, I've figured out the color. By mixing the dye with part B before combining them, you have time to work with the color and it stays pretty true after mixing part A. I used about 2 to 1 brown to White for this and the color is a pretty good match.
As a test, I sanded the inside of the cup a bit with 150 grit. You can definitely see the lines, but then u didn't sand very well either (seriously difficult to save the inside of a cup!). It does take the sheen out, so I might have to experiment with it some more. Maybe some better sanding with 150 or 220? I'm afraid much higher than that will make it too smooth. Or maybe there is a texture paint I could use?
Sent from my Moto Z (2) using Tapatalk
Attachments
Last edited:
Here is the latest attempt. Not perfect, but very useable. I would have liked a little more even finish on it and a bit more matte as opposed to gloss, but this isn't bad at all. It was a fun challenge to take on and a learned a lot on the prices, so I'll count that as a win. I feel confident you could reproduce most any rubber parts this way as long as you can design the part in CAD. Since we have two pre-war cars, I'm confident I'll get more practice.
Kudos to forum Bdbecker for printing the model for me and helping with the design. It worked flawlessly. Although one lesson learned is to not use hot glue on printed parts, they will melt!


Sent from my Moto Z (2) using Tapatalk
Kudos to forum Bdbecker for printing the model for me and helping with the design. It worked flawlessly. Although one lesson learned is to not use hot glue on printed parts, they will melt!
Sent from my Moto Z (2) using Tapatalk
Attachments


That turned out very well! I'm sure you'll find more ways to perfect the mold process as you make other parts.
What a time to be alive... a couple of guys halfway across the country working together to use modern technology to create new parts for a pre-war car. This is the future!
What a time to be alive... a couple of guys halfway across the country working together to use modern technology to create new parts for a pre-war car. This is the future!
Yeah, it was a learning curve for sure. If I can find a better way of putting subtle texture on the model I think it would solve the gloss, although it's not bad ( picture looks worse from the flash). Primer and silicon don't play well together, so a clear coat is required as well.That turned out very well! I'm sure you'll find more ways to perfect the mold process as you make other parts.
What a time to be alive... a couple of guys halfway across the country working together to use modern technology to create new parts for a pre-war car. This is the future!
I've recently learned that one of the local libraries has a 3d printer that is for public use. I'm going to look into that, might find something fun to print just to try it out. Wife is resisting pretty hard on me getting my own printer. [emoji19]. It's amazing what the average Joe can create now thanks to new technologies!
Sent from my Moto Z (2) using Tapatalk
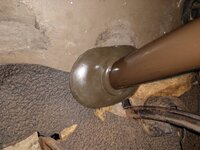
Works great! Before you give me **** for obsessing over this piece when the mats are in shambles and the peddle seals are gone, those pieces are coming! Eventually! We had to take the steering column it, so it was the right time to do the grommet.

Sent from my Moto Z (2) using Tapatalk
Sent from my Moto Z (2) using Tapatalk
Attachments

outdoorspace
Banned
- Joined
- Jan 28, 2014
- Messages
- 356
Nice job, that looks great!
I have directly 3D printed TPU and it turned out pretty good. But it would have a few lines, and not be as smooth as your casting.
I have directly 3D printed TPU and it turned out pretty good. But it would have a few lines, and not be as smooth as your casting.
Thanks. you have to use a high fill primer and a little sanding to get it smooth. Pretty easy in reality and didn't really take much time. For casting you'll also have to seal the primer with something.Nice job, that looks great!
I have directly 3D printed TPU and it turned out pretty good. But it would have a few lines, and not be as smooth as your casting.
Sent from my Moto Z (2) using Tapatalk
If I can find a better way of putting subtle texture on the model I think it would solve the gloss, although it's not bad ( picture looks worse from the flash).
What about sandblasting the mold to texture it a bit?
Monza Harry
Well-known member
Works great! Before you give me **** for obsessing over this piece when the mats are in shambles and the peddle seals are gone, those pieces are coming! Eventually! We had to take the steering column it, so it was the right time to do the grommet.
Never! That turned out XLNT! And I tackle projects with similar regards, I'm working on it or related parts, an opportunity for something popped up and spurred this on, or my absolute lack of focus drives me there while looking at something so far unrelated most think I've gone insane. Oh and if I'm working on less than ten things at a time [that all show no/little progress]
people start asking if I am dying or something. So yeah I jump around some too. Understandingly Harry")

