
You are using an out of date browser. It may not display this or other websites correctly.
You should upgrade or use an alternative browser.
You should upgrade or use an alternative browser.
Above 1200 Sq/FT Restart
- Thread starter Honch
- Start date
Wokspaces above 1200 squarefeet.
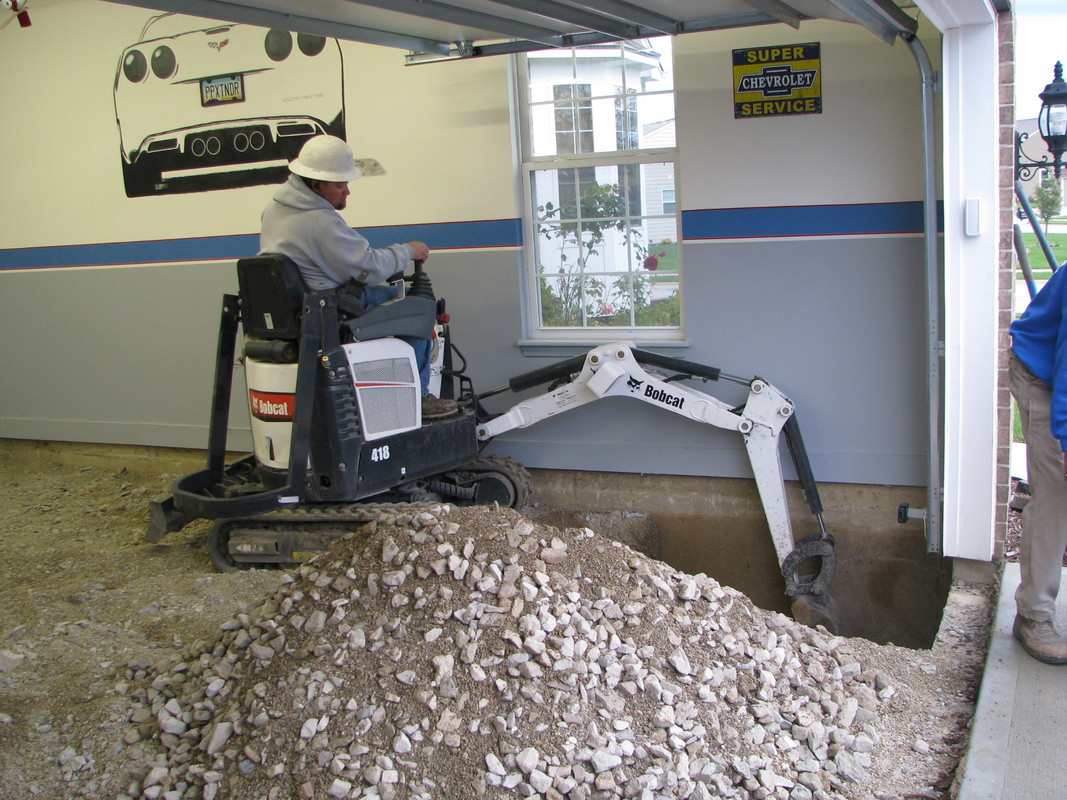
This morning they are digging out along the footers to put in ECP push piers. There was a small crack in the stem wall near the window. This crack propagated through the bricks on the outside of the house. Normally they would dig from the outside and put in the push piers, because they were replacing the slabs they did this from the inside.
Last edited:
55cadillacking
Well-known member
Whoa! That's heavy duty. I hope they get the issue resolved without too much more disruption to your space.
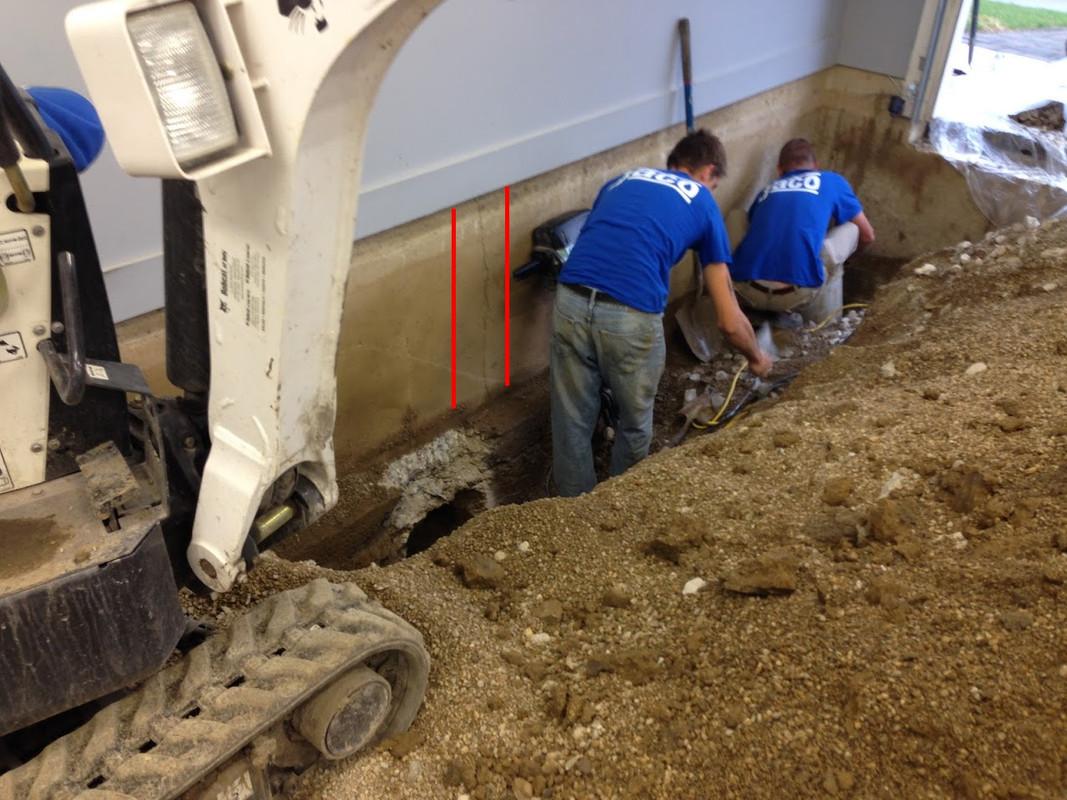
Here's a shot of where the stem wall was cracked (in-between the red lines). To the left and below it, where the concrete is freshly chipped away, is where one of the ECP push piers went in. In total they installed three of them along the wall. They will re-pour the slabs in two days.
I could not stay for the installation, but the piers are installed like the diagram below.
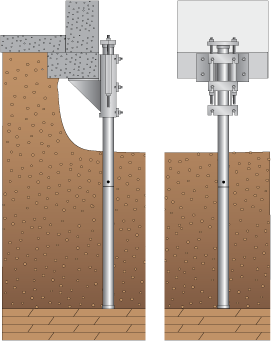
I could not stay for the installation, but the piers are installed like the diagram below.
Last edited:
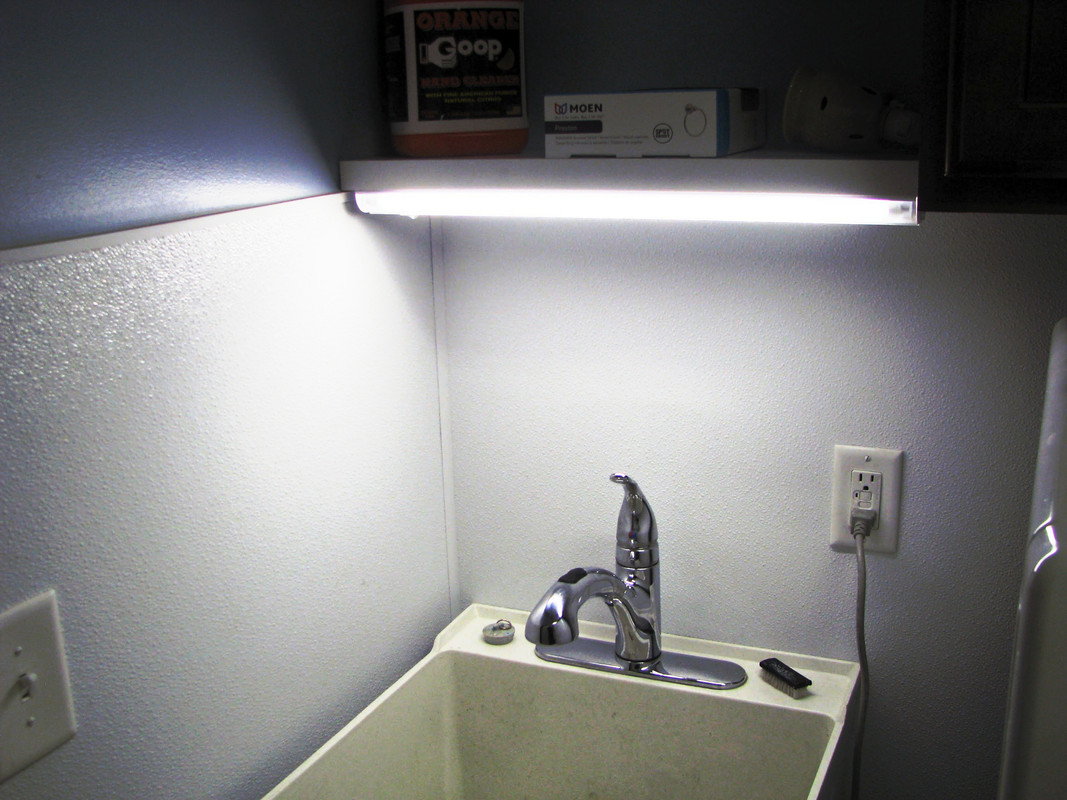
Last weekend we finished up a project I have been wanting to do for quite a while, not actually in the garage but what I call the garage sink. I purchased some FRP to put around the sink in the laundry room and when I started the project the wife unit decided to paint the laundry room. This then turned into installing a floating shelf and light above the sink. In the end it turned out good and should make keeping the walls around the sink much easier, plus I can see what I'm washing in the sink now.
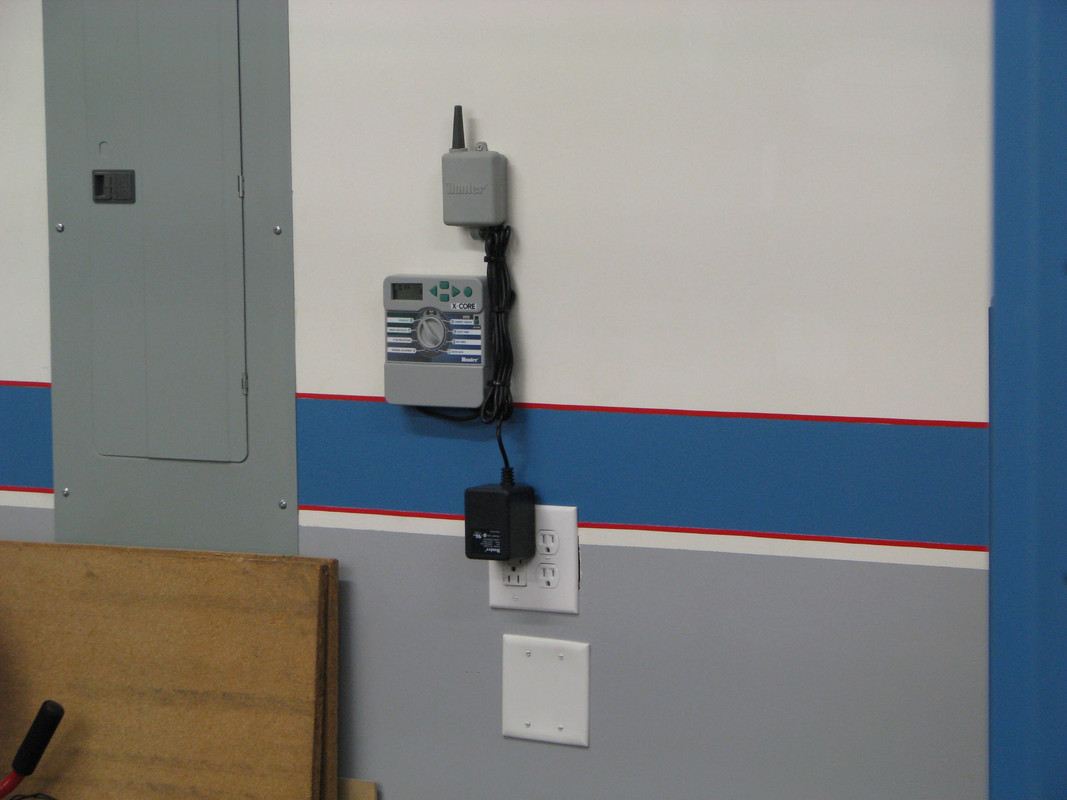
Now that we can park in the garage again, I get to move everything back where it goes. Before the Lista cabinets go back in place I need to do some wiring. The plug behind the cabinets was the first in the GFI circuit, where it is located there is no way to reset it if it should trip. Since I also needed to place a new outlet near the new sprinkler control we had installed this summer I decided to tie into this one and make the new one the first in the circuit.
Here is the outlet behind the cabinets, I was able to take the box out, pull the Romex loose from the wall, tie onto it and pull a new line up. I put a new box back in and reconnected the outlet to the new line.
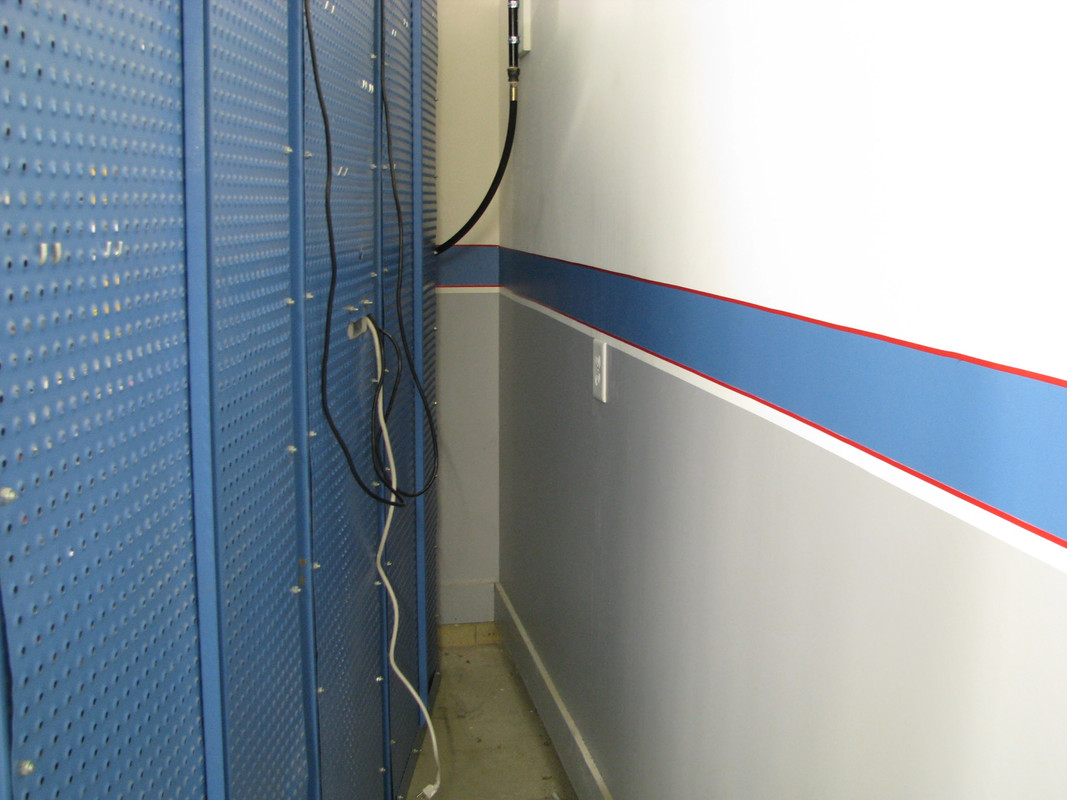
Taking the line from the box behind the cabinets we drilled a drop and sent it down to the sprinkler control. There were already two holes cut in this wall for, phone and cable service, since we never had phones installed I used that spot for the outlet and installed the GFI here. While I had it all apart, I also took down all the wiring to the sprinkler valves that was on the outside of the wall and ran it internally.
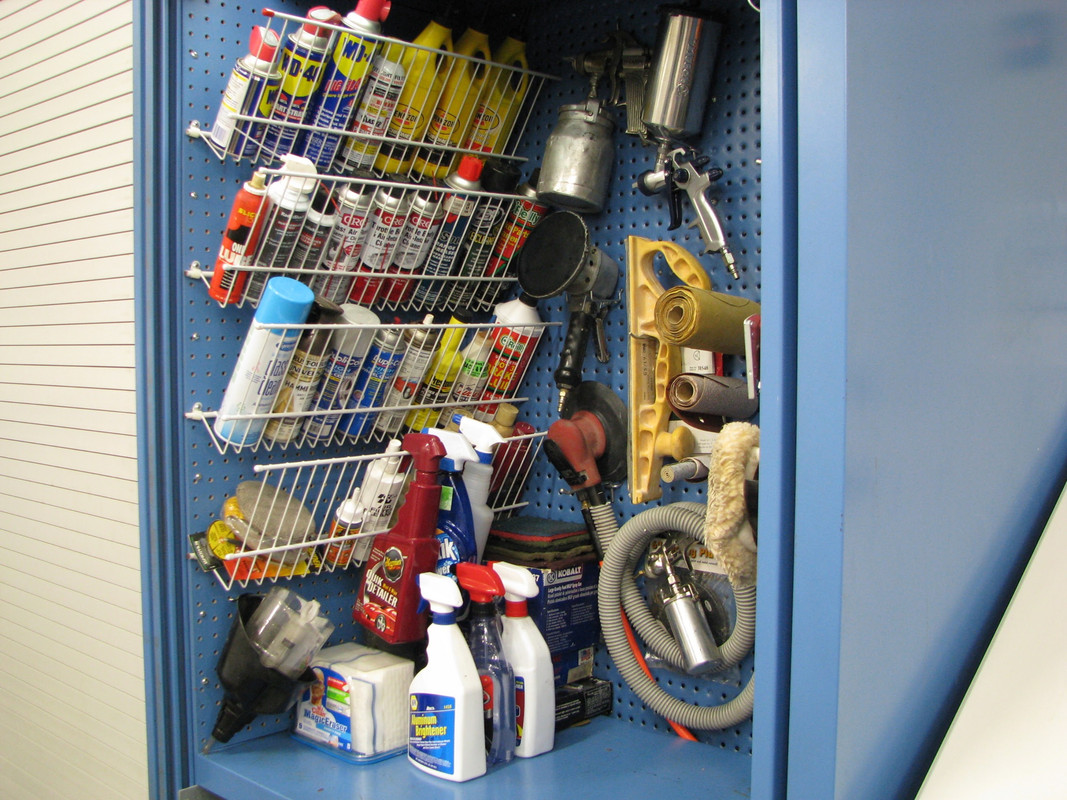
I also worked on re-organizing some of the items in the garage, I never had truly went through my cabinets and tool box and organized everything like I wanted it.
My first project was re-purposing some vinyl shelving by cutting off the lip and bending them in a brake. I was then able to just insert the ends of the shelf through the pegboard holes in the back of the cabinet. Some clamps using existing screws in the cabinet hold the main part of the shelf. I'm very happy with how they turned out with basically no cost, right away I found three cans of WD to put on them WTF?
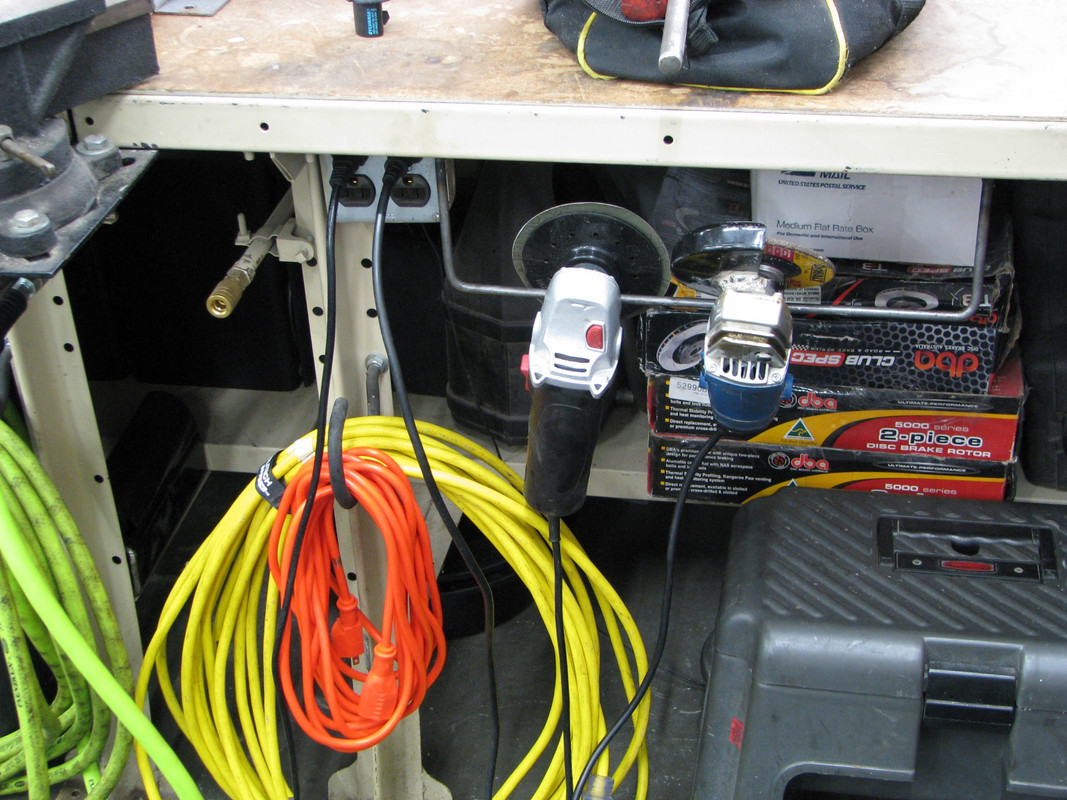
Next project was a simple hangar for my angle grinders. It seemed like they were always in the way on my work bench, I don't really know why I had not done this sooner.
Lastly project wise I got rid of the carpet remnant entry mat and bought a real one along with some stair treads from Lowes last weekend. This week when Tractor Supply put their 4'x6' horse stall mats on sale for Black Friday, getting two was a no brainer, I was tempted to buy four and put them under the benches too.
I still have a good weekend of organizing left but it is nice to be able to use the garage again.
Now that we can park in the garage again, I get to move everything back where it goes. Before the Lista cabinets go back in place I need to do some wiring. The plug behind the cabinets was the first in the GFI circuit, where it is located there is no way to reset it if it should trip. Since I also needed to place a new outlet near the new sprinkler control we had installed this summer I decided to tie into this one and make the new one the first in the circuit.
Here is the outlet behind the cabinets, I was able to take the box out, pull the Romex loose from the wall, tie onto it and pull a new line up. I put a new box back in and reconnected the outlet to the new line.
Taking the line from the box behind the cabinets we drilled a drop and sent it down to the sprinkler control. There were already two holes cut in this wall for, phone and cable service, since we never had phones installed I used that spot for the outlet and installed the GFI here. While I had it all apart, I also took down all the wiring to the sprinkler valves that was on the outside of the wall and ran it internally.
I also worked on re-organizing some of the items in the garage, I never had truly went through my cabinets and tool box and organized everything like I wanted it.
My first project was re-purposing some vinyl shelving by cutting off the lip and bending them in a brake. I was then able to just insert the ends of the shelf through the pegboard holes in the back of the cabinet. Some clamps using existing screws in the cabinet hold the main part of the shelf. I'm very happy with how they turned out with basically no cost, right away I found three cans of WD to put on them WTF?
Next project was a simple hangar for my angle grinders. It seemed like they were always in the way on my work bench, I don't really know why I had not done this sooner.
Lastly project wise I got rid of the carpet remnant entry mat and bought a real one along with some stair treads from Lowes last weekend. This week when Tractor Supply put their 4'x6' horse stall mats on sale for Black Friday, getting two was a no brainer, I was tempted to buy four and put them under the benches too.
I still have a good weekend of organizing left but it is nice to be able to use the garage again.
Last edited:
I decided to update my air line couplers, the ones I had were based on a eclectic mix of what came on the tool, where I have worked in the past and what I could find to make it work. Toss in some HF specials and I had couplers leaking everywhere.
Doing some research on Garage Journal, Milton was mentioned a lot but it really came down to you get what you pay for. Once I decided on Milton, I needed to decide on what type of coupler, choosing the "V Type" didn't take long. The couplers are capable of 74 SCFM air flow and in addition to the default "V Type" plugs they will also accept "M" and "A" at their own flow rates.
Its very obvious the "V Type" is quite a bit larger.
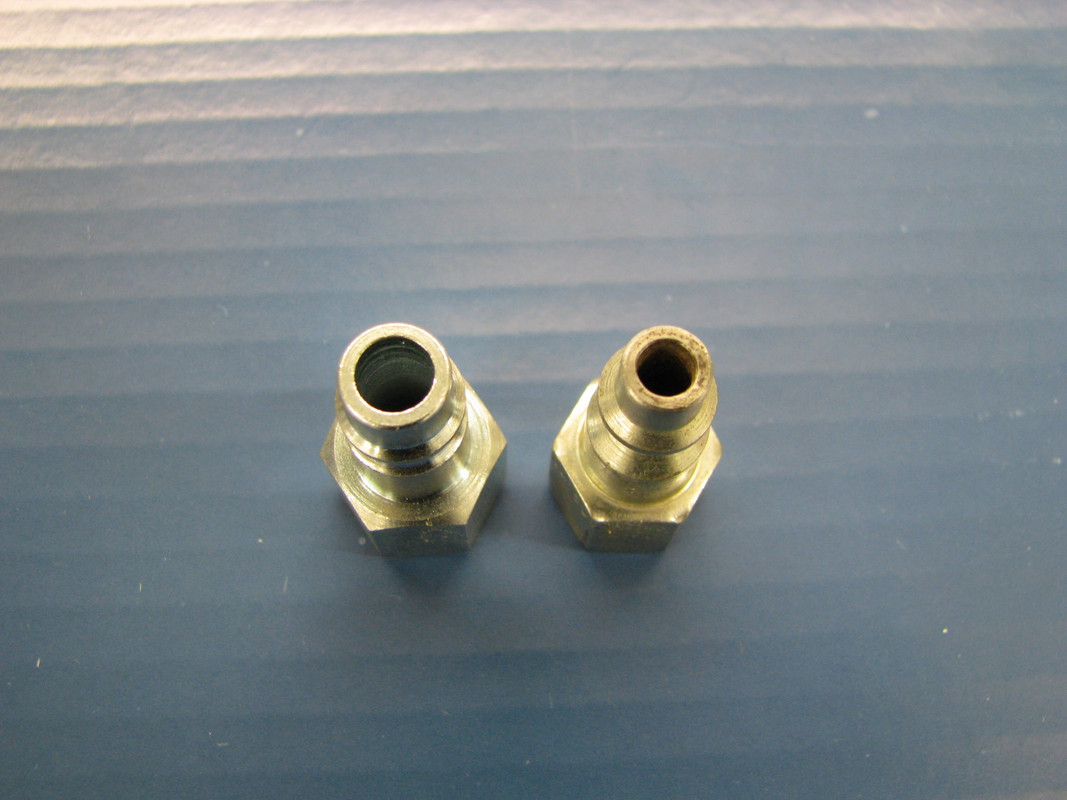
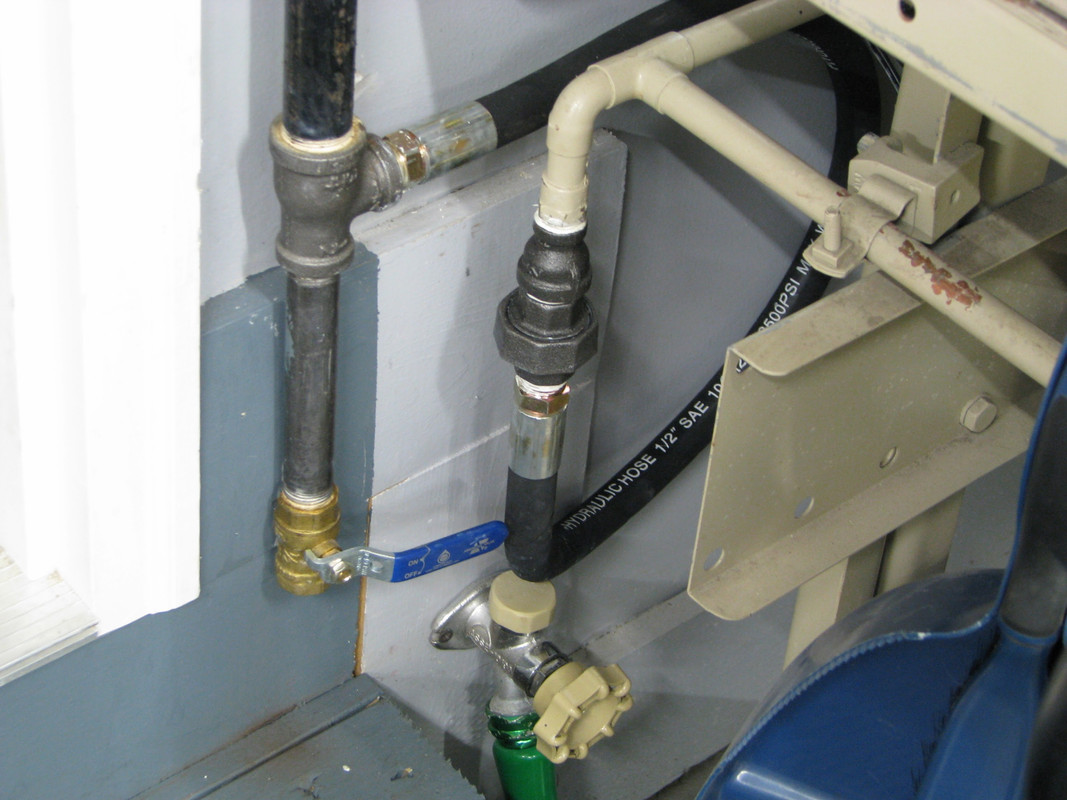
Removing the couplers as the weak link for flow in my system left one last item, the connection from the black lines to the work benches. I went with a 1/2" hyd line and a black pipe coupler. Much better than the 3/8" hose with couplers on both ends.
Now the limiting factor is the compressor itself.
Doing some research on Garage Journal, Milton was mentioned a lot but it really came down to you get what you pay for. Once I decided on Milton, I needed to decide on what type of coupler, choosing the "V Type" didn't take long. The couplers are capable of 74 SCFM air flow and in addition to the default "V Type" plugs they will also accept "M" and "A" at their own flow rates.
Its very obvious the "V Type" is quite a bit larger.
Removing the couplers as the weak link for flow in my system left one last item, the connection from the black lines to the work benches. I went with a 1/2" hyd line and a black pipe coupler. Much better than the 3/8" hose with couplers on both ends.
Now the limiting factor is the compressor itself.
Last edited:
Now that the garage is useable again I was able to finish some projects on the vehicles. The truck got a new water pump, lower radiator hose and a good clean out of the overflow tank. I also replaced all of the parking brake cables along with the 130k mile shocks. Along with the clutch I put in it a few months ago it should be good for the winter.
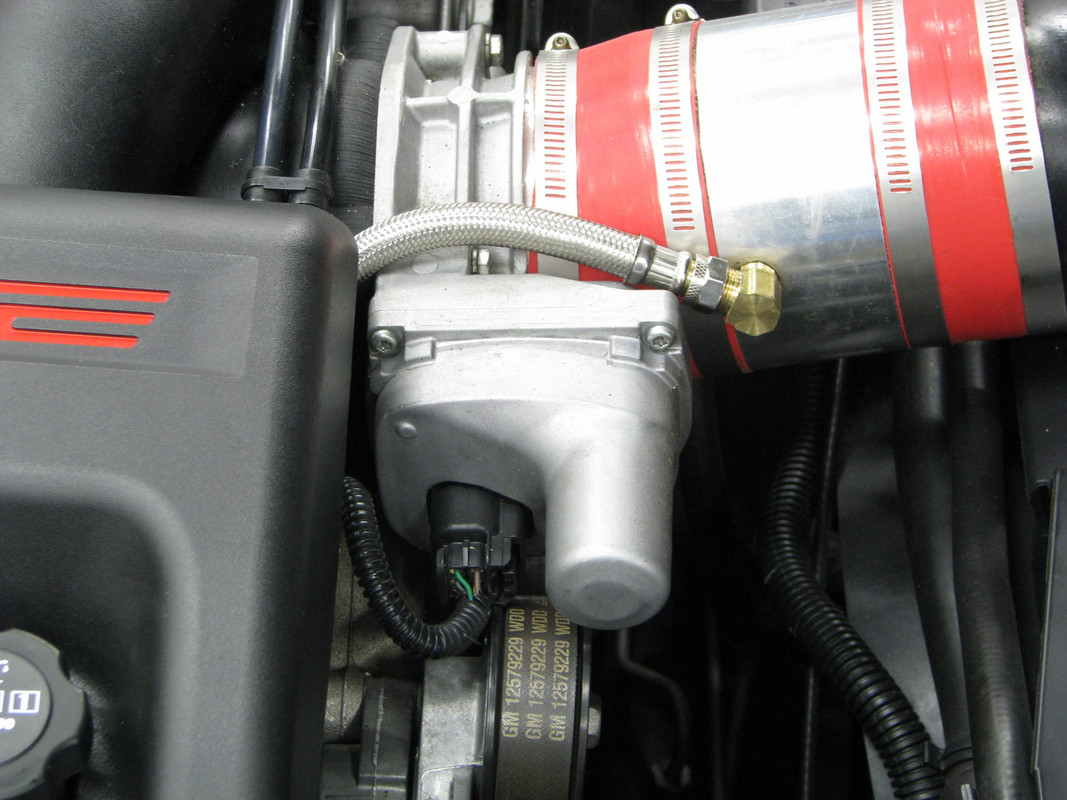
This let me park the corvette for the winter and get it ready for some mods. When I did the headers last spring I noticed that the EGR connection at the intake had split, it was something I had put together after I got the car to fix the original owners glued together solution. I don't know what the rubber elbow was from but it wasn't going to last long and wasn't a good solution.
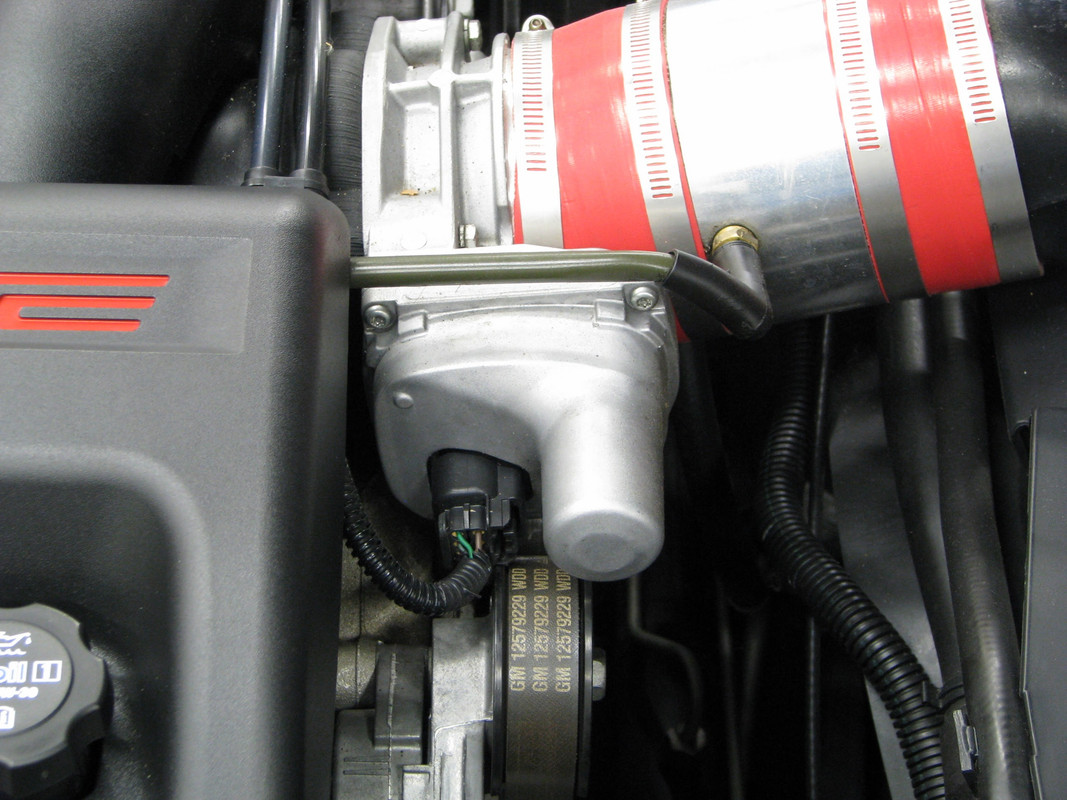
A better solution was the braided toilet tank fill line I replaced it with, I'm sure when found out I will be banned for life from any corvette forum, club etc.
Right now the most recent dyno was 415/414, my plans for the winter are a Spinmonster cam and possibly TFS heads I want a good solid 500 rwhp naturally aspirated.
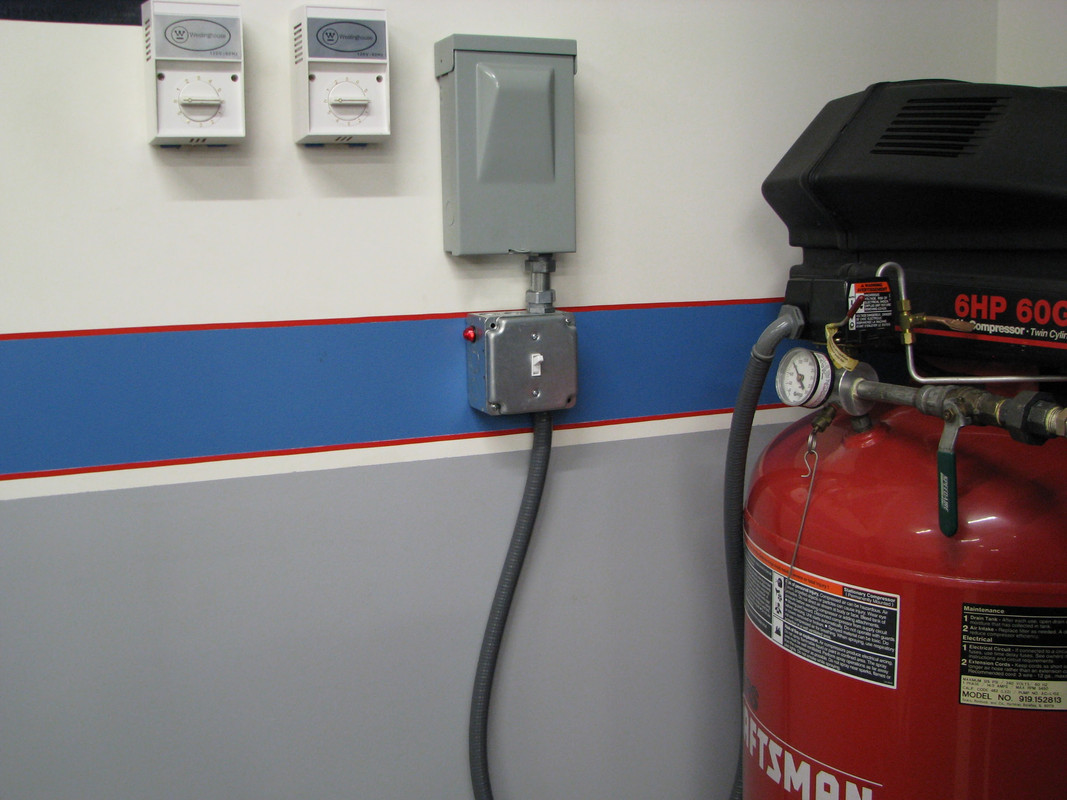
In the garage this week I added a motor rated switch on the compressor, I wanted a light to indicate that it was on to basically tell me "hey ******* turn me off" when I leave the garage. The switch works great the indicator light not so much it puts out all of .005 lumen. I need to figure out something brighter.
The big thing this weekend though was finding this on CL.
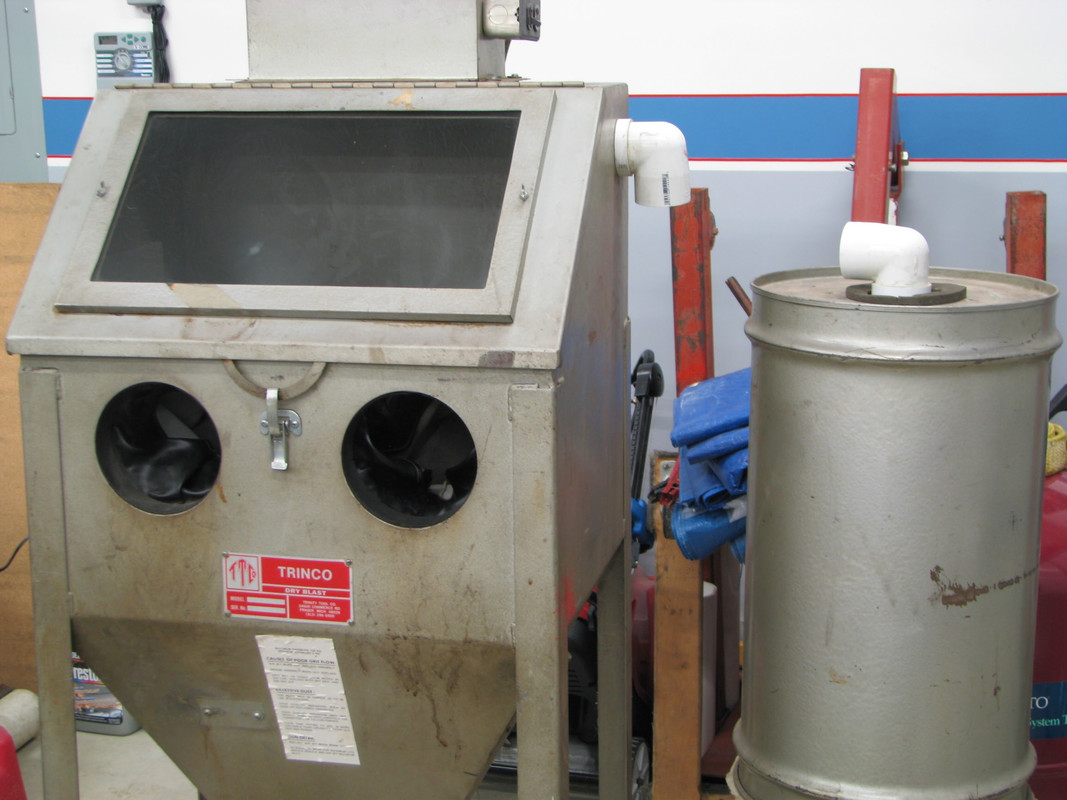
The cabinet has good glass and new gloves, the gun is in good condition and it came with three five gallon buckets of media and five new filters for the dust collector. The previous owner removed the motor from the dust collector, he said it had sucked up something that stopped the motor. While he had it off he rigged up the canister to work with a shop vac, but I got the original motor with the unit and it works fine so I will be putting it back.
Today I ran a new drop for the cabinet, physically it only sits 12 feet from the compressor but I tapped into a leg in the middle of the garage and added 16 feet to put it around 35 feet from the compressor.
This let me park the corvette for the winter and get it ready for some mods. When I did the headers last spring I noticed that the EGR connection at the intake had split, it was something I had put together after I got the car to fix the original owners glued together solution. I don't know what the rubber elbow was from but it wasn't going to last long and wasn't a good solution.
A better solution was the braided toilet tank fill line I replaced it with, I'm sure when found out I will be banned for life from any corvette forum, club etc.
Right now the most recent dyno was 415/414, my plans for the winter are a Spinmonster cam and possibly TFS heads I want a good solid 500 rwhp naturally aspirated.
In the garage this week I added a motor rated switch on the compressor, I wanted a light to indicate that it was on to basically tell me "hey ******* turn me off" when I leave the garage. The switch works great the indicator light not so much it puts out all of .005 lumen. I need to figure out something brighter.
The big thing this weekend though was finding this on CL.
The cabinet has good glass and new gloves, the gun is in good condition and it came with three five gallon buckets of media and five new filters for the dust collector. The previous owner removed the motor from the dust collector, he said it had sucked up something that stopped the motor. While he had it off he rigged up the canister to work with a shop vac, but I got the original motor with the unit and it works fine so I will be putting it back.
Today I ran a new drop for the cabinet, physically it only sits 12 feet from the compressor but I tapped into a leg in the middle of the garage and added 16 feet to put it around 35 feet from the compressor.
Last edited:
themachanic
Member
- Joined
- Mar 17, 2014
- Messages
- 22
Very organized
MattVette89
Well-known member
Very nice! I like the custom "artwork" and storage solutions.
You have put a lot of work into the garage and it looks fantastic. For some reason I am fascinated by the stub wall and grab rail by the man door to the house. Is that some sort of weird code requirement where you are, or what is going on with that?
Thanks,
Regards,
404
Thanks,
Regards,
404
Very organized
Very nice! I like the custom "artwork" and storage solutions.
Thank you
You have put a lot of work into the garage and it looks fantastic. For some reason I am fascinated by the stub wall and grab rail by the man door to the house. Is that some sort of weird code requirement where you are, or what is going on with that?
Thanks,
Regards,
404
I never put much thought into it and could not find any code requirements, I think it is required if there are over four steps.
Denwood
Well-known member
Honch, the garage is looking awesome ") I have a few comments on the use of black pipe based on what I found in my dual compressor system when moving it from the shop, to an outside shed. Every black iron fitting was significantly corroded internally after several years of use. When reassembling the compressors I ended up visiting the Parker distributor locally and replacing everything with brass, as well as custom made hoses. The old brass fittings in my system were like new..in stark contrast to the iron. Having seen this, I'd advise pulling a few fittings after a year or two and inspect them. I won't use black iron again as I would guess (just based on the corrosion present after two) that there was a fair bit of **** ending up in my tools from the internal rust. We're not in a humid environment, (and I empty any water from the system after every session) but my concern after a longer period would be pipe/fitting failure. From what I gather black pipe failure is not all that common and likely fails in a much more forgiving manner than PVC
I have a few comments on the use of black pipe based on what I found in my dual compressor system when moving it from the shop, to an outside shed. Every black iron fitting was significantly corroded internally after several years of use. When reassembling the compressors I ended up visiting the Parker distributor locally and replacing everything with brass, as well as custom made hoses. The old brass fittings in my system were like new..in stark contrast to the iron. Having seen this, I'd advise pulling a few fittings after a year or two and inspect them. I won't use black iron again as I would guess (just based on the corrosion present after two) that there was a fair bit of **** ending up in my tools from the internal rust. We're not in a humid environment, (and I empty any water from the system after every session) but my concern after a longer period would be pipe/fitting failure. From what I gather black pipe failure is not all that common and likely fails in a much more forgiving manner than PVC
I have a few comments on the use of black pipe based on what I found in my dual compressor system when moving it from the shop, to an outside shed. Every black iron fitting was significantly corroded internally after several years of use. When reassembling the compressors I ended up visiting the Parker distributor locally and replacing everything with brass, as well as custom made hoses. The old brass fittings in my system were like new..in stark contrast to the iron. Having seen this, I'd advise pulling a few fittings after a year or two and inspect them. I won't use black iron again as I would guess (just based on the corrosion present after two) that there was a fair bit of **** ending up in my tools from the internal rust. We're not in a humid environment, (and I empty any water from the system after every session) but my concern after a longer period would be pipe/fitting failure. From what I gather black pipe failure is not all that common and likely fails in a much more forgiving manner than PVC
Last edited:
Honch, the garage is looking awesome
Thanks for the input, I noticed some surface corrosion in the fittings when I added the blast cabinet drop. I have no concern about pipe/fitting failure it would take decades at my usage rate. I have some concerns about tool contamination, the bowl on my previous air filter broke, its replacement is more than a new filter costs.
bonecrrusher
Well-known member
That EGR setup - looks like an LS3 coil cover?
therealjakeg
Well-known member
Beautiful work I like the toilet fill.
That EGR setup - looks like an LS3 coil cover?
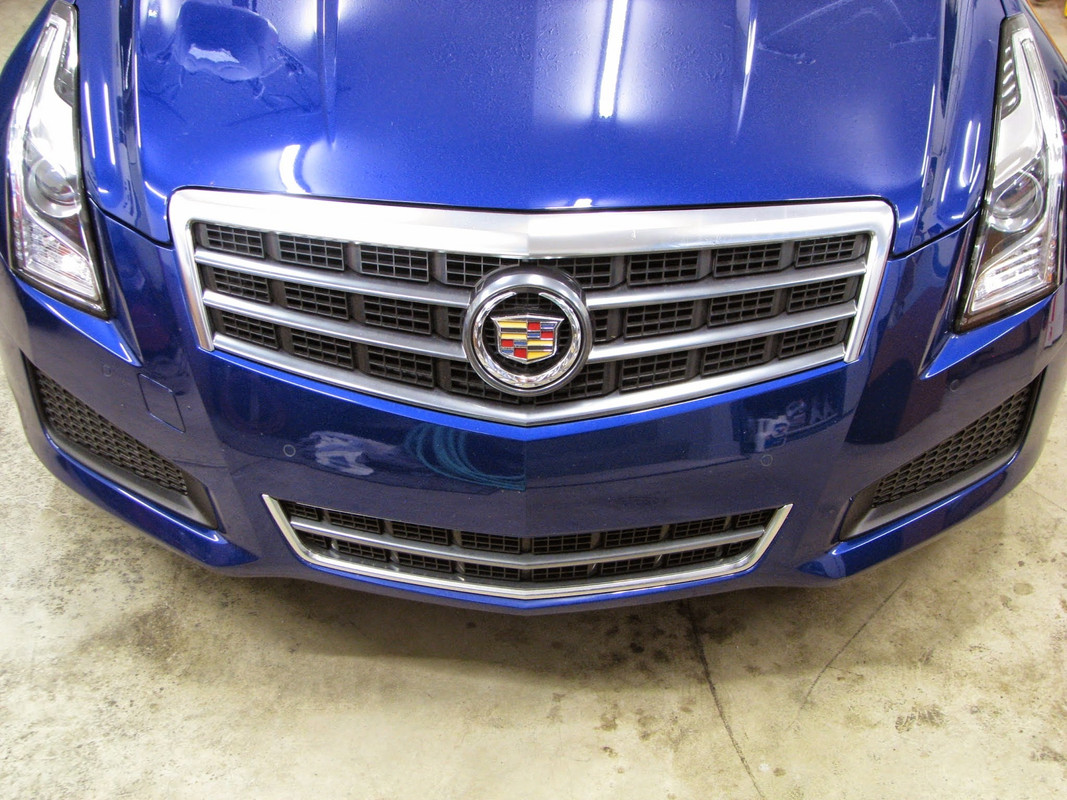
Yeah it is an LS3, I wanted a corvette the color of yours but I wanted an LS3 more. I searched for 1.5 years before I found the car I wanted.
We apparently have similar tastes in vehicles, my wife has owned a 98 GTP, an 05 GXP and when we decided to buy her most recent we looked at the SS. The mileage the car got took it out of contention for us. We ended up buying a 14 ATS4 2.0T.
It is a little quicker than the GXP and has very comparable handling, both cars have excellent brakes but the ATS kills the GXP in mileage and winter driveability. The thing that both of us miss is the effortless V8 performance and exhaust note of the GXP.
Last edited:
bonecrrusher
Well-known member
Nice looking ATS... I really like those - I would consider the new ATS-V over the new CTS-V.
Yeah 24 MPG on the highway ***** @ premium gas prices in the SS.
Sad thing is my diesel truck gets around 22 on the highway - and that thing ways 2x as much....
Good thing the Vette gets into the 30's... even after the engine build, lol.
Yeah 24 MPG on the highway ***** @ premium gas prices in the SS.
Sad thing is my diesel truck gets around 22 on the highway - and that thing ways 2x as much....
Good thing the Vette gets into the 30's... even after the engine build, lol.
Last weekend I did some work on the blast cabinet. The dust collector motor was seized and the previous owner had removed it and modified the collector with some PVC to connect his shop vac to.
The motor had silica and debris keeping it from turning, a simple cleanup got it working. The brackets that mount it were MIA so I made some new ones, cut out the PVC and got the motor remounted. After replacing most of the rubber seals in the cabinet and cutting the gloves to the right length the collector has enough vacuum that it will oil can the cabinet if you cover the vent hole.
This weekend I worked on the cabinet light, the light in it was a 60 watt and as you can see in this picture very dim.

The only thing I had handy last weekend was a frosted 100 watt bulb which I put in. Yesterday we were at Menards and I found they had 85 watt CFLs that were around 5500k, I bought a couple for the basement and one for the cabinet.
Here is the 85 watt CFL vs the 100 watt incandescent.


Here is the difference between the 100 and the 85 looking in the cabinet.


I also picked up a pressure regulator for the cabinet, I have some previous owner(s) mods to undo with the airlines then I can put it where the original one was located. Testing it some last weekend I was able to run it continuous at 45-50 psi which seems to be a good pressure to remove material and not pulverize the media or kill my 30 year old oiless.
The motor had silica and debris keeping it from turning, a simple cleanup got it working. The brackets that mount it were MIA so I made some new ones, cut out the PVC and got the motor remounted. After replacing most of the rubber seals in the cabinet and cutting the gloves to the right length the collector has enough vacuum that it will oil can the cabinet if you cover the vent hole.
This weekend I worked on the cabinet light, the light in it was a 60 watt and as you can see in this picture very dim.
The only thing I had handy last weekend was a frosted 100 watt bulb which I put in. Yesterday we were at Menards and I found they had 85 watt CFLs that were around 5500k, I bought a couple for the basement and one for the cabinet.
Here is the 85 watt CFL vs the 100 watt incandescent.
Here is the difference between the 100 and the 85 looking in the cabinet.
I also picked up a pressure regulator for the cabinet, I have some previous owner(s) mods to undo with the airlines then I can put it where the original one was located. Testing it some last weekend I was able to run it continuous at 45-50 psi which seems to be a good pressure to remove material and not pulverize the media or kill my 30 year old oiless.
Last edited:
Shortly after my last post to this thread, I fell on black ice during a business trip and broke my thumb bad enough I needed surgery. Between not being able to do much in the garage one handed and work becoming more demanding I ended up not posting any updates. That has changed for me now and I am going to make a few posts to update my thread.
Over the last four years I have done a lot of projects in the garage but not made many changes to the garage itself until recently.
March 2015
The water where I live measured 398ppm for TDS (Total Dissolved Solids) against a national average of 350ppm. This made it difficult to wash my car and dry it before it spotted. I had looked at different systems for drying and spot free rinses. I came really close to building a R/O system but couldn't get around the amount of waste water they generate so a purchased a de-ionized water system from CR Spotless.

March 2018
I have a Infinity Basslink sub-woofer that I purchased in 2002. It has been in three different cars for over 100k miles. In my corvette it started popping when I would go over bumps, I thought it was a cold solder joint but after taking it apart twice and going over the circuit board I never found anything wrong. I ended up pulling it out of the car and its sat in the garage for the last two years. Because it worked fine minus bumps I started looking into how I could use it with the stereo system in the garage.

The biggest issue was going to be finding a power supply with enough amperage, the sub needed around 20 amps to work correctly. After searching a bit I came across people using DELL blade server power supplies for various projects. I found one on Ebay for $14.00 that was capable producing over 60 amps on the 12 volt rail. These are proprietary DELL power supplies so it took a little searching to find a pin out. To work properly the supply needs jumpers to turn on and to select the fan speed. Because it does have a very small fan (loud) I put the supply on top of my Lista cabinets along with the Basslink.

Making use of the Basslink again was nice, it really added to the sound of the Klipsch speakers, but the best part was having on demand high amperage 12v. Since the power supply is essentially designed to run 24/7 for years I took an old extension cord and ran it from the power supply to one of my work benches. At the work bench I added an electrical box with banana connectors, this gives me a constant 12v source for any project I might be working on, no more jumpers to a car battery to get 12 volts.

June 2018
I have a friend at work that is a true audiophile, his home audio system is of the same value as a nice car. For years at the heart of that system was a Qsonix media server. Its basically a Windows XP based computer with 1.5tb of storage and a high end sound card that has a 24bit DAC.The internals are all bleeding edge for when it was built around 2007 and it came with a price tag to match of over $7500.00. The big selling point for it wasn't the fancy hardware, it was the software. It came with a 15" touchscreen that allows you to control all your music with a couple touches. Not really earth shattering until you think about 2007, the first iPhone came out midway through the year and the biggest iPods were around 8gb.
What does this have to do with iPhones and iPods?
It was the Apple interface that eventually put Qsonix out of business. Why spend $7500.00 when you can buy an iPad and interface it though a DAC or even use it to control a home built media server for a fraction of the price.
In May of last year, my friend asked me if I was interested in the Qsonix, it had developed a problem where it would not reliably boot if it lost power. He didn't want to sell it like that, he knew I enjoyed tinkering with things so he offered to give it to me. After researching it I found that there is no real fix for the reboot problem.The units are still being built and still exist, they are used in very high end digital juke boxes. The software even still looks the same. Unfortunately to protect the software they were never shipped with disks to reinstall like a normal computer. If something went wrong you shipped the unit or hard-drive back to Qsonix. The company that owns the rights to them now does not provide support for the older Qsonix units.
The unit still works fine, once you have it booted. So I decided to put it in the garage, because that is where I generally listen to music. It actually has 4 zone capabilities and can be controlled through a web interface, so I ran a 100' Ethernet cable from my router to the Qsonix.

While I was in the attic running the Ethernet cable I decided to mount some extra speakers I had bought at a garage sale a few years ago for $10.00. I bought the Ethernet cable $14.99, 100' speaker cable $6.00 and two speaker brackets $9.50 from Monoprice. I really don't know how they sell some of the things they do for the price. The speaker brackets are steel, support up to 33lb, can be tilted to most any angle and have a safety cable. I wouldn't even try to make wooden shelves to set them on when I can get brackets for that price.

I mounted the AIWA speakers in the corners over the edge of the garage doors.


Along with the garage sale Klipsch KG 4.2' speakers and Denon receiver, I have less than $200.00 in the system and it sounds great. The Qsonix is awesome because I can create playlists on it that will play non-repeating for days. I have just under 1,300 uncompressed albums loaded on it now.
July 2018
Over the years I have collected literally boxes and boxes of aviation hardware. Its not useful to me because I don't know the majority of what I have. In June of 2018 I noticed a hanging bin cabinet for sale on Craigslist for $100.00 minus the bins. I didn't know that I wanted to take the plunge on a large bin cabinet so I blew it off for a month. Id looked up some options for just hanging bins but I didn't find anything that I liked or that was really even cost effective. So I texted the guy with the cabinet and went to look at it.
Other than being really dirty the cabinet was in really good shape. Since the guy had the ad up for it for over three months and he had no bins for it I offered him $60.00 which he took and we loaded up.
When we had loaded it I noticed something was up with the feet on the bottom of the cabinet. After we got it home and I could lay it down and look closer I realized they were extended nearly all the way out and had bent over from people sliding the cabinet around. I took them out of the cabinet and dollied the floor back to flat. The feet themselves were relatively undamaged so I added large area washers to the openings and put the feet back in.

I gave the cabinet a good bath and after drying it I hit it with the power buffer and a good coat of wax. Generally cabinets like this spend their lives in an industrial environment and look pretty rough. This one is in really good shape with really only a couple paint scratches.

The cabinet is 36"W x 24"D x 72"H, 16 Gauge welded steel. I am not sure who makes it, it looks exactly like the cabinets sold by Global Industries. Their cabinets have a logo on the upper left corner of the left door which I believe is just a decal, this cabinet has no decals or stampings.
I ordered 96ea 4-1/8 x 5-3/8 x 3 bins to fill the doors and 24ea 5-1/2 x 10-7/8 x 5 bins for the back wall. The bins set me back $150.00 and there is room for 40ea more of the large ones.

I have $210.00 invested at this point and I have no fear that I cant get that back for it easily. A Global cabinet with the same bin loading sells for just over $1,000.00.
It may take a while but every time I'm able to use something from the cabinet versus buying hardware it starts paying for itself.
Over the last four years I have done a lot of projects in the garage but not made many changes to the garage itself until recently.
March 2015
The water where I live measured 398ppm for TDS (Total Dissolved Solids) against a national average of 350ppm. This made it difficult to wash my car and dry it before it spotted. I had looked at different systems for drying and spot free rinses. I came really close to building a R/O system but couldn't get around the amount of waste water they generate so a purchased a de-ionized water system from CR Spotless.
March 2018
I have a Infinity Basslink sub-woofer that I purchased in 2002. It has been in three different cars for over 100k miles. In my corvette it started popping when I would go over bumps, I thought it was a cold solder joint but after taking it apart twice and going over the circuit board I never found anything wrong. I ended up pulling it out of the car and its sat in the garage for the last two years. Because it worked fine minus bumps I started looking into how I could use it with the stereo system in the garage.
The biggest issue was going to be finding a power supply with enough amperage, the sub needed around 20 amps to work correctly. After searching a bit I came across people using DELL blade server power supplies for various projects. I found one on Ebay for $14.00 that was capable producing over 60 amps on the 12 volt rail. These are proprietary DELL power supplies so it took a little searching to find a pin out. To work properly the supply needs jumpers to turn on and to select the fan speed. Because it does have a very small fan (loud) I put the supply on top of my Lista cabinets along with the Basslink.
Making use of the Basslink again was nice, it really added to the sound of the Klipsch speakers, but the best part was having on demand high amperage 12v. Since the power supply is essentially designed to run 24/7 for years I took an old extension cord and ran it from the power supply to one of my work benches. At the work bench I added an electrical box with banana connectors, this gives me a constant 12v source for any project I might be working on, no more jumpers to a car battery to get 12 volts.
June 2018
I have a friend at work that is a true audiophile, his home audio system is of the same value as a nice car. For years at the heart of that system was a Qsonix media server. Its basically a Windows XP based computer with 1.5tb of storage and a high end sound card that has a 24bit DAC.The internals are all bleeding edge for when it was built around 2007 and it came with a price tag to match of over $7500.00. The big selling point for it wasn't the fancy hardware, it was the software. It came with a 15" touchscreen that allows you to control all your music with a couple touches. Not really earth shattering until you think about 2007, the first iPhone came out midway through the year and the biggest iPods were around 8gb.
What does this have to do with iPhones and iPods?
It was the Apple interface that eventually put Qsonix out of business. Why spend $7500.00 when you can buy an iPad and interface it though a DAC or even use it to control a home built media server for a fraction of the price.
In May of last year, my friend asked me if I was interested in the Qsonix, it had developed a problem where it would not reliably boot if it lost power. He didn't want to sell it like that, he knew I enjoyed tinkering with things so he offered to give it to me. After researching it I found that there is no real fix for the reboot problem.The units are still being built and still exist, they are used in very high end digital juke boxes. The software even still looks the same. Unfortunately to protect the software they were never shipped with disks to reinstall like a normal computer. If something went wrong you shipped the unit or hard-drive back to Qsonix. The company that owns the rights to them now does not provide support for the older Qsonix units.
The unit still works fine, once you have it booted. So I decided to put it in the garage, because that is where I generally listen to music. It actually has 4 zone capabilities and can be controlled through a web interface, so I ran a 100' Ethernet cable from my router to the Qsonix.
While I was in the attic running the Ethernet cable I decided to mount some extra speakers I had bought at a garage sale a few years ago for $10.00. I bought the Ethernet cable $14.99, 100' speaker cable $6.00 and two speaker brackets $9.50 from Monoprice. I really don't know how they sell some of the things they do for the price. The speaker brackets are steel, support up to 33lb, can be tilted to most any angle and have a safety cable. I wouldn't even try to make wooden shelves to set them on when I can get brackets for that price.
I mounted the AIWA speakers in the corners over the edge of the garage doors.
Along with the garage sale Klipsch KG 4.2' speakers and Denon receiver, I have less than $200.00 in the system and it sounds great. The Qsonix is awesome because I can create playlists on it that will play non-repeating for days. I have just under 1,300 uncompressed albums loaded on it now.
July 2018
Over the years I have collected literally boxes and boxes of aviation hardware. Its not useful to me because I don't know the majority of what I have. In June of 2018 I noticed a hanging bin cabinet for sale on Craigslist for $100.00 minus the bins. I didn't know that I wanted to take the plunge on a large bin cabinet so I blew it off for a month. Id looked up some options for just hanging bins but I didn't find anything that I liked or that was really even cost effective. So I texted the guy with the cabinet and went to look at it.
Other than being really dirty the cabinet was in really good shape. Since the guy had the ad up for it for over three months and he had no bins for it I offered him $60.00 which he took and we loaded up.
When we had loaded it I noticed something was up with the feet on the bottom of the cabinet. After we got it home and I could lay it down and look closer I realized they were extended nearly all the way out and had bent over from people sliding the cabinet around. I took them out of the cabinet and dollied the floor back to flat. The feet themselves were relatively undamaged so I added large area washers to the openings and put the feet back in.
I gave the cabinet a good bath and after drying it I hit it with the power buffer and a good coat of wax. Generally cabinets like this spend their lives in an industrial environment and look pretty rough. This one is in really good shape with really only a couple paint scratches.
The cabinet is 36"W x 24"D x 72"H, 16 Gauge welded steel. I am not sure who makes it, it looks exactly like the cabinets sold by Global Industries. Their cabinets have a logo on the upper left corner of the left door which I believe is just a decal, this cabinet has no decals or stampings.
I ordered 96ea 4-1/8 x 5-3/8 x 3 bins to fill the doors and 24ea 5-1/2 x 10-7/8 x 5 bins for the back wall. The bins set me back $150.00 and there is room for 40ea more of the large ones.
I have $210.00 invested at this point and I have no fear that I cant get that back for it easily. A Global cabinet with the same bin loading sells for just over $1,000.00.
It may take a while but every time I'm able to use something from the cabinet versus buying hardware it starts paying for itself.
Last edited:
April 2019
A friend from work gave me some items his room mate no longer wanted. One of which was a rather nice NAPA "Balkamp Racing" creeper. There is no way I would ever pay over $200.00 for one of these, I just wouldn't use it enough, but if someone wants to give me one...

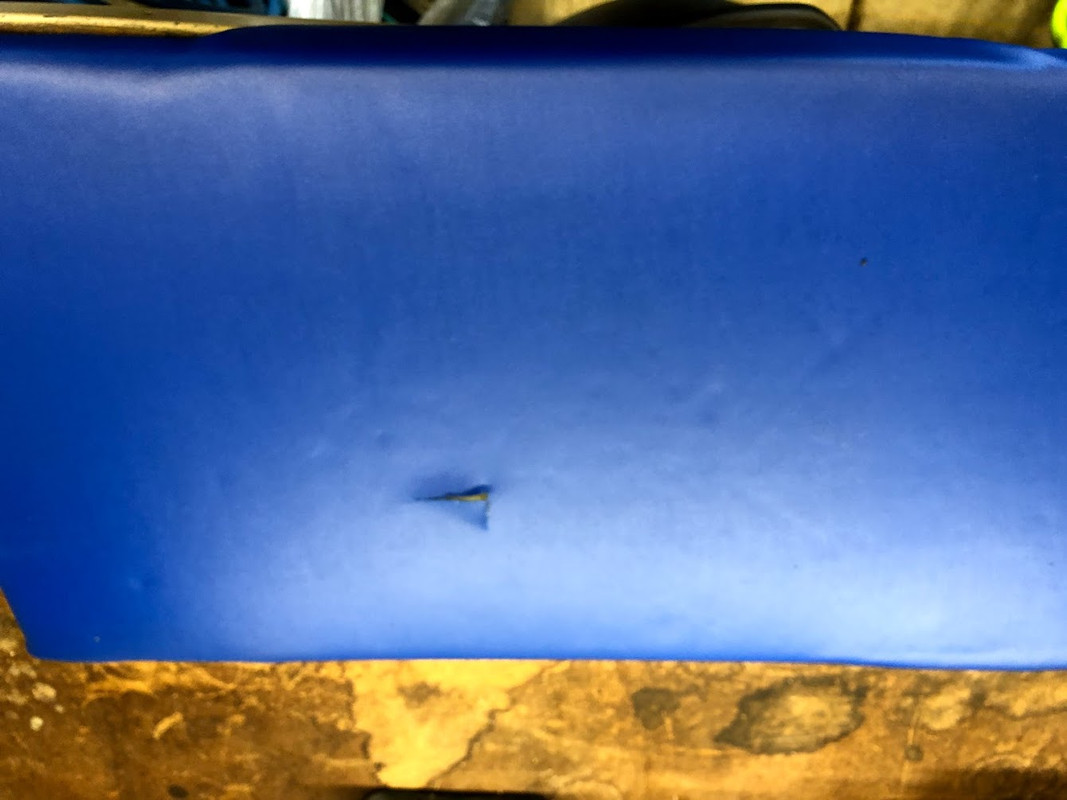
It looked like it had been used very little but the covering near the bottom had a tear in it.
I couldn't think of a good way to fix the vinyl that would have any longevity or wouldn't end with duct tape residue all over my back side. I decided to just recover it. I ended up buying black vinyl, there wasn't a blue that matched and the black was cheap. Buying one yard is enough to cover it twice and was less than $12.00.
It did take a little work to get the old covering off it was built like a piece of furniture.
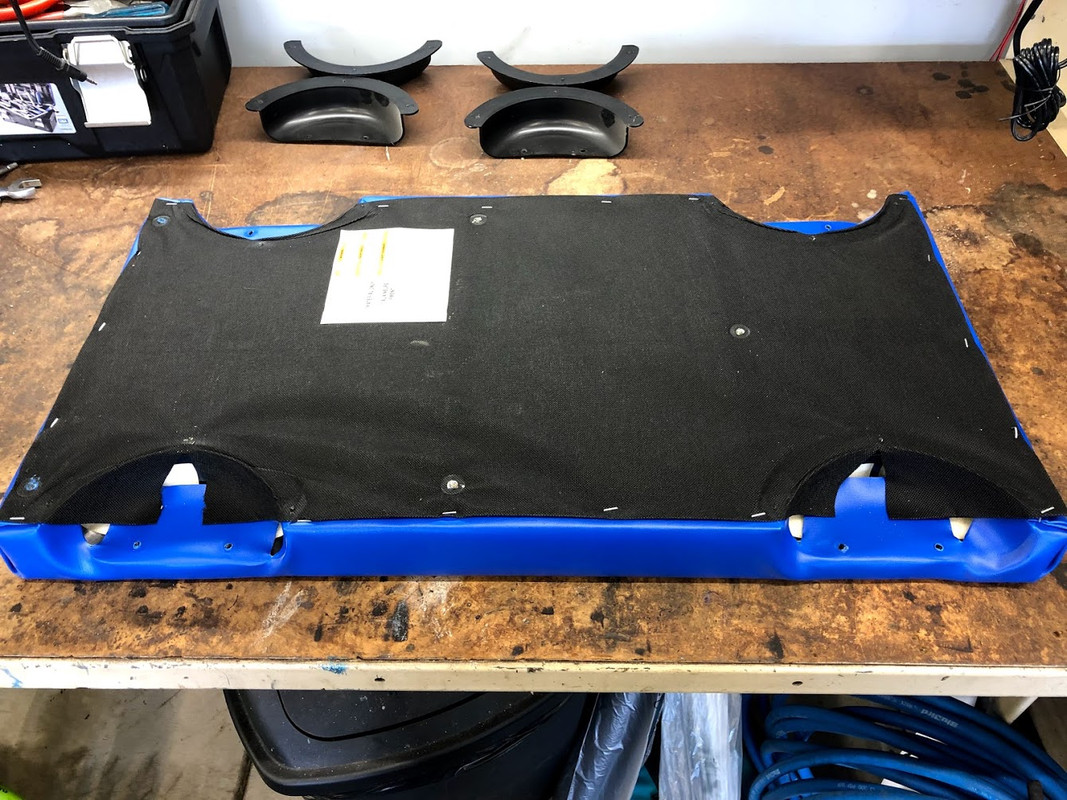
Putting it back together I used some 3M #77 spray adhesive to glue the foam pieces together along with the vinyl to the foam.
I'm happy with how it turned out, it took me longer to find my can of spray adhesive and the staple gun than it did to recover the creeper.
May 2019
My wife bought me a AR Blue pressure washer for my birthday back in February. I wanted a low volume pressure washer I could connect to my CR Spotless water de-ionizer. Utilizing it will allow me to use less de-ionized water when I rinse the car. The downside is connecting two water sources to it because demonized water is a solvent and left in the pump it will eat it up. To make this work I needed a bypass for the de-ionizer.
Because of cost I decided to use PEX, the hose, valves and fittings were much cheaper than copper and it is easier to work with. Because its less rigid I made a bracket from aluminum to mount everything to.
The bracket was easily attached through existing holes in the CR Spotless and the PEX went together rather quickly. I also purchased another section of Gladiator wall system. I had plenty of extra hooks to hang the pressure washer and more importantly the hose which allows me to store it in loose coils. Hopefully this will help with some of the memory these high pressure hoses have.
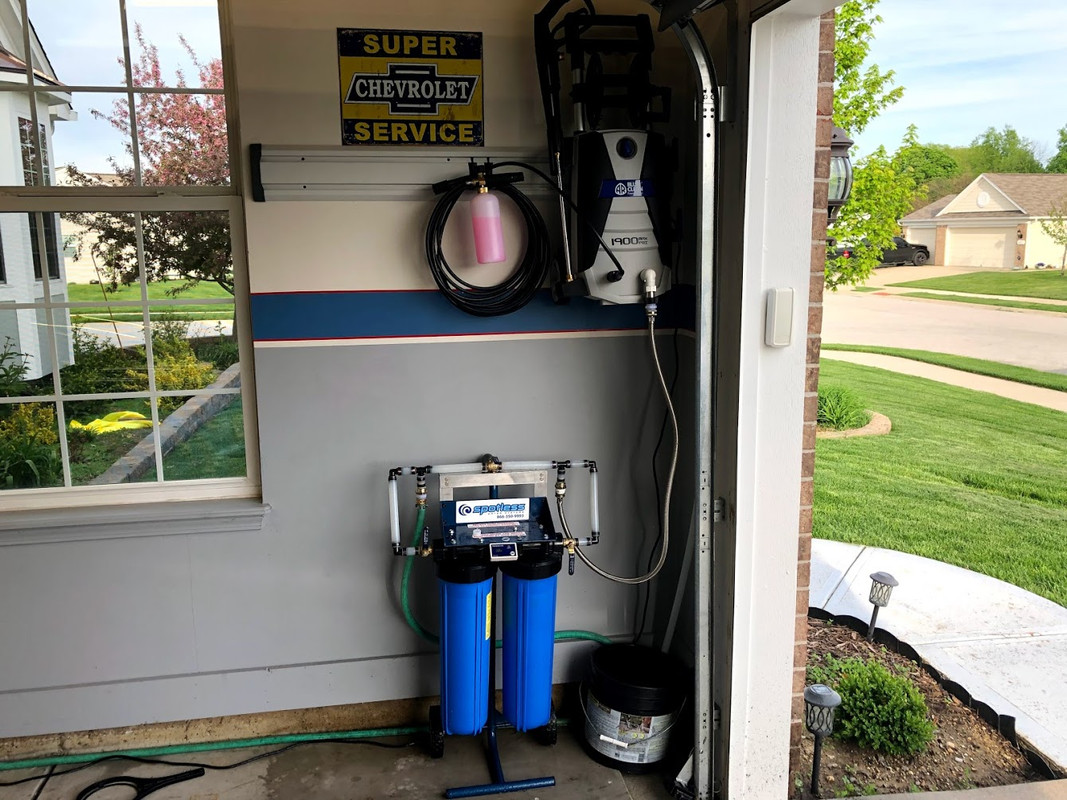

Now I can easily run normal water through the pump to rinse it out, without changing out hose connections. With the pressure washer connected this way it takes me less than 20 minutes to do a complete wash on my car and I'm using less than three gallons of water total. Once it is washed I close the doors and let it dry overnight.
June 2019
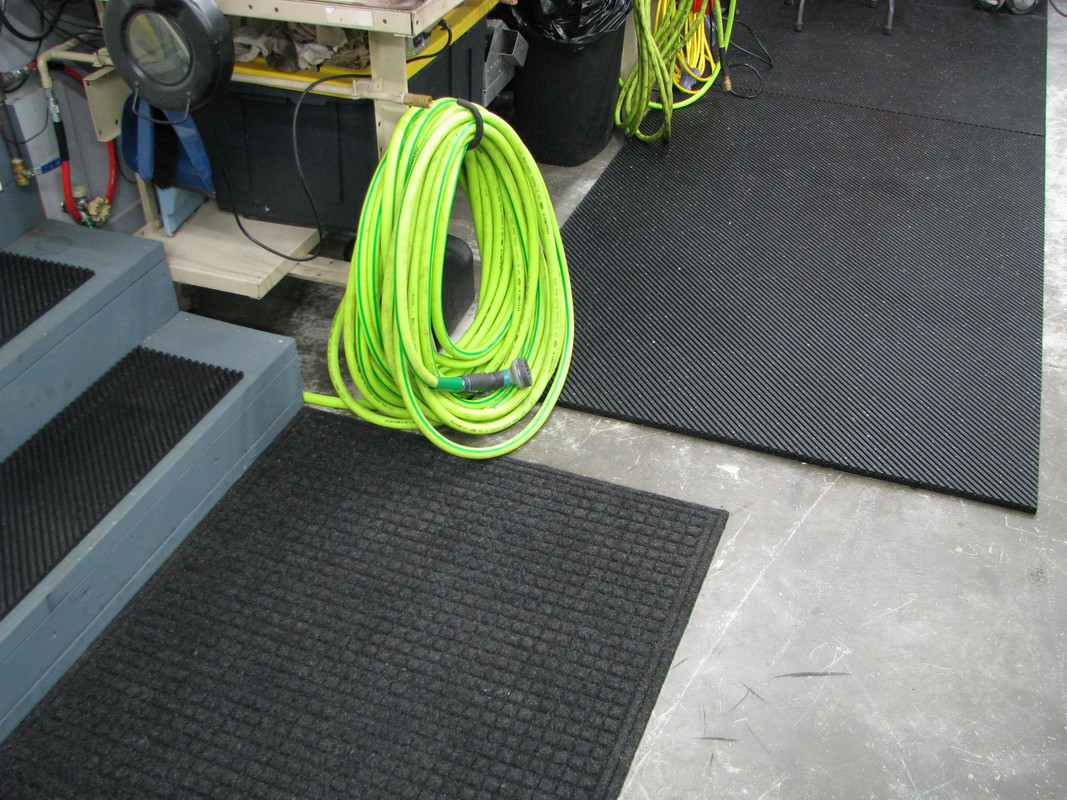
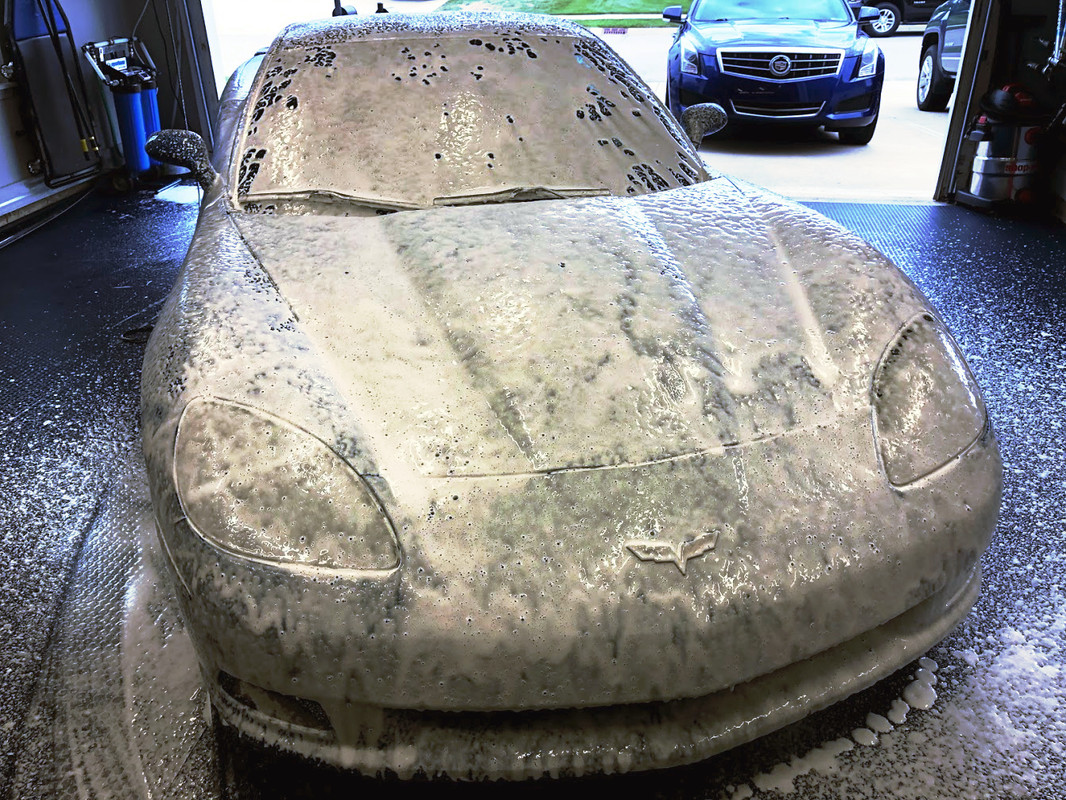
I managed to get my hands on some aircraft coin mat, this is a rubber mat that is generally used in the galley areas on commercial aircraft. These mats are approximately 11' x 12', weigh around 60-70lbs and are fire retardant. They have small slightly raised circles with ribbing inside of them, when they are wet the ribbed circles prevent slipping.
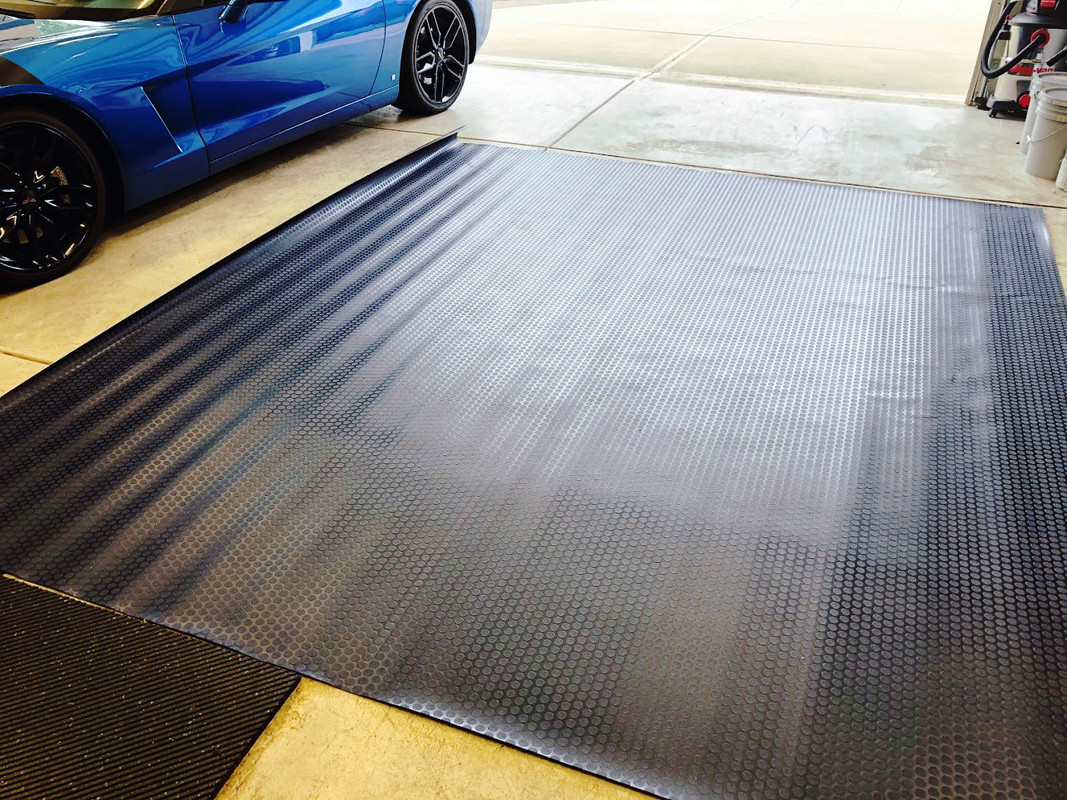
This shows the mats laid out in the two car bay, I wanted them to get warm and lay out before I started taping them down. The two mats closest to the door had been down for a week longer and are fairly flat at this point.
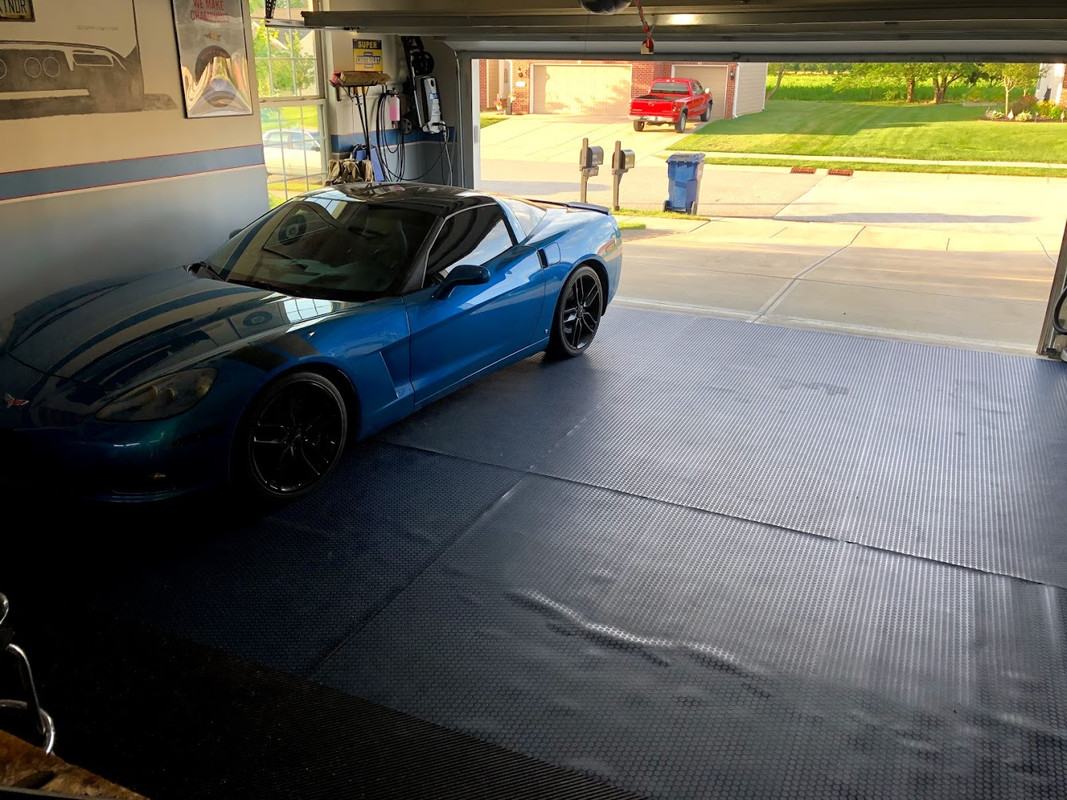
This shows the mats a week later after I taped them down. I would have liked that they lined up better but they are not made to be installed as a whole mat so they are not identical to each other in size, each one varies an inch or two. Cutting them the same size to line up the coins would have induced its own issues in trying to cut them perfectly straight so I left them uncut. This also allowed me to roll them up the stem walls.
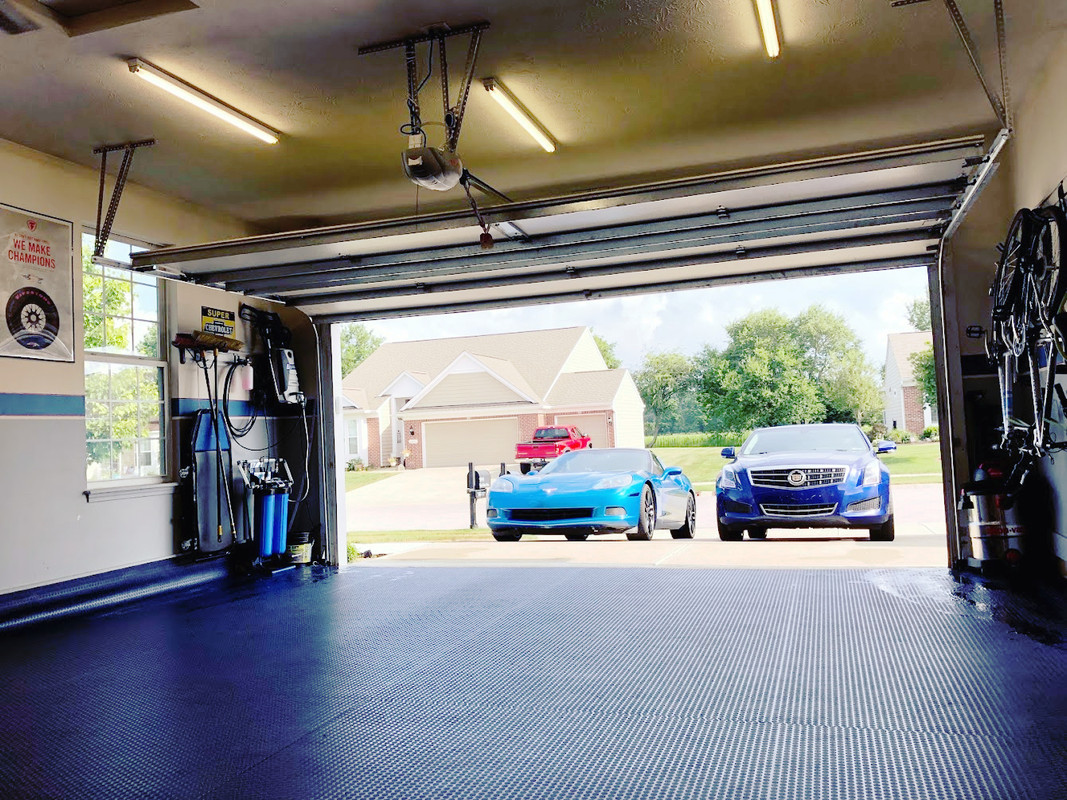
Ive washed my car numerous times since installing the mats. Ive also pulled them up to see the amount of water that might be getting under them. The main seam had maybe 6" of dampness under the mat, nothing I'm going to worry about. I have nothing invested in these other than my time, if they make the garage smell etc. Ill just pull them out. For now I am very happy with them, I like how they look and the floor is less slippery than bare concrete even when wet. They also made a huge difference in the sound, its much quieter in the garage with the compressor running etc.
A friend from work gave me some items his room mate no longer wanted. One of which was a rather nice NAPA "Balkamp Racing" creeper. There is no way I would ever pay over $200.00 for one of these, I just wouldn't use it enough, but if someone wants to give me one...
It looked like it had been used very little but the covering near the bottom had a tear in it.
I couldn't think of a good way to fix the vinyl that would have any longevity or wouldn't end with duct tape residue all over my back side. I decided to just recover it. I ended up buying black vinyl, there wasn't a blue that matched and the black was cheap. Buying one yard is enough to cover it twice and was less than $12.00.
It did take a little work to get the old covering off it was built like a piece of furniture.
Putting it back together I used some 3M #77 spray adhesive to glue the foam pieces together along with the vinyl to the foam.
I'm happy with how it turned out, it took me longer to find my can of spray adhesive and the staple gun than it did to recover the creeper.
May 2019
My wife bought me a AR Blue pressure washer for my birthday back in February. I wanted a low volume pressure washer I could connect to my CR Spotless water de-ionizer. Utilizing it will allow me to use less de-ionized water when I rinse the car. The downside is connecting two water sources to it because demonized water is a solvent and left in the pump it will eat it up. To make this work I needed a bypass for the de-ionizer.
Because of cost I decided to use PEX, the hose, valves and fittings were much cheaper than copper and it is easier to work with. Because its less rigid I made a bracket from aluminum to mount everything to.
The bracket was easily attached through existing holes in the CR Spotless and the PEX went together rather quickly. I also purchased another section of Gladiator wall system. I had plenty of extra hooks to hang the pressure washer and more importantly the hose which allows me to store it in loose coils. Hopefully this will help with some of the memory these high pressure hoses have.
Now I can easily run normal water through the pump to rinse it out, without changing out hose connections. With the pressure washer connected this way it takes me less than 20 minutes to do a complete wash on my car and I'm using less than three gallons of water total. Once it is washed I close the doors and let it dry overnight.
June 2019
I managed to get my hands on some aircraft coin mat, this is a rubber mat that is generally used in the galley areas on commercial aircraft. These mats are approximately 11' x 12', weigh around 60-70lbs and are fire retardant. They have small slightly raised circles with ribbing inside of them, when they are wet the ribbed circles prevent slipping.
This shows the mats laid out in the two car bay, I wanted them to get warm and lay out before I started taping them down. The two mats closest to the door had been down for a week longer and are fairly flat at this point.
This shows the mats a week later after I taped them down. I would have liked that they lined up better but they are not made to be installed as a whole mat so they are not identical to each other in size, each one varies an inch or two. Cutting them the same size to line up the coins would have induced its own issues in trying to cut them perfectly straight so I left them uncut. This also allowed me to roll them up the stem walls.
Ive washed my car numerous times since installing the mats. Ive also pulled them up to see the amount of water that might be getting under them. The main seam had maybe 6" of dampness under the mat, nothing I'm going to worry about. I have nothing invested in these other than my time, if they make the garage smell etc. Ill just pull them out. For now I am very happy with them, I like how they look and the floor is less slippery than bare concrete even when wet. They also made a huge difference in the sound, its much quieter in the garage with the compressor running etc.
Last edited:
i like the mat was looking for something similar
There are a few companies that make them custom sized so they don't have seams like mine.
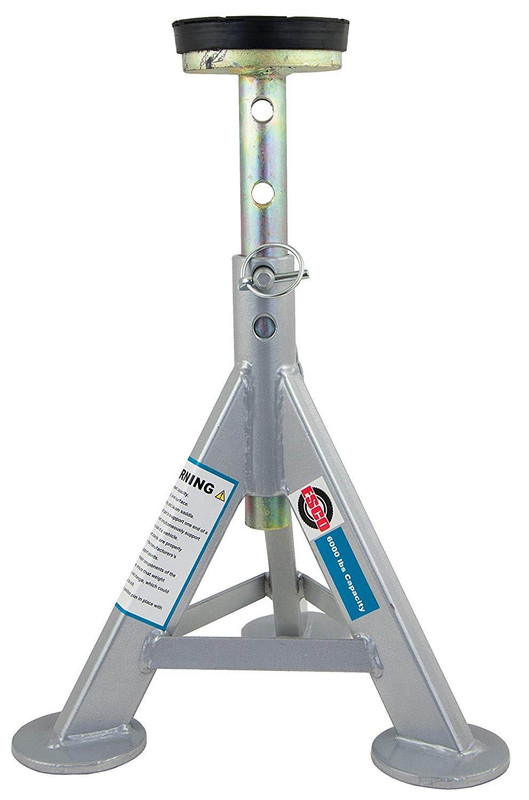
One thing I did not consider until I had them taped down, they are very durable to most things but can be cut by sharp edges such as a jack stand. None of my jack stands had "feet" on them and after searching there are not many made that way. I thought about welding pads to the bottom of the legs but was concerned about modifying HF jack stands, basically is my life worth saving a few dollars.
I bought a set of ESCO jack stands and really like them, they take a few more minutes to set up but are far more stable than the ones I had.
Last edited:
Yesterday I was able to get my hands on some hanging bins, these are a lot larger than the bins I had purchased and were perfect to finish out my cabinet. Now when I have some time I can load up the hardware I still have boxed.
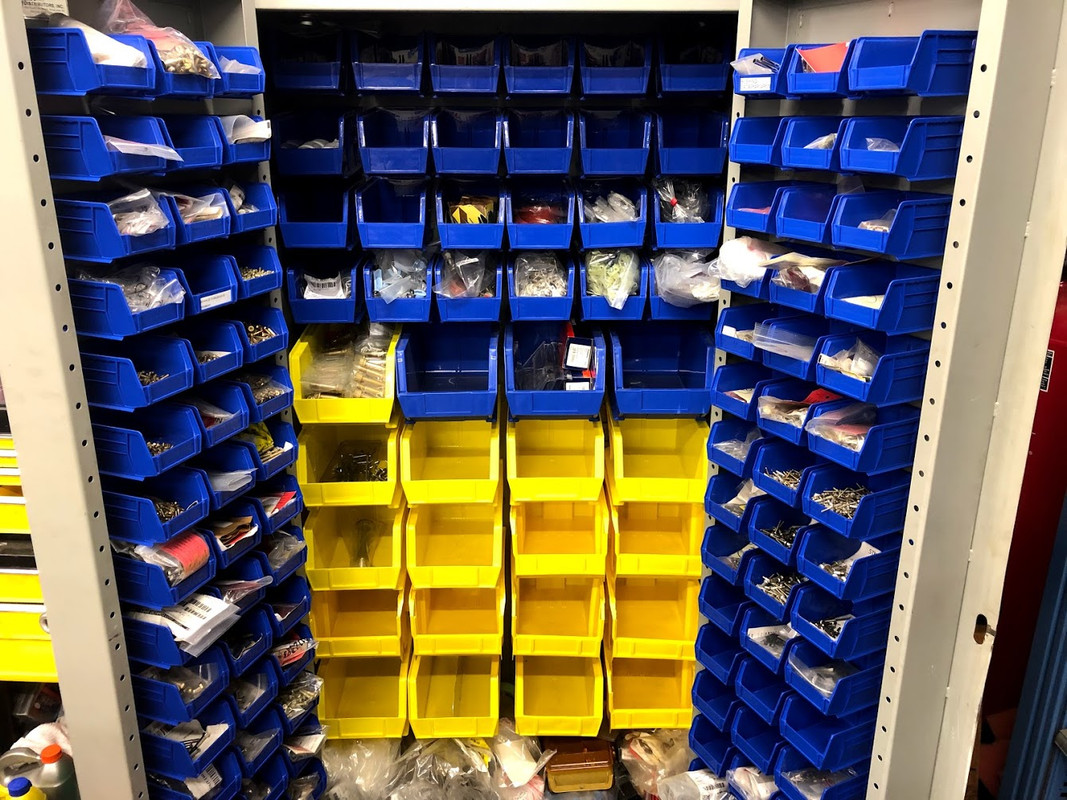
I also got thirteen very large hanging bins that I am going to stack in the Lista cabinets.
I also got thirteen very large hanging bins that I am going to stack in the Lista cabinets.
Last edited:
A while back I broke the retaining bolt in my HF vice trying to tighten it too much. It pulled the threads right out of the casting holding the nut in place and cracked it. I looked at some of the Wilton BASH vices but read mixed reviews on them, so I got my hands on a mid 90s Wilton 450S.
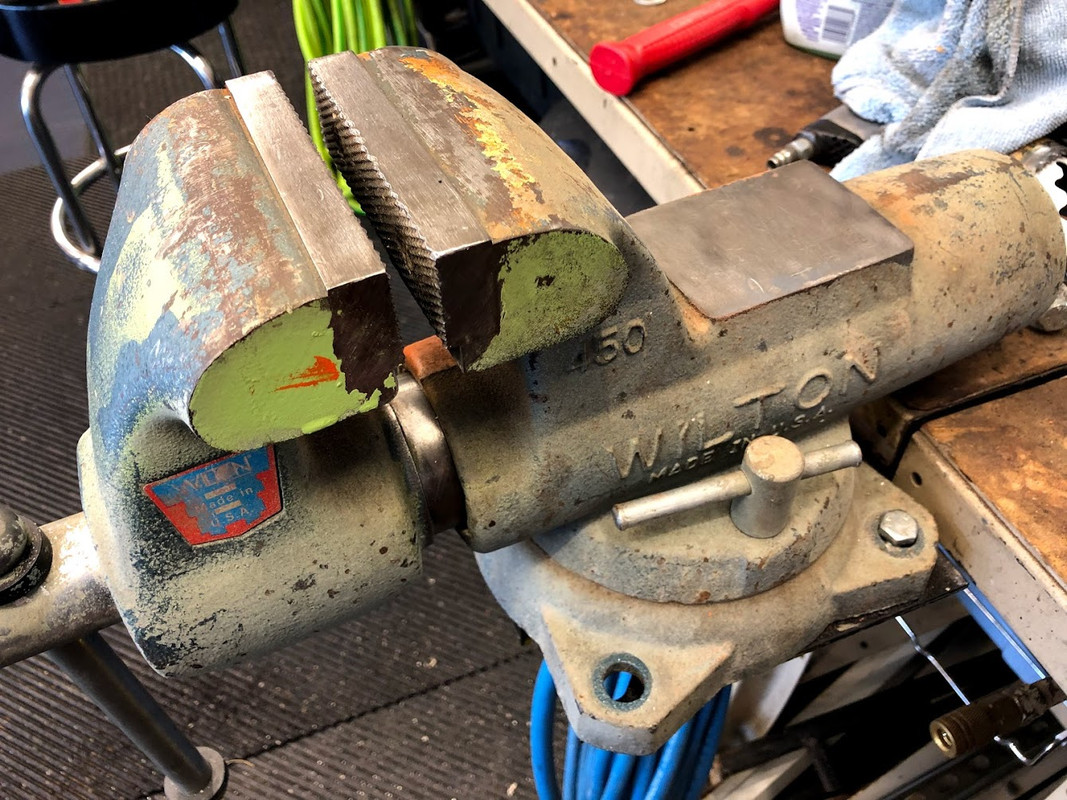
The vice was mechanically sound other than a few drill starts along the top and some dents in the back jaw where someone beat on it with a hammer.
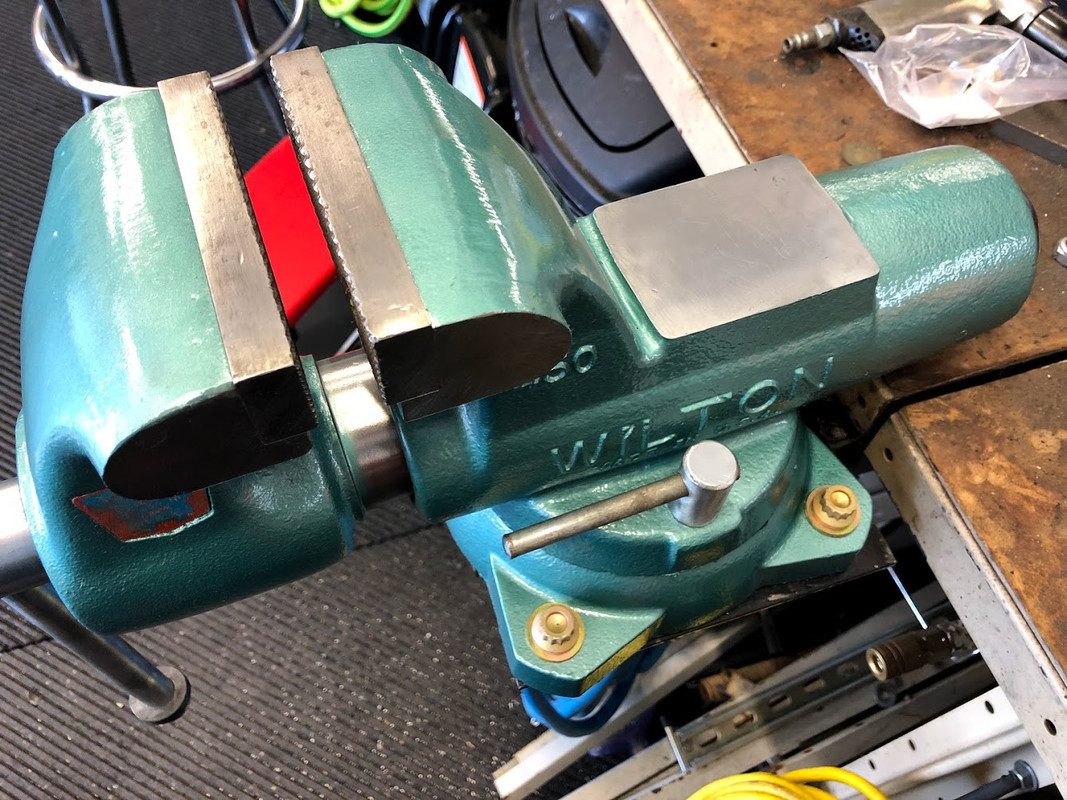
Thanks to the great information on this forum I was able to take it apart, clean it up and repaint in about six hours. Not a museum restoration I just wanted it to look nice again. The most difficult part and what took the longest was flat filing the back jaw to remove most of the damage. There are still three marks that weren't worth the amount of material I would need to remove for something that was basically cosmetic.
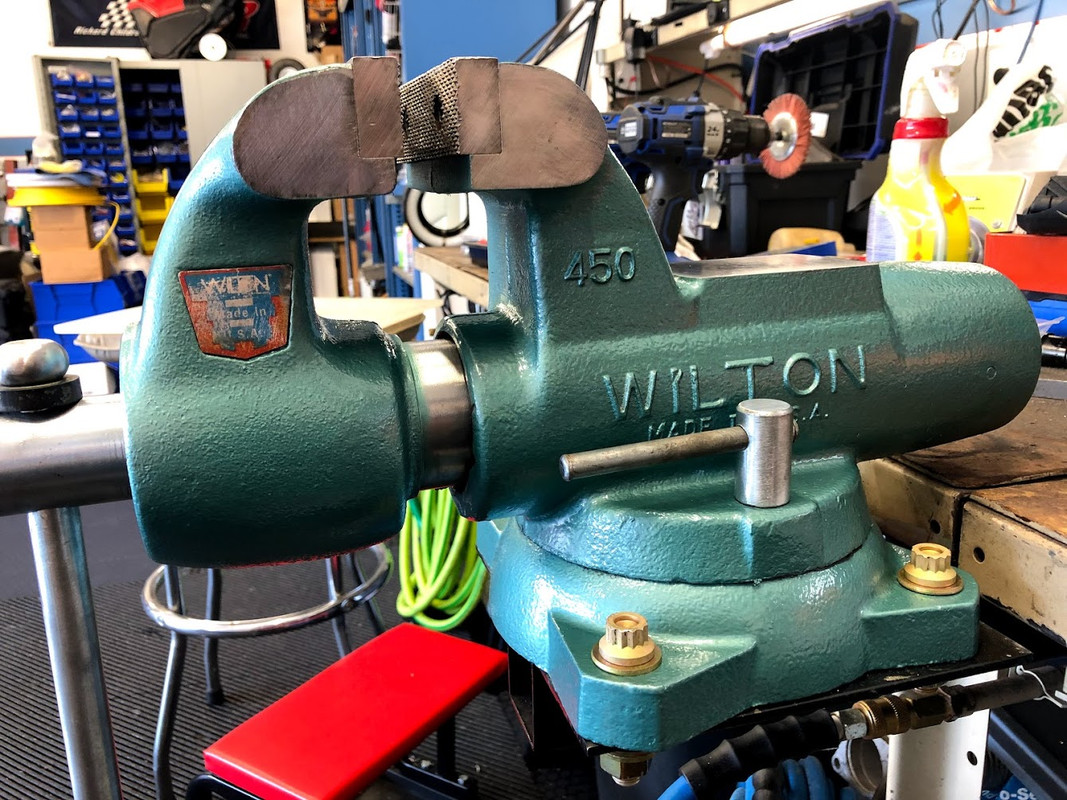
The vice is mounted to a hitch plate which slides into a receiver I welded to the bottom of the work bench. It lets me move the vice out of the way to use both benches.
I wanted to share some information that I didn't see posted that may help someone cleaning up one of these vices.
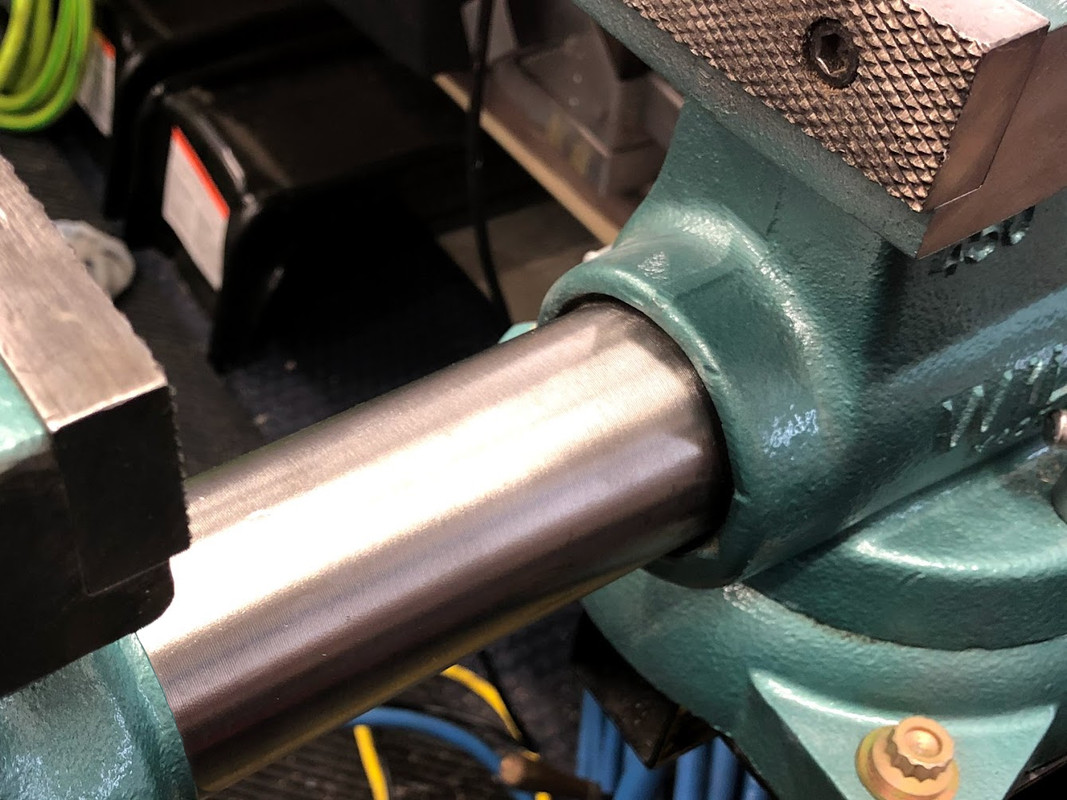
I like keeping the original machining marks on steel or aluminum whenever possible. The shaft on the front jaw wasn't heavily corroded but wasn't going to wipe clean either. I used a nylon wheel on it which cleaned it very well without leaving any marks like a wire wheel or sand paper would.
Lastly using a 3" sanding disc holder is a great way to plug the openings in the back jaw of the vice before painting it. They fit in it tightly and eliminate the need for taping off the openings.
The vice was mechanically sound other than a few drill starts along the top and some dents in the back jaw where someone beat on it with a hammer.
Thanks to the great information on this forum I was able to take it apart, clean it up and repaint in about six hours. Not a museum restoration I just wanted it to look nice again. The most difficult part and what took the longest was flat filing the back jaw to remove most of the damage. There are still three marks that weren't worth the amount of material I would need to remove for something that was basically cosmetic.
The vice is mounted to a hitch plate which slides into a receiver I welded to the bottom of the work bench. It lets me move the vice out of the way to use both benches.
I wanted to share some information that I didn't see posted that may help someone cleaning up one of these vices.
I like keeping the original machining marks on steel or aluminum whenever possible. The shaft on the front jaw wasn't heavily corroded but wasn't going to wipe clean either. I used a nylon wheel on it which cleaned it very well without leaving any marks like a wire wheel or sand paper would.
Lastly using a 3" sanding disc holder is a great way to plug the openings in the back jaw of the vice before painting it. They fit in it tightly and eliminate the need for taping off the openings.
Last edited:
I've been researching welders for a couple years now, I currently have a Lincoln Weldpak 100 that I bought used in the early 90's. I upgraded it to use gas and it works very well within its limitations. I started looking harder when the frame rails on my low hour Gravely ZT42 broke in half. The gussets I used to repair it were at the limits of what the welder could handle and made the whole repair more painful than it needed to be.
I had what I wanted narrowed down to three welders, and decided that I would buy whichever was the best deal over Black Friday. None of them went on sale so I just bought the one I wanted the most
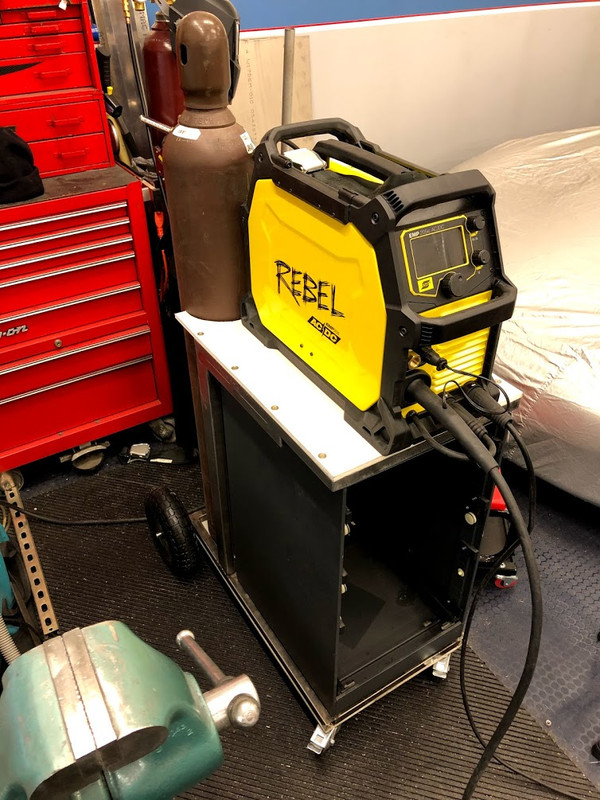
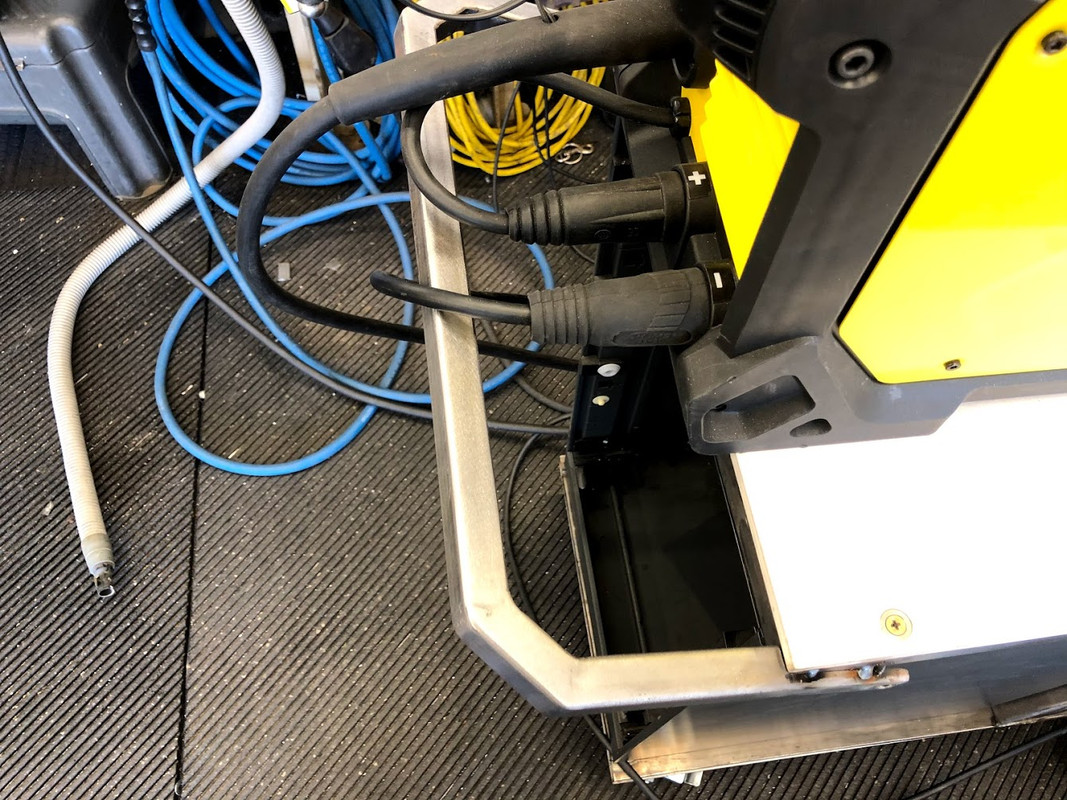
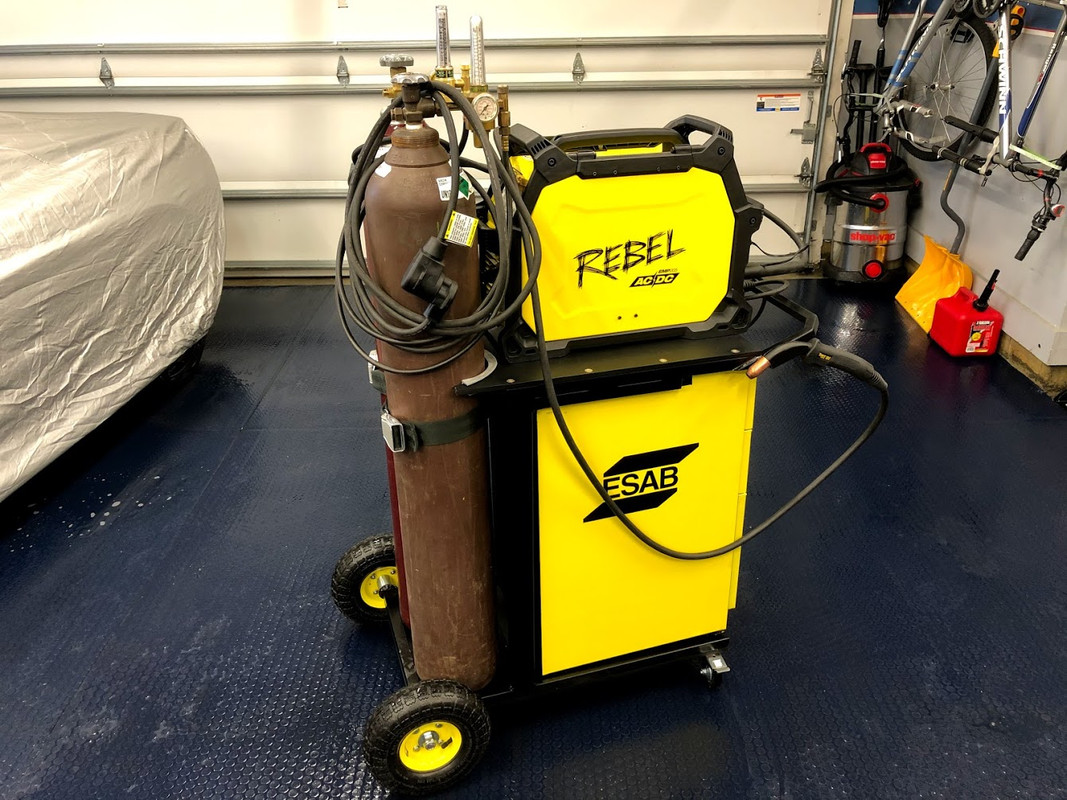
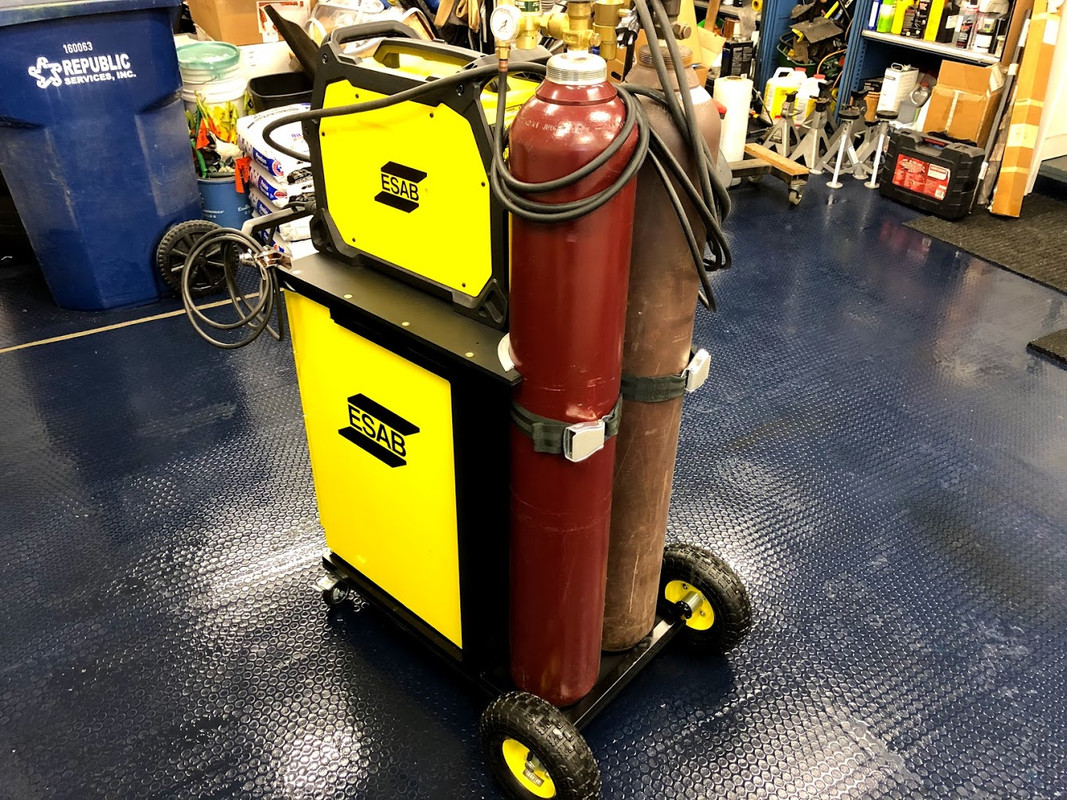
I ended up buying the ESAB Rebel 205ic and I doubt I will ever be able to weld to anywhere near its capabilities.
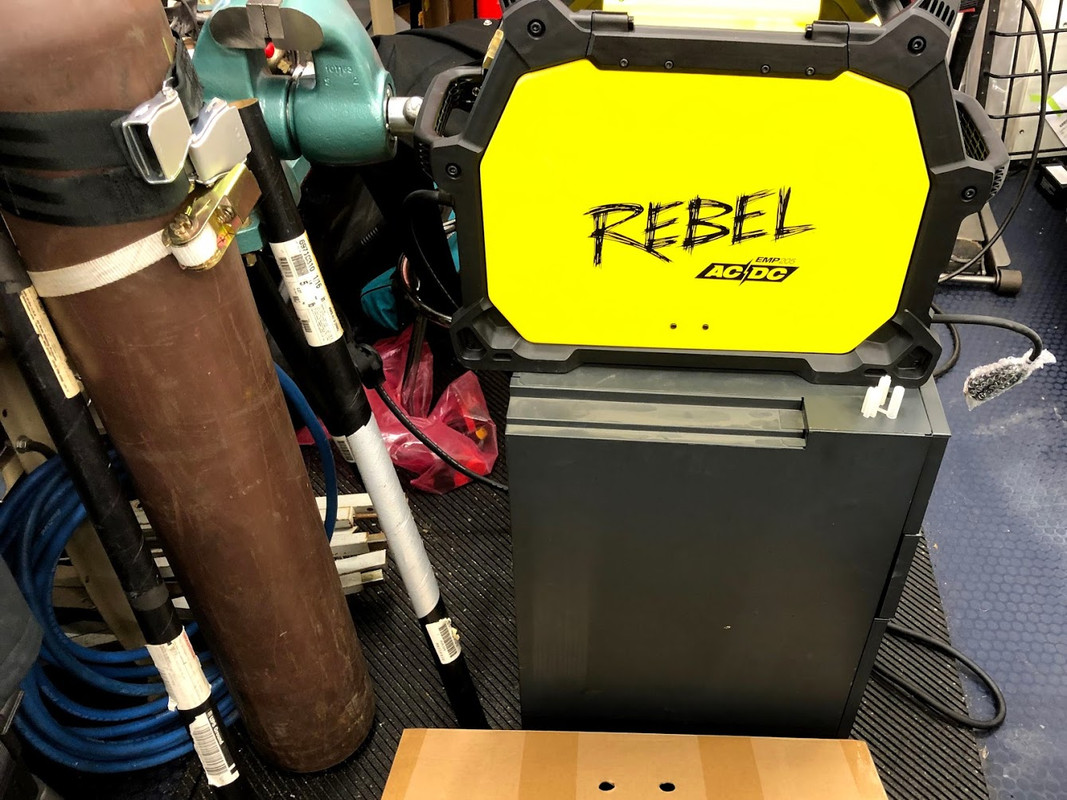
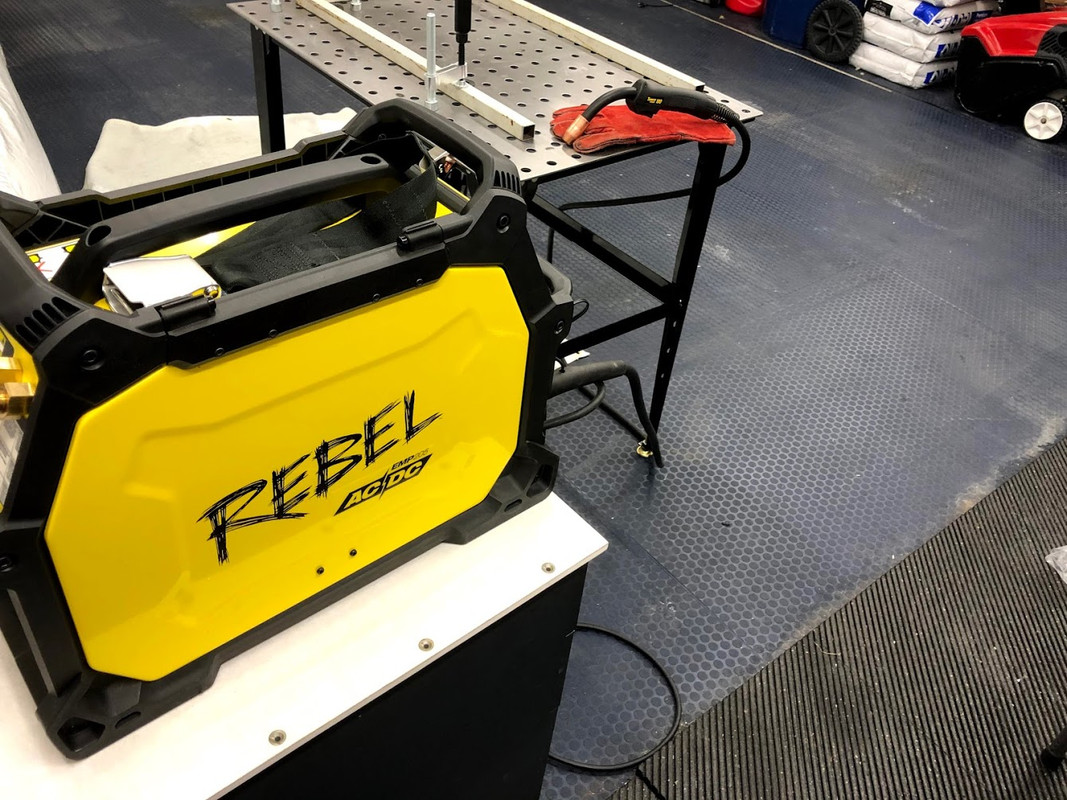
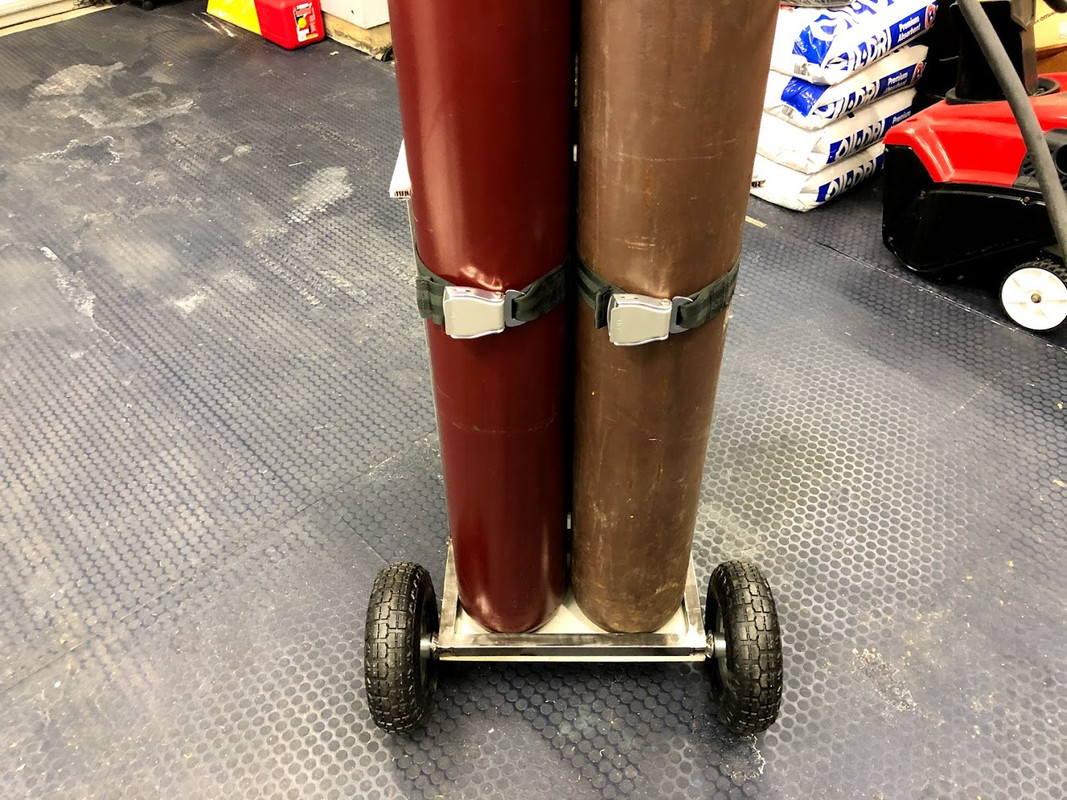
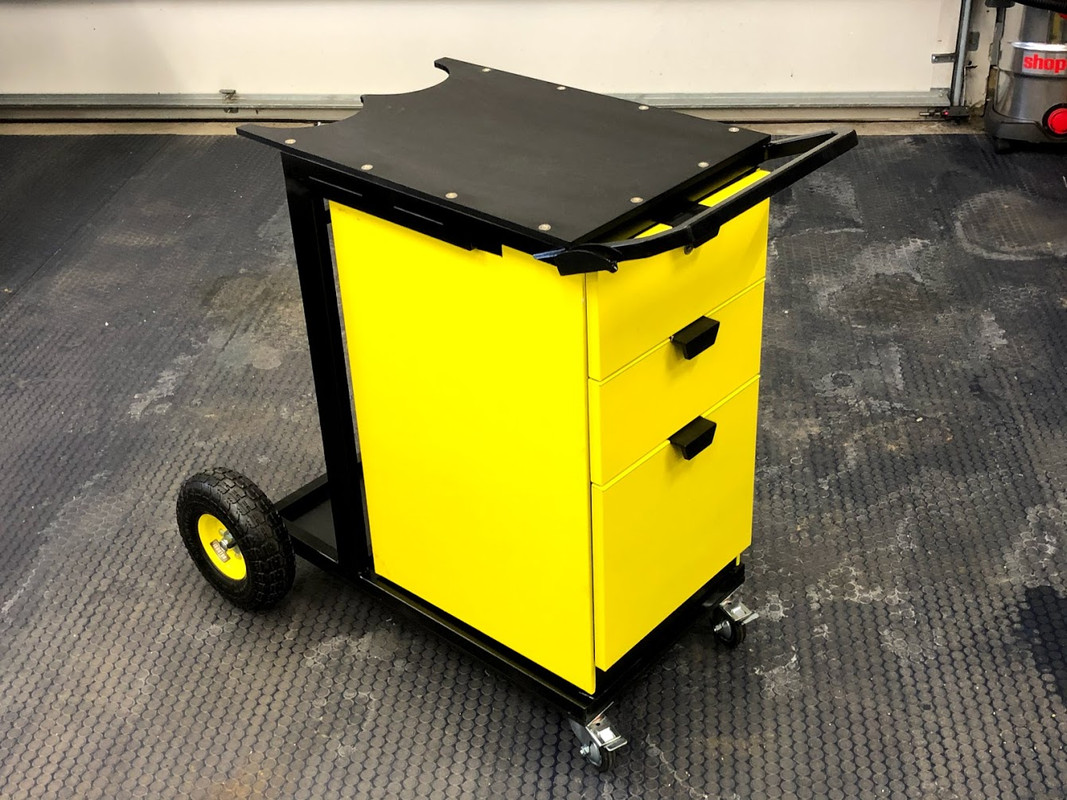
Most of my experience is with MIG or Oxy Acetylene, I have only stick welded a couple times and have never used a TIG before today. But before I start spending any time pretending to learn that skill, I need to build a welding cart. Having two 255cf bottles strapped to my work bench isn't the most effective way to use my work space, I need them on a cart.
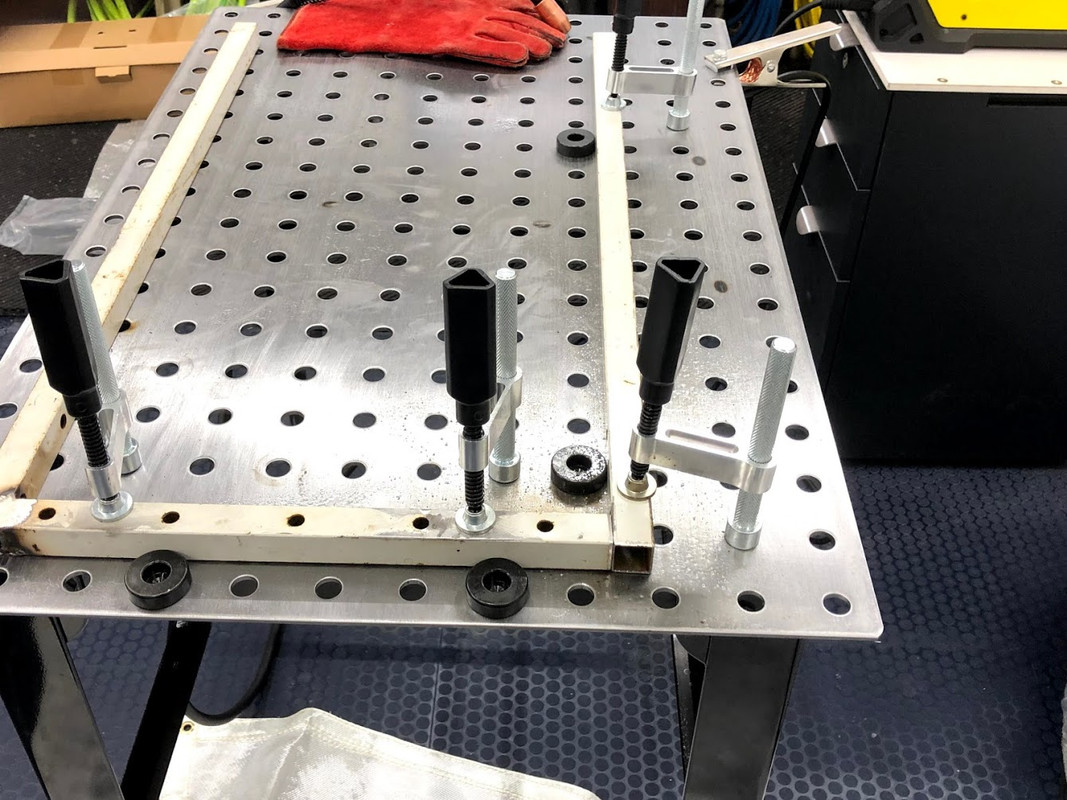
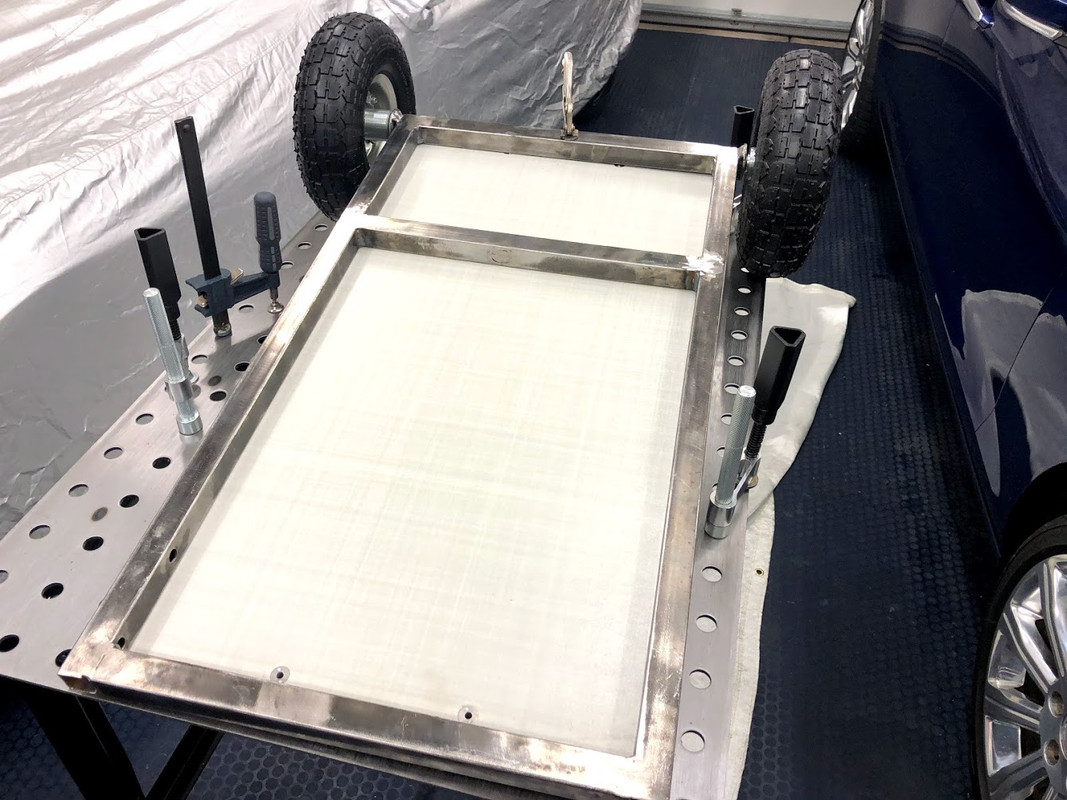
Yesterday I picked up a fab table that was on sale, its nothing fancy but really makes welding square easy. I have some existing material and decided to use as much of it as possible, to this point the only thing I have bought are the wheels and casters.
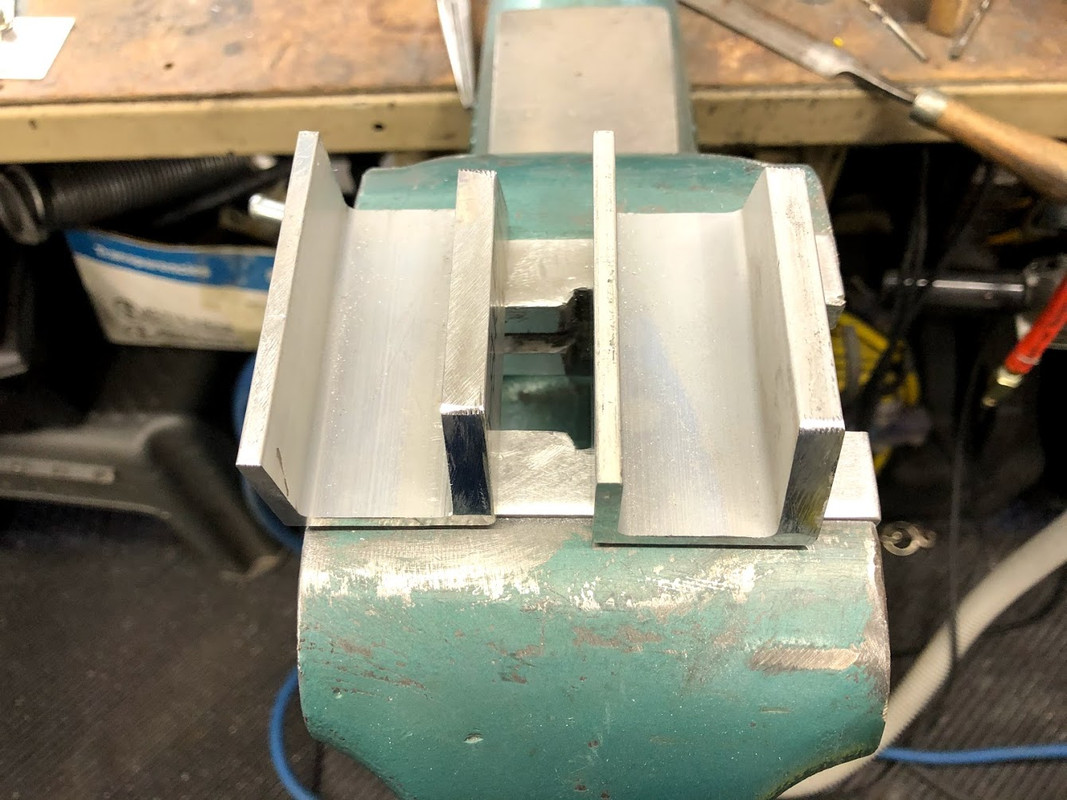
The frame of the welding cart I'm making from a commercial clothing rack that has 1" x 1" square tubing. The body of the cart is a three drawer file cabinet, which will sit on a fiberglass honeycomb panel screwed to the frame. The bottles will also sit on this panel and be held in place with aircraft seat belt extensions. The top will be another honeycomb panel and will extend past the welder, I will scallop it to fit around the bottles.
At least that's how it all works out in my head, I like reusing old materials but it is always more work than just cutting new materials to the correct size.
Today consisted of some mental design and me playing around with the multitude of settings on the welder. I did get the base cut to size and nearly welded together. The next four days are with the family and Ill try to pick back up on it this weekend.
I had what I wanted narrowed down to three welders, and decided that I would buy whichever was the best deal over Black Friday. None of them went on sale so I just bought the one I wanted the most
I ended up buying the ESAB Rebel 205ic and I doubt I will ever be able to weld to anywhere near its capabilities.
Most of my experience is with MIG or Oxy Acetylene, I have only stick welded a couple times and have never used a TIG before today. But before I start spending any time pretending to learn that skill, I need to build a welding cart. Having two 255cf bottles strapped to my work bench isn't the most effective way to use my work space, I need them on a cart.
Yesterday I picked up a fab table that was on sale, its nothing fancy but really makes welding square easy. I have some existing material and decided to use as much of it as possible, to this point the only thing I have bought are the wheels and casters.
The frame of the welding cart I'm making from a commercial clothing rack that has 1" x 1" square tubing. The body of the cart is a three drawer file cabinet, which will sit on a fiberglass honeycomb panel screwed to the frame. The bottles will also sit on this panel and be held in place with aircraft seat belt extensions. The top will be another honeycomb panel and will extend past the welder, I will scallop it to fit around the bottles.
At least that's how it all works out in my head, I like reusing old materials but it is always more work than just cutting new materials to the correct size.
Today consisted of some mental design and me playing around with the multitude of settings on the welder. I did get the base cut to size and nearly welded together. The next four days are with the family and Ill try to pick back up on it this weekend.
Last edited:
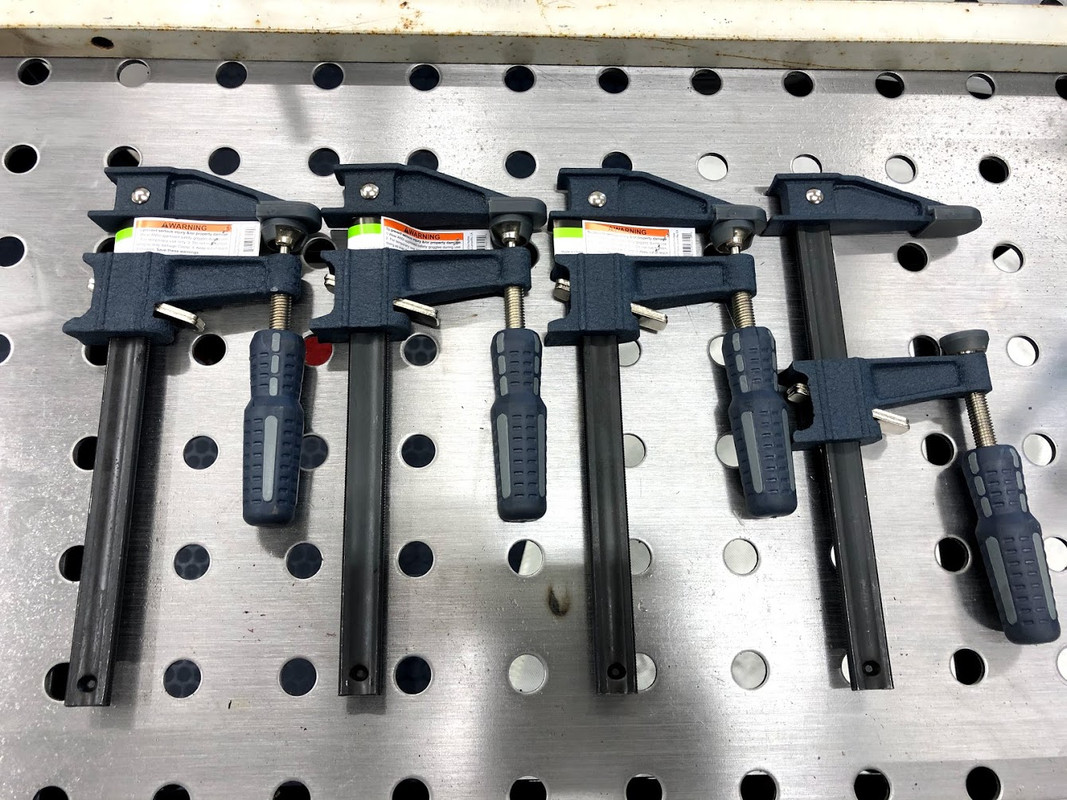
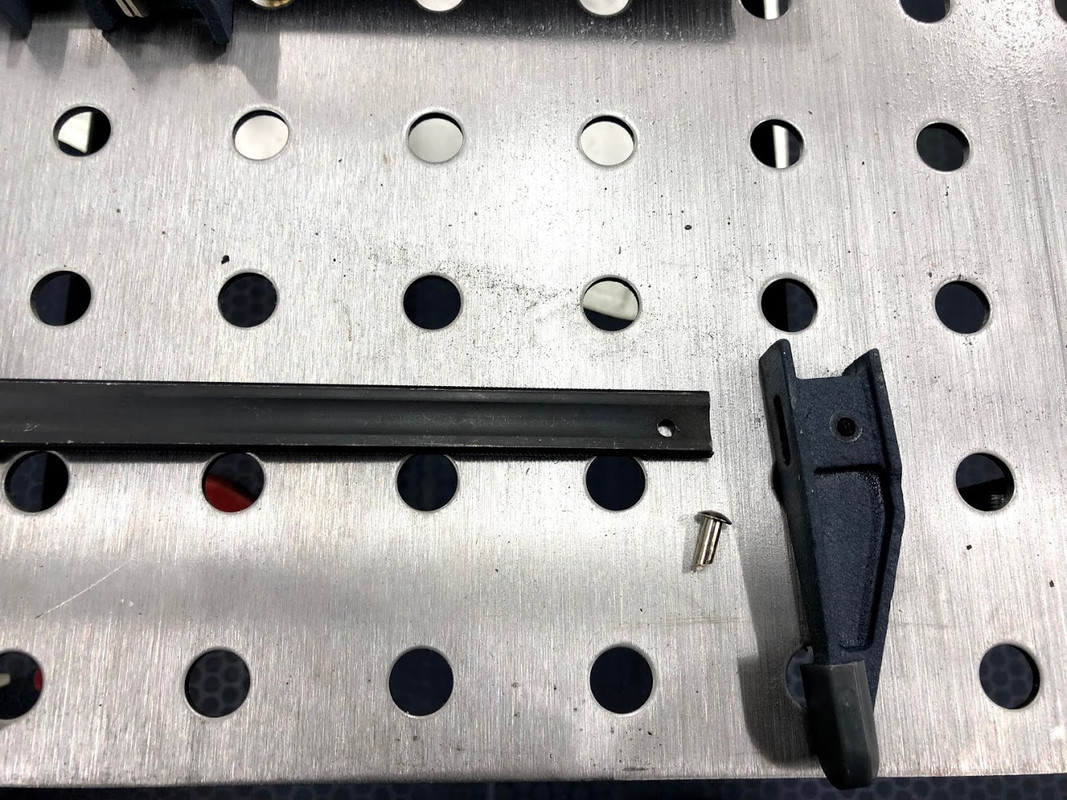
We went to my moms house for Christmas and on the drive home we stopped in Springfield MO to eat lunch. There was a HF just off the exit so I stopped and picked up some clamps I had seen people on YouTube using for fab tables.These clamps were on sale for $3.19 ea and you simply drill out the rivet at the end and replace the clamp jaw with a solid rod.
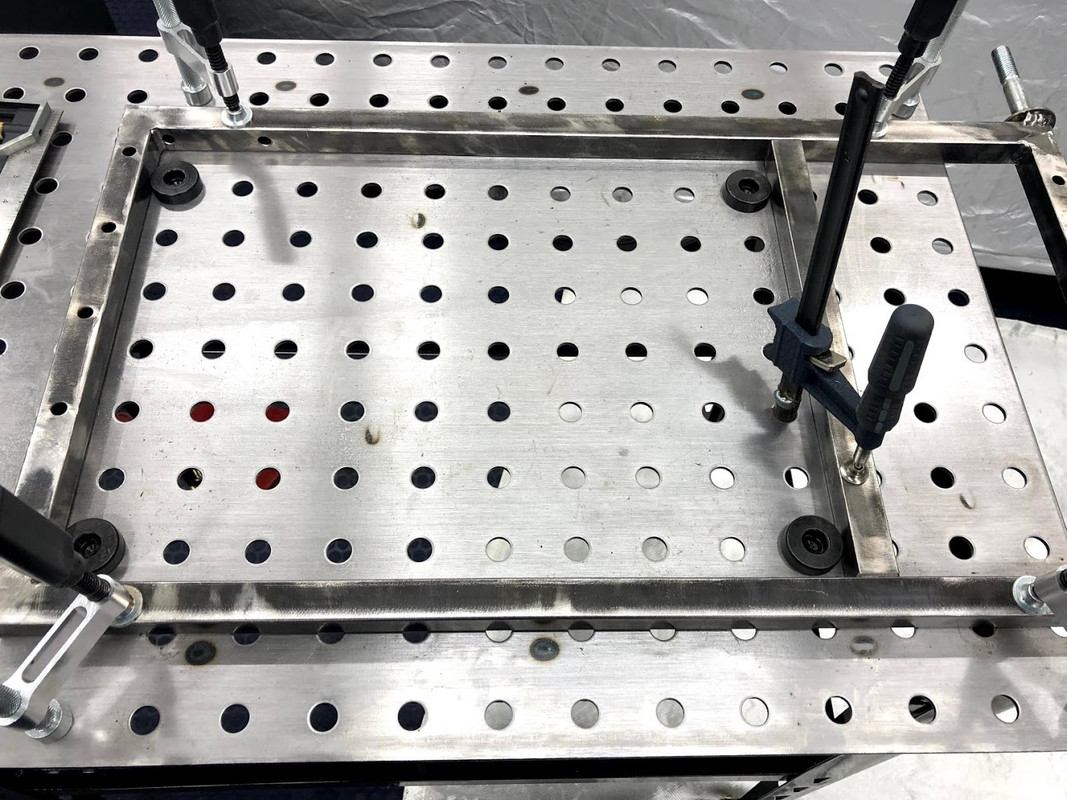
Today I got all the paint cleaned off the metal for the base and finished welding it together along with installing the axles for the rear wheels.
I'm going to use a floor panel from a CRJ for the bottom of the cart and for the welder to sit on. They are made from honeycomb fiberglass, have inserts already installed and are edge sealed.

Initially I was going to use the file cabinet to set the welder on but it is too flimsy, so I will build a frame around it and use another floorboard above the file cabinet.
Today I got all the paint cleaned off the metal for the base and finished welding it together along with installing the axles for the rear wheels.
I'm going to use a floor panel from a CRJ for the bottom of the cart and for the welder to sit on. They are made from honeycomb fiberglass, have inserts already installed and are edge sealed.
Initially I was going to use the file cabinet to set the welder on but it is too flimsy, so I will build a frame around it and use another floorboard above the file cabinet.
Last edited:
ZRX61
Well-known member
Re the aircraft hardware:
Get a catalog from Genuine Aircraft Hardware. They only cost $8.00 which is far outweighed by their usefulness. The company actually refer to it as a reference book, not a catalog.
This book is the bible when it comes to NAS/AN/MS aircraft hardware, are highly sought after & never thrown out.
https://www.gen-aircraft-hardware.com/
Catalog link:
https://www.gen-aircraft-hardware.com/site_tips.asp#How_do_I_get_a_Catalog
Re the aircraft hardware:
Get a catalog from Genuine Aircraft Hardware. They only cost $8.00 which is far outweighed by their usefulness. The company actually refer to it as a reference book, not a catalog.
This book is the bible when it comes to NAS/AN/MS aircraft hardware, are highly sought after & never thrown out.
https://www.gen-aircraft-hardware.com/
Catalog link:
https://www.gen-aircraft-hardware.com/site_tips.asp#How_do_I_get_a_Catalog
Great reference, thank you I was unaware of it, I ended up getting the PDF version which will make searching easier than a paper copy and will definitely be something I use.
I didn't explain myself well in my post, for example yesterday I needed some 3/32 pop rivets to install some 10/32 nutplates, I just didn't know if I actually had any without looking through boxes for 1.5 hours.
I have bushings, washers and nuts fairly sorted in my hanging bins, rivets and hiloks I haven't decided what I am going to do with for sure. Most everything is bagged and marked so I may just bin them by diameter. Just looking through all the 6/32 rivets for a specific length is quicker than going through a box/boxes with everything mixed together.
The cold weather has been poor motivation for working on my welding cart.
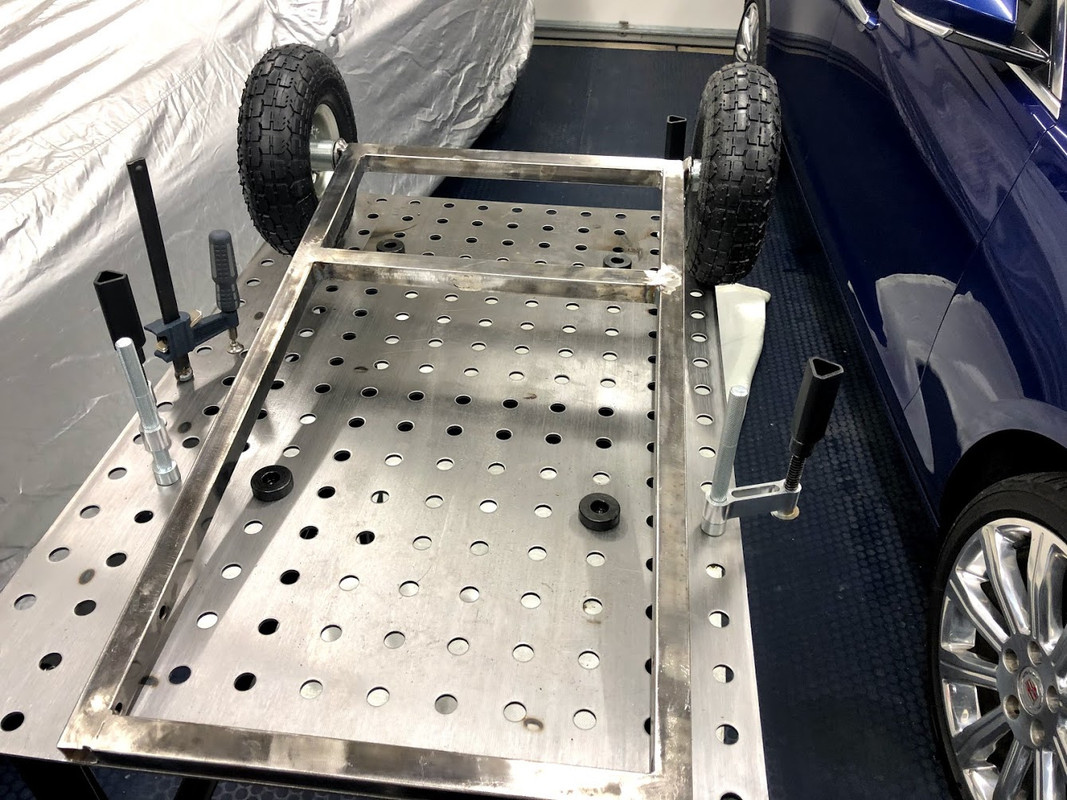
This weekend I got the upper frame made and attached to the base. I mounted the floorboard to the upper frame and cut it to fit the bottles.
I used some 1/2" strap to fab brackets to hold the seat belt extensions
I haven't decided what I am going to do yet for cable management, probably something simple. Once that is done I can take it all apart and start painting everything.
Last edited:
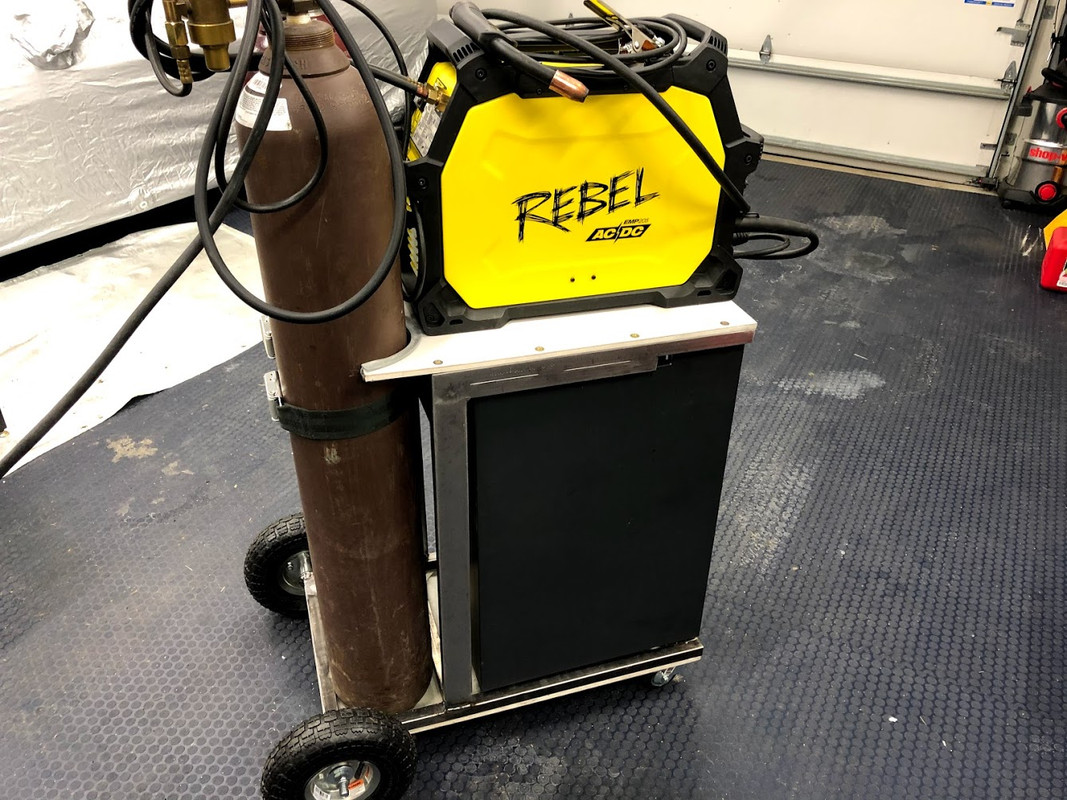
Over the last few weekends I finished the welding cart that was becoming a science project.
After I started painting the drawers, I decided I didn't like the look of the drawer pulls with them being curved out and rounded on the edges. There wasn't enough material to to square them off so I made some new ones from 7075 extrusion.
For the same reasons I decided to make a squared off handle for the cart, my intent was to match the angles of the handles on the welder.
This weekend I took the cart apart, finished some welds I couldn't get to with it assembled, prepped it for painting and hauled everything downstairs to paint it. It was 54° today but not warm enough to paint in the garage or outside.
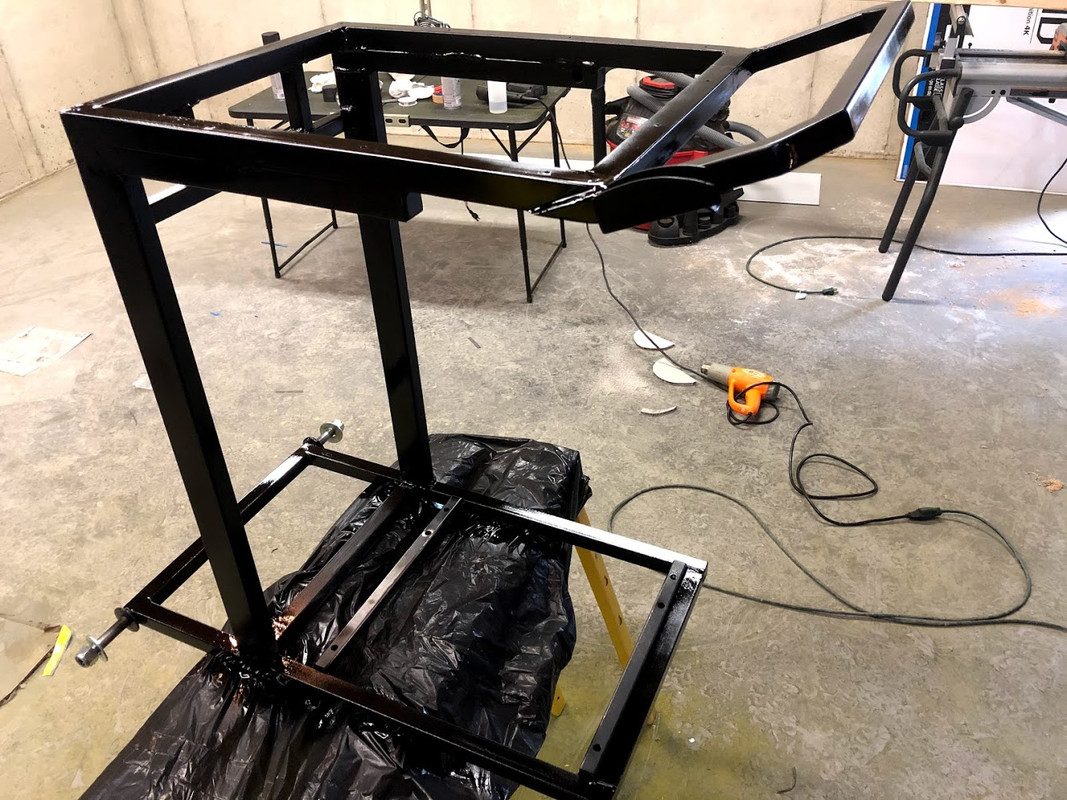
Today the paint was dry but was still fairly soft, I spent about 45 minutes going over it with a head gun, hauled everything back out to the garage and started reassembly.
The last pictures are of it fully assembled and finished... maybe. I may make a hanger for the ground cable, I haven't decided yet. I prefer having the mig gun make a big loop over the welder versus trying to coil it up on the side and I'm not sure I want any cable management brackets sticking out from the sides.
I'm very happy with how it turned out and while I only have just over a $100.00 invested I wont do another project like that. The amount of time I spent with cutting up the clothing rack, grinding old welds and splicing pieces to make them long enough far outweighed just buying new material. The metal from the clothing rack would have been useful, just not for this project, it seemed like every piece I had was one inch too short or had three holes that needed to be filled.

 .
.
After I started painting the drawers, I decided I didn't like the look of the drawer pulls with them being curved out and rounded on the edges. There wasn't enough material to to square them off so I made some new ones from 7075 extrusion.
For the same reasons I decided to make a squared off handle for the cart, my intent was to match the angles of the handles on the welder.
This weekend I took the cart apart, finished some welds I couldn't get to with it assembled, prepped it for painting and hauled everything downstairs to paint it. It was 54° today but not warm enough to paint in the garage or outside.
Today the paint was dry but was still fairly soft, I spent about 45 minutes going over it with a head gun, hauled everything back out to the garage and started reassembly.
The last pictures are of it fully assembled and finished... maybe. I may make a hanger for the ground cable, I haven't decided yet. I prefer having the mig gun make a big loop over the welder versus trying to coil it up on the side and I'm not sure I want any cable management brackets sticking out from the sides.
I'm very happy with how it turned out and while I only have just over a $100.00 invested I wont do another project like that. The amount of time I spent with cutting up the clothing rack, grinding old welds and splicing pieces to make them long enough far outweighed just buying new material. The metal from the clothing rack would have been useful, just not for this project, it seemed like every piece I had was one inch too short or had three holes that needed to be filled.
.
Last edited:
Apparently I have some issue with permissions and google photos which is only letting some of my pictures be visible to everyone. I think I have it fixed now.
This post is mostly testing the photo link.
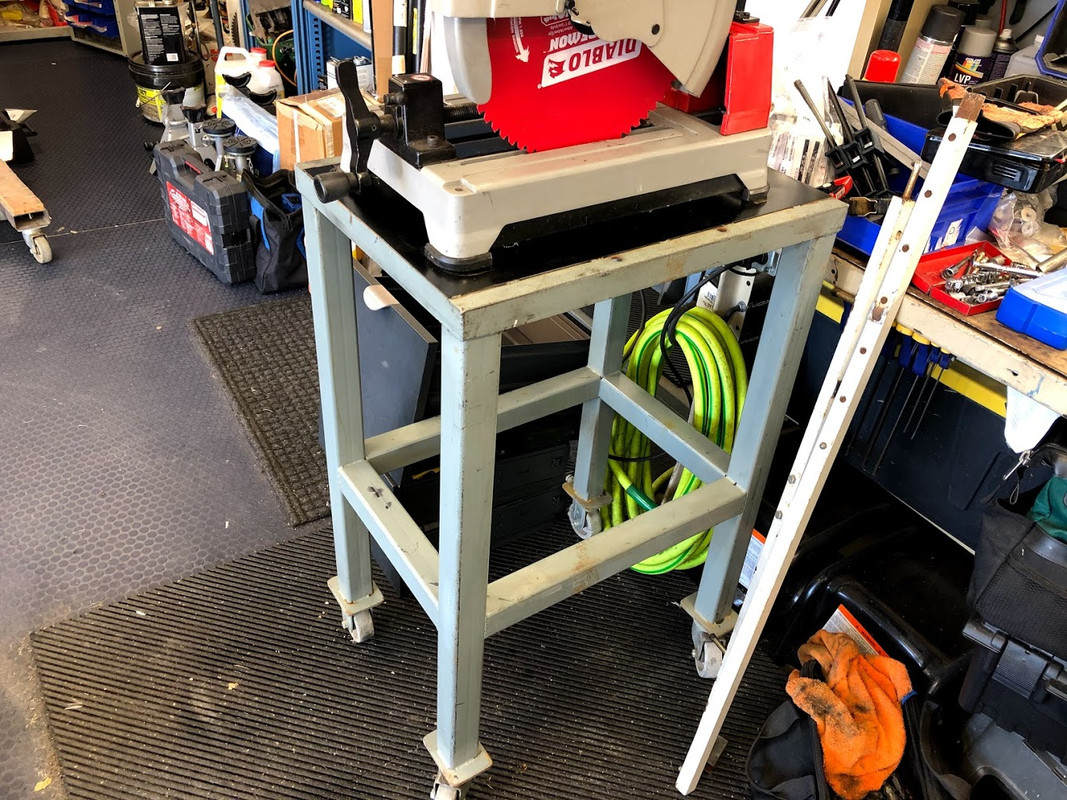
I got this nice table for my cold saw two weeks ago for free. Its standard height but has casters welded on it. For now I'm going to leave them on because I need it to be portable, when I get into a place that is larger Ill set it on the floor.
This post is mostly testing the photo link.
I got this nice table for my cold saw two weeks ago for free. Its standard height but has casters welded on it. For now I'm going to leave them on because I need it to be portable, when I get into a place that is larger Ill set it on the floor.
Last edited:
53PontiacSD
Well-known member
You've done fantastic work in your garage. Keep posting. The drawing is awesome.
Billy
Billy
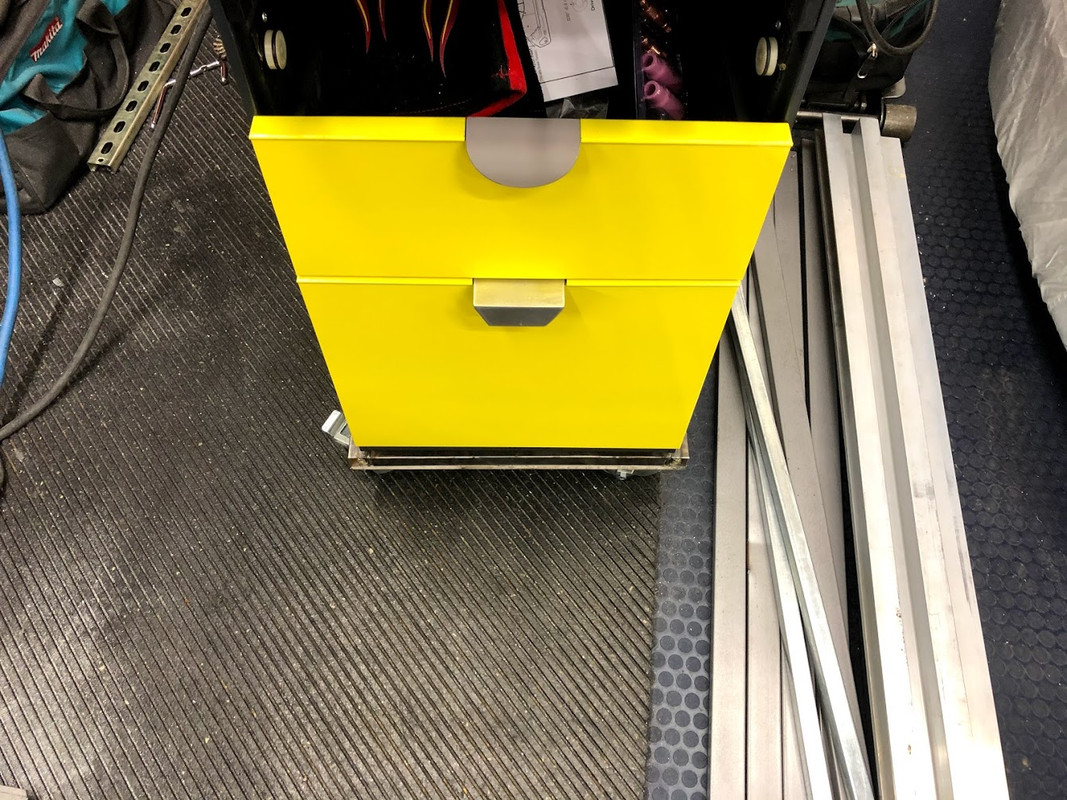
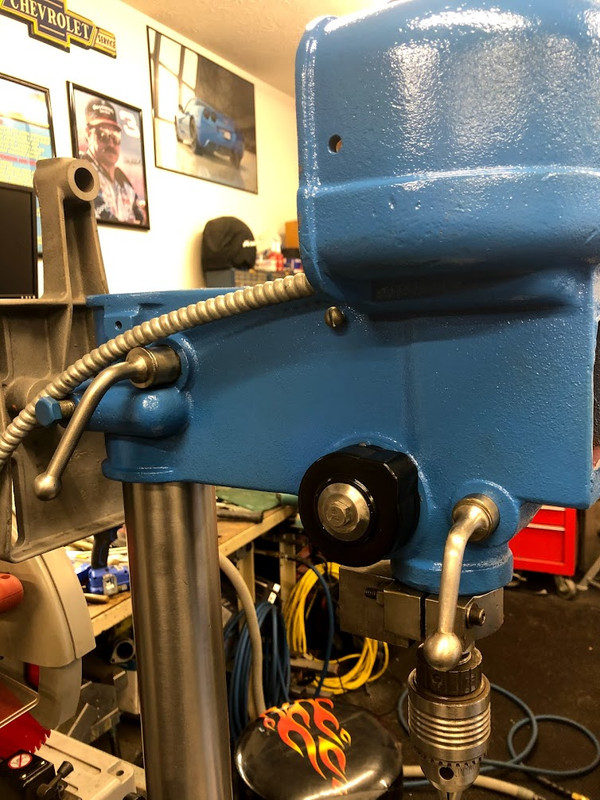
Picked up a new project today off of CL, a Walker Turner 1200.
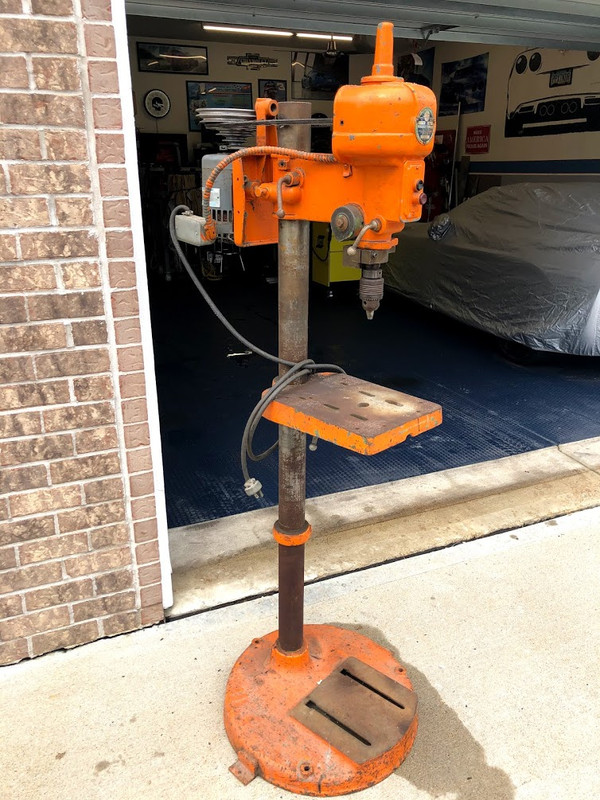
The good:
The bad:
I have it mostly apart now and plan not to fully restore it but make it functionally sound as possible. Its my first drill press and I don't know much about them so it should be fun.
The good:
- It was cheap.
- The bearings feel good with no play.
- It runs
- It has a nice large base
- The table is relatively undamaged
The bad:
- No low speed
- The belt cover is missing
- The quill handles are missing
- The depth stop is missing
I have it mostly apart now and plan not to fully restore it but make it functionally sound as possible. Its my first drill press and I don't know much about them so it should be fun.
Last edited:
Last weekend I borrowed my buddies blast cabinet and cleaned up most of the drill press castings. Wednesday it was warm enough here to paint what I had blasted.
The biggest pain was cleaning the support column, the rust on it was fairly thick but fortunately it didn't pit the metal.
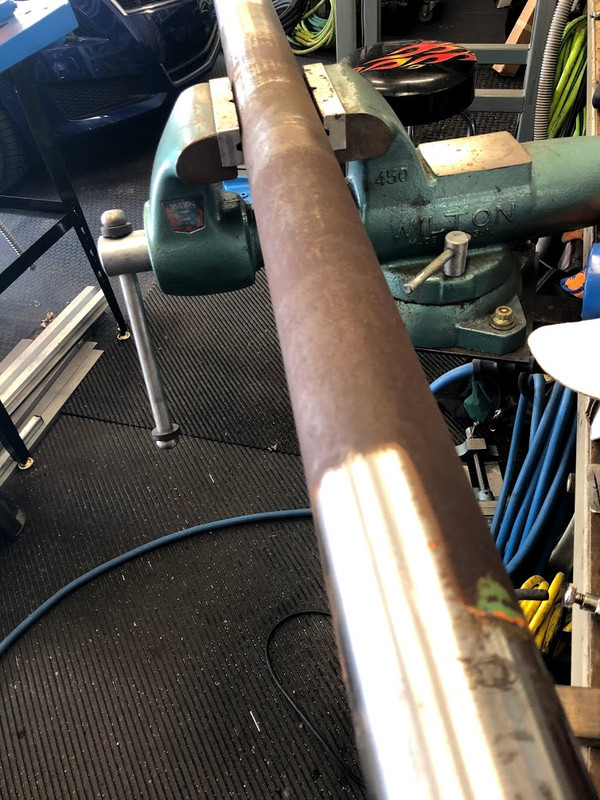
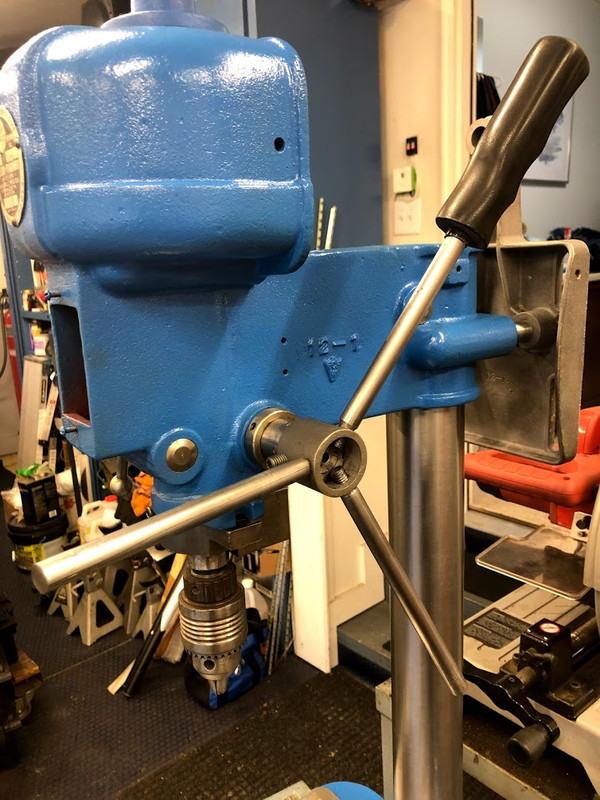
I got about 70% of it put back together today.
I still have some details to figure out. It didn't have any quill feed handles or a depth stop, I think I can make both. The thing that has me a bit baffled right now is the motor mounts. It has a Marathon 1/2 horse motor with resilient ring mounts, the mounts are shot and I have no idea how to remove them from the end plates on the motor or what to buy to replace them. I have had zero luck matching the data plate to anything I can find online. I did find a major supplier for Marathon motors, I'm going to call them next week and see if I can get more information or what replacement rings to buy.
The biggest pain was cleaning the support column, the rust on it was fairly thick but fortunately it didn't pit the metal.
I got about 70% of it put back together today.
I still have some details to figure out. It didn't have any quill feed handles or a depth stop, I think I can make both. The thing that has me a bit baffled right now is the motor mounts. It has a Marathon 1/2 horse motor with resilient ring mounts, the mounts are shot and I have no idea how to remove them from the end plates on the motor or what to buy to replace them. I have had zero luck matching the data plate to anything I can find online. I did find a major supplier for Marathon motors, I'm going to call them next week and see if I can get more information or what replacement rings to buy.
Last edited:
ARFLY
Well-known member
The drill looks amazingly. Going to be awesome when it's all back together and working.
The drill looks amazingly. Going to be awesome when it's all back together and working.
Thank you ARFLY I appreciate the feedback.
Today I spent the better part of the day trying to bead blast the wheels for my corvette. The factory paint on them wasn't done very well and one has some minor curb rash so I thought I would repaint them. Unfortunately only blaster I have available to me large enough to put them in had plastic media and while it would remove the paint I estimate it would have taken me 3+ hours a wheel.
Because I wasted the better part of the day with that, I didn't get much done on my drill press.
I did get the quill spring cleaned, painted and installed, along with the motor plate which I some how forgot completely about when I blasted all the other parts. The plastic beads worked ok on it, I just need to paint it now.
I also got some quill handles made, this is one part I'm confused about. Every photo I have seen of this model has a quill handle that bolts to the end of the pinion. My pinion has a hole that is about 1/4" that is not very deep and not threaded, so I'm not very sure how the original handles attached. Anyway I made some from 1/2" rod and threaded them into a sleeve at a 18° angle. Now I just need to find something to use for knobs. I found an old umbrella handle but I don't really want to wait till I break two more.
Last edited:
I spent some time since last weekend searching for machine knobs. I found some on Amazon but the delivery dates on them were at best in May. I ended up finding some nice textured ones at Grainger for less than $2.00ea.
I had an hour tonight to get the rods threaded and install them.
Tomorrow I'm contacting a Marathon distributor to see if I can figure out the resilient rings on the motor.
I had an hour tonight to get the rods threaded and install them.
Tomorrow I'm contacting a Marathon distributor to see if I can figure out the resilient rings on the motor.
Last edited:
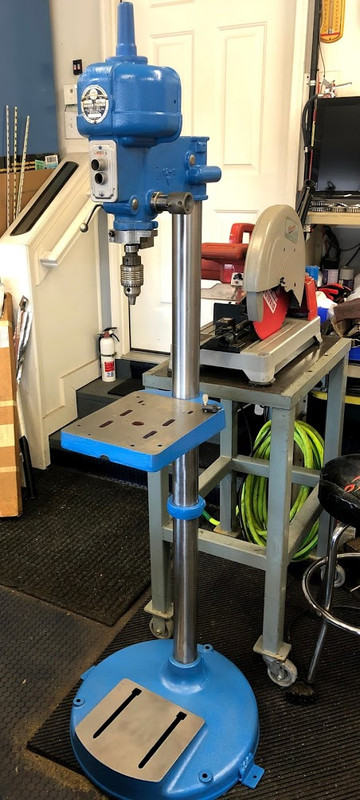
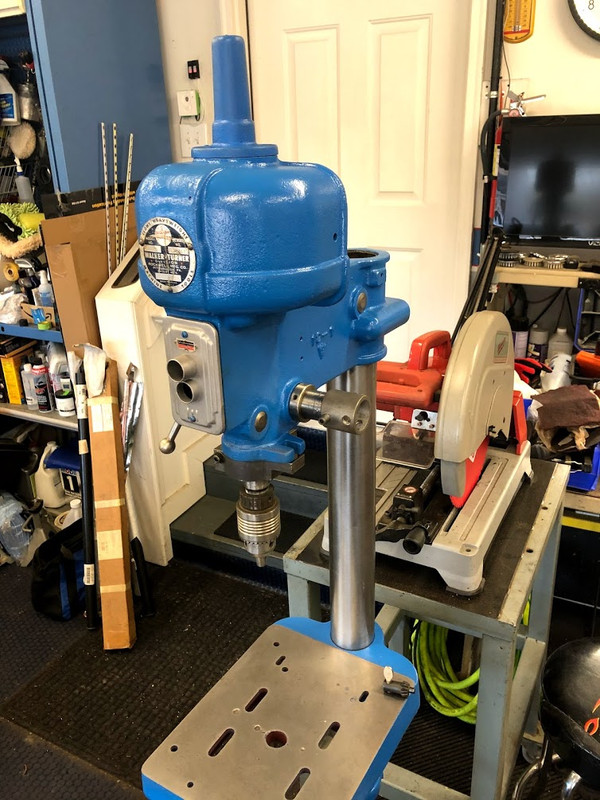
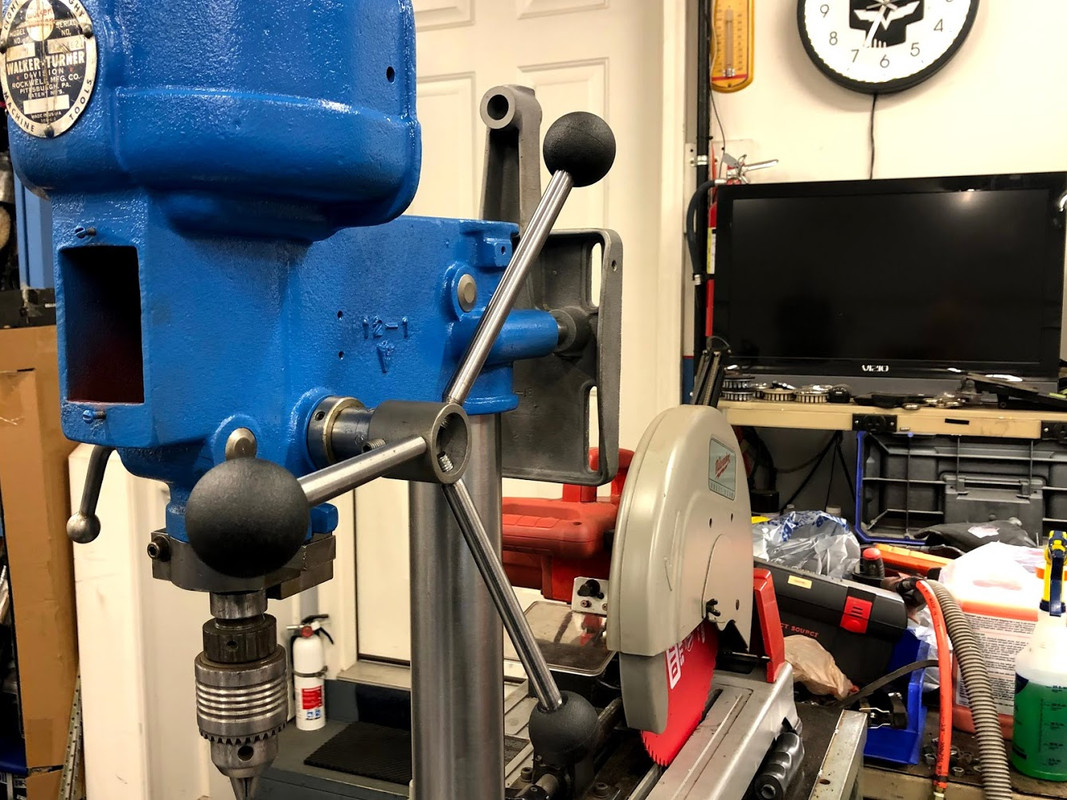
I contacted a a bunch of different parts distributors trying to find the resilient rings to mount the motor with. What I did find out was the Marathon motor was originally sold to be used in an assembly for some type of HVAC equipment and didn't have a standard catalogue number that could be used to determine what rings were on it or if they were proprietary to the installation. After wasting a massive amount of time trying to find the correct resilient rings and purchasing two sets that were "the right ones", I used the last set I purchased to center the motor on the mount. I made some brackets, welded the case to the mount and cut the ends off that attached to the resilient rings. Yesterday I finished up the wiring and mounted a light I purchased off Amazon. I'm very impressed with the build quality and brightness of the light for its cost, its also a very nice 5 to 6k color. I will definitely buy a couple more.


The press is useable now but I have two more things I want to do with it. I need to purchase a new belt for it and either make or purchase a down stop.
The press is useable now but I have two more things I want to do with it. I need to purchase a new belt for it and either make or purchase a down stop.
Last edited: