To avoid these ads, REGISTER NOW!

Above 1200 Sq/FT Restart

Wokspaces above 1200 squarefeet.

amkluttz

Well-known member
Joined
Sep 8, 2014
Messages
279
Location
Concord, NC
Looking good Honch!

Is it just me or does anyone else get 1 or 2 pictures per post and the rest have a gray circle with a white line like the pics aren't available? Quite a few posts are this way for me. When I click on the pic it acts like it wants to redirect to Google Photos but I get nothing.
 
To avoid these ads, REGISTER NOW!
OP
H

Honch

Well-known member
Joined
Jul 30, 2011
Messages
401
Location
Danville, IN
Looking good Honch!

Is it just me or does anyone else get 1 or 2 pictures per post and the rest have a gray circle with a white line like the pics aren't available? Quite a few posts are this way for me. When I click on the pic it acts like it wants to redirect to Google Photos but I get nothing.

When I started this thread Google used Picasa to host photos, when they stopped using it I continued to try linking to them with mixed results. Tonight I moved everything over to Imgur, if you still have issues please let me know.

Nice looking garage and beautiful cars.:beer:

zmotorsports I've actually been going though your "Shop Projects" threads when I have time, your shop is awesome and your Miller cart looks like some military rocket launcher.

Thanks for your comments.
 
OP
H

Honch

Well-known member
Joined
Jul 30, 2011
Messages
401
Location
Danville, IN
I haven't posted in a while, COVID-19 changes at work and trying to get my wheels done for the corvette have kept me busy.

My tires are worn out so this was the best opportunity to fix some light curb rash on one wheel and change the finish to more of a satin look. I didn't realize the odyssey this was going to take me on. Four different sand blasters, three different types of media and three chemical dips the wheels are finally clean and ill have them painted this week.


This weekend I got a lot of small projects done. I replaced the brushes and brush carrier in a nice little Bosch hammer drill a guy at work was throwing away. The drill was badly overheated and the brushes melted though the carrier. It was a cheap fix and will make a nice drill for my son.


Friday night when I pulled the weed eater off the wall there was gas running all over the place. The supply and return fuel lines had deteriorated and were both leaking. I started looking for some fuel line and remembered someone had given me another power head three years ago. I found it and started to swap the lines over but they were completely different. It was the same model but it was a much newer power head. I decided instead to just swap my clutch over and use it. Great plan until I found the clutch retaining bolt broke off in the crankshaft of the new head. Now I know why it was free :)

Even with the pain of drilling it out, it was all worth it, the new head runs so much better than my old one.


Yesterday I finished up building a 220v extension cord for my welder. I had 25 feet of stranded 10-3 but was having a hard time finding NEMA 6-50 connectors that weren't bakelite or hard plastic. Since I couldn't find any locally I decided I would mount one end to my weld cart. After I put the cord together I ended up using magnets instead of hard mounting it.


They are amazingly strong, it easily supports the weight of the cord as a side load. Unplugging the welder doesn't even come close to pulling it off.


Today I spent the day working on my Nicholson files that I have completely abused and ignored since I bought them in 1987. This is a fair representation of what all of them looked like.


After reading a few threads on here, I used a flattened copper tube to clean out the files and then soaked them for 20 minutes in muriatic acid. After neutralizing the acid, I sprayed them down with WD-40. They definitely cut and run smoother on material although I think cleaning them with the copper was 80% of the results, the acid made them look a lot better.


I found a piece of extrusion with a lip on the leg that has a 85° inside angle. I'm going to notch it out and use it as a file rack, something to do next week.

 
Last edited:
OP
H

Honch

Well-known member
Joined
Jul 30, 2011
Messages
401
Location
Danville, IN
I finally got my wheels painted Friday, i'll give them a week to cure and mount everything up this coming weekend. I'm excited to drive the car with some sticky rubber again.


I did a couple of small projects this weekend, first I finished my simple file rack and mounted it to the side of the fab table. I have a couple of files that I ordered new handles for that should be in this week.


The second project was something I started months ago as a cup holder for the Corvette. The cup holders in the Corvette will hold (and heat) a can of soda, they are way too small and get heated by the trans tunnel. I was going to make ones large enough to hold 64 ounce drinks, from 1/4" rod and mount them to the seat rails. My desire and ability to didn't match and the cup holder went on a shelf. Last weekend when I was cleaning up that area I found the rod and decided to re-purpose it for a hook rack on my welding tank. It actually fit the tank better than if I had tried to make one to fit it. by slightly spreading it open it fits to the flange of the tank tightly.


The only thing I didn't like at all were the unfinished ends of the rod. I went online to buy some 1/2" steel balls with the intent of drilling them 1/4" and slipping them over the rod to tack in place. I came across some "50 Caliber Slingshot Ammo" 100ea for less than I could buy 4ea mild steel balls so I ordered the box. Turns out it appeared to be reject ball bearings, which I wasn't going to be able to drill. Instead i drilled the end of the rod to cup it and welded the bearings on that way.

 
Last edited:
OP
H

Honch

Well-known member
Joined
Jul 30, 2011
Messages
401
Location
Danville, IN
I took last week off, its the first time I have had off this year. My plan was to do some projects for storage in the garage. Unfortunately other projects came up that weren't part of the plan.

One of the planned projects was to service my mower, its a 8 year old Gravely ZT-42 with less than 400 hours on it. I changed the oil, fuel oil and air filters along with zeroing out the steering. The following day my wife pulled it out of the garage and there was a rather large puddle of oil under the mower, right under the drain plug for the motor. After looking it over I found the oil was leaking out of the right hydro vent tube. I couldn't think of a logical reason for it to be pushing oil out of the vent, nothing came up on internet searching so I pulled the vent plug and the oil level was in spec. I started reading the manual for the hydro and found that there shouldn't be any oil under the plug I pulled.

The hydro has only a fill plug and a vent plug they are actually side by side but go into two different compartments in the hydro.


The compartment with the vent tube has a plastic plate that seals it off from the rest of the transmission. The plate hs a tube molded into it which allows air pressure to pass between both compartments but oil stays out of the vent box. The manual actually said to order a new plastic plate because it will most likely break when it is removed. I has just two screws and is sealed in place. Its visible in this picture all the way to the right under the largest gear.


When I took mine apart it lifted right out very easily. I spent three hours cleaning everything and resealing the vent box and the case halves. I mowed with it the following day and no leaks. Apparently the oil was bypassing the cover and allowing it to push out the vent tube.

Two weeks ago I won an auction for a Trinco Dry Blast machine, its 36X30 and has a 800cfm dust collector. I talked a buddy into helping me bring it home, he has a nice new Detro trailer and a Kubota SVL95 he has been looking for a reason to use. it made it very easy to get the blaster home and into the garage.


Everything went flawlessly until he got in his truck to leave and had no brakes. We found a braided section of line under the secondary battery had failed. Fixing it took the next day and a half with his truck, trailer and skid steer stuck in front of my house. Fortunately it happened there and not while he was towing 15k lbs.
 
Last edited:
OP
H

Honch

Well-known member
Joined
Jul 30, 2011
Messages
401
Location
Danville, IN
Last weekend I started cleaning up my new blast cabinet. Its been sitting in a corner of a shop for the last 15 years unused. The gloves turned to powder when I touched them and all the seals on the cabinet and dust collector were shot.

At some point someone had splattered black paint all over the front of both units ad the foot pedal, it was a royal pain to get off without taking all the paint off.


The dust collector has twelve filter socks that were in very good condition, they cost about 15 dollars each so I decided to try cleaning them up.


I hung them the way they are installed in the collector and ran water over the outside of them. They are made of a very thick felt type material and cleaned up very good. This is a picture of the inside of one of them after they were washed out.


The top of the dust collector was rusted from a roof leak. I sanded it down and cleaned up the motor and impeller.


I replaced the light housings with new outdoor floodlights, the housings were cheaper than buying new seals for the old ones. The cabinet had 75 watt bulbs which I replaced with 1400 lumen PAR38 LEDs, I also added a couple of 1000 lumen work lights.


This was taken looking through the glass.


The expanded metal grating was beyond saving, so I replaced it along with the wore out jet and nozzle. I downsized both to 12 CFM units to work with my compressor.


I added casters to both units to make it easier moving them around, they both weigh around 300lbs. The blast cabinet needed plates to make the legs wide enough for casters, the dust collector had holes drilled in the base. Unfortunately the casters on the dust collector which were rated for 350lbs all failed after moving it twice. The casters on the blast cabinet actually put it at a better height to use at least for me.


Both units cleaned up very nicely and work better than I could have hoped for. The dust collector is about twice as big as it needs to be at put so much vacuum on the cabinet it was hard to move the gloves or it would pull them off my hand. I need to remove the lights I added and try it again, I think they might be blocking too much of the inlet air and its trying to pull it through the gloves.

This picture puts into perspective how big they are when you consider they just clear the garage door track by a few inches.

 
Last edited:
OP
H

Honch

Well-known member
Joined
Jul 30, 2011
Messages
401
Location
Danville, IN
I picked up a couple more projects this week. The first is a Wilton 4204 combination disk/belt sander. It has a 6x48 belt sander, a 12" disk sander and a bad motor.


The second is a flammable locker with a broken handle. I'm particularly happy about this one because I got it for $18.00. I got another for $30.00 because of the timing of the auction, but really only have room for one, I may end up selling one.


The last item was an infrared heating panel, these things work great for drying painted parts quickly or even preheat on aluminum.


That's probably it for buying new projects for quite a while, I'm basically out of room in my garage.

I was also able to knock out a small project in the garage tonight. I built a rack above the garage door to hold my spools of heat shrink, Velcro etc. I have some more to put on it but ran out of time.


Last edited:

jdowd26

New member
Joined
Mar 13, 2008
Messages
1
The wheels look great, would like to see them on the c7, I have the same color
 
OP
H

Honch

Well-known member
Joined
Jul 30, 2011
Messages
401
Location
Danville, IN
The wheels look great, would like to see them on the c7, I have the same color

Thanks for the complement.

I got the wheels off a C7, they are the factory Z51 forged wheels. Here is a couple of older photos of them on my C6.

bG1OBxl.png

iECoSei.jpg
 
Last edited:
OP
H

Honch

Well-known member
Joined
Jul 30, 2011
Messages
401
Location
Danville, IN
We took a 100 mile drive today to eat lunch at Thirty Six Saloon in Rockville IN. During the summer we would normally do something like that weekly or at least bi-weekly. With everything going on the world right now this is the first time this year we have.


Its a very cool saloon and a major Harley crowd stop. We were able to eat outside socially distanced as they had converted the stage to separate the seating.


Because we exited differently than we entered I didn't notice this very cool metal sculpture of Ghost Rider. It was on the roof of the stage and we had been sitting under it.


After a nice drive back home, I worked on finishing up a few more things in the garage. I got the new dust collector hose installed on my blast cabinet along with grounding everything.


With it now fully functional, I tested it on a vice Ive had in the corner of the garage for a couple years. The one I already cleaned up I changed out the jaws for aluminum, I want this one to stay steel.

It took just under five minutes to make the base look like this inside and out. Most of that time was blasting all the paint on the underside that has spilled into the mounting holes and was super thick.


I couldn't be happier with how the cabinet works, it does have some slight surging with the media I need to figure out, I may have the siphon tube set too deep.

Last week when I was moving some things into storage I found a towel dispenser I forgot I bought a few years ago at a garage sale for two dollars. Tonight with wall space at a premium, I used some magnets in the mount holes and put it on the side of my Lista cabinets.


Tomorrow at noon I get to pick up the Wilton belt sander and flam cabinets.
 
Last edited:
OP
H

Honch

Well-known member
Joined
Jul 30, 2011
Messages
401
Location
Danville, IN
I got some work done on the flammable cabinet this weekend. It had quite a bit of oil and who knows what other chemicals trapped in the bottom.


The powder coating in the bottom had started to come off so I hit it with a wire wheel so I could repaint it. It looks like it was powder coated right over dirty metal. Areas that had solid paint had rusty stained metal underneath.


I bought some oil based Rustolem and primed/painted the bottom. This gave me a chance to try out the heater I bought. I set it up about 2 feet off the bottom of the cabinet and turned it on.


Five minutes later it was reading over 170° and it stabilized right around 185°.


While that was drying I went to work on the shelves. They are very heavy and galvinized with 30 years of various chemicals spilled on them. I washed them down and went over them lightly in the sand blaster. I was able to get most everything off of them without removing the galvanizing.


I have the inside as clean as I can get without completely stripping and painting the cabinet.


Next weekend I am going to try and clean up the outside some more. I had to de-skin the right door to straighten out the lock mechanism. I found a handle in the clearance bin at ace hardware that had the same bolt pattern. Now the door closes and latches properly.

 
Last edited:

amkluttz

Well-known member
Joined
Sep 8, 2014
Messages
279
Location
Concord, NC

Great job on cleaning up the cabinet! After I read about your flammables cabinet I looked in to what constitutes a cabinet being for flammables since I store my gas cans in my garage inside of an all metal cabinet. One of the things I read was that it had to have self-closing doors or hinges. I didn't realize self-closing could be as simple as a couple of springs illustrated by your picture. I was also quite surprised to find out you can make a flammable cabinet out of certain grades of fire-retardant wood, which seems like an oxymoron.

Any reason you wouldn't paint the shelves in matching yellow?
 
Last edited:
OP
H

Honch

Well-known member
Joined
Jul 30, 2011
Messages
401
Location
Danville, IN
Great job on cleaning up the cabinet! After I read about your flammables cabinet I looked in to what constitutes a cabinet being for flammables since I store my gas cans in my garage inside of an all metal cabinet. One of the things I read was that it had to have self-closing doors or hinges. I didn't realize self-closing could be as simple as a couple of springs illustrated by your picture. I was also quite surprised to find out you can make a flammable cabinet out of certain grades of fire-retardant wood, which seems like an oxymoron.

Any reason you wouldn't paint the shelves in matching yellow?

Thank you for the complement, as far as self closing doors these wouldn't pass the requirements with the springs. Self closing doors have an indexing mechanism that makes the door on the left close before the door on the right because there is a fire strip along the left door and it wont close after the right one. Self-closing safety cabinets are required by certain states and certain districts within states that follow an adopted Fire Code (such as the International Fire Code (IFC) or NFPA 1 Uniform Fire Code.) I don't live in a state or a district with those requirements, not even considering they wouldn't apply to my garage. The reality is anything I do with this cabinet is probably better than the stuff sitting on a shelf in my garage.

I didn't paint the shelves because most of the stuff I am going to store in it is metal cans (Spray Paint, Gallon paint cans etc.)+, sliding them across the shelves would just damage or scrape the paint off.

Since my last post I basically made a clean spot and it got out of hand after that. I took the cabinet all apart and took out the majority of the dents. While it was apart I coated all the bare metal inside with ARDROX AV15. I replaced all the rivets and primed/painted the entire cabinet.


Yesterday I made a base frame for it with casters and next weekend Ill start loading it up with everything I want to store in it.

 
Last edited:
OP
H

Honch

Well-known member
Joined
Jul 30, 2011
Messages
401
Location
Danville, IN
This week I was able to finish my Wilton 6x48 sander. Because of the space I have available in my garage I have been putting everything on casters so I can move whatever the tool or cabinet is around as necessary to either use or clean around.

When it came time to buy casters for the sander I found these leveling casters that I had not seen before. I'm really impressed with the build quality of these for the $40 a set they cost.


Once I installed these I went to work on the upper belt cap. It is positioned by two pins and held in place by a large stud and hand wheel. The casting the stud was screwed into was broken and the cap was just sitting loosely on the sander. I ordered some nickel rod and tack welded the stud in place. it didn't need to be super strong which is good because there wasn't much material there to work with. I have never welded cast before, it was very strange, it felt like I was welding a marshmallow.


I also needed to replace the motor. It came with a three phase 1.5hp Dayton and the unit was tagged as having a "bad motor". I decided not to even mess with determining if it was bad and buying a VFD. Instead I found a relatively cheap 2.0hp Dayton and just replaced it. I also bought a mag starter with overtemp protection, because I wanted it separate from the motor.

It came with its own starter switches mounted in the box, but its a very large box that I didn't want sticking out from the front of the sander so I mounted it to the side and wired in the original remote switches.


The last thing I did was buy some disks and belts. I decided to buy a couple ceramic belts, I'm curious to see how well they will actually hold up. Right now they are just stupid sharp but I haven't used it more than 10 minutes to this point.


My plan now is to remove one of the work benches in my garage and put the sander and my flam cabinet in that area. I rarely use the bench and it just becomes a place that collects junk. It will also give me enough room to get a larger toolbox. Its fun how easy it is to justify some things :)
 
Last edited:

loganb

ALLIANCE MEMBER
Joined
Dec 29, 2011
Messages
5,503
Location
Omaha, NE
Lot of win in this thread! Especially fond of the Lista's and well done on that recent flammable cabinets and sander...2 items I have standing searches on Craigslist for!

Sent from The Garage Journal mobile app
 
OP
H

Honch

Well-known member
Joined
Jul 30, 2011
Messages
401
Location
Danville, IN
Lot of win in this thread! Especially fond of the Lista's and well done on that recent flammable cabinets and sander...2 items I have standing searches on Craigslist for!

Sent from The Garage Journal mobile app

I have not seen many good deals for either of those items on Craigslist. I just started paying more attention to local auction houses that post online auctions. If you go down that path pay close attention to auction fees and rigging fees. The auction house I bought these from charged 18% plus tax to whatever your bid is. For me that was 25%, not a huge deal on a cabinet I paid $18.00 for, a little bit bigger on a $300.00 item. Some of their auctions have $50-100 rigging/disconnect fees wither you load the item yourself or not.
 
OP
H

Honch

Well-known member
Joined
Jul 30, 2011
Messages
401
Location
Danville, IN
I have not posted in a while so this is a fairly big update.

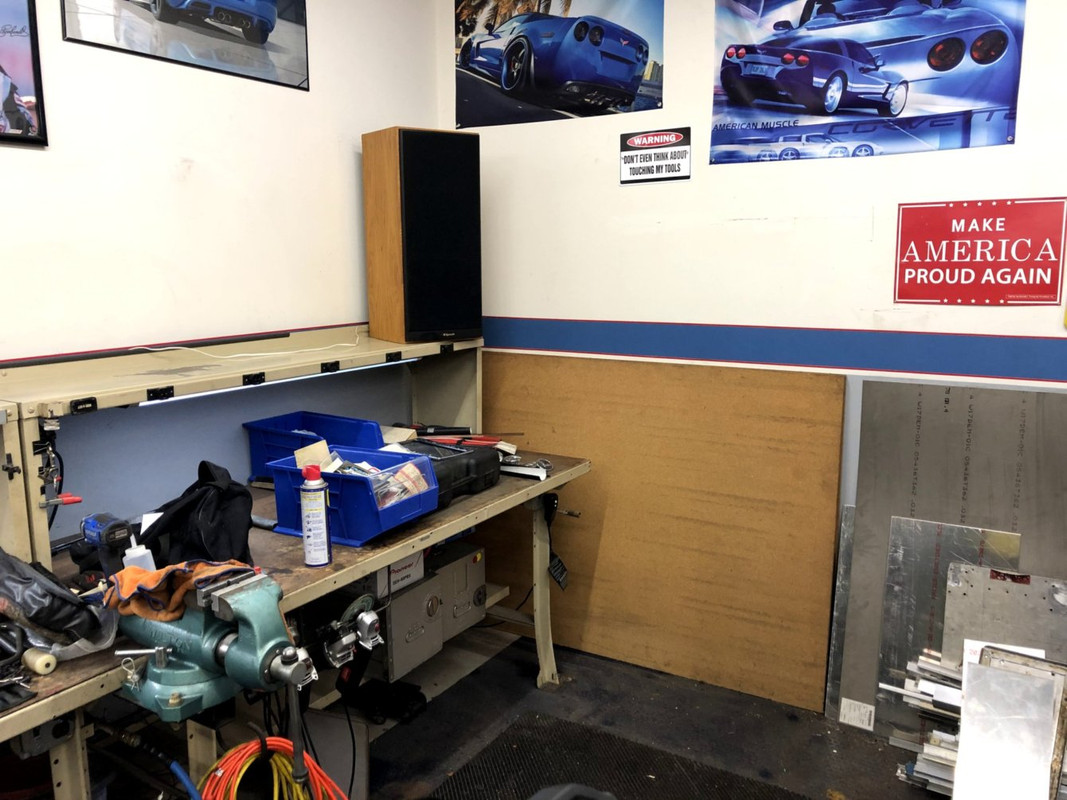
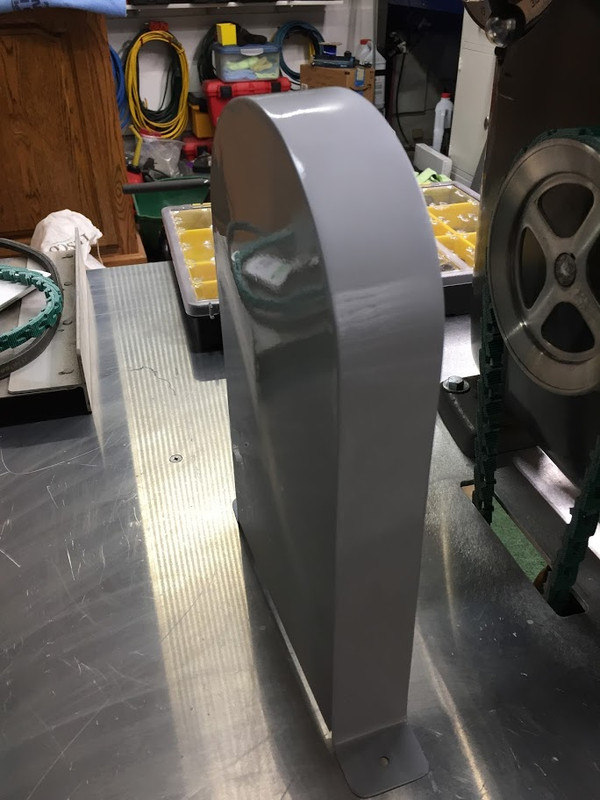
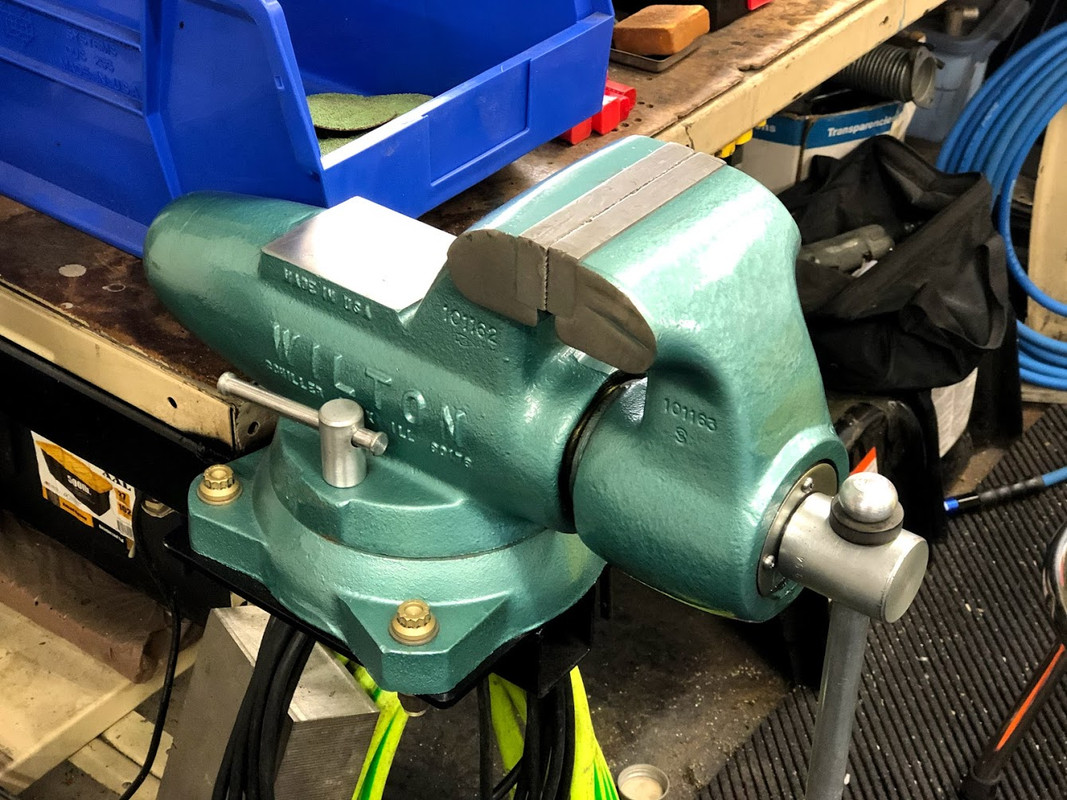
Two weeks ago I finished up my second Wilton 450S and got it mounted to the other end of my main bench. Now I have one set up with soft jaws and one with steel jaws. HF use to sell vice mounts for hitches and I couldn't find one online for under $50 so I scrounged up some material to make one.


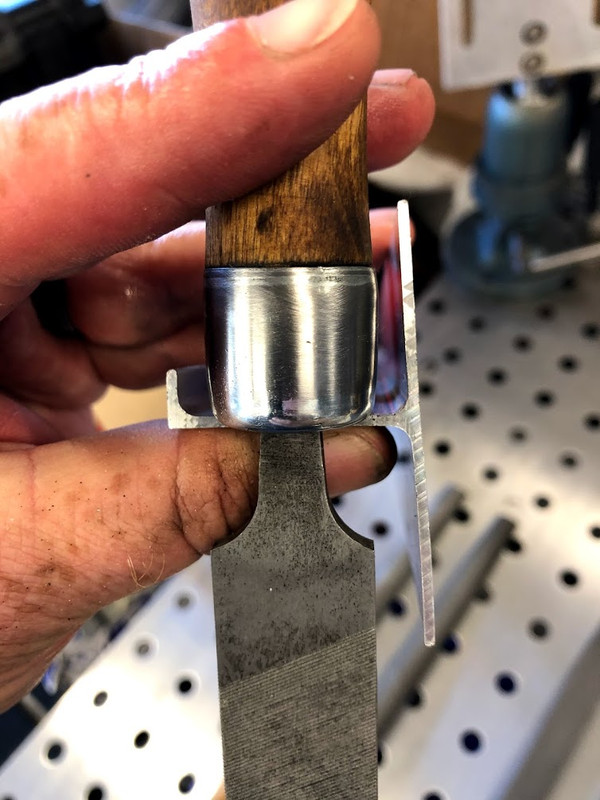
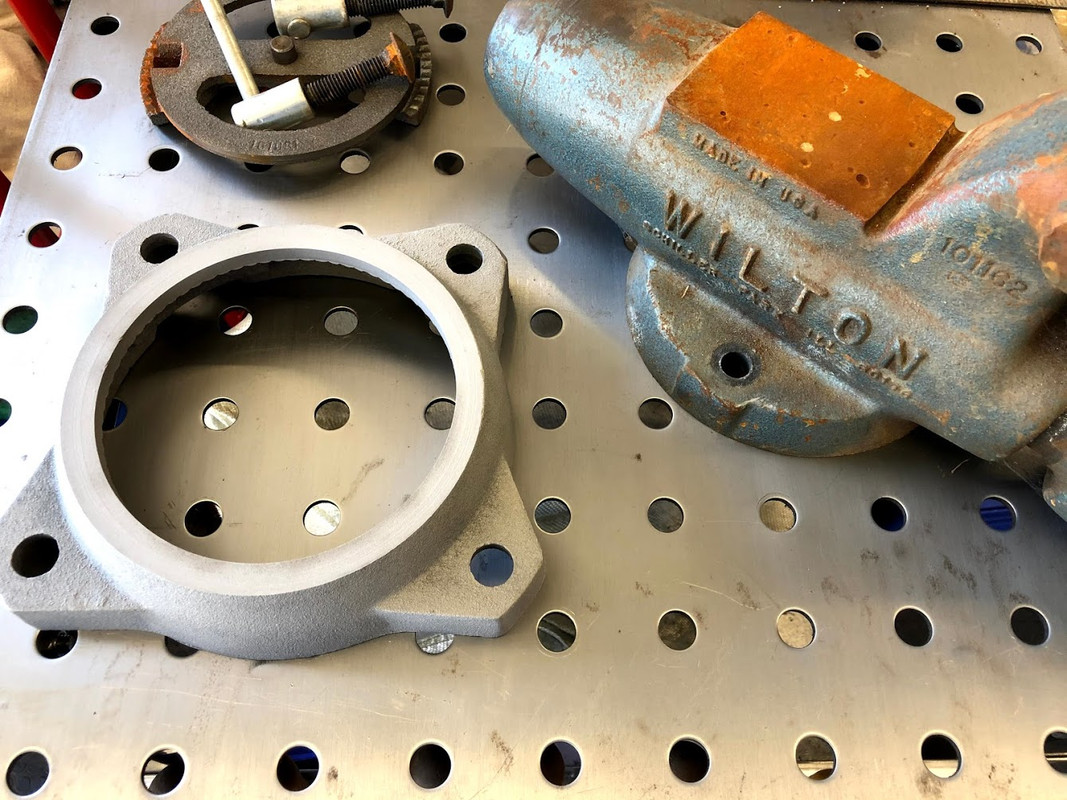
This vice had a lot of play in the screw and was starting to wear against the opening in the foot. When I tightened it, the screw would move off to the side and displace some of the clamping force. I took some measurements of the opening in the foot and the diameter of the screw and found a bronze oilite online to fit it.


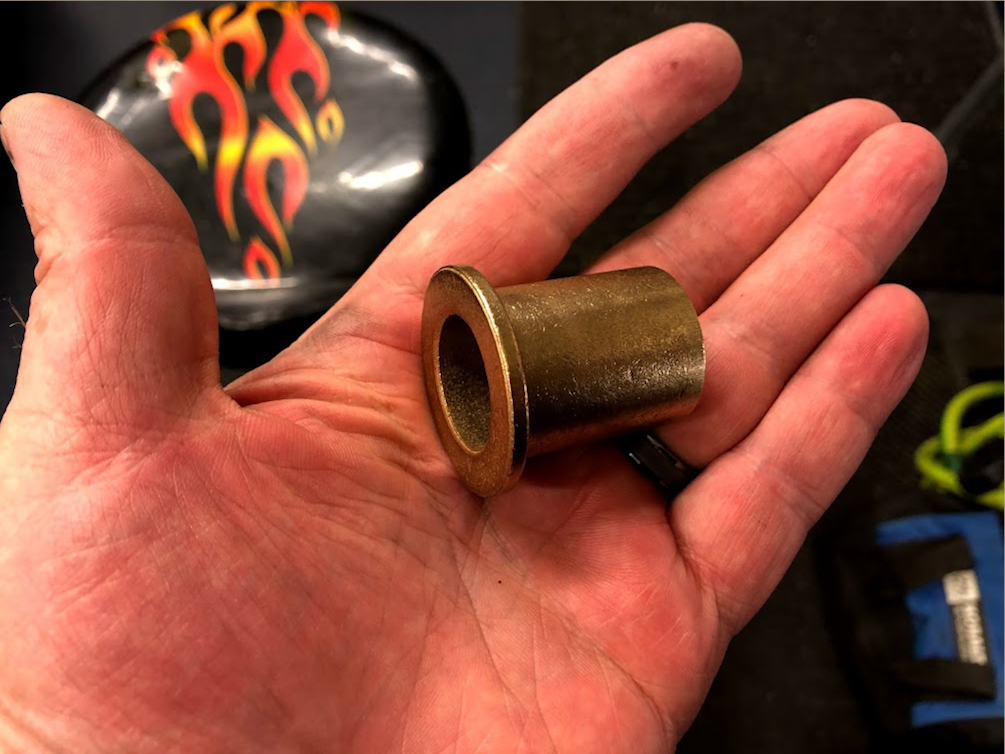
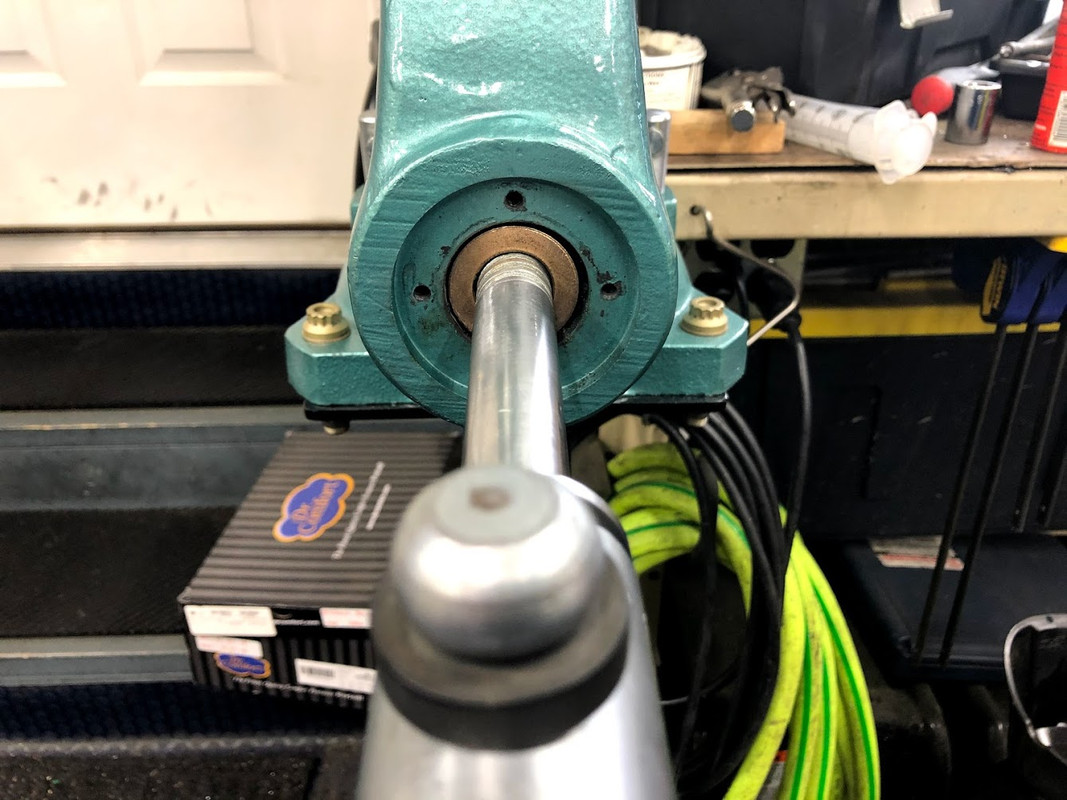
The bushing fit into the foot perfectly and the only modification I needed to make was spacing out the C-clip that retains the screw 0.030 to compensate for the hat of the bushing. With the bushing in place there is no slop in the screw and the vice clamps and releases very smoothly.

Overall the vice came out very good, I nickle welded some of the grinder cuts and drill starts and now its ready for me to beat it up some. Its going to be nice having both of them inline on the same bench.


Last weekend I picked up some more auction items. I know I said in a previous post I was done for a while but I was able to get a temporary reprieve on space. A friend of mine is going to store some of the items for me.

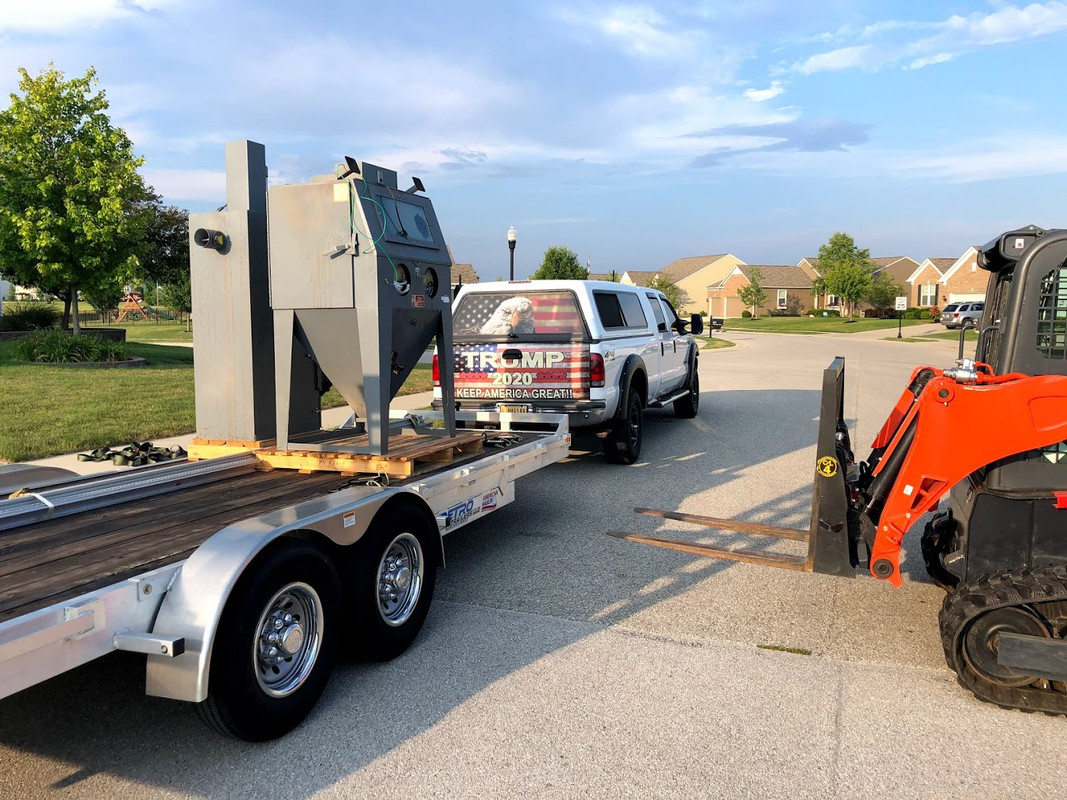
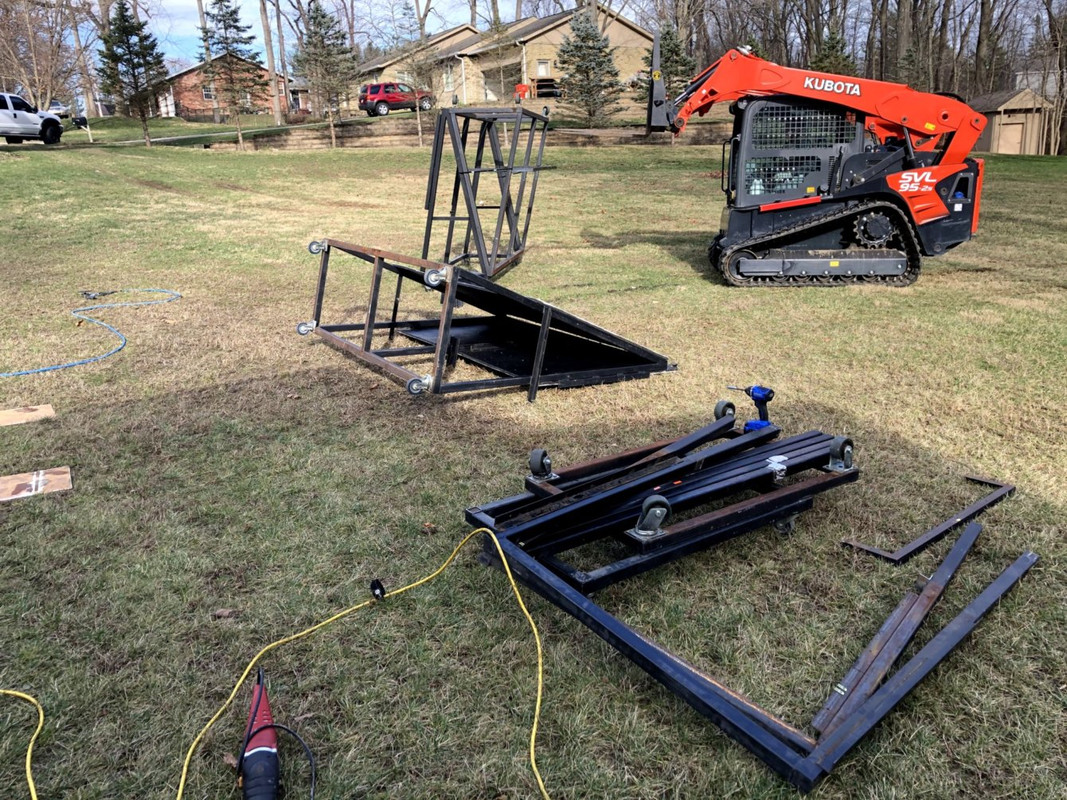
I ended up buying nine different racks and A-frames mainly for their steel. They are all built with 2"x2" 3/16" steel with some 1"X1", this is everything loaded up on the trailer.


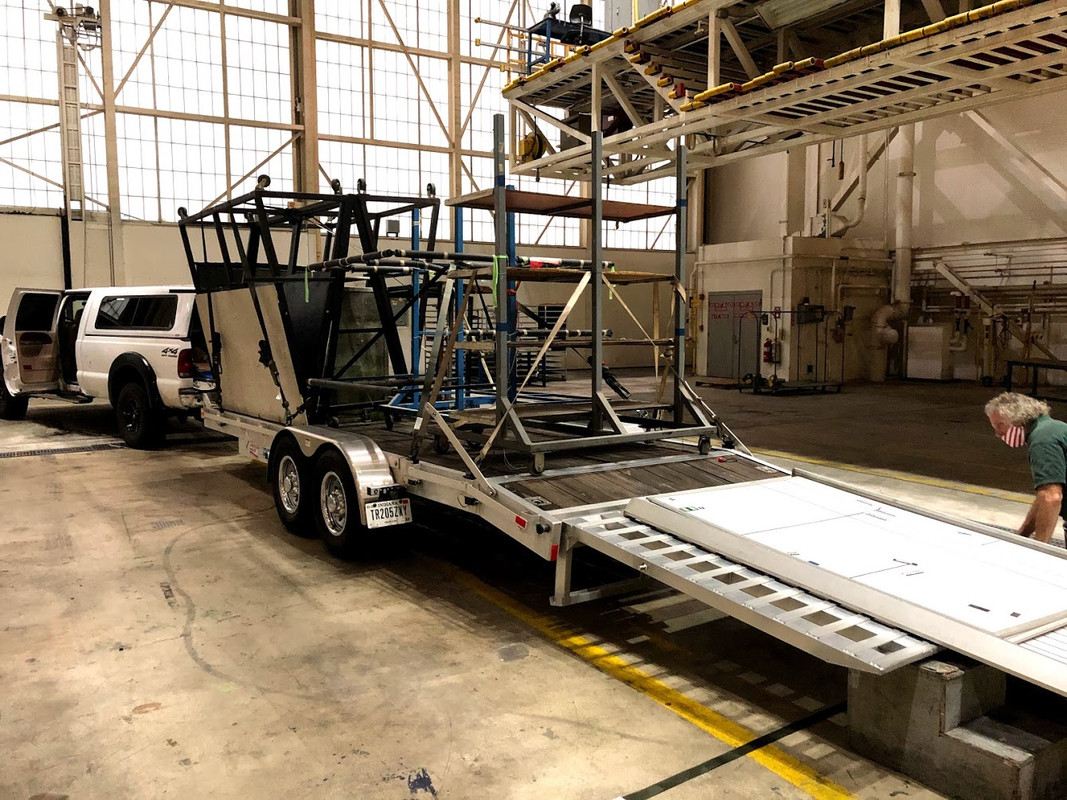
Most of the racks I will cut up for the metal, this one I am going to keep fairly intact and use as a metal storage rack.


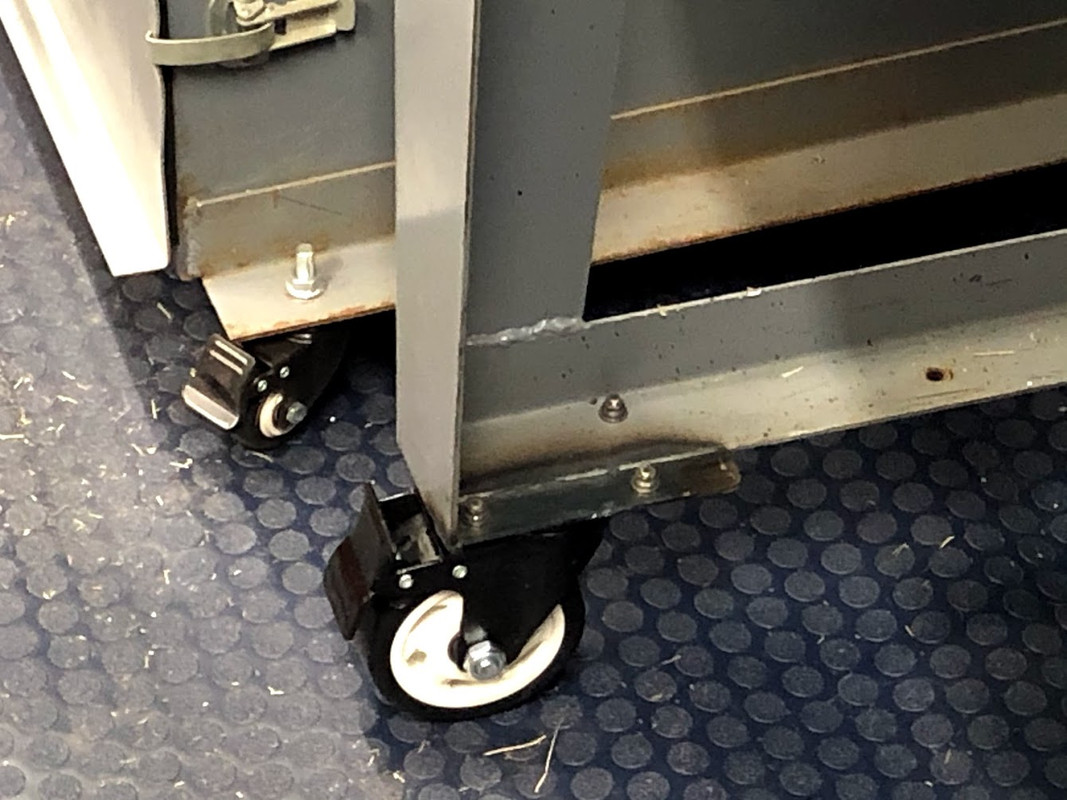
I paid just over $100 for all the racks so there is a good bit of metal for the money in them, plus every one of them has casters.

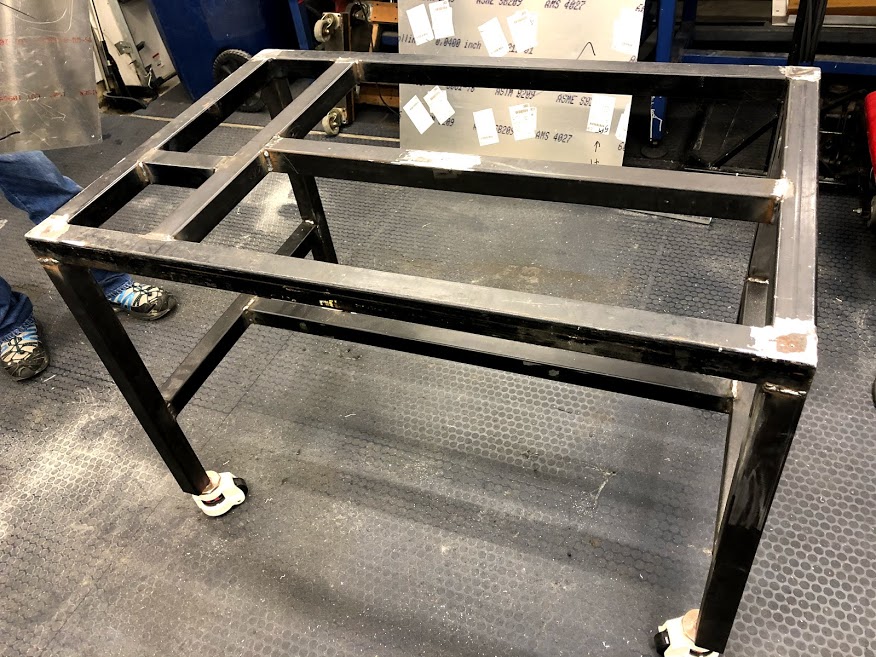
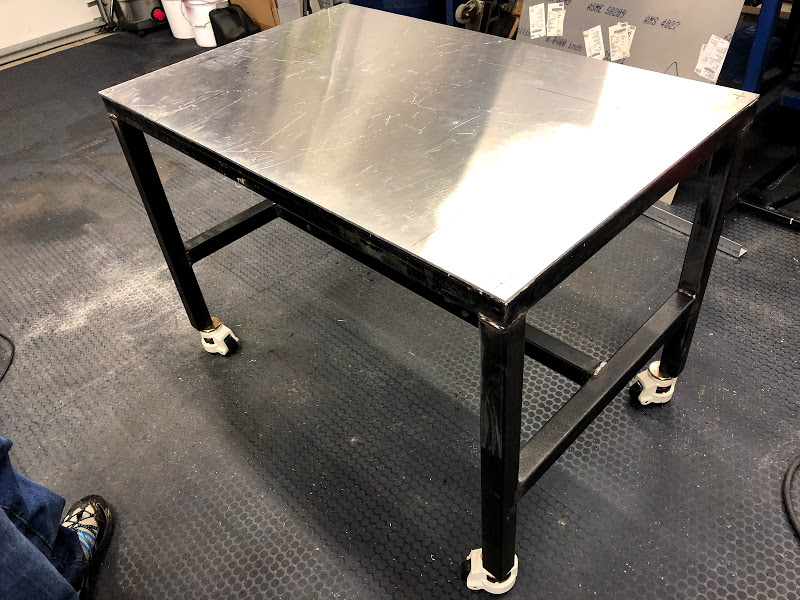
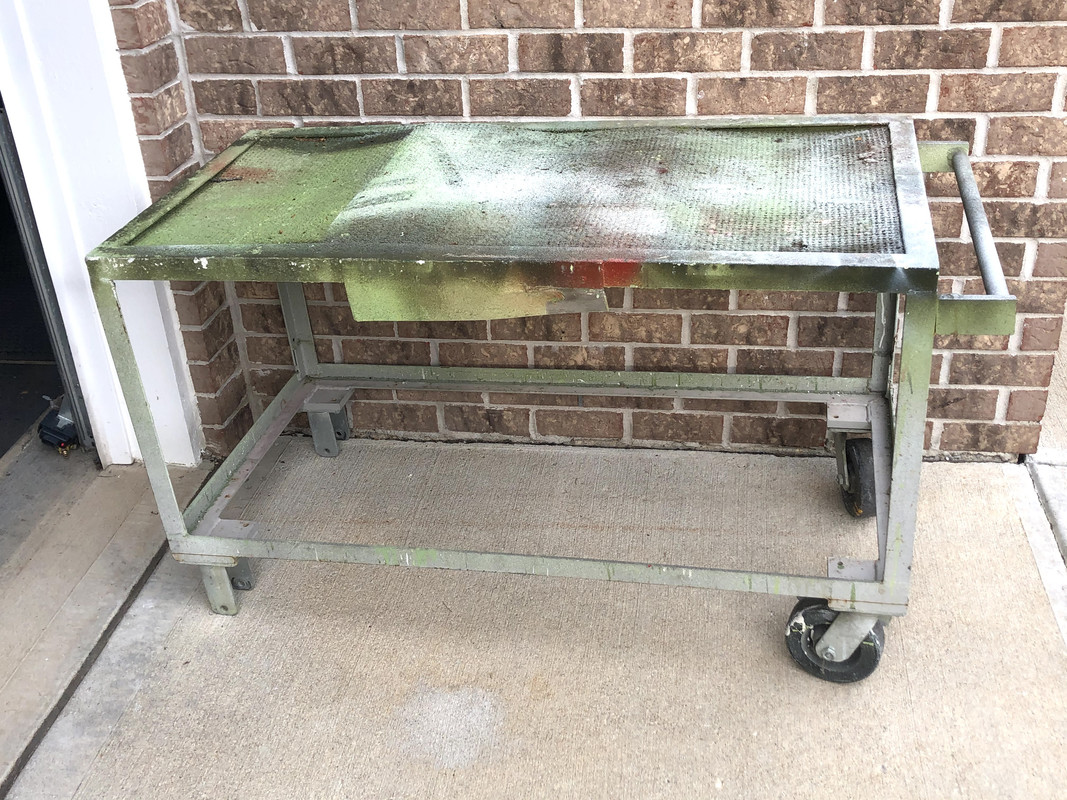
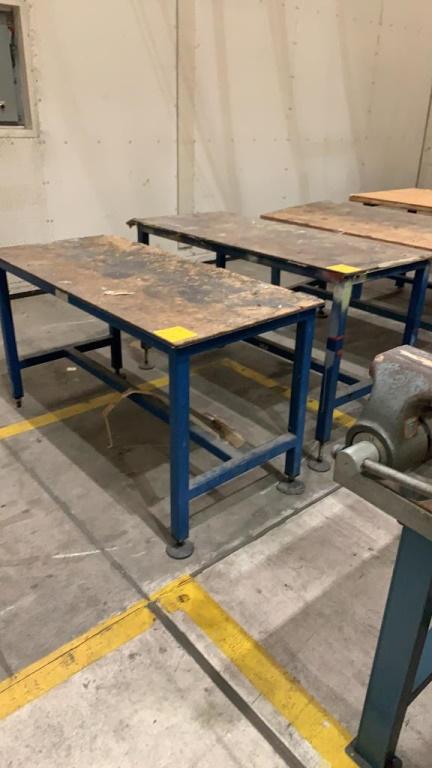
I also won a couple of tables, they have adjustable feet, are 3"x5" and made out of 2"x2" square tubing by a company called All Metal Designs Inc. Under the masonite top its 1/4" plate, I got both for less than the top of one of them would have cost me, I plan to use both for welding tables.


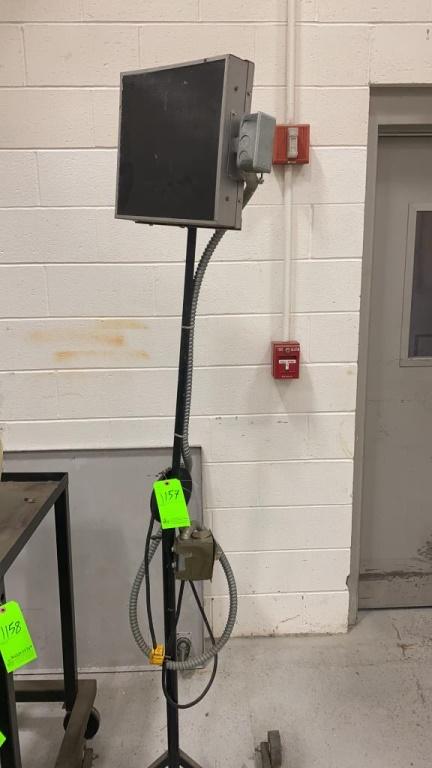
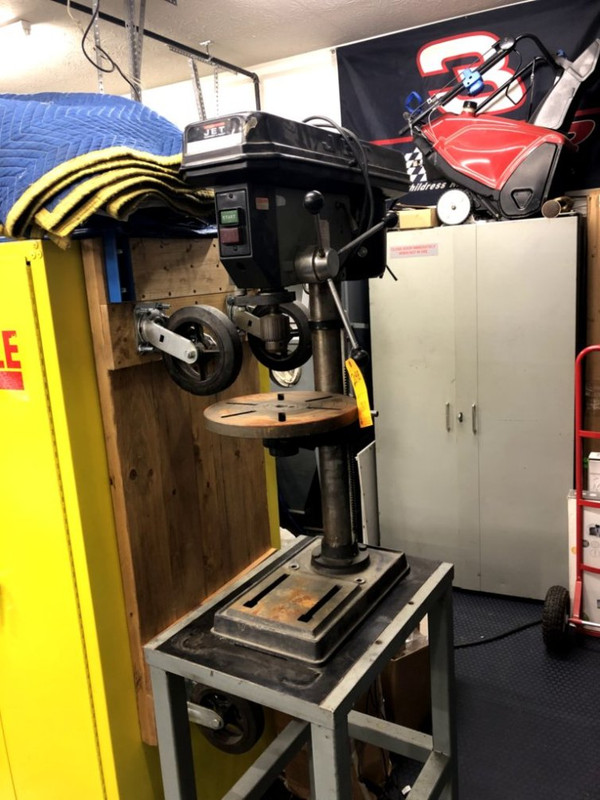
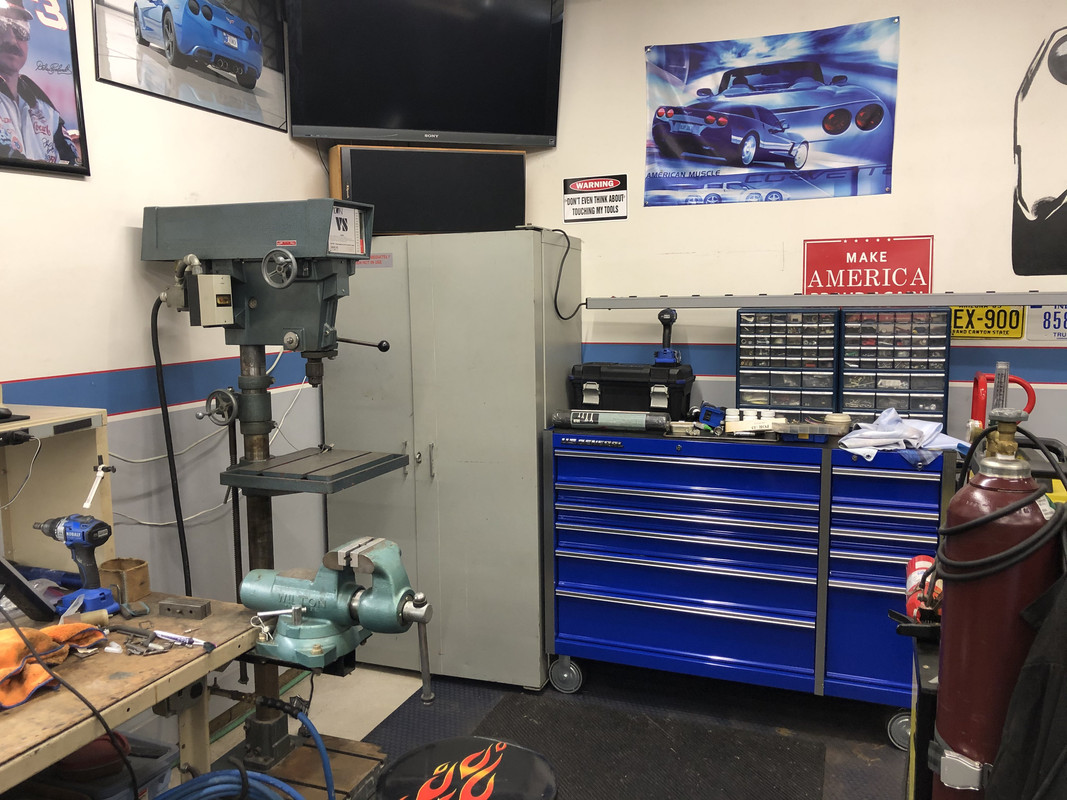
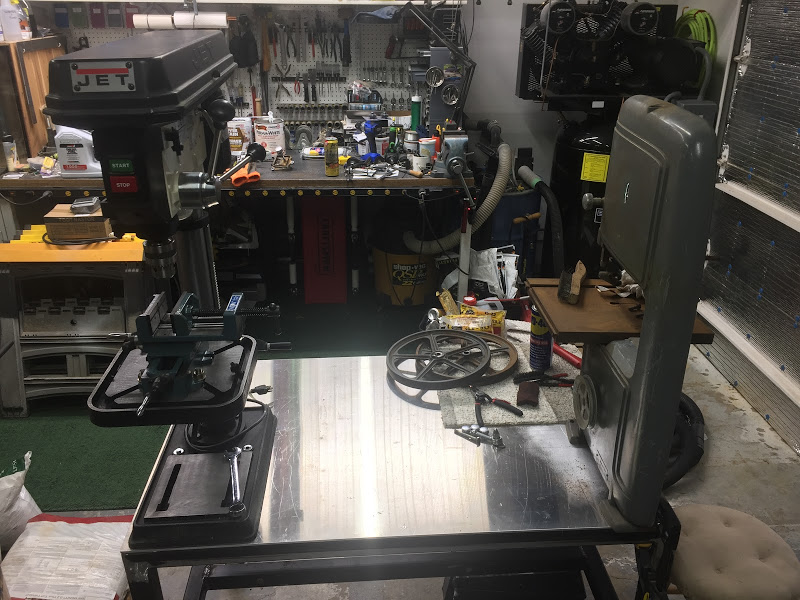
I also got a Jet JPD-14M drill press, its a 14" drill press with a 5/8" chuck and 1/2hp motor. It needs a couple very minor things fixed, but works great. I'm going to clean it up and sell it.


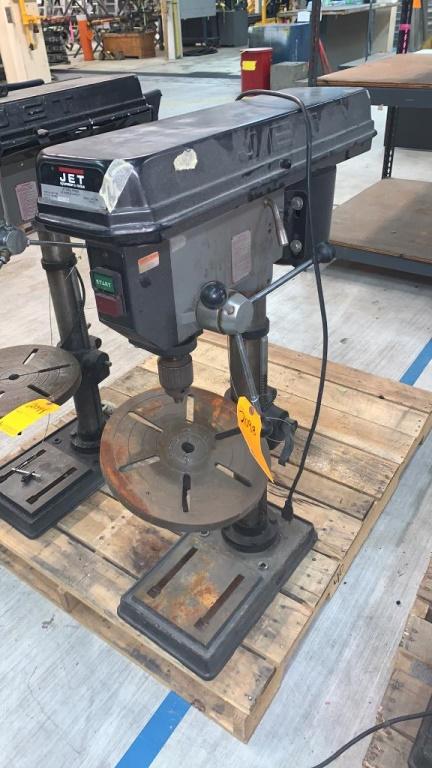
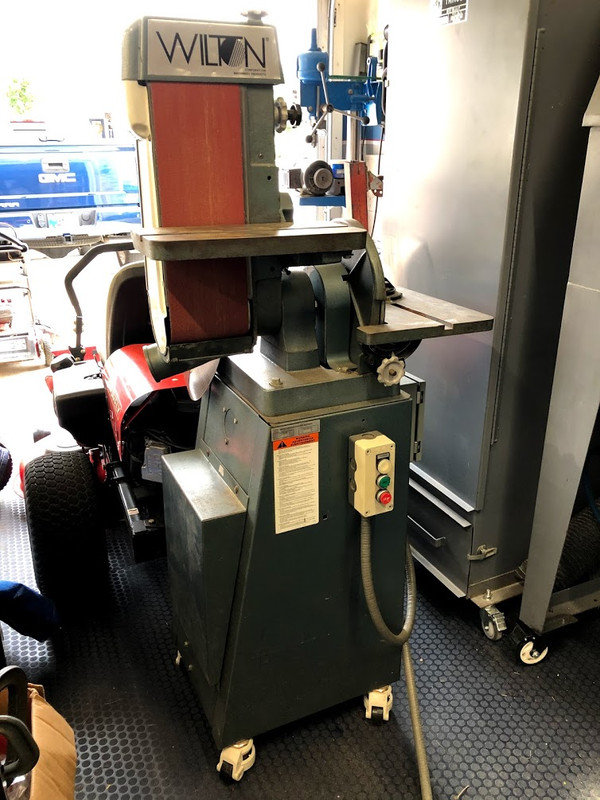
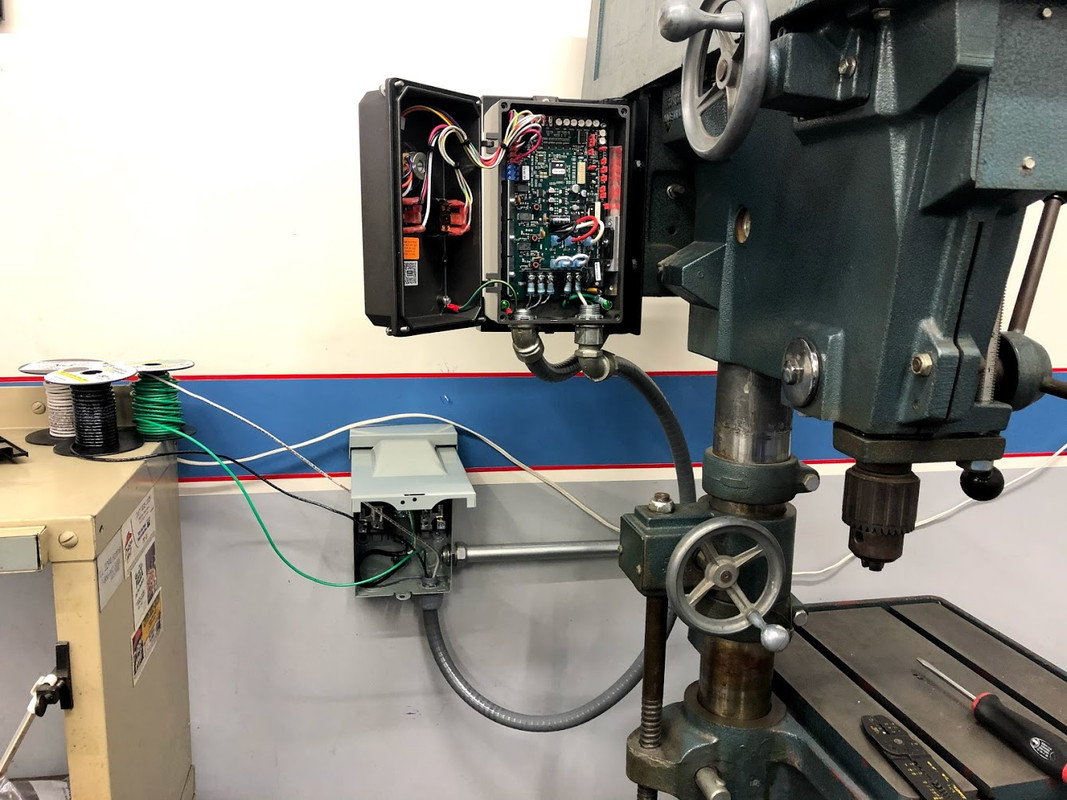
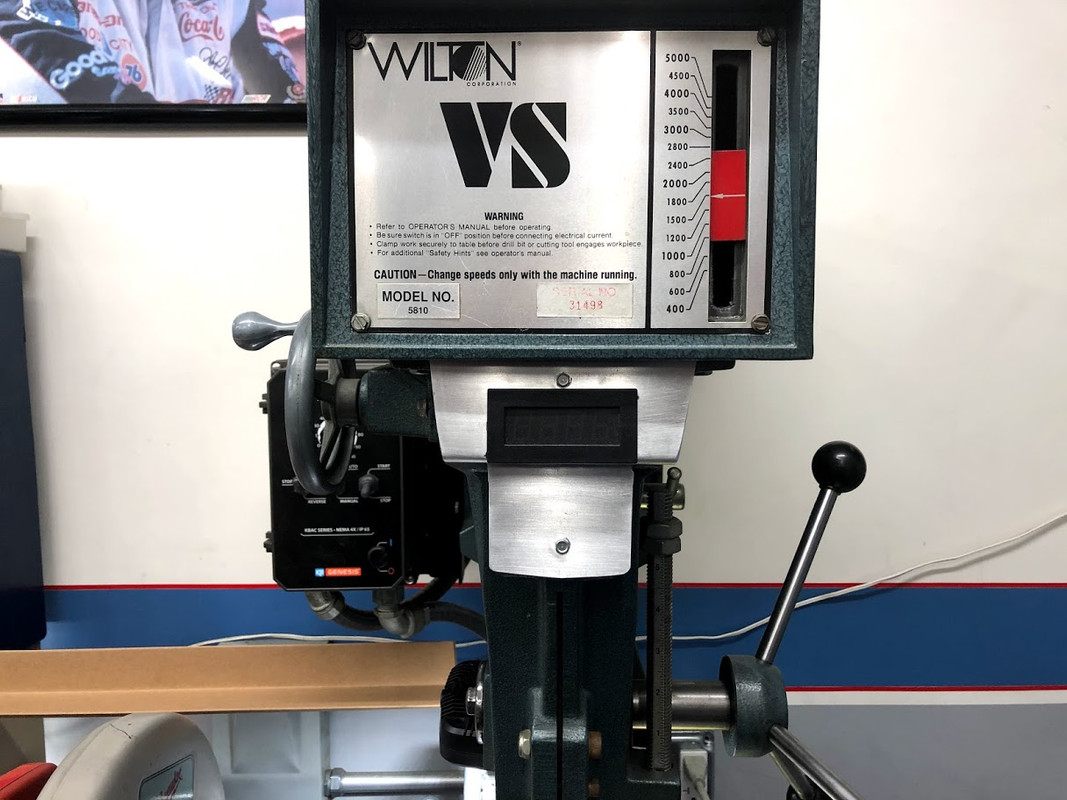
I'm selling the Jet because I also got this Wilton 5810. This was the only item I actually was going to try and buy. This drill presses are so versatile with a variable speed adjustment from 400-5000 rpm. Its a 15" with a 1/2" chuck and 3/4hp motor. This thing is about as perfect as you could expect for a drill press that's 25 years old.


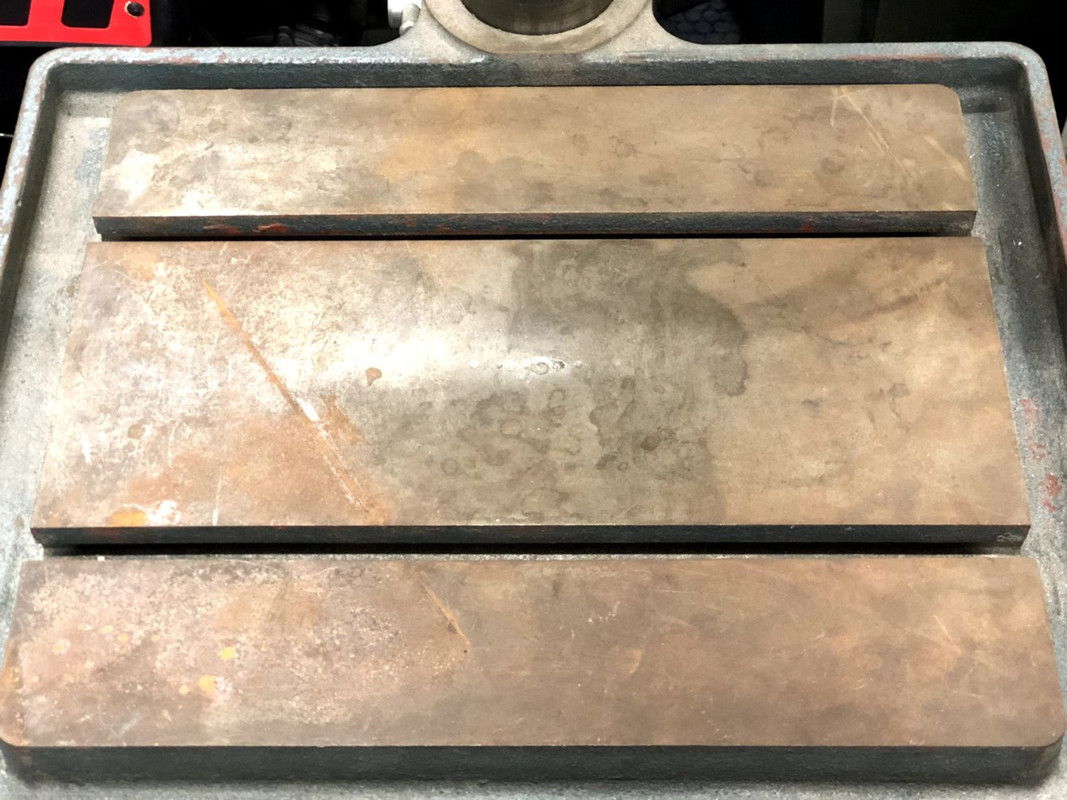
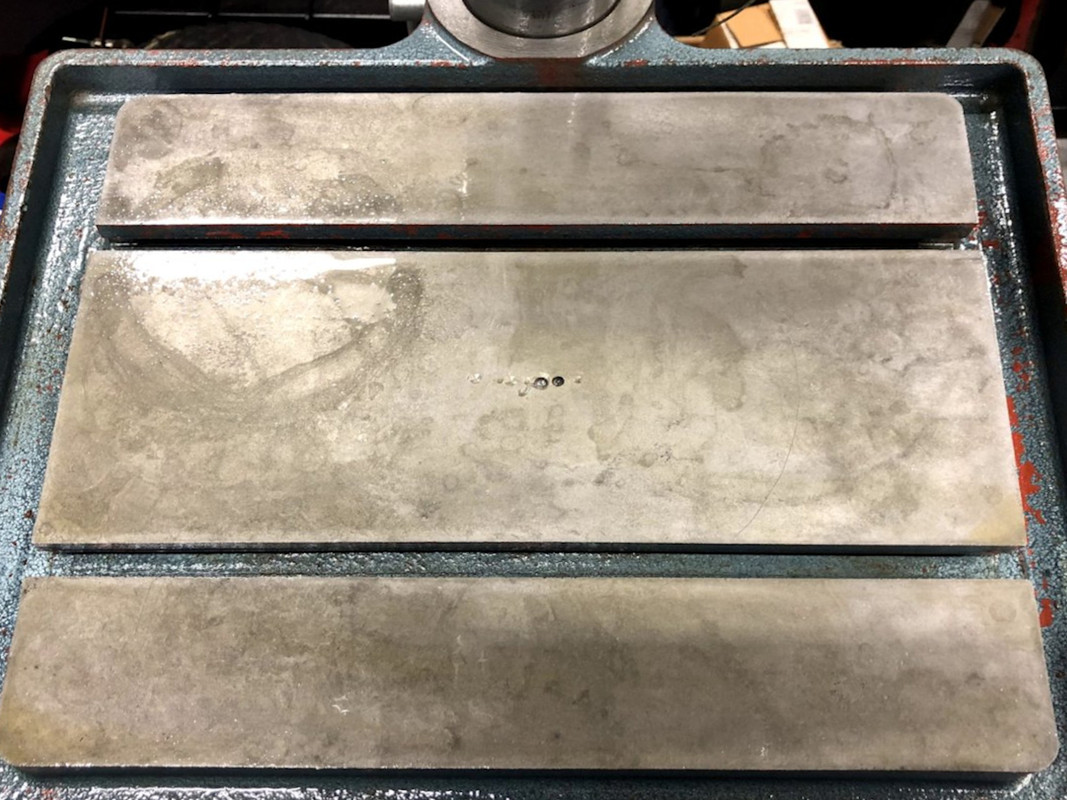
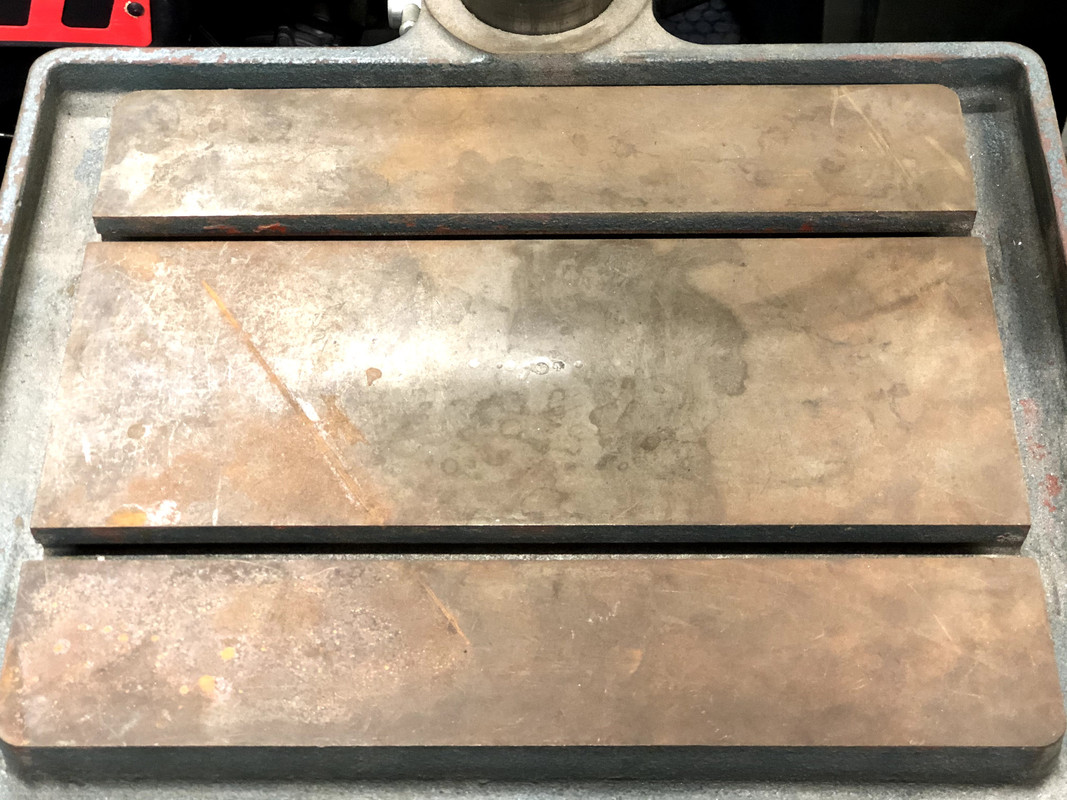
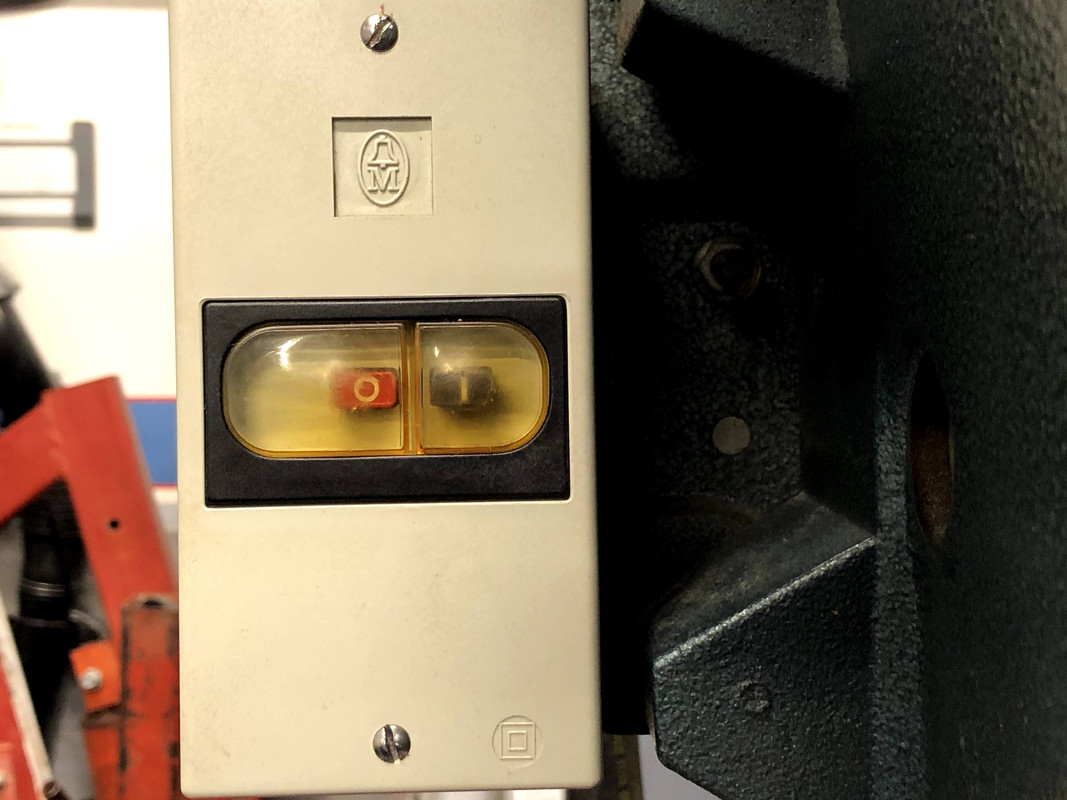
The table and the power control buttons give indication to how much this machine was actually used.


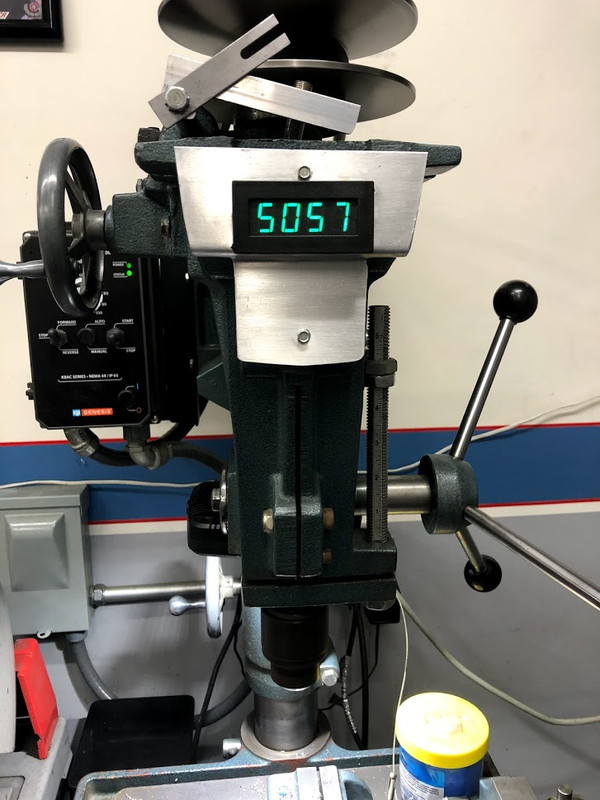
I look forward to getting this cleaned up and running. I do not plan on replacing the motor, I am going to go the VFD route with it.
 
OP
H

Honch

Well-known member
Joined
Jul 30, 2011
Messages
401
Location
Danville, IN
I finished up a project I started six months ago, its a material cart that had a deck which was broken in half. I have no idea how that happened but the guy that gave it to me had already taken it apart. Basically it was the handle and casters with no hardware.

It had a Uline sticker on it so I looked it up to see what size the deck was. Because of the price of wood now I decided to make it out of 2X6s. I squared up the lumber and to get it 4' wide I ran a 2x4 down the center. I borrowed a biscuit cutter from a friend and glued/strapped the pieces together. I don't have any pipe clamps so getting it together without bowing the middle was a bit of a challenge.


The handle was pretty beat up so I stripped all the green paint off of it and of course painted it blue.


I had an old can of deck varnish that I used to try and seal the wood. Part of the reason it took me so long was I tend to rush anything that involves glue or paint. With this I deliberately walked away and let things dry for days/weeks.


At this point I'm not sure what I am going to do with it, but I have a few places I can put it that wont take much room. I just wish I had taken a picture of it before I put it up there.
 
To avoid these ads, REGISTER NOW!
OP
H

Honch

Well-known member
Joined
Jul 30, 2011
Messages
401
Location
Danville, IN
Yesterday was fairly nice outside so we cut up some of the A-frames i bought at auction. We tried a 7" air motor with a cut off wheel, corded and cordless recip saws and the thing that worked best was an elcheapo HF grinder with a cutoff wheel. Five hours later and I have one stand left to cut apart.


A couple of miles from my buddies house there is a ReStore that regularly has cheap abrasive wheels and cutoff wheels normally $00.25 ea, I picked up the 3" Roloc discs and cutoff wheels in this this tub for under $20 to dress out all the cuts. Mostly 24 grit with some 36 grit. I'm very impressed with the durability of the discs, they last as long as any 3M pads I've used. I've only used a couple of the cutoff wheels, they seem fairly durable and they are very thin like Nortons.


After we got the metal put away and everything picked up, I loaded up the bench top Jet drill press I bought at the same auction and brought it home. I still haven't decided for sure if I am going to keep it but for now Ill get it cleaned up and fix the handle on the table lift.


Today Christmas came early and I was able to replace my tiny Snap-on box that I bought new in 1989. October 31st HF put out a 15% off everything coupon, paring that with their credit card signup I got the box for 25% off. I just had to wait a month for it to come in.


I spent the better part of the day moving tools from one to the other along with putting a lot of tools in it I didn't have room for in the old box. This weekend I am going to disassemble my second Lyons bench and move it to my woodworking area in the basement. I have never used it very much in the garage and it generally just becomes a place I lay things until I figure out where I am going to store them. This will make room for me to put my bin cabinet and sander where the bench is and room for the new tool box to fit, plus Ill actually use it in the basement.


While I was loading up the new toolbox I played around a bit with some Rust-Oleum Rust Remover on the table of the Wilton drill press. I bought it two years ago for another project and never ended up using it. Its very similar to naval jelly and removed the light rust in about 10 minutes.


I sprayed the table down with WD-40 and I'll let that soak in for a few days.
 
OP
H

Honch

Well-known member
Joined
Jul 30, 2011
Messages
401
Location
Danville, IN
Yesterday I removed the workbench and moved it into the basement.

Today I emptied and moved the bin cabinet across the garage and put it where the bench was, the flam cabinet went in place of the bin cabinet. I moved the TV off my main bench, made a bracket for it out of unistrut and mounted it above the bin cabinet. This made room for the drill press and my new tool box.


I have all the hard moves done, now I just need to reorganize some of the things I displaced and clean up some of the mess I created.
 
OP
H

Honch

Well-known member
Joined
Jul 30, 2011
Messages
401
Location
Danville, IN
A few months ago my wife asked me to make her a pegboard for her craft room. I had some scrap 20 gauge metal I used to make a frame to attache the pegboard to.


Last week while she was out of town I took it back down and attached swivel brackets and four each, four foot lights so she can swing them over the areas she is working in or nest them up directly against the board.


The lights are 5k lumen and light up the room nicely.


I also got my drill press wired up this week. I found a thread on these forums about VFDs along with some recommendations on which one to use. Im glad I did, I had originally planned on replacing the motor with a single phase unit. The VFD works great and makes the drill press way more versatile.


I also used the same 20 gauge metal to fab a simple bracket to mount an LED spotlight for the table.


Adding the VFD gave me an opportunity to put in another set of outlets in an area of the garage I didn't have any before. This allowed me to put some extra lights I had inside my bin cabinet.

 
OP
H

Honch

Well-known member
Joined
Jul 30, 2011
Messages
401
Location
Danville, IN
This week I took some of the metal I salvaged from auction and built a table for my buddy that helped me move and cut up everything.

I cut and tacked everything together and he finish welded it, he hasn't welded in almost 20 years but he did good with this. He also bought some leveling casters off Amazon and we welded a bolt in the inside corner of the tube to mount them, there was no real reason to go to all the work of capping the tube.

The cross bracing on the top is specific to the drill press and band saw he is going to mount on it. They are better bolted to the frame than the table top.


I had a 4'x4' piece of .190 7075 that we cut a foot off of and attached to the top.


This is a shot of it in his garage with the equipment in place. It should make a really good work table for him.


I also had some time this week to try some aluminum welding. Since I bought my new welder I have ran just over 10lb of wire through it but only spent about 30 minutes trying to tig weld some steel. During that time I must have dipped the tungsten 10 times. This completely frustrated me and I hadn't tried it again since. Last week I got all the pieces I needed to set up a fairly nice tungsten grinder so now there were no excuses to not try some tig welding.

These were my three first attempts at tig welding aluminum. I'm not really sure what the brownish coloring is around the edge, it may be the cladding on the aluminum or I didn't clean it well enough. Regardless I'm pretty happy that I could actually make it work, obviously though I still have a long way to go and a lot to learn.


I did enough practice runs to consume 4 rods before I had to shut down for the day. When I was putting everything away I realized I hadn't dipped my tungsten once and never even used the new grinder.
 
OP
H

Honch

Well-known member
Joined
Jul 30, 2011
Messages
401
Location
Danville, IN
I didn't spend a lot of time working in the garage this weekend, but I did get a few things done.

My drill press has an indicator that is linked to the hand crank for the variable speed. Its fairly rudimentary and appears to be accurate to around +/- 250 rpm. That changes with how you install the top cover or have it adjusted. The 110v models had a on/off switch in the front, mine was mounted on the side and had a blanking plate on the front. I used this area to put in a rpm counter and fabbed up a simple aluminum plate to mount it into.


With the VFD set to 60hz the drill press would run as low as 490 rpm and as high as 5100 rpm, so the adjustment is fairly close. The rpm indicator was fairly easy to install, the hardest part was not having a good place to locate the hall sensor. I ended up needing to make a bracket that would follow the lower shiv as it moved up and down. The only stationary points were the tops of the shiv's and I didn't want to drill a hole in the top cover to make that work.


While I had the top cover off I decided to clean everything and lube up the variable speed mechanism. That's when I noticed the low speed stop was broken off, so I got to practice arc welding cast again.


Last night I ordered parts to build a flood coolant system for it. The table is already set up with a drain so it should be fairly easy to make it work.

My buddy stopped by asking about a pulley/belt guard for his band saw. Its the saw he mounted on the table we built a couple weeks ago, its an old Craftsman with the motor hanging under it.


I had a small piece of 16 gauge that worked perfectly for this, I think it came out very nice, he just needs to install it now.

 
OP
H

Honch

Well-known member
Joined
Jul 30, 2011
Messages
401
Location
Danville, IN
Friday all the parts for my flood system came in, the only thing I hadn't really figured out is what I was going to use for a reservoir. Yesterday I decided to go to Lowes and buy a five gallon bucket with a lid. After looking around the store I came across some storage containers that were Craftsman branded, they seemed to be very sturdy and only a couple bucks more than the Lowes bucket. I bought two different sized five gallon containers and chose the one that was shaped like a square bucket to use for the reservoir.


I put a small notch in the lip so the lid to pass the hoses through and made a simple bracket on the column to mount the loc-line shutoff valve. I used de-ionized water to mix with the cutting fluid concentrate. Hopefully it will keep the corrosion to a minimum.


Most of the fittings and adapters I scrounged up so I only have about $75 invested in the whole system, over half of that was the cutting fluid concentrate. I figure if it will save me a few burs and bits it wont take long to pay for itself.

 
OP
H

Honch

Well-known member
Joined
Jul 30, 2011
Messages
401
Location
Danville, IN
I have had a some projects over the last few weeks that required some type of tapping. Each time I needed to, I would end up pulling out my phone and searching for a chart, so I decided to make one. I did some google searching and found the information I wanted and had Walgreens print out on a sticky poster. Their service was 60% off making a 16"x22" poster $13..00. The picture of it looks a little funky, I managed to get some hand prints on it when I smoothed it out and it was still drying from me wiping it down.


Now I'm working on putting one together that is a speed chart for the drill press.

Last December my oiless 6hp 60gal Craftsman compressor started making an awful racket (more than normal). I pulled the shrouds off and found the bolt holding the fan on had come apart and the fan was no longer working. The bolt hole was completely trashed so I drilled and tapped it for another bolt and reinstalled the fan. Unfortunately the damage was done and it would take 20-25 minutes for the compressor to go from 80-120 psi.

Since then I have been researching new compressors and settled on a Eaton/Polar Air unit I want. The problem is its quite a bit larger and wont fit where my current compressor is located. With my limitations on space I decided to fix my current compressor for now. A few weeks ago I took the pump apart and found the rings had chunks missing out of them and the cylinders were badly worn and scored.


Pretty straight forward to fix except searching by model number nothing I need for my 27 year old compressor is made anymore. I did find a few kits that basically replaced everything minus the pump housing but the +$300 price tag wasn't doing it for me. After spending a couple evenings searching I came across a kit for a devilbiss pro 4000 for $80 that had similar dimensions to the sleeves I needed.

The parts came in Friday and it took me about 2 hours to clean and put everything together. The new sleeves were quite a bit thicker and chromed versus the thin coated original sleeves.


Now the compressor takes exactly five minutes to completely fill the tank from empty. Using some information I found online calculates this to right at 13cfm. I am more than happy with that. Hopefully this will allow me to get a few more years out of it until we move and I can get the Eaton.
 
OP
H

Honch

Well-known member
Joined
Jul 30, 2011
Messages
401
Location
Danville, IN
I haven't accomplished anything post worthy in the garage over the last two months. I did a brake job on the Sierra, got the Corvette up and running for the summer and replaced the pads on it, nothing terribly exciting. Two weeks ago though I came across some 767 engine mount bolts and I decided to implement them into a project I have been wanting to do.

My wife had bought me a HF stool 10 years ago which I have used quite a bit. Its not comfortable, its way too tall and the covering is damaged from chemicals and welding splatter. I recently cut the legs down on it to make it more useful for me but the way it is designed I cannot make it any shorter. Its still about 4 inches too tall to use at a bench, so I decided to build a shop stool.

I started looking for stool seats online and they seemed to be relatively inexpensive. The bigger issue is most of the ones I could find were made in China and had two month lead times, I don't want to wait so I decided to make my own. It also gives me a reason to buy a pneumatic staple gun. Its great when you can self justify things with a completely lame reason.

I started by cutting out some foam to fit a 13" X 3/4" piece of plywood my buddy donated.

IMG-1872.jpg

I then covered it with some black vinyl I have left over from covering my creeper. I put a small piece of polyester batting between the foam and vinyl to keep the vinyl from eating up the foam.

IMG-1874.jpg

I'm very happy with how this turned out on my first try. I didn't have any dust cover fabric so I used some more of the batting to cover the bottom of the seat, it ***** that its white but I use what I have available.

IMG-1875.jpg

This is a mock-up of the seat with a 1" diameter acme screw mounted to a 2"x2" center post. I used two "1x3" engine mount bolts welded to an acme nut to create a jamb nut for the screw. This will allow the seat height to be adjusted between 20 and 30" inches.

IMG-1880.jpg

I wanted to do something fancy with the legs but the engine mount bolts only being 6" long limited me from doing a completely unnecessary leg design. Here is a shot of the legs with two of them having the ends capped. I still need to do some finish sanding on them as I plan to leave the stool with a sanded metal finish.

IMG-1881.jpg

This is where my project finished for the weekend because the entire time I was fighting with my welder working intermittently. It was very frustrating because it would only work about 25% of the time when I pulled the trigger. Long story short I pulled the gun apart to see if I could clean the contacts on the switch and found this:

IMG-1876.jpg

I have no real experience with Tweco guns but they seem to have a good reputation. Frankly I am not terribly impressed with the build quality, but soldering the wire back on the micro switch was easy enough. I just wasted a lot of time figuring out that was the problem, so Ill have to finish up the stool this coming weekend.
 

zmotorsports

ALLIANCE MEMBER
Joined
Oct 20, 2009
Messages
21,325
Location
Northern Utah
Nice job on the seat cushion/padding.

I like the adjustment nut for the Acme thread and looking forward to seeing the finished legs.:thumbup:
 
OP
H

Honch

Well-known member
Joined
Jul 30, 2011
Messages
401
Location
Danville, IN
Nice job on the seat cushion/padding.

I like the adjustment nut for the Acme thread and looking forward to seeing the finished legs.:thumbup:

Thanks for the comments, I read about your Chrysler click fix a few days ago. I cant tell you how many times I have melted plastic to fix tabs, studs, cracks etc. I have one soldering iron dedicated for it.

I had a high school friend planning to stop by yesterday afternoon, I had not seen him in at least 10 years and knowing it would be a late night I took today off. Before he arrived I started a small project on the drivers seat in the Corvette. Three years ago the leather on the bolster started cracking so I bought an OEM cover and replaced it. A few weeks ago I noticed cracks on the face of the headrest. I have no idea what causes this, since nothing ever touches this area and the passenger side is 12 years old and looks new.

I cleaned the area to get a better look at it and that is why the cracks in the coating look so dark.

IMG-0325.jpg

I sanded the face of the headrest with 220 grit and filled in the cracks with skim coat of adhesive RTV. Then I did the hardest thing for me to do, I left it alone for 24 hours. Today I sprayed 3 dusting coats of SEM interior paint over the area.

IMG-1852.jpg

Its not perfect and still has a couple low areas. I am going to let it go for a few weeks and if it retains durability Ill repeat the process. As it is now I only have about 15 minutes of actual work invested.

After my friend left this morning I was able to finish up my shop stool. I am very happy with how it turned out.

IMG-1894.jpg

Something I didn't fully think through was the finish on the metal. Originally I had planned to clear over it but I couldn't find any clear (spray paint) that I felt had any durability to it. Recently I tried to buy some in 2k and wasn't going to go through that again, so for now it has a nice soaking coat of WD-40. Ill see how that works and it may end up as the permanent solution, unless anyone has any better suggestions. Otherwise if it doesn't work Ill paint it black.
 

Prospecter

Well-known member
Joined
May 16, 2015
Messages
2,392
Location
Maine
Love the stool.

I use FluidFilm every year or two on my tablesaw top. Spray on lightly. Rub in. Wipe off as much as possible. Never rusts.
 

amkluttz

Well-known member
Joined
Sep 8, 2014
Messages
279
Location
Concord, NC
I was going to mention something similar to Prospector. WD-40 makes a gel lube under their "Specialist" brand that has similar properties to fluid film. I use it on my floor standing drill press to keep the rust off the leg.

Great looking stool!
 
OP
H

Honch

Well-known member
Joined
Jul 30, 2011
Messages
401
Location
Danville, IN
Stool turned our freakin' awesome. Love it and may have to copy that.:beer:

Copy all you want, the thing I like the most about it is its weight, it doesn't slip, move or easily tip when I sit on the corner of it.

Love the stool.

I use FluidFilm every year or two on my tablesaw top. Spray on lightly. Rub in. Wipe off as much as possible. Never rusts.

Thanks for the information, I'll read more about it.

I was going to mention something similar to Prospector. WD-40 makes a gel lube under their "Specialist" brand that has similar properties to fluid film. I use it on my floor standing drill press to keep the rust off the leg.

Great looking stool!

I've seen the Specialist stuff on the shelves and really not paid much attention to it, I thought it was marketing / rebranding of WD-40. When I was looking at the gel I came across WD-40 Specialist Silicone which apparently dries and leaves no residue, I am going to research it some more. Even if it doesn't work for this I have some other things it would be useful for.

Thanks for the feedback from all of you, its much appreciated.
 

amkluttz

Well-known member
Joined
Sep 8, 2014
Messages
279
Location
Concord, NC
I've seen the Specialist stuff on the shelves and really not paid much attention to it, I thought it was marketing / rebranding of WD-40. When I was looking at the gel I came across WD-40 Specialist Silicone which apparently dries and leaves no residue, I am going to research it some more. Even if it doesn't work for this I have some other things it would be useful for.


I have a can of the WD silicone spray. It's pretty much the same as any other can of silicone based lubricant. I don't know if it has much staying power. You might try some dry lube. 3-IN-ONE makes a Lock Dry Lube in a small can that I picked up from Lowes. It states it won't attract dirt, is anti-corrosion and the "dry" portion I believe means it doesn't leave a super greasy film.
 
OP
H

Honch

Well-known member
Joined
Jul 30, 2011
Messages
401
Location
Danville, IN
I have a can of the WD silicone spray. It's pretty much the same as any other can of silicone based lubricant. I don't know if it has much staying power. You might try some dry lube. 3-IN-ONE makes a Lock Dry Lube in a small can that I picked up from Lowes. It states it won't attract dirt, is anti-corrosion and the "dry" portion I believe means it doesn't leave a super greasy film.

I did not realize 3-IN-ONE had so many different products.

Interesting enough I read this on their company website page showing their history:

1995
WD-40 Company officially acquires the worldwide 3-IN-ONE® Oil business from Reckitt & Coleman Plc., worldwide manufacturer and marketer of household, toiletry, pharmaceutical and food products.
 
OP
H

Honch

Well-known member
Joined
Jul 30, 2011
Messages
401
Location
Danville, IN
This weekend I started another project, I decided to build a pirates chest. Its basically a container that will go on my front porch to prevent porch pirates from stealing my packages. I haven't had any stolen yet but don't really want to wait till it happens before I do something about it.

Last year I bought a couple drying tables for the infrared heaters on them. I planned to eventually cut up the tables for the metal, but after thinking about it I decided to use the shorter of the two as the basis for the pirates chest.


The table is 4'x2' and just over 22" tall with the casters removed. I am going to sheet it with 0.071 7075 on the sides and 0.100 on the top and bottom. I have around 50 sheets at my friends house where the table was located so I went over yesterday to look through what was there and try to use up some of the smaller sheets. While I was digging through the stack I found a 3'x10' sheet of 301 1/2 hard stainless that was 0.061, so I took it along with me to cut for my work bench.

I have access to a 6' hydraulic sheer so it only took a few minutes to cut all the sheets for the pirates chest, and cut the stainless down to a 6' piece.

Once I got home I realized the stainless was going to be in my way no matter where I put it, so the pirate chest went on the back burner and I changed out the 25 year old piece of masonite on my bench. I had debated on doing this in the past but I liked how forgiving the soft masonite was I just hated how it looked and now it was deteriorated to a point it would leave stains on some of the items I would place on the bench.


The bench is only 34" deep so I let the sheet hang off the back 2", this lets the sheet go against the wall and should help keep items from rolling off the back like they did before. It would have been nice to bend the 2" up but I think it would have taken a press brake to do it.

 
OP
H

Honch

Well-known member
Joined
Jul 30, 2011
Messages
401
Location
Danville, IN
This morning I spent a few hours extending my garage door opener antenna outside and above the door. It seemed to help with the range on the transmitters, I want to go with it a few weeks before I decide if I mess with it anymore. Previously I needed to have my front wheels on the driveway but now I can be in front of the neighbors and start it opening.

After that I ran a few errands and started working on the pirate chest. One of the reasons I decided to use the drying cart for this project was I didnt want to waste a bunch of time cleaning the paint off the metal, it would be all covered. Unfortunately that's exactly what I ended up doing I knew the paint would probably be thick but I had no idea it was going to be over 1/4" thick.


The quickest, easiest way to get it off was using a cut down, sharpened putty knife like a chisel. Even doing that Its going to take probably two hours to get it off the top rails.

I did get all the unnecessary brackets, handles etc. removed and while looking it over to decide what other grinding I would need to do I noticed its unique or well unique to me construction. I have never seen someone put together angle iron this way, none of the seams on the main structure are welded just the splices inside.


I'm guessing it would help with preventing warping, but I'm not sure.
 
OP
H

Honch

Well-known member
Joined
Jul 30, 2011
Messages
401
Location
Danville, IN
Today I finished cleaning up the framework, the amount of paint that came off of it was fairly significant.


I then started to go over it with a 40 grit flapper disk, I recently bought some cheap ones for a dollar each on Amazon. Three minutes into using it the grinder started vibrating badly and I immediately blamed it on the cheap flapper disk. Thirty seconds later I had grease splattering on my glasses and I noticed the head of the grinder was coming apart . The screws holding the case halves were loose and one was missing.

I dug through my machine screw bin and found one identical to the missing screw, it was shortly after I put it back together that I realized it was the same screw. I found it a little over a week ago on the floor and tossed it into the machine screw bin.


I finished up with painting some of the bare areas of the frame until I ran out and moved on to my next new project.

Last weekend I picked up a couple of free standing fans for free, one is in really good condition and only needed a motor pulley along with a new belt. I gave it to a friend and kept the other for myself, it needs a bit more work.


Something fell on it while it was running and put the fan into the barrel, one of the fan blades was badly bent and the barrel was smashed in. The motor works fine and the bearings are all good. I straightened out the barrel and the fan, if I cant get it to run smooth Global still sells the fan blades fairly cheap. I dont plan on doing any cosmetics to it, I am just going to get it in good working order.
 
To avoid these ads, REGISTER NOW!
Top Bottom