To avoid these ads, REGISTER NOW!

Restoring a 1947 vintage snap on tool box

which type of restoration should i do


  • Total voters
    128
OP
B

billybudge

Well-known member
Joined
Apr 17, 2011
Messages
321
Location
UNITED KINGDOM
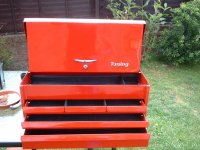
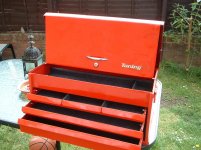
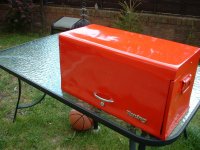
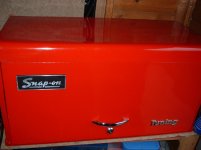
Well, I guess it.s time to add a few pictures of the nearly finished project, although I still need a snap on badge and the lid stays,
I am very pleased with the outcome of this box. its not perfect, but 100 times better,and now fully usable and structuraly sound,
considering the age and history of this box, I think it has come up well,
it was made in 1947 and very well used and abused.
 
To avoid these ads, REGISTER NOW!
OP
B

billybudge

Well-known member
Joined
Apr 17, 2011
Messages
321
Location
UNITED KINGDOM
Here are some pictures,
 

Attachments

  • snap on  part end 024.jpg
    snap on part end 024.jpg
    144.9 KB · Views: 449
  • linbins forever 012.jpg
    linbins forever 012.jpg
    143.9 KB · Views: 390
  • snap on  part end 016.jpg
    snap on part end 016.jpg
    142.4 KB · Views: 361
  • snap on  part end 025.jpg
    snap on part end 025.jpg
    143.8 KB · Views: 419
  • snap on  part end 017.jpg
    snap on part end 017.jpg
    146.8 KB · Views: 390
  • snap on  part end 026.jpg
    snap on part end 026.jpg
    72.9 KB · Views: 387
  • snap on  part end 022.jpg
    snap on part end 022.jpg
    143.8 KB · Views: 428
OP
B

billybudge

Well-known member
Joined
Apr 17, 2011
Messages
321
Location
UNITED KINGDOM
The paint finish I used an old fashion way of painting, not spraying,
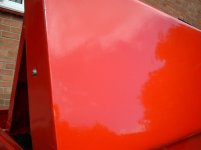
The paint is a double flip, using these colours from 1940s snap on orage/red to 2011 snap on red, then triple glossed, so as you look at the tool box and walk round it it changes colour shade gently between the snap on ages, a nice little touch.
as you can see I lined the drawers,
I added the tuning badge, and I will say why, when I was aged about 4 I wrote on this box with a paint marker pen, the word tuning, at the time My Dad thought it was funny ish,and after all these years, well that was nearly 35 years ago, when I sanded the box, that word which I wrote was still slightly visable,
 

Even 11

Well-known member
Joined
Dec 7, 2009
Messages
1,322
Location
Colorado
That's a beautiful resto!! I would find that one hard to use with how nice it looks now!

-Dane
 

morlock

Member
Joined
Apr 28, 2011
Messages
5
wow, that's beautiful great work! tell me more about the paint:

"The paint finish I used an old fashion way of painting, not spraying,..."?

... as in with a brush!?
 
OP
B

billybudge

Well-known member
Joined
Apr 17, 2011
Messages
321
Location
UNITED KINGDOM
wow, that's beautiful great work! tell me more about the paint:

"The paint finish I used an old fashion way of painting, not spraying,..."?

... as in with a brush!?

Hi, thank you for your nice comments,
As for the painting techniques, i picked this up when i was very young, i had a chance to watch a very old man custom paint buses and coaches in an old coachworks, and the finish was outstanding,and No spraying all rollered and brushed, and it takes a long lomg time. patients is needed,
OK, How it is done. you need to work with oil based paints, liquid glosses,
a nice 2 stage with a gentle flip, that is where you can see a slightly different shade as you walk round the painted item, this is how you do it,
lets say a tool box, its all now sanded and nice and straight, use a grey primer, mixed 2 grey and 1 white spirit, roller everything, let it dry, check for imperfections, then roll over again, allow 12 hours to dry, then dry sand with 500 grit paper,I use 400grit,
now roller a lighter base colour, one even coat,also use a standard sponge mini roller, this will dry like an orange peel effect, and everything needs to be the same, lallow 12 hours to dry,
then
mix 1/2 and 1/2 top coat and white spirit, this will be very thin and runny. also use a fine mini roller sponge, add three coats allow about 2 hours between each coat, then allow 12 hours to dry, this paint will be very transparrent and also dries very smooth, the stipple effect from the base coat, gives the shading effect as you look at the box at different angles, the use a mix of 1/3 of each top cat, clear gloss, and white spirit, give it one really good coat,
allow to dry about 12 hours, this now will give a mirror deep gloss finish, very deep, with that special flip effect paint,, incredable, and once fully dry, this paint is so hard wearing, I have never had a chip or scratch in any of my finishes even after years of garage use,
Its is all down to practise and getting the right paint colours for special effects,just try it out and have a go, it is well worth it in the long run, I am planning to make a few youtube vids one day,on how to do a boat load of old school techniques,
 
To avoid these ads, REGISTER NOW!
OP
B

billybudge

Well-known member
Joined
Apr 17, 2011
Messages
321
Location
UNITED KINGDOM
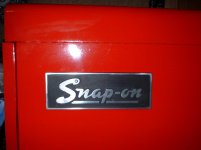
Well. I have managed to get My Snap on badge, after weeks and weeks of searching, I managed to find a vintage badge, although not the one I really wanted, but its OK,
 

Attachments

  • cabinet restore 015.jpg
    cabinet restore 015.jpg
    86 KB · Views: 138
  • cabinet restore 006.jpg
    cabinet restore 006.jpg
    85.9 KB · Views: 126
  • cabinet restore 013.jpg
    cabinet restore 013.jpg
    103.5 KB · Views: 168
  • snap on  part 2 002.jpg
    snap on part 2 002.jpg
    143.3 KB · Views: 110

FJ 432

Well-known member
Joined
Aug 2, 2010
Messages
3,745
Location
Littleton Colorado
Very nice work. The outside looks amazing. How much time do you spend on the inside of your tool box? I'm interested in how you paint (Brush vs. Spray) the crevices along the slides so they operate effectively.
 
OP
B

billybudge

Well-known member
Joined
Apr 17, 2011
Messages
321
Location
UNITED KINGDOM
Very nice work. The outside looks amazing. How much time do you spend on the inside of your tool box? I'm interested in how you paint (Brush vs. Spray) the crevices along the slides so they operate effectively.

Thank you,
The inside of the box had the same amount of attention, I also put a thicker layer of paint on the inside of the drawers, as this will get more of a battering with tools etc over the years,
Yes you do have to be careful with any moving parts, hinges and tight gaps, I found after years of doing this paint technique, after rolling each coat, I use an fine bristled artists paint brush, and I also sometimes, mix the paint a little bit more thiner for things such as hinges and tight gaps,
and now the paint finish is great and so hard aswell,
 

ramac

New member
Joined
Aug 15, 2012
Messages
4
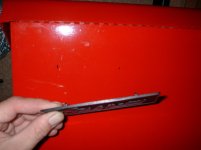
On the drawer removal....Last year I had a bottom drawer where a tool had fallen behind and I could not get it out. I tried the feeler gages and hack saw blade with teeth ground off. Neither worked for me. I tried over and over again. I ended up bending the back in and fishing the tool out then hammering the back on the drawer back in place.

Now, I just had a top middle drawer sticking where I keep my pliers. Again I try as I had done before. It did not work again. The next day I then decided to grind more off the blades and make them narrower. WALLA...out in a flash.

Seems the feeler gages were .500 wide and the hack saw with the teeth ground off were .440. The rail on the tool box is approximately .400 so the blade of the tools needs to be .400 on a little less to do the job. Took me a long time to figure this out.

Hope this helps others out. Ray
 
OP
B

billybudge

Well-known member
Joined
Apr 17, 2011
Messages
321
Location
UNITED KINGDOM
What's it worth now since it is re-built?

Hi:
I have been offered up to £450.00 to £575.00 GBP from at least 3 Collectors, and a Snap On Dealer offered a direct swap for a newer and larger version, all were very generous and tempting offers,
However because of history and sentimental reasons, I will never let it go, although its not used, just a garage ornament ,
When I am forced from this planet , then thats when it can be sold,given away or binned, lol.
 

SteveCh

Well-known member
Joined
Dec 21, 2012
Messages
1,053
Very, very nice work there. You did yourself proud. What a beauty.
 
To avoid these ads, REGISTER NOW!
Top Bottom