To avoid these ads, REGISTER NOW!

Restoring a mid 50s model CraftsMen Drill Press

Vice

Active member
Joined
Jun 15, 2018
Messages
27
Location
USA
I have begun the process of restoring a craftsman drill press that my father has had for the last 20 years or so. It has seen a lot of use from my family alone, so it is in much need of some restoring and refurbishing. I am starting on dismantling the machine tonight but here is the before pictures.

View media item 84143
View media item 84145
View media item 84148
View media item 84149
View media item 84146
This is my first time restoring anything such as this so any help I much appreciated especially in the what not to do category. Thanks and have a blessed day.
 
To avoid these ads, REGISTER NOW!

lafester

Well-known member
Joined
Mar 1, 2017
Messages
2,191
Location
Northern CO
lots of restoration threads on these, just look around a bit and see what others have done.
FreankLee's thread has tons of info.

Looks good!
 
OP
V

Vice

Active member
Joined
Jun 15, 2018
Messages
27
Location
USA
Theres a spider in the 4th picture...

Yea That's Jim he likes to chill out on the drill press from time to time.

Lol, I honestly didn't see the spider when taking the picture, but the drill press hasn't been moved from that spot in about two decades, so he probably set up shop a while ago.
 

Negen

Well-known member
Joined
Jul 15, 2015
Messages
1,909
Location
Seatltle WA
Do you know the date of this models? I am guessing '57 by the color but I am not sure how many years they used that color scheme. I will be picking mine up Tuesday good luck with restoration. And when your done taking pictures take five more we like pictures.

Sent from my G8141 using The Garage Journal mobile app
 

lafester

Well-known member
Joined
Mar 1, 2017
Messages
2,191
Location
Northern CO
There isn't any real way to date them other then the headband/color changes and then the last couple years when they went to emerson and removed the spring knob. The motor can have a date but they were often taken from another machine rather then buying new.
 

rickhigginshtbr

Well-known member
Joined
Aug 7, 2012
Messages
1,551
Location
Lower Bucks, PA
Do you know the date of this models? I am guessing '57 by the color but I am not sure how many years they used that color scheme. I will be picking mine up Tuesday good luck with restoration. And when your done taking pictures take five more we like pictures.

Sent from my G8141 using The Garage Journal mobile app

late '56 they started with the Bronze, I believe '58/'59 they started with the crown logo. So this press in particular should be late-56 to '58ish.
 

RodneyW

Well-known member
Joined
Aug 26, 2016
Messages
69
Location
Centralia, WA
All good advice above.
Along with VM, take a look at OWWM.org too. A LOT of info on those DPs there.
Search for the term power bronze. That will give you a bunch of hits along with what the closest current paint matches are.
That will clean up nicely and the fact that it's been in your family so long makes it even better.
Rodney
 

RodneyW

Well-known member
Joined
Aug 26, 2016
Messages
69
Location
Centralia, WA
Straightening that pot metal can be tricky. That stuff generally only likes to bend once. I'm no help there but others will have some suggestions.
For power cords I buy the black rubber bulk wire and use that. Cut down neon colored extension cords scream hack wiring job IMO. If the machine isn't grounded now is a good time to add one.
EDIT: Is the small wire next to the cracked one a separate ground? Buy 3 conductor cord and you can eliminate that.
 
Last edited:

Mgdoug3

Well-known member
Joined
Mar 2, 2018
Messages
1,391
Location
KY
I have one just like that except except it's a bench top. I think I gave $50 for it. I use it often.
 
OP
V

Vice

Active member
Joined
Jun 15, 2018
Messages
27
Location
USA
Straightening that pot metal can be tricky. That stuff generally only likes to bend once. I'm no help there but others will have some suggestions.
For power cords I buy the black rubber bulk wire and use that. Cut down neon colored extension cords scream hack wiring job IMO. If the machine isn't grounded now is a good time to add one.
EDIT: Is the small wire next to the cracked one a separate ground? Buy 3 conductor cord and you can eliminate that.


The small green wire is attached directly into the motor casing >I am assuming it is a separate ground.
 

RodneyW

Well-known member
Joined
Aug 26, 2016
Messages
69
Location
Centralia, WA
That's what it would be then. The other end probably attached to the faceplate screw on the outlet.
When you replace the cord you can almost always find a spot inside the junction box on the motor for the ground. Sometimes you might have to drill and tap a hole for the ground screw. Looks like the wire enters thru the base of the motor in this case. It should be easy.
I know there are a lot of ungrounded machines out there that have run for decades with no issues but to me it's a case of it's better to have and not need then to need and not have.
 
To avoid these ads, REGISTER NOW!
OP
V

Vice

Active member
Joined
Jun 15, 2018
Messages
27
Location
USA
I removed the head frame assembly and disassembled it last night. Here are the pictures.

View media item 84547
The Head Frame after removing from the column. That took some doing and a good bit lubrication just to remove it from said column.

View media item 84548
The Feed handles. It has a good bit of rust on it, and to me, it looks as if it was chrome. I am not sure of how to clean rust from chrome without damaging the coating.

View media item 84549
The inside of the headframe. Sixty years worth of dirt, dust, (a few dead spiders probably from the seventies ) and who knows what else.

View media item 84550
The quill assembly. I am not sure at how much work will be needed here to my untrained eye it looks in alright shape for the most part.

View media item 84551
The feed handle assembly with the internal spring. Needs a good dusting for sure anything else is hard for me to say.

View media item 84552
One of the Feed handes. This is the amount of rust on the feed handles.

View media item 84553
The Spindle Pulley Assembly. Both screws that held the assembly in place were broken and will need to be replaced, but besides that, it looks ok I`ll probably buy new bearings for it.

Any help on how to clean parts and what needs to be taken care of would be much appreciated.
 
OP
V

Vice

Active member
Joined
Jun 15, 2018
Messages
27
Location
USA
Finally got to do some work on the drill press. First big deals are the new paint job on the head frame.

View media item 90281
The head frame before paint.

View media item 90358
And after the paint. I decided to go with a black paint job because the black and shined up metal will look sharp together.

View media item 90362
The old power switch with the new one I found out on the shop. It was a grey color, but I went ahead and painted it to match the new paint job of the drill press, and it looks pretty dang nice especially compared to what was the switch. I still need to get a cable to replace the old one with though.

View media item 90355
The feed handles before.

View media item 90360
And after. They could do with getting chromed again, but I am not sure of any places in my area that do that or how much that would cost. So for the time being this is how they will be.

View media item 90356
My rig for cleaning and sanding the rods. With the drill press broken apart at the moment the only drill we had around here with a big enough chuck to use was this old craftsman corded drill. This sucker is a monster I will tell you that much.

I have been cleaning a few more parts and hope to get to the pillar, table, and base next.
 

sheltonfilms

Well-known member
Joined
May 28, 2014
Messages
157
That press is a 56 model. 56 was the first year of the power bronze paint on the 100s. It also has the cast motor mount and the old style depth stop (not the rapid adjust). The stamped tilting motor plate started in 57 along with the rapid adjust depth stop. So definitely 56.

I have a 1956 one as well.

What part of central AL you at? I'm in Hoover.

Haven't seen anyone post Franklee's thread yet so here it is:
https://www.garagejournal.com/forum/showthread.php?t=227480

attachment.php


attachment.php
 

Attachments

  • press1 (Small).jpg
    press1 (Small).jpg
    54.7 KB · Views: 314
  • press2 (Small).jpg
    press2 (Small).jpg
    64.6 KB · Views: 317
OP
V

Vice

Active member
Joined
Jun 15, 2018
Messages
27
Location
USA
I`m just outside of the Birmingham area. Your drill press looks sharp, especially with that light blue color. How did you remount the craftsman logo and the metal band on the head frame did you use the same rivets that were on it or did you thread the existing holes and put new screws in their place?
 

sheltonfilms

Well-known member
Joined
May 28, 2014
Messages
157
I`m just outside of the Birmingham area. Your drill press looks sharp, especially with that light blue color. How did you remount the craftsman logo and the metal band on the head frame did you use the same rivets that were on it or did you thread the existing holes and put new screws in their place?


Thanks. I just punched the old ones out from the back and reused them. If you need new ones just google “drive screws”.

The only times I haven’t been able to reuse them on machine is if they were in blind holes. About the only way to get them out is to slot them like a slot headed screw and screw them out.


Sent from my iPhone using Tapatalk
 
OP
V

Vice

Active member
Joined
Jun 15, 2018
Messages
27
Location
USA
images


She is Alive!

While not wholly restored yet I have the head frame all reassembled, cleaned, and lubricated. I put the motor and belt back on to test her out, and he works fine so here are some pictures.

View media item 90546
Here is the head frame all assembled. Pardon the motor it has not been restored yet, but it is last on the list for me after the collum, table, and base are restored next. I decided I would go with the black paint and got all the parts I could good and clean so they would be shined up. Unfortunately, I was not able to punch out one of the pens holding the craftsman logo on and had to grind it down; I will need to drill a new hole for that side as well as tap them for screws later on.

View media item 90543
Heres the left side of the machine the Tension nob and spindle lock shined up very nicely and the chrome on them didn't seem very bad off at all.

View media item 90542
The right side with the feed handles and the spindle. The feed handles were in pretty rough shape, but I got them as clean as I could and perhaps later ill get them re-chromed.

She is finally coming together, and I am honestly proud of it so far. As a kid, I took apart quite a few things that never really worked again (granted most of them were already broken VCRs but still. )

Next up is sandblasting the table and the base as well as sanding down the column back to a shine. Then it's on to painting the table and base.
 
OP
V

Vice

Active member
Joined
Jun 15, 2018
Messages
27
Location
USA
Hey, guys so I found some footage of the drill press I recorded before starting the restoration process. Here is a link if you are interested in hearing how terrible it was.

 
OP
V

Vice

Active member
Joined
Jun 15, 2018
Messages
27
Location
USA
Big update everyone.

She isn't quite finished yet I still have to replace the belt along with the restoration of the motor its self, but she is back to being self-standing, and she is looking good. I got some pictures as well as a little side upgrade I made to the set up for the drill press as a whole.

View media item 90816
Here she is. I am looking good so far. I can't wait till I get the motor back mounted up and get her running again for the foreseeable future.

View media item 90820
The collum its self could still use a work my sandpaper was used up on the top half so when I will probably go over it once more before the final assembly.

View media item 90817
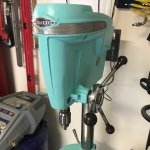
The head frame assembly. I managed to reuse the chain that the chuck was hanging from but relocated to one of the bolts that hold the motor mount in place. It gets it out of the way of the table its self.

View media item 90818
A little blurry this pic but the craftsman logo completes the look to me when it comes to the head frame.

View media item 90821
Here it is with my recent upgrade. The lighting in the basement is not the best at times, and usually, the nearest light source is behind me, so I got the idea to add an old adjustable lamp to the setup.

I was looking online for lamps to use but didn't have the extra funds to pay for a $30 to $40 lamp that was from the same period as the drill press so I was going to forgo the idea. That was until yesterday when I found this lamp tucked away in the loft of my father's barn. Dirty, dusty, and rusty, I took it in and cleaned it up and gave it the same coat of paint I gave the drill press so it would match. I tell you what guys The Lord provides.

View media item 90819
Here it the lamp its self. It works fine and just needed a new bulb and some minor fixes. A few screws were stubborn and had to be cut off but for the most part, it's all original.

Let me know what you guys think so far. I can't thank all of yall enough for the help in getting it this close. I wouldn't even have a clue what I was doing other wise.
 

JZiggy

Well-known member
Joined
Dec 1, 2014
Messages
990
Location
Atlanta
Great idea having a swivel lamp nearby. I have one like that and I keep an LED bulb in there so that it doesn't get hot and I don't have to worry about the bulb shattering.
 
OP
V

Vice

Active member
Joined
Jun 15, 2018
Messages
27
Location
USA
Well She is done as far as the press its self is concerned. So here is before and after pictures.

View media item 84143
View media item 91940
The whole press .

View media item 84144
View media item 91941
The new cable and switch after having been rewired and put back in place.
This being my first wiring job I managed to flip the breaker at one point when wiring it up but I figured out what was wrong and fixed the issue.

View media item 84145
View media item 91943
The pullies and belt of the press it was rough before but with a new belt and a good cleaning its looking great.

View media item 84148
View media item 91942
The tension nob and all. They only really needed a good cleaning. The chrome on them was in rather good shape all things considered.

View media item 84149
View media item 91949
The motor. I managed to scratch off a good bit of the label sadly but it was nearly unavoidable in my case. That was one of two rather aggravating screw ups of mine in this project.

View media item 84147
View media item 91951
The other screw up of mine was re drilling the whole for the new screws to hold the Craftsman Logo in place. When removing the original pins one was not moving and had to be cut off. I then had to re drill the whole but the drill drifted with out my knowing and made the logo uneven.

View media item 84146
View media item 91950
The Table and spindle of the press along with a new addition I have added to the press.

View media item 91944
The new addition to the drill press a vise I got a hold of at a yard sell. I also took it apart, restored, and painted it to match the press.

View media item 91945
and last but not least one Final shot of her with all her new additions and after getting her back into working order. Video of her working to come soon.

I just want to thank everyone that has been a part in helping me get this project finished cause with out the help of this Forum it would have taken a whole lot longer then it did and I would have probably broken something.

I have plans to construct a cabinet that will fit under the table of the press for storing bits and other accessories as well as some more upgrades to build at a later date. so While this first project is done many more have now opened up to me. Thanks everyone I would love to hear what ya`ll have to say about my process and any ideas on what some more stuff to do for it would be . Thanks and Have a blessed day.
 
To avoid these ads, REGISTER NOW!
Top Bottom