To avoid these ads, REGISTER NOW!

Restoring my ferris wheel seat

don long

Well-known member
Joined
Mar 31, 2012
Messages
8,906
Location
southern california
A couple weeks ago I received a Text from from a guy at the Long Beach swap meet. He included a picture of a ferris wheel seat and told me that a friend of mine from Arizona had just stopped by. He said he knew a guy that would buy the ferris wheel seat and gave me your number.

I called the guy and told him my friend was right that I would buy it.
The next week I drove to Montery where the guy lived and picked up the seat

last friday I decided to bring in the seat and get started on it

1 by don long, on Flickr

I took the wings off and took pic's of all 4 corners to document the build

2 by don long, on Flickr

3b by don long, on Flickr

4a by don long, on Flickr

I found the patent date on the foot rest so I scratched the paint off the top of the numbers
It reads Aug 8, 05

4g by don long, on Flickr

Looking over the seat I had to chuckle when I read the back of the seat "NO ROCKING" that brought back a few memories of my childhood

4b by don long, on Flickr

After documenting the seat it was time to start the work.
First I removed the foot rest. Then the seat came out.
That was nasty

6 by don long, on Flickr

Looks like we disrupted a varmints home

6a by don long, on Flickr

I grabbed the vacuum and cleaned out all the trash only to find the bottom of the seat with rusted out holes all over including the reinforcement bars

7 by don long, on Flickr

So the floor needed to be cut out, but before I started that I thought I'd remove ALL the hardware first. Including the angle supports

With the die grinder they came out pretty easy

8 by don long, on Flickr

The other hardware unbolted pretty good only cut 3 bolts out with the die grinder but the pieces were pretty ruff

5i by don long, on Flickr

5j by don long, on Flickr

5f by don long, on Flickr

While I cut the floor out of the seat my buddy Pat sand blasted the hardware (he missed the 2 big pieces) he said that paint was a ***** to get off

5k by don long, on Flickr

Now the floor is cut out and the process of straightening the side panels has begun

10 by don long, on Flickr
 
Last edited:
To avoid these ads, REGISTER NOW!
OP
D

don long

Well-known member
Joined
Mar 31, 2012
Messages
8,906
Location
southern california
That is going to be one unique piece. Do you have other amusement pieces. Keep us all up to date. I wonder where the other seats ended up.

I just received another ferris wheel seat that is made out of wood Saturday.
I have a couple fiberglass bumper cars and a lead on an old metal one.
But thats all. I'm excited to get this one out into the party garage

Thanks for checking in

Don
 

Richard Cranium

Well-known member
Joined
Apr 22, 2011
Messages
18,552
Location
central Washington
A saw this was by Don and had to stop by to see what he was restoring this time.
I know from his other work this will turn out great.
Looking forwards to seeing the end results. Rich
 

southalabama

Well-known member
Joined
Jan 10, 2011
Messages
5,547
Location
Brewton AL
That's a cool project.

Never seen Ferris wheel seats restored. Don't know why not. Perhaps scrap metal guys got them. I've seen old ski lifts restored hanging up at Lake Tahoe.
 

royce

Well-known member
Joined
Jun 22, 2014
Messages
3,112
Location
fairbanks ak
Great project Don,
Will you build a frame for it to pendulum on?
Also, will you stick with the colors and graphics that are existing?
This thing is way cool.

Royce
 
OP
D

don long

Well-known member
Joined
Mar 31, 2012
Messages
8,906
Location
southern california
Great project Don,
Will you build a frame for it to pendulum on?
Also, will you stick with the colors and graphics that are existing?
This thing is way cool.

Royce

Yes I plan on building a base that the seat will swing in and no I think I can do a lot better in the color and graphics department
 
OP
D

don long

Well-known member
Joined
Mar 31, 2012
Messages
8,906
Location
southern california
A saw this was by Don and had to stop by to see what he was restoring this time.
I know from his other work this will turn out great.
Looking forwards to seeing the end results. Rich

Thanks for those kind words Rich
I'm excited to work on this project

Once again, the GJ collective never ceases to amaze me

Cobbler

It amazes me as well. I've gotten a ton of knowledge from our community

That's a cool project.

Never seen Ferris wheel seats restored. Don't know why not. Perhaps scrap metal guys got them. I've seen old ski lifts restored hanging up at Lake Tahoe.

Alabama

I saw one once and never forgot it . Started looking for one a few years ago and today I have 2
 

Ole Slewfoot

Well-known member
Joined
Feb 22, 2016
Messages
5,098
Location
Freedom, CA
No old walking tractors in the back 40?:evil:


gallery_1940_525_1328955934_3955.jpg
 
OP
D

don long

Well-known member
Joined
Mar 31, 2012
Messages
8,906
Location
southern california
Thanks guy for jumping on board with me as I go through the seat.

Thanks for the research Bluebolt

No Bradleys in my stable yet Slewfoot

Ok guys
Here is an update on the seat.

I spent the day with my angle grinder and 36 grit discs cleaning up the casting marks on all the hardware then I polished them up with 80 grit sand paper
The reason for all the grinding and sanding is to get the metal pieces cleaned and smoothed so each piece can be chromed

5m by don long, on Flickr


The hardware will be at the chrome shop for a while so I will start removing the paint on the seat parts next
 
Last edited:

Stuart in MN

Well-known member
Joined
Sep 8, 2005
Messages
23,427
Location
Minneapolis
The Tilt-A-Whirl ride was invented by a guy in Owatonna, MN. They have a restored seat from a vintage Tilt-A-Whirl on display in their downtown area - one of those would go nicely with your Ferris Wheel seat. :)


attachment.php
 

Attachments

  • tilt a whirl.jpg
    tilt a whirl.jpg
    144.5 KB · Views: 2,013
To avoid these ads, REGISTER NOW!
OP
D

don long

Well-known member
Joined
Mar 31, 2012
Messages
8,906
Location
southern california
Sorry for the delay in posting. I've been out of town for a few days.

The Tilt-A-Whirl ride was invented by a guy in Owatonna, MN. They have a restored seat from a vintage Tilt-A-Whirl on display in their downtown area - one of those would go nicely with your Ferris Wheel seat. :)


attachment.php


Stuart

One of those would be a fun project I'll keep an eye open for one now Thanks


Following.

Bodyman

Nice to have you following along.

Today the hardware made it to the chrome shop.
I'll start removing the paint on the seat tomorrow
 
OP
D

don long

Well-known member
Joined
Mar 31, 2012
Messages
8,906
Location
southern california
Today I got some shop time in on the ferris wheel seat.
The seat needed to have the paint stripped (6 different coats) so I grabbed my angle grinder and 50 grit discs and went to town. Got it done in about 2 hours of heavy grinding.

11 by don long, on Flickr

I found a couple places that were rusted through the metal. To get to those places I needed to get the panel reinforcement straps off the side of the swing.

This shot is of the other side with the straps still welded on

20 by don long, on Flickr

The rust hole was under the support strap so I drilled out all the spot welds and removed the 2 straps. I found plenty of rust under the straps so I was happy to remove them.

12 by don long, on Flickr

I cut out the rust pocket and made a patch panel to weld back into the hole

14 by don long, on Flickr

13 by don long, on Flickr


After welding the patch panel into place I decided to try to straighten the side panel.
the panel was stretched very badly so i grabbed the torch and started shrinking the metal back into place before welding the new straps back on.

19 by don long, on Flickr

The straps are welded in and the welds ground down and the panel is ready for a little bondo tomorrow

17 by don long, on Flickr

I will repeat the process for the other side
 
Last edited:
OP
D

don long

Well-known member
Joined
Mar 31, 2012
Messages
8,906
Location
southern california
Slick alignment fixture Don.
Cool project and I'm anxious to see your color scheme.

Royce

Thanks Royce
Those little clamps work well on small patch work.
I'm working on the color scheme in my mind now, I'm thinking turquoise, pink and white for starters

Nice project Don! Brings back memories when I was in the local VFD, we set up a carnival for fund raising every year. If that seat came off an Eli, they are still in business....

http://www.elibridge.com/

Thanks for the link Robert. It is interesting to me to look at other seats.
I enjoy your thread very much and have picked up several tips (Thanks)
 
OP
D

don long

Well-known member
Joined
Mar 31, 2012
Messages
8,906
Location
southern california
I was able to spend a few hours working on the seat today.
I managed to find some metal for the bottom of the seat and some tubing for reinforcement.
I got it all welded up. I also managed to cut the left support straps off today as well

21 by don long, on Flickr
 
Last edited:
OP
D

don long

Well-known member
Joined
Mar 31, 2012
Messages
8,906
Location
southern california
I spent a few more hours on the seat today and got one wing ready for primer
After the bondo was sanded with 80 grit paper I rubbed the panel with charcoal dust to see the heavy sand scratched while I sanded the bondo with 120 grit paper

25 by don long, on Flickr

26 by don long, on Flickr
 
Last edited:

Jayman17

Well-known member
Joined
Feb 6, 2017
Messages
3,843
Location
Seattle, Wa
Hi Don,
Just wanted to say I really enjoy your threads and I'm looking forward to seeing how this one turns out. I'm amazed at your restoration and metal working skills. Really appreciate guys that post informative threads on GJ! By the way, you can really put a polish on an old tool too, haha.
-Jay
 

gahrajmahal

Well-known member
Joined
Dec 12, 2008
Messages
2,620
Location
Cincinnati, Ohio
Mr Long, I am sure enjoying your posts. Wish I had something as interesting to put up. It looks like you are using standard auto style sheetmetal repair skills. Would a Ferris wheel have had a nice spray finish on it, or would they just have been painted with a brush or roller? I can’t imagine the original owners putting too much effort into the straightness of the panels, just would want it to be all one color. Carry on!
 

LXCam

ALLIANCE MEMBER
Joined
Apr 23, 2013
Messages
19,385
Location
AZ
Your projects are always amazing Don, I'd luv to have your body and paint skills. :bowdown:

What are you planning for a stand. Are you going to hang it or go part way up and swing it like a gliding rocker?

Thanks, Cam
 
OP
D

don long

Well-known member
Joined
Mar 31, 2012
Messages
8,906
Location
southern california
Thanks for dropping in last week Cam

I've been out of town for a bit.

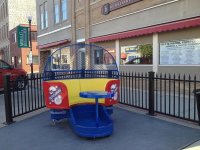
The seat will be sitting on a frame sitting on the floor that allows the seat to swing similar to this one

6 by don long, on Flickr
 
Last edited:
tslater1989

Well-known member
Joined
Sep 13, 2015
Messages
54
Location
Michigan
I just received another ferris wheel seat that is made out of wood Saturday.
I have a couple fiberglass bumper cars and a lead on an old metal one.
But thats all. I'm excited to get this one out into the party garage

Thanks for checking in

Don

Awesome work as always. I have always wanted to get two bumper cars, set them up with a 3.5hp gas motors and do bumper cars in a parade. Kind of a gag thing.
So if you feel like crating them up and shipping them to me, I'll do it! Just gotta figure out how to tell the wife I need a bigger budget.... lol keep up the good work don!
 
OP
D

don long

Well-known member
Joined
Mar 31, 2012
Messages
8,906
Location
southern california
Hi Don,
Just wanted to say I really enjoy your threads and I'm looking forward to seeing how this one turns out. I'm amazed at your restoration and metal working skills. Really appreciate guys that post informative threads on GJ! By the way, you can really put a polish on an old tool too, haha.
-Jay

Jayman
I'm soo sorry that I missed your post.
Thank you for those nice comments. I do enjoy working on these old pieces.

Mr Long, I am sure enjoying your posts. Wish I had something as interesting to put up. It looks like you are using standard auto style sheetmetal repair skills. Would a Ferris wheel have had a nice spray finish on it, or would they just have been painted with a brush or roller? I can’t imagine the original owners putting too much effort into the straightness of the panels, just would want it to be all one color. Carry on!

gahrajmahal
I'm sorry that I overlooked your post too
You are correct I am falling back on my work experience to get a lot of these projects completed.
This seat had over 6 thick coats of paint on it and it looked like it was all applied with a big brush and the seat is full of dings and dents that need attention (very ugly) I will paint it up like a show car

Thank you all for visiting my threads
 
OP
D

don long

Well-known member
Joined
Mar 31, 2012
Messages
8,906
Location
southern california
That's gonna rock!!!.........no really ;)

YEP

My similar project.
It was going to be a golf cart.
It will soon have a big ol' flat screen sitting in it and hung from the ceiling(I'm not in love with that idea)
Potential for two fans, but that decision is still
Up in the air :)

Related to the David Bradley Surrey/tractor picture in post 13 above:
I have two DB cowls that are becoming porch lamps/wall sconces.

ducksface
That will take a lot of imagination so post it up when you get started.
I'd love to see it.

Awesome work as always. I have always wanted to get two bumper cars, set them up with a 3.5hp gas motors and do bumper cars in a parade. Kind of a gag thing.
So if you feel like crating them up and shipping them to me, I'll do it! Just gotta figure out how to tell the wife I need a bigger budget.... lol keep up the good work don!

tslater
I have 2 fiberglass bumper cars sitting on the roof of the 30s garage but want 2 steel ones to paint up fancy so I found one the other day but $10,000 is outside my budget

14 by don long, on Flickr

I love this thread. Such a cool project. Thanks for sharing Don.

~Jim~

Thanks for dropping by Jim
I hope to make some progress on the seat this week

This Ferris Wheel seat is a super cool project Don....

Bumper cars:

Thanks for the link dkmc
Those are too cool
 
OP
D

don long

Well-known member
Joined
Mar 31, 2012
Messages
8,906
Location
southern california
Made a little more headway on the seat today.
Straightened out the other side and got 2 coats of bondo on
It is so hot that the bondo cures before I can get it on smoothly so it will take a bit more work

Had to tie the seat to the bench to keep it from getting away while sanding it. I put a moving blanket on the floor for the finished side to sit on so it doesn't get scratched up while working on the opposite side

22 by don long, on Flickr
 
Last edited:
OP
D

don long

Well-known member
Joined
Mar 31, 2012
Messages
8,906
Location
southern california
It has been several months since I have had a chance to work on the seat.

I have managed to get some work done however and as of tonight the seat has been completely straightened and has primer on it for the second time, with block sanding between the coats

2018-12-18 16.13.04-1 by don long, on Flickr

IMG_5394 by don long, on Flickr

Today I started working on the step. I ground off the paint, hammered out the MANY dings and smeared bondo on both sides of the step

28 by don long, on Flickr
 

casmurbax

Well-known member
Joined
Sep 25, 2012
Messages
2,776
Location
Wilton, NY
Don, I totally forgot this thread. :-(

It was nice re-read it and look at the transformation to it's present stage.

I am looking forward to seeing it completed.

Of course now I want to do one, I just don't have the skill you have.

John
 
To avoid these ads, REGISTER NOW!
Top Bottom