To avoid these ads, REGISTER NOW!

Rewire/restore 15" Delta Rockwell Drill Press?

Goldhawg

Well-known member
Joined
Nov 27, 2010
Messages
363
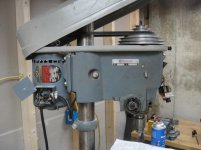
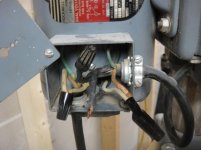
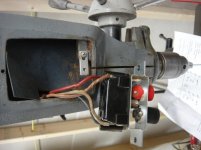
I have a Delta Rockwell drill press, and I decided to convert the motor over to 220v since I have 220 right were its parked in my basement. When I pulled the wire cover, the wire that goes to the front of the drill press for the start/stop looked frayed a bit, and I couldn't tell which wire was which color to match up to the wiring diagram on the motor. Decided to pull the start/stop cover and the wire insulation on that end was all cracking with exposed copper. So I need to replace this. First, where can I get a couple feet of 12-5 SOOW wire to replace this? Second, not sure whether I will have to disassemble the head to get the wire thru there. If I do, are there other maintenance things I should do? Given its about a 40 year old drill press, anything else I should consider doing? You know...while I'm in there:)

Any good links on restoring/rewiring one of these drill presses?

Thx
 
To avoid these ads, REGISTER NOW!

spongerich

Well-known member
Joined
Apr 17, 2010
Messages
2,339
Location
Monroe, NY
I'd check the bearings and spindle runout before starting on any wiring. Wiring is cheap and easy to obtain. Other replacement parts can be tougher, or at least a lot more time consuming to locate.

owwm.org is probably the best resource on the web for old machinery parts, diagrams, manuals, etc.
 
OP
G

Goldhawg

Well-known member
Joined
Nov 27, 2010
Messages
363
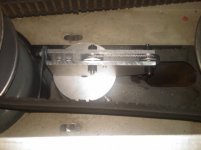
Thx. Here are some pics of the drill press showing the wiring.

Also, have a question re the table. I've seen many drill presses that have a gear that you can turn to raise/lower the table. On mine you can't do that; just turn the knob and make sure you've got a good grip or the table will slip a ways. Where can I get a pole that has the teeth and gears to easily raise/lower the worktable?
 

Attachments

  • DSC00592.jpg
    DSC00592.jpg
    87.3 KB · Views: 216
  • DSC00591.jpg
    DSC00591.jpg
    86.1 KB · Views: 224
  • DSC00590.jpg
    DSC00590.jpg
    84.2 KB · Views: 199
  • DSC00589.jpg
    DSC00589.jpg
    84.7 KB · Views: 179
  • DSC00588.jpg
    DSC00588.jpg
    77.6 KB · Views: 185

Lightfoot

Well-known member
Joined
Dec 6, 2010
Messages
430
Sorry, i don't have answers for you. But i plan to keep an eye on the thread because i have an old Cman press with no gear thingy on the table either. And you're right, you loosen it you better have hold of it. A buddy of mine set up a counter weight and pulley system for his and that does work but I'd love to find a gear system for mine too.:thumbup:
 
Last edited:

evintho

Well-known member
Joined
Apr 6, 2006
Messages
1,358
Location
Santa Rosa, CA.
What spongerich said about the bearings and spindle runout. Grainger should have your SOOW cable.

As far as the ratcheting mechanism to raise and lower the table, both of our dp's are just too old! They didn't invent ratcheting mechanisms until the '70's, I believe. You'd have to fabricate and adapt something to make it work. Probably more trouble than it's worth. I just restored my Craftsman and I don't really mind having to adjust the table. That's part of what makes it old skool!

P1010002.jpg[/QUOTE]
 

Lightfoot

Well-known member
Joined
Dec 6, 2010
Messages
430
Evintho,
Man that thing is beautiful. Mine is the identical same press (but not as pretty). Maybe someday i'll get mine spiffed up. Mine is the C-man grey. What brand/color paint did you use? I like it a lot better than the grey on mine. Mine still runs smooth as silk, it just doesn't look as pretty.
Any idea what year(s) our presses were made?
 

gorilla

Well-known member
Joined
Dec 13, 2007
Messages
1,660
The way to make the table easy to move is to counter balance it. Attach a cable to the back of the table, install a pulley to the top of the drill press, run the cable over the pulley and attach a weight that matches the table. Before you laugh at this understand that counter weights are part of many large machine tools. You will need to design some brackets but that's much easier that manufacturing rack and pinion gears.
 

c_mccann

Well-known member
Joined
Mar 30, 2010
Messages
919
x2- I've got that same cman drill press. Great unit, I painted mine Delta Grey, but yours is a real first class resto job..!
 

Greatbear

Well-known member
Joined
Jan 17, 2008
Messages
1,702
Location
Columbia/Fulton, MD
I have the same 15" DP, but in benchtop form. I rewired it a couple years ago. I picked up 14/5 from a local electric supplier, I had some 14/3 already for the line cord. My version is only 1/2hp, and the original wiring was all 16ga. You'll need about 3ft of wire for the switch wiring. It's a rather simple job.
 

DHS

Well-known member
Joined
Feb 9, 2009
Messages
1,054
Location
Central FL
The way to make the table easy to move is to counter balance it. Attach a cable to the back of the table, install a pulley to the top of the drill press, run the cable over the pulley and attach a weight that matches the table. Before you laugh at this understand that counter weights are part of many large machine tools. You will need to design some brackets but that's much easier that manufacturing rack and pinion gears.

I like that idea. Once you have a vise on the table it can get heavy fast.
 
OP
G

Goldhawg

Well-known member
Joined
Nov 27, 2010
Messages
363
I have the same 15" DP, but in benchtop form. I rewired it a couple years ago. I picked up 14/5 from a local electric supplier, I had some 14/3 already for the line cord. My version is only 1/2hp, and the original wiring was all 16ga. You'll need about 3ft of wire for the switch wiring. It's a rather simple job.

Will I be able to feed the wire thru the head or do I have to take it apart to get it thru? I have 12/3 for the cord, which is probably overkill; any reason why I shouldn't get 12-5 if I can? I also have the 1/2 hp motor, which only draws 3.5A on 220v, so I know I don't need to go that big--just thinking of matching what my cord was.
 

mrbreezeet1

Banned
Joined
Dec 6, 2010
Messages
3,694
Location
Moundsville, WV, 15 miles South Of Wheeling WV
Last edited:

larry_g

Well-known member
Joined
Apr 28, 2007
Messages
16,921
Location
oregon
Gentlemen
Another way to balance the table is with a gas spring; http://www.mcmaster.com/#gas-springs/=avzpr3 . I had one go bad on my pickup cap so I replaced the pair. The one old good one I mounted under the drill press table. It sets in a cup so that it will come out easy if I need to swing the table out of the way. It has a bit over 12" of travel which is within the range of 90% of what I do. If I remember the spring is in the 25 lb range. Also avaiable at the salvage yard on a lot of hatchback cars.

lg
no neat sig line
 

Lightfoot

Well-known member
Joined
Dec 6, 2010
Messages
430
Gentlemen
Another way to balance the table is with a gas spring; http://www.mcmaster.com/#gas-springs/=avzpr3 . I had one go bad on my pickup cap so I replaced the pair. The one old good one I mounted under the drill press table. It sets in a cup so that it will come out easy if I need to swing the table out of the way. It has a bit over 12" of travel which is within the range of 90% of what I do. If I remember the spring is in the 25 lb range. Also avaiable at the salvage yard on a lot of hatchback cars.

lg
no neat sig line
Larry, that is a really good idea. That amount of travel would just about do it for me on most stuff also. In fact, i think i may still have a couple of those laying around i took off my kid's Toyota Celica rear hatch. (one went bad and the other wouldn't hold it up). I think they may even have a little more travel than that. :bowdown: YOU DA MAN!
 
To avoid these ads, REGISTER NOW!

Greatbear

Well-known member
Joined
Jan 17, 2008
Messages
1,702
Location
Columbia/Fulton, MD
You don't need a different switch for a 240V conversion, it's already a double-pole switch. While there is nothing wrong with using oversized wire, it's not truly necessary at the current draw, and does make it a bit of a challenge to cram it all into the rather small switch pocket up front. There is also a clamp holding the cable in place next to the quill inside the main casting. The screw is seen to the right of the data plate. You might not be able to fit a 12/5 cable in the original clamp. The clamp is metal, and has a captive nut attached. You can finagle things around somewhat using the opening on the bottom of the casting, It's kinda cramped IMO. To make it easier on you, attach the new cable to the old one and pull it through. Better yet, use the old cable to pull a temporary fish string or wire, since I don't think you can pull the original cable out through the front. This will also allow you to see how the original cable was dressed so you can duplicate it outside of the housing and just pull the new one into place.
 

sscan

New member
Joined
Aug 19, 2011
Messages
1
The way to make the table easy to move is to counter balance it. Attach a cable to the back of the table, install a pulley to the top of the drill press, run the cable over the pulley and attach a weight that matches the table. Before you laugh at this understand that counter weights are part of many large machine tools. You will need to design some brackets but that's much easier that manufacturing rack and pinion gears.

New member here with first post. Great forum and members. Here are a couple of photos of a counterweight assembly that I fabricated for my Rockwell 15-655 floor drill press. It uses a couple of pulleys and 3/32" dia SST wire rope. I can post the drawings and p/n of pulleys (Mcmaster Carr) if anyone is interested. It uses 2"dia x 6" long (4x) lead weight and makes raising and lowering the table quite easy even with a 6" Heinrich quick clamp vise.
 

Attachments

  • Rockwell Counterweight Bracket Assembly.jpg
    Rockwell Counterweight Bracket Assembly.jpg
    127.4 KB · Views: 157
  • Rockwell Counter weight table view.jpg
    Rockwell Counter weight table view.jpg
    126.7 KB · Views: 145

tool_scrounge

Well-known member
Joined
Jul 20, 2010
Messages
4,229
Location
Southern California
New member here with first post. Great forum and members. Here are a couple of photos of a counterweight assembly that I fabricated for my Rockwell 15-655 floor drill press. It uses a couple of pulleys and 3/32" dia SST wire rope. I can post the drawings and p/n of pulleys (Mcmaster Carr) if anyone is interested. It uses 2"dia x 6" long (4x) lead weight and makes raising and lowering the table quite easy even with a 6" Heinrich quick clamp vise.

Nice job on the raising/lowering mechanism. You have a very clean and simple design. I have been looking at doing something similar. The variation I was thinking about has two cables on the left and right side of the post. This would connect to a collar on the post under the table. It is a more complicated, but since it is on the sides of the post there is no loss of throat of the drill press. However, your design should lift the table more efficiently since it pulls up in front of the post.

For grins I put a bungie cord on the table on a table drill press and I was impressed on how well it worked. So well that I have not made much progress on the counterweight design. Oh well...
 

GarageTodd

Member
Joined
Dec 30, 2021
Messages
7
I have the same 15" DP, but in benchtop form. I rewired it a couple years ago. I picked up 14/5 from a local electric supplier, I had some 14/3 already for the line cord. My version is only 1/2hp, and the original wiring was all 16ga. You'll need about 3ft of wire for the switch wiring. It's a rather simple job.
I have the same drill press and I am trying to reattach new wiring. I didn’t snap a pic before taking old rotted wire off, and now not sure how to reattach. 5 wires from switch, 3 wires from plug. Any help or pic of wiring diagram would be a huge help.
 

GarageTodd

Member
Joined
Dec 30, 2021
Messages
7
I have the same 15" DP, but in benchtop form. I rewired it a couple years ago. I picked up 14/5 from a local electric supplier, I had some 14/3 already for the line cord. My version is only 1/2hp, and the original wiring was all 16ga. You'll need about 3ft of wire for the switch wiring. It's a rather simple job.
I really need your help! I’m trying to rewire mine but can’t figure out what goes where. I have 5 wires going to the front switch, but can’t figure out how to wire them to the motor with the 3 wire plug for the outlet. The motor only has 2 posts plus the ground. The OG wiring was all attached but so dried out it crumbled when removing. Really should have snapped a pic.
 

Attachments

  • 52B51607-0B54-4DAC-8B34-F106315CFE8B.jpeg
    52B51607-0B54-4DAC-8B34-F106315CFE8B.jpeg
    219.3 KB · Views: 57
  • 43C79CA9-A78B-4DE8-95A3-972ABE462CE4.jpeg
    43C79CA9-A78B-4DE8-95A3-972ABE462CE4.jpeg
    249.5 KB · Views: 71

WAS Jr

Well-known member
Joined
Nov 8, 2014
Messages
275
Those collars are to keep the head from slipping. One can be used underneath the table to keep it from slipping too. Cheaper versions used a round thick sheet metal versions instead of these cast ones.
Bill S
 

Greatbear

Well-known member
Joined
Jan 17, 2008
Messages
1,702
Location
Columbia/Fulton, MD
Ah! Since this thread got a bump and GarageTodd sent me a message where I replied to him about his wiring issue, I will repeat what I said to him in here so others can maybe benefit.

Your DP is configured like it should be, as far as wiring types goes. Because the cable from the switch is so thick, you will have to put it through the clamp if it is too thick to pass through the notch in the motor wiring box. The line cord will fit in the notch and will be held by the wiring box cover. Inside the motor wiring box, connect the black and white wires from the line cord to the corresponding ones from the switch cable. Remove the ring terminals and use a pair of wire nuts, or insulated male and female spade lugs (I did the latter). At the switch, there are four screw terminals, two for the line side, two for the load side. Connect the black and white wires to the line side. Connect the orange wire to the load side terminal corresponding to the one with the white line wire. The red wire goes to the load terminal corresponding to the black (hot) line wire.. The ground should be connected to the switch frame, or put a screw into one of the unused holes in the left side of the head casting and connect the ground there. This makes a good ground to the drill press frame. Back at the motor, connect the orange wire to low/neutral/L1 terminal, and the red to the other terminal (this looks like it has already been done). Use the screw hole in the lower left of the wiring box to secure both ground wires inside the wiring box. And, you're done!

I have a bench version of this DP, about 1968 vintage. I tore it apart to the last nut and bolt in early 2020 and completely restored it. New bearings, a brand new chuck I had for a few decades went on, new wiring, and a new (used) table, since my original table was some sort of home/shop made thing that was not adjustable. I got an angling table from epay that didn't have much of an "arc of shame" from drilling through the work and into the table. I beadblasted and resurfaced the table, bead blasted everything else, and after a solid batch of paint coats, some new hardware, reconditioning old hardware, and some 'blueprinting' what I could that needed it, it came together quite nicely. In its day it was just a "utility' DP, but it runs solid and true much better than just about anything you can find today. I added a light about a year later. The motor on mine is a totally enclosed, fan cooled model with a side mounted wiring box.
 

Attachments

  • drillpress1.jpg
    drillpress1.jpg
    190 KB · Views: 64
  • drillpress2.jpg
    drillpress2.jpg
    138.4 KB · Views: 62
  • drillpressandlight.jpg
    drillpressandlight.jpg
    203.3 KB · Views: 68

GarageTodd

Member
Joined
Dec 30, 2021
Messages
7
Thank you so much, Greatbear! Super helpful. I was able to get the line cable through both the inside clamp as well as the hole in the back of the drill housing, but barely. The OG wiring harnesses were so dried out it was difficult to see wire colors. I will try what you suggested today, I might have more questions when I do because electrical work is not my forte lol.

Your DP looks incredible! Amazing work on it! The one I am working to restore sat in a filthy outdoor shed in AZ for years. Rust removal from the DP and stand was brutal.
 

GarageTodd

Member
Joined
Dec 30, 2021
Messages
7
So I hooked it all up and think I did something wrong at the switch. Are the line/load terminals both top (white / black) “on” and orange / red bottom “off” or left and right sides of the switch (when facing the drill press)? I wired it like this and when plugged in, it goes on but switch won’t turn it off.
 

Attachments

  • 19D13650-3279-49D6-8FE7-0F0E9EACC554.jpeg
    19D13650-3279-49D6-8FE7-0F0E9EACC554.jpeg
    228.5 KB · Views: 50

GarageTodd

Member
Joined
Dec 30, 2021
Messages
7
Not labeled on the switch. Motor has both labeled as Line.
 

Attachments

  • 19C381EB-7E66-453A-9CD0-D08F2FFD3F81.jpeg
    19C381EB-7E66-453A-9CD0-D08F2FFD3F81.jpeg
    202.5 KB · Views: 45
  • 6323D220-D726-442D-8BBF-A6BA2DA83319.jpeg
    6323D220-D726-442D-8BBF-A6BA2DA83319.jpeg
    254.4 KB · Views: 45

Greatbear

Well-known member
Joined
Jan 17, 2008
Messages
1,702
Location
Columbia/Fulton, MD
That is wired correctly, but if it won't turn off, the switch is likely stuck on. You might be able to save it by spraying a bit of WD-40 into the switch using the straw both where the toggle is hinged, and where the missing set of terminals on the back are, if the holes are open. Exercise the switch rather vigorously after it has soaked a bit, and try again. if that doesn't help, the switch will need to be replaced, or, if you feel adventurous, disassembled and cleaned. There's grease inside these switches, and over time it get hard. There could be a chance the switch got welded on as well.
 

454ragtop

Well-known member
Joined
Mar 24, 2008
Messages
5,011
Location
Carver, MA
If you are running this on common 115 volt household power, you're making this way too complicated. From the cord, hook up the neutral (white) wire and ground (green wire up to the motor. Run the hot (black) wire to the switch, and 1 more wire, preferably also black, but any color will work, back to the motor. Usually at the switch you use the 2 terminals on 1 side of the switch, one at the top and one at the bottom on the same side. Only need 4 wires at the switch if running off 230 volts single phase. Can also use the other pair of terminals to control a lamp if desired.
 

jmarkwolf

Well-known member
Joined
Jan 15, 2013
Messages
1,827
Location
Southeast Michigan
Timely article bump!

I'm currently in the process of rewiring my older version of the same 15in Delta drill press, 1956 model. Pics below. Surprised I never encountered this old thread before.

Using 14-3 from the wall to the drill press distribution box, and 14-4 between the "distribution" box and the front power switch, to make use of the power isolation afforded by the dual pole power switch.

Replacing the spindle bearings while I'm at it.

I just found a new place that sells parts and services for these and similar old Delta drill presses, for anyone involved in similar projects. Check them out:

www.hammerscale.com
 

Attachments

  • Delta_Rockwell_DP500_1.jpg
    Delta_Rockwell_DP500_1.jpg
    191 KB · Views: 27
  • Delta_Rockwell_DP500_2.jpg
    Delta_Rockwell_DP500_2.jpg
    174 KB · Views: 28
  • Delta_Rockwell_DP500_3.jpg
    Delta_Rockwell_DP500_3.jpg
    152.9 KB · Views: 37
Last edited:

bubinga

Well-known member
Joined
Jul 26, 2014
Messages
12,744
Location
Bridgeport Ohio. (Across River From Wheeling WV)
Timely article bump!

I'm currently in the process of rewiring my older version of the same 15in Delta drill press, 1956 model. Pics below. Surprised I never encountered this old thread before.

Using 14-3 from the wall to the drill press distribution box, and 14-4 between the "distribution" box and the front power switch, to make use of the power isolation afforded by the dual pole power switch.

Replacing the spindle bearings while I'm at it.

I just found a new place that sells parts and services for these and similar old Delta drill presses, for anyone involved in similar projects. Check them out:

hammerscale.com
Is Hammer scale.com reasonable, on their parts and shipping?
 
To avoid these ads, REGISTER NOW!
Top Bottom