To avoid these ads, REGISTER NOW!

Rigpig's Garage-Mahal

Rigpig

Well-known member
Joined
Feb 13, 2010
Messages
188
Location
Victoria,BC
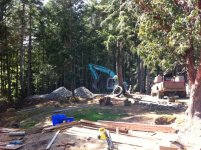
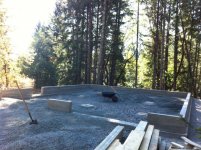
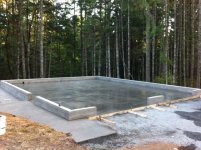
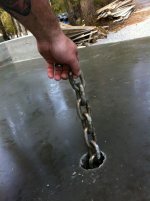
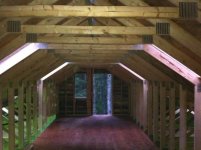
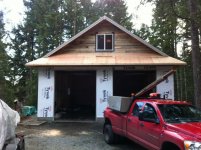
Hey guys, i'm in the initial stages of building my shop. Thought i'd post up some pics of the progress as i go along. Looking forward to the thoughts and build ideas of those that have already gone through what i'm starting...
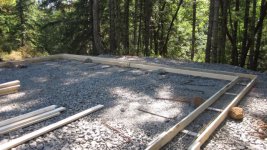
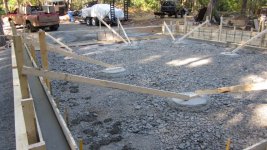
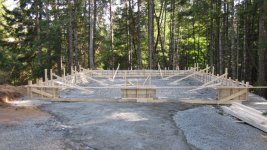
Shop specs are: 30x36deep, 14ft walls, 2-10x10ft doors, one mandoor, 6 skylights, and 4-4ft windows.
Here's a pic of the start.
Cheers!
 

Attachments

  • GJ shop pic.jpg
    GJ shop pic.jpg
    85.6 KB · Views: 187
To avoid these ads, REGISTER NOW!

JPorkins

Active member
Joined
Dec 28, 2011
Messages
37
Sounds cool. Where is this being built? Looks like the south judging by the pines.
 

Rowdy9

Active member
Joined
Sep 6, 2012
Messages
42
Location
Dallas, Tx
Rigpig you was right on our building specs, we are very close. I will watch for ideas off your build also. East Texas maybe???
 
OP
R

Rigpig

Well-known member
Joined
Feb 13, 2010
Messages
188
Location
Victoria,BC
Had to drop a few trees for the shop footprint. My little diesel Land Cruiser did a good job of skidding them back up. Firewood for next winter...
 

Attachments

  • skidding2.jpg
    skidding2.jpg
    103 KB · Views: 222
  • skidding.jpg
    skidding.jpg
    98.6 KB · Views: 196
OP
R

Rigpig

Well-known member
Joined
Feb 13, 2010
Messages
188
Location
Victoria,BC
Sounds cool. Where is this being built? Looks like the south judging by the pines.
LOl... close, but i guess i should update my sig and avatar etc...
Rigpig you was right on our building specs, we are very close. I will watch for ideas off your build also. East Texas maybe???
Yup, i'll be following yours closely, mine is pretty simple and more than i've ever had so it'll be fun regardless.:beer:
 

Rowdy9

Active member
Joined
Sep 6, 2012
Messages
42
Location
Dallas, Tx
Yup, i'll be following yours closely, mine is pretty simple and more than i've ever had so it'll be fun regardless.:beer:
Same for me. I moved into my house 6 years ago and the garage was converted to a room. What used to be my man cave, is now my 3yearold daughters play room. I bought the house with plans to build my shop, just never had the money. :beer::beer:
 
OP
R

Rigpig

Well-known member
Joined
Feb 13, 2010
Messages
188
Location
Victoria,BC
Same for me. I moved into my house 6 years ago and the garage was converted to a room. What used to be my man cave, is now my 3yearold daughters play room. I bought the house with plans to build my shop, just never had the money. :beer::beer:

Kids are in the plans for me now, figured i'd better get a start on the shop or it'll never happen! LOL
 
OP
R

Rigpig

Well-known member
Joined
Feb 13, 2010
Messages
188
Location
Victoria,BC
Had an excavator from up the road show up do some more work. I needed about 30 truck loads of 18"minus to fill the hole on the back side and to extend towards the back. I also brought in a geotech just to certify the excavation, rock quality and location. Its only money i guess...:eyecrazy:
 
OP
R

Rigpig

Well-known member
Joined
Feb 13, 2010
Messages
188
Location
Victoria,BC
Forgot the pics, first one of the rock coming in. Second one is the dog getting comfortable on the finished product.
 

Attachments

  • excavator1.jpg
    excavator1.jpg
    118.5 KB · Views: 175
  • slab1.jpg
    slab1.jpg
    115.3 KB · Views: 187
OP
R

Rigpig

Well-known member
Joined
Feb 13, 2010
Messages
188
Location
Victoria,BC
Got the footings prepped and poured, I'm pretty happy to finally see some progress on this thing now. I need to find some anchor pots for the slab pour, if anyone has a good source for ordering, and manufacturer, please post up.
Thanks!
 

Attachments

  • GJ footings1.jpg
    GJ footings1.jpg
    91.1 KB · Views: 144
  • GJ footings2.jpg
    GJ footings2.jpg
    115.1 KB · Views: 159
OP
R

Rigpig

Well-known member
Joined
Feb 13, 2010
Messages
188
Location
Victoria,BC
Got the pony walls all layed out and and managed to pour on the weekend.
Here's how it sits.
Cheers!
 

Attachments

  • GJ ponywalls1.jpg
    GJ ponywalls1.jpg
    128.8 KB · Views: 168
  • GJ ponywalls2.jpg
    GJ ponywalls2.jpg
    133.1 KB · Views: 164
OP
R

Rigpig

Well-known member
Joined
Feb 13, 2010
Messages
188
Location
Victoria,BC
A little more done before i head back to work for a few weeks. Gonna try and prep to pour the slab for the end of the week and let it cure while i'm away working so we can get some walls up next time i'm home. First the forms come off then the fill gets shoveled in.
 

Attachments

  • GJslabprep1.jpg
    GJslabprep1.jpg
    108.2 KB · Views: 121
  • GJslabprep2.jpg
    GJslabprep2.jpg
    107.4 KB · Views: 130
OP
R

Rigpig

Well-known member
Joined
Feb 13, 2010
Messages
188
Location
Victoria,BC
Ran the tamper for a few hours and watered at the same time to try and get the fines down. I can't find any anchor pots locally so i'm gonna fab some up, it'll be the official first project in the shop!!!:D
 

Attachments

  • GJslabprep3.jpg
    GJslabprep3.jpg
    77 KB · Views: 97
OP
R

Rigpig

Well-known member
Joined
Feb 13, 2010
Messages
188
Location
Victoria,BC
First shop project! I couldn't find anchor pots anywhere local so i decided to use up some material that i had lying around. I'll have five pull pots in total in the garage, two centered with the doors at the back, two centered with the doors at the front and one somewhat center of the floor.
 

Attachments

  • shop pullpots.jpg
    shop pullpots.jpg
    66.7 KB · Views: 410

LutzTD

Well-known member
Joined
Dec 31, 2011
Messages
3,673
Location
Lutz, Florida
First shop project! I couldn't find anchor pots anywhere local so i decided to use up some material that i had lying around. I'll have five pull pots in total in the garage, two centered with the doors at the back, two centered with the doors at the front and one somewhat center of the floor.

those are awesome, how thick are you going to make the slab around these? how is the chain tied in on the pot. cool :) I wish I had seen those before I poured, you can bet my second phase slab will have some.
 
OP
R

Rigpig

Well-known member
Joined
Feb 13, 2010
Messages
188
Location
Victoria,BC
those are awesome, how thick are you going to make the slab around these? how is the chain tied in on the pot. cool :) I wish I had seen those before I poured, you can bet my second phase slab will have some.

Thanks Lutz! The chain drops through a cross patern in the bottom plate, a 1/2" grade 8 bolt through the bottom link and welded along with two other links welded to the plate. It won't go anywhere, and it beats the $300. i was quoted to order them in!
Nice Mustang by the way! I've got my pop's 65' k-code fastback under the white tarp in one of the pics. Another reason to get the shop done for the restoration:D
 
OP
R

Rigpig

Well-known member
Joined
Feb 13, 2010
Messages
188
Location
Victoria,BC
At the last minute i decided to get the goundworks layed out for a potential future washroom and shower. I already had a water feed for a hose bib coming in and didn't want to break up the slab at a later date.
 

Attachments

  • GJgroundworks.jpg
    GJgroundworks.jpg
    90.1 KB · Views: 225
  • GJgroundworks2.jpg
    GJgroundworks2.jpg
    81.6 KB · Views: 181
OP
R

Rigpig

Well-known member
Joined
Feb 13, 2010
Messages
188
Location
Victoria,BC
I ordered concrete for the weekend so it was a busy couple days and long nights! Got the anchor pots roughed into place and the rebar layed out for the pour.
 

Attachments

  • GJrebar layout.jpg
    GJrebar layout.jpg
    45.6 KB · Views: 250
OP
R

Rigpig

Well-known member
Joined
Feb 13, 2010
Messages
188
Location
Victoria,BC
Managed to get the slab poured over the weekend. I'm pretty happy with the way the polishing turned out. Anchor pots worked out great also, nice and flush with the floor.
 

Attachments

  • GJslab finishing.jpg
    GJslab finishing.jpg
    84.4 KB · Views: 237
  • GJslab finishing2.jpg
    GJslab finishing2.jpg
    91 KB · Views: 254
To avoid these ads, REGISTER NOW!

GTO

Well-known member
Joined
May 8, 2009
Messages
3,927
Location
NJ,FL
Awesome so far! Noob question: what are the anchor pots for??

Frame pulls,I'm assuming.
Looks good so far
Just curiuos,why didn't you wait to pour the slab last.
Good luck the rest of the way.
 
OP
R

Rigpig

Well-known member
Joined
Feb 13, 2010
Messages
188
Location
Victoria,BC
Awesome so far! Noob question: what are the anchor pots for??

Like GTO said, for pulling etc... I had never heard of anchor pots before, i was just interested in being able to pull something into the shop, winching etc... I searched around to buy them local, couldn't find them anywhere so i made my own. They'll have covers on them when the time comes so they're flush with the floor.
Cheers!
 
OP
R

Rigpig

Well-known member
Joined
Feb 13, 2010
Messages
188
Location
Victoria,BC
Frame pulls,I'm assuming.
Looks good so far
Just curiuos,why didn't you wait to pour the slab last.
Good luck the rest of the way.
A couple reasons, i leave for work for another 5 weeks and it'll give the slab time to cure. I'm also framming for 14ft.walls so it'll make it easier rolling scaffoding around to put it all together including the trusses.

Looking good rigpig.

Thanks guys!
Cheers!
 
OP
R

Rigpig

Well-known member
Joined
Feb 13, 2010
Messages
188
Location
Victoria,BC
Here's a shot of one of the pots installed. I'll make covers for them later.
 

Attachments

  • GJanchorpotchain.jpg
    GJanchorpotchain.jpg
    60.3 KB · Views: 338

vegar

Well-known member
Joined
Jun 22, 2010
Messages
279
Location
Fredrikstad, Norway
I like the idea with anchor pots. Its not something I would have used often, but would be nice too have the times I need it

btw, your avatar makes me think about this pic I took a couple of months ago. They are not so big in sizes, but big in numbers :)

Picture062.jpg
 

pwschuh

Well-known member
Joined
Jun 29, 2012
Messages
240
Location
Mid-Atlantic
Like GTO said, for pulling etc... I had never heard of anchor pots before, i was just interested in being able to pull something into the shop, winching etc... I searched around to buy them local, couldn't find them anywhere so i made my own. They'll have covers on them when the time comes so they're flush with the floor.
Cheers!

That's actually a great idea. I thought of it too late for my garage but I would do them now if I could.
 

JakeKohl

Well-known member
Joined
Feb 23, 2012
Messages
1,365
Location
Greenville, SC
A couple reasons, i leave for work for another 5 weeks and it'll give the slab time to cure. I'm also framming for 14ft.walls so it'll make it easier rolling scaffoding around to put it all together including the trusses.


Thanks guys!
Cheers!

Agreed - my slab was poured before the stick construction began. There is no problem if freezing isn't a concern and it does provide a much nicer (safer) surface to work from...it also makes it easier on the concrete delivery and should they back into the block around the door opening, it's much easier to fix before the walls are on it! (first hand experience).
 
OP
R

Rigpig

Well-known member
Joined
Feb 13, 2010
Messages
188
Location
Victoria,BC
Here's one of the reasons for the shop. Pops passes away a few years ago and we had long agreed to get the Mustang running again together someday. I need to get this thing under cover and working on it.
One owner since 65' GT 289 K-code, came from Comstock racing's fleet of cars with some racing history. 39K original miles, numbers matching, 4spd, Thunderbolt fiberglass hood, still have the original mag wheels and bias ply rubber. Anyhow, if there are any Mustang guys on here, chime in cause i'll be looking for parts sources and some good restoration info and tips.
Cheers!
 

Attachments

  • GJ r-front65.jpg
    GJ r-front65.jpg
    94.6 KB · Views: 181
  • GJ l-rear65.jpg
    GJ l-rear65.jpg
    104.5 KB · Views: 162
OP
R

Rigpig

Well-known member
Joined
Feb 13, 2010
Messages
188
Location
Victoria,BC
Here's a shot of the valve cover and one of the original windshield washer reservoir.
 

Attachments

  • GJ valvecover65.jpg
    GJ valvecover65.jpg
    91.4 KB · Views: 105
  • GJ fender65.jpg
    GJ fender65.jpg
    81.6 KB · Views: 131

Rowdy9

Active member
Joined
Sep 6, 2012
Messages
42
Location
Dallas, Tx
Sorry for the loss of your old man. That would be a very sweet car to restore. I've always loved those old mustangs. Pots are a great idea.
 
OP
R

Rigpig

Well-known member
Joined
Feb 13, 2010
Messages
188
Location
Victoria,BC
Sorry for the loss of your old man. That would be a very sweet car to restore. I've always loved those old mustangs. Pots are a great idea.

Thanks Rowdy! It'll good to get the car going again and burning a set of tires off of it!!
Well, finally got some walls up, slow progression but its on its way!
 

Attachments

  • framing walls.jpg
    framing walls.jpg
    55.7 KB · Views: 97
OP
R

Rigpig

Well-known member
Joined
Feb 13, 2010
Messages
188
Location
Victoria,BC
Had an i-beam brought in and dropped into place also.
 

Attachments

  • shop ibeam.jpg
    shop ibeam.jpg
    85.1 KB · Views: 146
OP
R

Rigpig

Well-known member
Joined
Feb 13, 2010
Messages
188
Location
Victoria,BC
Trusses are up, should have the roof sheeted and skylights done in a couple days.
 

Attachments

  • GJtrusses.jpg
    GJtrusses.jpg
    86.1 KB · Views: 160

canadiancobra

New member
Joined
Dec 26, 2012
Messages
4
Location
Alberta, Canada
Great looking projects! (garage and car) I have restored a few 65-66's. My favorite car by far! Wish I could find a K-code FB!! Drop me a line if you have questions during the resto process. Love to see more car picts. Fellow Canadian in Edmonton.

Cheers John
 

Attachments

  • IMG_0615.jpg
    IMG_0615.jpg
    148.4 KB · Views: 71
OP
R

Rigpig

Well-known member
Joined
Feb 13, 2010
Messages
188
Location
Victoria,BC
Great looking projects! (garage and car) I have restored a few 65-66's. My favorite car by far! Wish I could find a K-code FB!! Drop me a line if you have questions during the resto process. Love to see more car picts. Fellow Canadian in Edmonton.

Cheers John
I'll defenitely pick your brain about parts availability, and resto questions that's for sure! Thanks! I'll get some pics up when i get it under cover in the shop.
Cheers!

Awesome garage build Rigpig, subscribed.
Thanks Rockuf8, been waiting for some time and its more than i've had for a shop so it'll do just fine!
Cheers!
 
OP
R

Rigpig

Well-known member
Joined
Feb 13, 2010
Messages
188
Location
Victoria,BC
Here's a shot of the upper loft/office space. It's just over 8' in the center and 12' wide. I'm glad i changed the truss design to incorporate this extra space, it'll come in handy.
 

Attachments

  • GJ shop loft.jpg
    GJ shop loft.jpg
    60 KB · Views: 210
OP
R

Rigpig

Well-known member
Joined
Feb 13, 2010
Messages
188
Location
Victoria,BC
A side shot, decided to go with 8 skylights, 4 for the loft and 4 for the shop. Also changed the front to a dutch hip roof cause i wanted an overhang and with the doors open didn't want it raining into the shop. Changed the door openings to 10'wide x 12' tall. Planning for a boat down the road, figured it might help getting it in and out.
Cheers!
 

Attachments

  • GJ shop side.jpg
    GJ shop side.jpg
    99.7 KB · Views: 139
  • GJ shop front.jpg
    GJ shop front.jpg
    86 KB · Views: 172
To avoid these ads, REGISTER NOW!
Top Bottom