OP
Mr. Roboto
Well-known member
Hahaha, thanks, first time, I swear! My wife is already trying to recruit me to build a new bathroom vanity now.

Hey can you come and build some cabinets in mine when you're done with yours?

This thread is full of win. You've done awesome work in here. I'm loving the bench.
On a side note I remember a thread about painting or covering electrical panels. I can't remember what it was called though. The general consensus was it doesn't matter but should be labeled. But chances are most homes have a main shut off outside the building.
Wow it's really coming together, looks great!
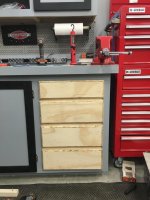
Gotta say you have done an awesome job on those cabinets.
Nice!
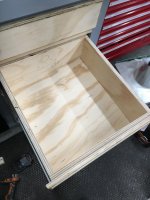
Drawers came out great! As far as the edge burning. Could be a couple of different things. Router bit is dull or you ran it through too fast or too slow. If you are looking for good quality bits that aren't super expensive Grizzly.com has a good selection. What brand bits are you using?
Bret
Those look great! I think that's just the adhesive reacting to the heat from the router.
Mr Roboto the garage came out great. love the colors, that cieling insulation will pay dividins for a long time in propane usage.....By the way do you know your state is upside down? [a private joke between VT & NH] I thought that the wall between the upper cabinets and the service panel would be perfect for a fire extingser ,low and behold it appeared on page 8, I am a believer that if you buy them you will not have to use them so cheap insurance.......Now the bad , what has bothered me is the space behind the backsplash....now that you have put the "pegboard" up any thing dropped into the void will be lost forever, it appears about 4-5 inches tick due to the sill........I have in the past built my toe kick up high enough so the cabinet/workbench would fit flat against the wall or put a trough there for spray cans etc.......the other thought would be a shelf from thr backsplash to the wall with sone holes for screwdriver/chisle storage, peanut butter jars of screws etc ,,,,I just feel that is a problem waiting to ****** up stuff! Love the garage and a much too good mudding and taping job for a Garage...lol great work....bobbycoke
I have one of those long reach claw things from harbor freight for retrieving things from back there at the moment. The plan is exactly what you described, I am going to build a shelf that extends from the top of the countertop backsplash horizontally back against the pegboard. Should to the trick, and will make for another ledge for me to set stuff down on. Just thought of something else ....on the floor how is that race deck for woodworking ??? does the dust get in the "cracks" ???? a painted floor or expoxy [sweepable] is better IMHO......BC
I love that! I put some under my cabinets (just white) but I'd like to put some on top like that. Really gives it a cool vibe for a hangout.
Those drawer fronts shouldn't present any problems once you've lightly sanded them.
Thanks for the updates.
It's a brand new router bit, but a cheapo Ryobi from HD. I have no idea how fast I should be setting my router, I need to read up on that!
Your router can be set between 10,000rpm and 12,000 is where I keep mine. What I was referring too is the speed at which you feed the wood through. If you go too fast or too slow it will burn even with a sharp bit. There's a butter zone right in the middle.
I like the lights!
Bret
Thanks! I actually have a strip of dual row cool white LEDs sitting on my bench ready to go for under the cabinets. I just need to find a power supply for them. I was hoping to salvage something instead of having to buy something. They should all compliment each other nicely. How did you attach the lights? The adhesive backing on the strip itself certainly leaves something to be desired, I don't think they will stay stuck up under there without some mechanical fasteners. I'm just not too sure what to use. My first thought was romex wire staples (not hammered in quite all the way of course, to prevent damage) but they are not wide enough to fit around the strip.
Yes for sure - the original sticky tape was useless. What I did was go to the auto parts store and bought the narrow width 3M emblem tape. I adhered it to the underside of the cabinet first, then stuck the led light strip to it. It worked great and hasn't come off again. Nice that it's not permanent and is nicely attached all the way down the strip.
Thanks, that's what I'm hoping for. I'm planning on sanding, priming, and painting this weekend. Fingers crossed!
Ah, got it. Thanks for the info. I definitely routed them slowly. I'm relatively new to woodworking, so I'm not all that comfortable with the router yet. It's a little intimidating, that things got some power.
 DSCN2723 by bjohnson388, on Flickr
Good idea. I also may screw a strip of aluminum to the underside of the cabinets, and then tape the lights to that. I'm sure they'll stick much better to that surface than they would if fastened directly to the wood.
I used the 3M on my inside kitchen cabinets too and it worked well on a smooth finished underside cabinet. If your cabinet is rough it might not work but you might try a little test strip before messing with the aluminum. Looking forward to seeing the undercab lights done. I love using these LED strips - amazing how inexpensive and great looking compared to wiring in all those 120v puck lights like in the past!
")
Turned out great! I like the contrasting dark handles.
I just had a few min. to read through. Nice job on the drawers, the black handles were a good call. Plus, the lights are cool! You have turned it into a great workspace, for sure.
What's next on the project list?
Cheers,
Chris
My buddy got the BP10 when I got mine for the same reason. He's been more than happy too. I got the 12k so my trailer fits between the posts, this has been very useful. Plus we have a truck over 10k lbs.Unfortunately, I don't have the ceiling height to get a full height 2 post overhead lift, so the best I can get is a 2 post baseplate lift.
I believe I've settled on the Atlas BP9000
http://www.gregsmithequipment.com/Atlas-BP9000

My buddy got the BP10 when I got mine for the same reason. He's been more than happy too. I got the 12k so my trailer fits between the posts, this has been very useful. Plus we have a truck over 10k lbs.
Sent from my HTC6525LVW using Tapatalk
Nice! Looks awesome! I don't anticipate myself ever having to lift anything heavier than a half-ton pickup, so I hope the 9K will do the job. That's one of the questions I have for them when I head in on Friday. My truck now is only around 5600lbs, but these newer pickups seems to be getting heavier. Even at an over-estimated 7K lbs, I am just curious to hear if the lift starts to struggle at all as you approach its rated weight. I assume the rating has a factor of safety built in to it, though.
Might as well look at the BP10 while you are there. Its not much more than the 9k. My buddy liked the lift arms on the 10k over the 9k. He has a 8k pound F250. Figure out all of your dimensions before you go and take a tape measure with you.
WOW!
Just read the whole thread, and I am impressed.
As far as the floor, do you use salt on the roads in NH? I would think the melt would get under the Race Deck and ruin the concrete. I'm in the planning stage right now and have ruled out Race Deck for that reason.
Early on when you were talking mud and tape I honestly thought "some people are really over the top" now that I've seen the finished product I'm thinking I'll go all the way with my build.
Where are you going to put the lift? I'm looking at a 24'x36' build myself, and have been thinking of using the right side as a tandem with the lift in the back stall, and possible walling off the other bay as an "office"