bcoke
Well-known member
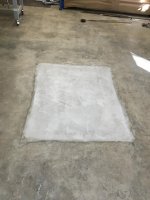
Great deal on the cement ! I feel much better as I gret so annoyed at being in my opinion "ripped off" by ready mix cemebt people that always try for a HomeRUN [full load] , I can understand a miminimum load and such but my scotch-irish heritage really kicks in......now you have more to spend on toys [$2200 minus what your REAL costs were= TOYS [ good luck bobbycoke

 It is tough work, especially for those of us that don't do it day in and day out. I've found that operating a shovel goes much smoother when Stout or Porter is in large supply.