Growlertdi
Well-known member
Nice place, just read through this over the last couple of days. keep up the good work.

Nice place, just read through this over the last couple of days. keep up the good work.
")
My first time reading this today. Amazing work! I never considered putting a shop vac on the wall for cleaning out cars... a great idea that I will copy!! The concrete work looked great, and when you are under that lift it is good to have the insurance of a well done pad. I'm also a fan of minor over-engineering.
Jeff

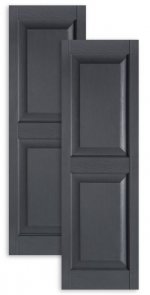
I say dark grey bottom, light grey top and stripe pattern on the horizontal area between the recessed panels. With the grey border/trim on the door, the stripe will look like a bit of forced perspective or a shadow box style.. hard to describe in words.

 2017-06-19 22.24.05 by Chad Perry, on Flickr
Mr. Roboto, it always amazes me how much dirt it takes to level an area like that. That really changes the corner of your yard. When you put up the fence are you planning to have a vehicle-size gate or easily removed section? It never fails that you need to get equipment back there soon after the fence goes up.
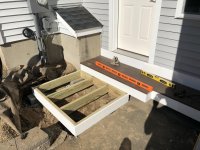
Well, as you can tell from my lack of updates, I've been pretty busy and/or lazy lately. If you remember from last fall, I threw down some large stepping stones quickly in front of the front door to the addition temporarily to get us by. Our thought was to eventually install a paver landing and new front walk way to the main door of the house, but after getting some quotes, it's not in the cards this year. We're actually getting a fence instead along our left property line instead soon, but I digress.
Here is how it's been since last fall. Yuck.... embarrassing when someone comes to the door.

And here is my still temporary but more elegant solution. It will due for another year or two until we probably get around to having someone come in and do the pavers we'd like to do.


I think your temporary solution is a damn fine one. Should absolutely do the trick until you get your pavers in place.
And I totally understand/relate with the being busy part. Kids, especially young ones, will do that to you. Glad to hear all seems to be well on your front and good to hear from you again.
Take care!

Thanks for sharing the progress over the years!
Lately I've just been feeling like there are never enough hours in the day, or days in the week! Lately I've just been feeling like there are never enough hours in the day, or days in the week!
Looks nice with that PVC wrap treatment.
To echo what others have already said, the addition you guys did really transforms the house. And that's an awesome deck you made there, looks very pleasant!
I have to say the amount of things you've accomplished since the baby gives me hope
My daughter just turned 10 months a few days ago, it's a riot!
Thank you for sharing all of your progress over the years. Reading through it all, you should be dang proud of the work you have done/ have had done. Awesome awesome awesome. Makes me appreciative to be on the board to view. Good stuff!
 The new shutters will arrive on Thursday. Hopefully I can get them up this weekend.
 House is looking good. What color will the new shutters be?
Hope New Age sorts out the damage for you and in a timely fashion. 2-3 inches twist is a lot, even if functional, shouldn't be like that on what I assume was an expensive cabinet. Looks nice, though!
Not sure how I missed it, but that deck came out fantastic!! I'm with you on avoiding staining/painting where possible. I hate doing either of those things. My father-in-law and I stained my deck last year and it already looks awful. Maybe the prep work I did wasn't good enough, but I am very unhappy with the Thompson's WaterSeal stain that we used. I may pony up the cash next spring to pay the pro's to come in and redo the deck.
One day, I'd love to expand our deck and go composite. But not anytime soon, ha!
Also glad to hear NewAge is quick to address that cabinet damage. I had great experience with them. The only thing I ended up doing was ordering more shelves for my tall cabinets. They don't come with enough from the factory.
Take care!
Thanks! It's been 3 years and it hasn't fallen down yet, so I guess that's a good thing haha. It is certainly nice to maintain other than requiring a power-washing a few times per year. That's a bummer about your failing deck stain. Since your house is so new, did you give the PT enough time to dry out before applying stain?
And yes the new doors will be in mid next week. I've considered adding one more shelf to mine, too. Was it affordable to buy more?
Ha, definitely a good thing! As for the PT wood, I gave it over a year before applying the stain. The home inspector told me that should be more than enough time to wait, but perhaps it needed more time?! Either way, all I know it is looks AWFUL. Luckily we have a rug as part of our deck decor that covers a good majority of it. Or else I would have redone it already since it would be much more in my face.
Yeah, the shelves were definitely affordable. Right around $60 for a two-pack.
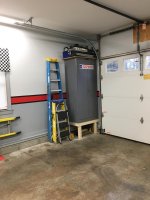
Sorry if this has already been answered. I didn't read all 38 pages
but why the furring strips on the ceiling? Why not just screw to the bottom of the trusses? I ask because I'm getting ready to do the drywall in my shop.
My builder quoted 3k for insulation and finished drywall. I'm debating on whether to just hire it out.
Thanks for the info!