To avoid these ads, REGISTER NOW!

Between 705 & 1200 SQ/FT Roboto's Garage

Workspaces between 705 and 1200 squarefeet.
To avoid these ads, REGISTER NOW!
OP
M

Mr. Roboto

Well-known member
Joined
Dec 11, 2012
Messages
2,159
Location
New Hampshire
Well, this has been a long time coming. As I've pointed out a few times in the past, I have hated the maroon trim and shutters on my house since day 1. The shutters, window trim, window sashes, door trim, garage door casing....everything the previous owners could paint maroon... they did. Other things had been taking precedence over the years, but today is the day I can finally say that it's all gone.

Here is a photo from the day I closed on my house 7 years ago:

attachment.php


and here is a photo from the same spot today:

attachment.php


And one head on shot as well:

attachment.php


Kind of nice to take a moment to take a step back and realize how far things have come here... I'm also exhausted thinking about all of the work that went into the difference between these 2 pics!

As always, thanks for everyone who follows along and puts up with my non garage related posts as well hahaha. It's been fun to document a lot of these changes.
 

Attachments

  • 57.jpg
    57.jpg
    94.6 KB · Views: 1,212
  • 56.jpg
    56.jpg
    150.1 KB · Views: 1,172
  • 55.jpg
    55.jpg
    151.1 KB · Views: 1,208
Last edited:

amkluttz

Well-known member
Joined
Sep 8, 2014
Messages
279
Location
Concord, NC
What a change. The front porch/covering and attaching the garage made such a difference to the house. Getting rid of that maroon trim was the way to go. Great work!
 

Bob Heine

ALLIANCE MEMBER
Joined
Oct 24, 2009
Messages
10,703
Location
Boca Raton, Florida
An amazing transformation from the front and equally amazing from the rear. At some point you will be amazed at how much you got done in seven years.
 
OP
M

Mr. Roboto

Well-known member
Joined
Dec 11, 2012
Messages
2,159
Location
New Hampshire
I received the replacement doors for my NewAge 48” locker. Once again, the doors were damaged in transit. I don’t know who they think they’re kidding, but these are severely under-packed. I can see them surviving if they’re shipped in a large lot if you order a large setup from them on pallets where a freight company would handle the shipping, but I am getting doubtful that UPS can deliver this single set of doors without damage. I reached out to them again and we’ll see how they handle it. Pretty disappointing after spending $400 on a cabinet. They no doubt are building these for a fraction of that cost after seeing the quality, so I’m beginning to believe they just build in the cost of sending replacement parts into the price.

attachment.php


attachment.php
 

Attachments

  • 1CD7CB5A-700A-48D1-8A2C-12FE3511C838.jpg
    1CD7CB5A-700A-48D1-8A2C-12FE3511C838.jpg
    57 KB · Views: 1,090
  • 1823AC6C-86A3-4087-A427-EFD1BF9AB356.jpg
    1823AC6C-86A3-4087-A427-EFD1BF9AB356.jpg
    46.9 KB · Views: 1,091
Last edited:

Bessy

Well-known member
Joined
Dec 18, 2012
Messages
992
Location
Ontario, Canada
Re: Mr. Roboto's Garage Makeover

That's seriously disappointing, I'd be looking for a discount at this point. Shipping/receiving people really don't care, that's just par for the course I guess.

Even watching the guy unload my 42" tool cab upon delivery was cringy (I offered to assist him).


Sent from my Pixel 3a using Tapatalk
 
OP
M

Mr. Roboto

Well-known member
Joined
Dec 11, 2012
Messages
2,159
Location
New Hampshire
They just responded that they will be sending a second set of replacement doors but that they won't ship out until to the middle/end of September due to stock.He made a special request for them to be packed with "extra packaging" so hopefully the 3rd time is the charm? I guess we'll find out.
 
OP
M

Mr. Roboto

Well-known member
Joined
Dec 11, 2012
Messages
2,159
Location
New Hampshire
Had a day to myself yesterday, so I spent it trying to get some more things checked off the never ending list. When we lost the window in the master due to the addition in between the house and garage, I never got around to patching it. Didn’t feel like dealing with the mess that comes with tape/mud with a 2 year old in the house, so today was the day.

Before:

attachment.php


After:

attachment.php


Still need to prime and paint obviously.

I also got the 2 windows painted on the side of the garage, and the shutters up. These windows never had shutters, so I decided to add them while I was replacing the ones on the house.

attachment.php


I had planned on painting the soffit too, but there were a few trouble areas that I was hoping was just peeling paint. Nope, completely rotten. I think I’ll most likely just rip the whole 36’ of soffit/fascia down and replace with pvc and vinyl. At least this means I won’t have to paint it!

attachment.php
 

Attachments

  • 68A73A4A-4370-4D7A-818A-5188166B6265.jpg
    68A73A4A-4370-4D7A-818A-5188166B6265.jpg
    139.9 KB · Views: 978
  • 763CC177-5B99-4AEB-89F3-5D26743AEA71.jpg
    763CC177-5B99-4AEB-89F3-5D26743AEA71.jpg
    157 KB · Views: 979
  • EF486B00-6367-4BC3-B191-EE774EE629E7.jpg
    EF486B00-6367-4BC3-B191-EE774EE629E7.jpg
    48.2 KB · Views: 976
  • 0E078857-6898-4073-BDF9-0DD974EAF090.jpg
    0E078857-6898-4073-BDF9-0DD974EAF090.jpg
    80.9 KB · Views: 977
Last edited:

Pluribus

Well-known member
Joined
Dec 16, 2012
Messages
2,143
Location
Skagit County, WA
Great job on the front porch, the garage-house connection, and the color! I've never liked seeing an entry door on a 2-story, flat, eave wall, even if it's not in snow country. That porch breaks up the space, adds aesthetic appeal, and it would make me feel much safer from ice & snow that might fall.
 
OP
M

Mr. Roboto

Well-known member
Joined
Dec 11, 2012
Messages
2,159
Location
New Hampshire
Great job on the front porch, the garage-house connection, and the color! I've never liked seeing an entry door on a 2-story, flat, eave wall, even if it's not in snow country. That porch breaks up the space, adds aesthetic appeal, and it would make me feel much safer from ice & snow that might fall.

Thank you! I couldn't agree more. I really love the look and functionality that it added. I'm not sure if I would have had the motivation to do it if the rot issues behind the old steps were not present causing them to be completely removed, but I am glad that it's done now.

Also, I finished up the window patch job in the master. It's not perfect, but good enough I suppose. I am not great at tape/mud.

attachment.php
 

Attachments

  • br.jpg
    br.jpg
    51.8 KB · Views: 887

Bob Heine

ALLIANCE MEMBER
Joined
Oct 24, 2009
Messages
10,703
Location
Boca Raton, Florida
I find dimmable or three-way lights on their lowest setting improve my tape and mud work. If that doesn't work, a nice piece of artwork that SWMBO loves comes to my rescue.
 
OP
M

Mr. Roboto

Well-known member
Joined
Dec 11, 2012
Messages
2,159
Location
New Hampshire
I had to pick up a new oil lift drain... the old Harbor Freight one I've been using for the last few years is just falling apart, and is poorly designed. Went with the Lisle 11102. My daughter is absolutely obsessed with helping me with things around the house now, so we teamed up on putting it together after dinner last night!

attachment.php
 

Attachments

  • ergdfb.jpg
    ergdfb.jpg
    96.3 KB · Views: 792
To avoid these ads, REGISTER NOW!
OP
M

Mr. Roboto

Well-known member
Joined
Dec 11, 2012
Messages
2,159
Location
New Hampshire
Well... the time has come. It’s been one year since I did the addition to connect the house to the garage. The inside has been 100% unfinished since then, but I’m finally just now staring to work on it. I have some time off this week so I’m going to be chipping away at it the best that I can.

Today was day 1.... spent several hours out there making my plan of attack, made my first big run to Home Depot, and framed in the wall around the vent pipe for my oil boiler. Gotta start somewhere!

attachment.php
 

Attachments

  • EA7F5EE7-E1E3-44DA-82C8-E0F70F098B0D.jpg
    EA7F5EE7-E1E3-44DA-82C8-E0F70F098B0D.jpg
    100.3 KB · Views: 1,487
OP
M

Mr. Roboto

Well-known member
Joined
Dec 11, 2012
Messages
2,159
Location
New Hampshire
Well, it's already Thursday of my week off, and I'm nowhere near where I had hoped to be. My daughter came down with something, so I've had her a few days, and we had a bad wind storm come through last night and I was without power for most of the day today, but I guess any progress is good progress. Excuses, excuses... right?

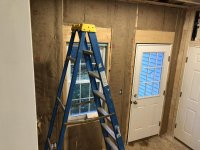
Framing is all done. I had to strap out the wall along the garage for 2 reasons. 1, I need space for some electrical. And 2, the door they used going in to the garage is framed out for a 2x6 wall. My garage is framed with 2x4s (unfortunately) so it protruded out a lot. This meant I had to shave about 3/16" off the broad side of a 2x4 to make the drywall sit flush with the door. A planer would have made quick work of this, but I do not have one and didn't really want to rush out and buy one, so I ripped slivers of wood off each one on my table saw. This was both time consuming and a little dangerous, since it's kind of a risky cut, but I survived. Also strapped out the ceiling with 1x3s.

attachment.php


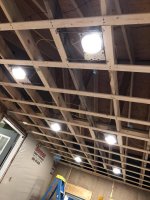
Electrical is done. Outlets are all in, overhead cans are wired, complete with 3 separate switches controlling them (something new for me, I've never wired up a 4 way switch before) Ethernet cable is roughed in, and I wired in an AC disconnect outside too because I may end up putting in a mini spit in here. Yes, it may seem like overkill, but if we end up having another kid, I will lose my office (which is now the 3rd bedroom) so my desk will probably end up out here. So, conditioned space would be a requirement for that.

attachment.php


attachment.php


Also, wall insulation is about 90% done as well.

attachment.php


I am still undecided on how I'll insulate the ceiling at this point. I did blown in on my garage, but it was a much bigger area and made sense. This time, I'm not so sure. I already put the strapping up, so some of the options that would normally get stapled to the underside of the rafters is out... unless the strapping itself is enough to hold up insulation until the drywall is hung? I'm all ears if anyone has any suggestions.

At least the weather has been pretty nice this week for the most part, and I've been able to sit out on the back deck for lunch every day and admire the foliage.

attachment.php


That's it for now. Next up is finish wall insulation, decide on ceiling insulation, and then start hanging sheetrock.
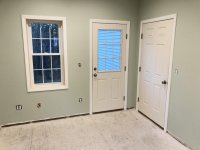
 

Attachments

  • unnamed (2).jpg
    unnamed (2).jpg
    149.5 KB · Views: 1,384
  • unnamed.jpg
    unnamed.jpg
    149.1 KB · Views: 1,383
  • unnamed (3).jpg
    unnamed (3).jpg
    101.1 KB · Views: 1,390
  • unnamed (1).jpg
    unnamed (1).jpg
    153.4 KB · Views: 1,396
  • IMG_7733.jpg
    IMG_7733.jpg
    82.2 KB · Views: 1,392

M-technik-3

Well-known member
Joined
Feb 16, 2008
Messages
1,785
Location
Western Mass
Nice work, yeah yesterday was ****. Lost a tree here and yard was flooded in the back as we had 3 inches of rain supposedly.

The nice thing is you don't have to rush to finish this space.
 

nicholam77

Well-known member
Joined
Dec 18, 2016
Messages
2,655
Location
Minneapolis, MN
Looks like a lot of progress to me!

That must have been a pain to rip all those 2x4's down. I've done that on much shorter boards with my jobsite saw to square up 2x4's and had to take a bunch of passes. Maybe your table saw is more powerful. :)

Great work so far, looks like it will be a nice comfortable space when finished.
 
OP
M

Mr. Roboto

Well-known member
Joined
Dec 11, 2012
Messages
2,159
Location
New Hampshire
Nice work, yeah yesterday was ****. Lost a tree here and yard was flooded in the back as we had 3 inches of rain supposedly.

The nice thing is you don't have to rush to finish this space.

Thanks, hopefully there was no related damage from the tree or water.

Looks like a lot of progress to me!

That must have been a pain to rip all those 2x4's down. I've done that on much shorter boards with my jobsite saw to square up 2x4's and had to take a bunch of passes. Maybe your table saw is more powerful. :)

Great work so far, looks like it will be a nice comfortable space when finished.

Thanks! Yes, it was a bit of pain, and took 2 passes per board. The saw had the power, but the blade height doesn’t come up high enough to do it In one pass. So I had to make one pass, flip the board, and complete the cut from the other side. My already dulling blade is now completely toast after all of that though haha.

Also, I’ve decided to lay down 2 opposing layers of R-30 batts up in the ceiling after doing some research. Hoping to bang that out today/tomorrow and then it will be time to hang Sheetrock!
 
OP
M

Mr. Roboto

Well-known member
Joined
Dec 11, 2012
Messages
2,159
Location
New Hampshire
Insulation is now complete! I need to add the second row of directionally opposed insulation in the attic, but I’ll do it after the Sheetrock is up so it’s there to hold it up better. Finally ready to hang drywall now.

attachment.php
 

Attachments

  • 963D6AEC-E28A-454D-A66E-8627B872C738.jpg
    963D6AEC-E28A-454D-A66E-8627B872C738.jpg
    122.6 KB · Views: 1,257
OP
M

Mr. Roboto

Well-known member
Joined
Dec 11, 2012
Messages
2,159
Location
New Hampshire
Was able to set aside a few hours today to get the ceiling hung. I certainly miss having the drywall lift that I used when hanging the sheetrock in my garage, but I made due.

attachment.php
 

Attachments

  • IMG-7869.jpg
    IMG-7869.jpg
    112.2 KB · Views: 1,155
OP
M

Mr. Roboto

Well-known member
Joined
Dec 11, 2012
Messages
2,159
Location
New Hampshire
Drywall is (almost) done! There is one piece that I cut to shape (behind the box fan) and laid in place, but need to add the cut outs for electrical boxes still. Other than that, it's all up! I am going to reach out to a few people to see about taping and mudding for me. I am just not in the mood :lol_hitti 
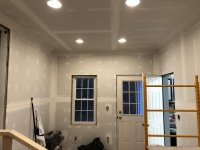
This was my first time working with 54" wide Sheetrock too. I definitely see the benefit (in this case, it eliminated an entire horizontal seam all the way around the room) but they're kind of a bear to work with by yourself.

It's definitely nice to see the addition at this stage though. I've been dreaming about it ever since buying this place.

attachment.php


attachment.php


attachment.php


attachment.php
 

Attachments

  • 4.jpg
    4.jpg
    84.6 KB · Views: 1,072
  • 3.jpg
    3.jpg
    111.7 KB · Views: 1,079
  • 2.jpg
    2.jpg
    70.5 KB · Views: 1,085
  • 1.jpg
    1.jpg
    90.4 KB · Views: 1,092
Last edited:

Bob Heine

ALLIANCE MEMBER
Joined
Oct 24, 2009
Messages
10,703
Location
Boca Raton, Florida
I used the same drywall lift for my garage ceiling repair. Mine was just a little shorter so I could set it on a floor jack. I like the idea of fewer seams but the 5/8" 4'x8' sheets are already a bear to lift. It always amazes me how much drywall it takes to cover a small space but at least you didn't have to do a closet.
 
OP
M

Mr. Roboto

Well-known member
Joined
Dec 11, 2012
Messages
2,159
Location
New Hampshire
I used the same drywall lift for my garage ceiling repair. Mine was just a little shorter so I could set it on a floor jack. I like the idea of fewer seams but the 5/8" 4'x8' sheets are already a bear to lift. It always amazes me how much drywall it takes to cover a small space but at least you didn't have to do a closet.

Are you talking about the wooden support T I built to hold up the ceiling sheets in the corner? If so, yes, it was a real life saver!

Fortunately, everything in the addition was 1/2". I had the foresight to use 5/8" fire rock along the left wall in the garage with the hope that I would some day be able to build this addition, so I was covered there from a code requirement. But yes, it took a total of (14) 12 foot sheets! I purchased one extra just in case that I did not have to use as well. But we all know that if I did not buy it, I would have needed it.

I actually thought about building a closet to the right of the boxed out area in the corner that encapsulates my heat vent pipe, but decided against it due to the added complexity. I was not in the mood for all that went along with it. In general, I'm kind of over it when it comes to all of these house projects to be honest. I'm hoping this will be the last one for a while.
 
OP
M

Mr. Roboto

Well-known member
Joined
Dec 11, 2012
Messages
2,159
Location
New Hampshire
Your hard work is paying off - it looks great!

Thank you very much!

Day 1 of tape/mud is complete. This time, I can take zero credit. It pains me to admit, but I hired it out. This was going to be the largest time sink for me in completing the interior, so I decided it was best off to have someone else do it. I'm sure it will come out better as well. He expects to have it done by the end of the week!

attachment.php


attachment.php


attachment.php
 

Attachments

  • 1.jpg
    1.jpg
    90.7 KB · Views: 866
  • 2.jpg
    2.jpg
    100.9 KB · Views: 865
  • 3.jpg
    3.jpg
    107.9 KB · Views: 867
OP
M

Mr. Roboto

Well-known member
Joined
Dec 11, 2012
Messages
2,159
Location
New Hampshire
Some updates since the last post... tape and mud was completed, primer up, and ceiling and walls have been painted. Installed the recessed lights too (i've had temporary bulbs in there this whole time to keep the real ones clean) I also ordered the LVP flooring today as well. Starting to take shape! The flooring is a gray looking (fake) wood, and I'll be doing white trim. I have to say, the LVP floors have come a long way. They look pretty convincing, and since this is a mud room, the fact that they are waterproof, scratch proof etc is what sold me!

attachment.php
 

Attachments

  • 123456789.jpg
    123456789.jpg
    90.9 KB · Views: 728
OP
M

Mr. Roboto

Well-known member
Joined
Dec 11, 2012
Messages
2,159
Location
New Hampshire
That is looking really good! Nice addition for you.

Thank you very much!

I started out trimming out the windows and doors. Anyone have any recommendations on filing the nail holes and closing up the miters? I’ve read some saying paintable caulk, others say wood filler. I’ve never really done any finish interior trim so I’m not sure which way to go! As you can tell from the pre primed trim I used, I’ll be painting it white.

attachment.php
 

Attachments

  • F4BCC22F-16D2-4615-AA29-52F64BDF7E45.jpg
    F4BCC22F-16D2-4615-AA29-52F64BDF7E45.jpg
    107.7 KB · Views: 1,392
To avoid these ads, REGISTER NOW!
Top Bottom