To avoid these ads, REGISTER NOW!

Rockwell Turret RAS

Cruzan80

Well-known member
Joined
Jul 22, 2015
Messages
4,306
Location
Denver, CO
TL:DR RAS came from Auction, wiring was shot, having trouble figuring out correct wiring. Skip to post 2.

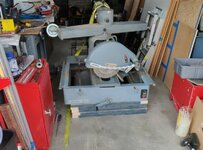
So I just had a huge Radial Arm saw follow me home... Found a listing on Facebook for a large Rockwell Turret arm saw. The wife had listed it for her husband, and they knew almost nothing about it. I went back and forth with her a few times, trying to make aure it would fit and figure out what was going on with it.

Backstory ...(found out when I picked it up) was the hisband had bid on a stack of 26" wide toolboxes on a local auction, and thought this looked interesting, so he threw a bid out. He won it, and was VERY surprised when he went to pick it up by the footprint (was thinking it was more like a 10" saw). They apent the last year plus trying to sell it, and finally just resorted to listing it for free, as they had a semi-deep single car garage, and needed it gone! The workshop it came out of had mounted it on a huge bench, and hadnt moved in the last 40+ years.

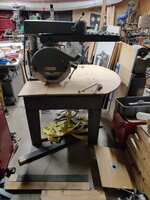
The saw surprisingly had all of the accesories still with the machine, including the legs, blade guard, lower leaf guards, and the anti-kockback pawls. it also came with another anti-kickback (for a smaller machine), and a more modern lower blade guard. it also had a table in great shape to get me started.

After setting up a time to meet, I then had to figure out how we were going to move this thing. Fortunately, I had a buddy's engine hoist still in my garage, so I simply starpped that to the trailer and off I went! When I got there, we needed to raise the saw up slightly from the cribbing it was sitting on. After some pushing and shoving, we got it slung off the hoist, and then rolled onto the trailer. Getting it off the trailer was a bit harder, as I had used the ratchet strap like a come-along to pull the unit towards the tongue. Finally realized where to strap it to pull the saw back to the tailgate. After I moved it back and slung it up, was able to move it into the garage, and re-mount the legs.

And that brings me to where I am now...
 

Attachments

  • IMG_20210606_131902.jpg
    IMG_20210606_131902.jpg
    631.1 KB · Views: 54
  • IMG_20210606_193914_01.jpg
    IMG_20210606_193914_01.jpg
    90.6 KB · Views: 49
  • IMG_20210607_212422.jpg
    IMG_20210607_212422.jpg
    280 KB · Views: 47
  • IMG_20210613_160445.jpg
    IMG_20210613_160445.jpg
    405.8 KB · Views: 46
To avoid these ads, REGISTER NOW!
OP
C

Cruzan80

Well-known member
Joined
Jul 22, 2015
Messages
4,306
Location
Denver, CO
TL:DR. When plugged in, LVC hums until I press the on button. Then hum stops, but motor still doesnt spin.

The wiring on this saw was so deteriorated, insulation kept breaking off whenever I moved or bent the wires at all. It was so bad that the power cord actually had the insulation splitting off the interior wires, beneath the outer jacket.

I tried my best to mark where each wire came off from, but either I mislabelled, or it was messed up before that. The PO never attempted to run the machine, or mess with any wires that I kkow of, so my thought is what I saw was how the machine came from the auction.

Personal Rule #2: Never trust a previous owner did anything correctly, especially wiring. (Follows Rule 1: Never assume a seller knows anything about the machine).

I have made a diagram labelling each wire connection, as well as where I believe they go (based off of where they came off). However, when I plug the machine in, all I get is a low hum. When I press the On button, the hum goes away. At neither point did the motor show any signs of trying to start.

I marked any continuity between connections as best I could on my diagram (continuity measured eithout any wires present). I do know that not all of the wire colors listed on my handmade drawing match up with the wiring diagram colors. The switch follows the correct wiring (including colors) and the correct colors are capped off from the transformer. I didnt have a brown sharpie, so I used a light blue (marked on picture). Naming convetions were to use a S for screw terminal, and T for spade terminal (as last letter). 24v transformer wires are noted as 24V.

The only questionable part of my notes is trying to remember what I meant by the White line to the switch. It is currently hooked up to 3T on my drawing and not sure if I should move it to 2S.

The motor wiring looks correct, in that the black and white lines go to T1 and T4, respectively, and the red goes to T5 (and into a capacitor). There is also an odd device at the end of the motor housing with the capacitor feeding into it, and lines T6 and T9 coming out of the motor and attaching on the sides. It is defjnately a single phase motor, so not sure what T6 and T9 are for. My best guess is that it is a centrifugal switch, designed to take the capacitor out of the circuit when up to speed.

I am not sure if the capacitor is any good either, but want to fix the humming issue before I start firing the parts cannon at it. I plan on removing and testing the capacitor as well, to see if I can verify if it is dead or not.

The only thing not mentioned above, or shown in the pictures, is every set of wires (suppky, switch, motor) does have a ground, and it is grounded to the body at each point along the way (switch, mag starter panel, motor). Just didnt want to clutter the diagram with more colored lines.
 

Attachments

  • IMG_20210615_114417.jpg
    IMG_20210615_114417.jpg
    358.8 KB · Views: 45
  • IMG_20210615_114358.jpg
    IMG_20210615_114358.jpg
    301 KB · Views: 33
  • IMG_20210615_102654.jpg
    IMG_20210615_102654.jpg
    180.8 KB · Views: 29
  • IMG_20210615_102646.jpg
    IMG_20210615_102646.jpg
    299.5 KB · Views: 27
  • IMG_20210615_102606.jpg
    IMG_20210615_102606.jpg
    203.8 KB · Views: 33
OP
C

Cruzan80

Well-known member
Joined
Jul 22, 2015
Messages
4,306
Location
Denver, CO
Sorry, knew I forgot something...

The wiring diagram from the saw may help...
 

Attachments

  • IMG_20210609_200301.jpg
    IMG_20210609_200301.jpg
    344.7 KB · Views: 48

crguy

Well-known member
Joined
Jan 24, 2016
Messages
2,659
Location
SW Washington
I see radial arm saws listed for free frequently. Most people consider them to be obsolete and they can be dangerous to use. When the Dewalt 12" mitre saws came out I bought one and got rid of my radial arm. Never regretted it.
 

Nutria

Well-known member
Joined
Jun 23, 2015
Messages
799
Location
Eastern Sierra
Have you measured capacitance and compared with markings on the capacitor? The humming certainly sounds like a bad capacitor, but that doesn't explain the responses that you had from the switch.
 
Last edited:
To avoid these ads, REGISTER NOW!

Provincial

Well-known member
Joined
Sep 21, 2011
Messages
6,874
Location
Near Salem, OR
That wiring diagram is confusing. For one thing, some of the symbols don't show up on an internet search of motor control symbols.

The switch seems to have a 24V hold-in coil, and it is unclear if the OFF setting opens the 24V circuit, releasing the hold-in coil, or if it cuts the current to the motor without affecting the hold-in coil.

I find it highly likely that the saw is wired incorrectly, and that the switch is energized when in the OFF position, and current is interrupted when in the ON position. Beyond that, when energized there may be another problem (like a dead capacitor) more miswiring.

I hope someone that recognizes those symbols and understands the wiring diagram will step in and help us understand it.
 
OP
C

Cruzan80

Well-known member
Joined
Jul 22, 2015
Messages
4,306
Location
Denver, CO
Sorry for the delay, guys. The blade on there is a 14" blade, it can handle either a 16-18" under the guard.

Crguy, I would like to see a 5hp, 16-18" compound mitre saw, that can do a greater than 45deg cut accurately. Sorry, but this isn't a cheap Emerson saw, and shouldnt be confused for one. This thing is over 750lbs, and built to industrial standards.

Provincial, I think I have figured it out with the help of a couple of guys over at OWWM. Basically, I am using 1S and 2S as the fourth section from the diagram. I think I was sending the full voltage thru the transformer, without the motor output wired correctly.
 

Roberts210

Well-known member
Joined
Dec 21, 2015
Messages
3,177
Location
Missouri
I'll never give up my Comet radial arm saws. I also use an older Makita chop saw, but you can do so much more on a good radial arm saw.
 
OP
C

Cruzan80

Well-known member
Joined
Jul 22, 2015
Messages
4,306
Location
Denver, CO
Thanks. Everything is great, except wiring. Just got it to fire up, by holding the contactor in. So motor works, just need to figure out the switch.
 
OP
C

Cruzan80

Well-known member
Joined
Jul 22, 2015
Messages
4,306
Location
Denver, CO
SUCCESS! It lives again! With some help from OWWM, figured out the wiring. What I should have done is listened stronger to my personal Rule #2: Never assume the previous owner did anything correctly (especially electrical). Once I pulled out almost all the old wiring, hooked up 2<->3 (white and red lines from switch) to the small aux poles on the side of the contactor, spliced the black switch wire with the brown, and ran the red thru the coil contacts, it worked like a charm.

And it was all there for me to read, and apply, if I would have just removed all the old wiring and started from absolute scratch ... Actually, it was the aux poles on the contactor that originally threw me for a loop (didn't recognize them).
 
To avoid these ads, REGISTER NOW!
Top Bottom