covert
Well-known member
Hi everyone.
I've been looking around on here and couldn't really find any detailed how to's for beginners on how to take apart, clean, lube, and put back together an older style roll toolbox.
Some background:
- I am not a pro.
- I have never done this before, but based on what I have seen here, I was willing to try giving it a go.
- I'm pleased with the result. That doesn't mean you have to be
- This only goes over disassembly, cleaning, lubricating, and putting back together. It does not go over stripping paint, fixing dents, rust removal, etc.
- I'm in Canada, so all the links are to Canadian shops.
- I did not take "during" pictures, as I wasn't thinking about it till after. Maybe next time.
So, I picked up this box for $180, including the contents, at an auction. I was not upset with the price, it seemed fair to me.
Here's a picture from the catalog of the B-89:

I was drawn to this box for a few reasons. It's Canadian made, it's sturdy, it's got great lines, and I love the cover for the drawers when put away. I'd passed on another B-89 a few months ago and was kicking myself.
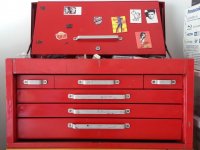
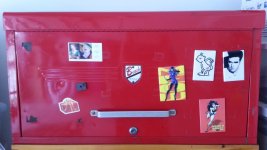
Here's the pictures from the auction (it was online-only):


So as you can see, it was pretty dirty and messy. When I got to see it when picking it up, I could see it was pretty dirty, but overall seemed pretty good, condition-wise. Emptying out the drawers, I found that there were some spots of rust inside a drawer, and almost every drawer had melted rubber bands on the bottom. The previous owner had run a seasonal barbecue stand, and the drawers were filled with BBQ parts, welding supplies, keys and locks, drill bits, and some other tools. Anyway, I ended up tossing a lot of the junk, but did find some stuff worth keeping (flex head 3/8" ratchet, calipers, drill bits, vintage snap-on tool and die set, as well as a SO vintage electrical circuit tester), and the rest went into secondary toolboxes or the scrap pile.
So, after I got it home, I got to work. First things first: As the drawers were friction sliders, I used a flathead screwdriver to pop the 12 drawers out and set them aside. I found this Youtube video from the new owners of Beach to be really helpful in properly getting the drawers out:
Now, I used the garden hose to wash out the box, and the drawers. I used some soapy water to wash it (first I used car wash soap and a wash pad.
Then I washed it using some dawn and soapy water to get rid of some lingering grease. Already the box was starting to have a much clearer shine.
Now, I dried it down using some microfiber cloths and let it sit in the sun for a couple of hours.
Next up was cleaning the mess left inside the drawers. For this, I used a plastic card to scrape out what was there. I was unable to find anything in any stores that resembled a plastic razor blade, so I used a bank card I found stuffed into the back of the box when it was disassembled. This helped a ton on getting the old rubber off, as well as some other unidentified liquids. For the really hard to clean stuff, I used a process of:
- Spray the area in goo gone
- Spray the leading edge of the card with goo gone
- Scrape the affected area
- Dip the card into a bucket of clean water
- Wipe off the excess goo gone and mess with a microfiber towel
- Wash with soapy water
I used this process also on removing the stickers on the box. It worked great. For the sides where the sliders were, I used a 1:1 ratio of Simple Green Max and water, mixed in a dollar-store spray bottle. I sprayed it on, used a cheap brush to scrub it, then hosed it off and washed with soapy water again to clean off any overspray or residue.
After cleaning off the drawers, I washed and rinsed the boxes and let them dry again. Once dry, I used Turtle Wax 1-Step Wax & Dry, from Walmart to wax them.
I followed the directions. I put a light mist of water on the drawer, then sprayed the wax on, then wiped dry with a cloth. The results were good. I was impressed with the deep red shine coming from the drawers. I had thought about doing a thorough waxing using paste wax, but was happy with the results of the spray wax. If it doesn't last long I may redo it.
The drawer pulls are polished aluminum on this box. I used Mother's Aluminum Polish to clean them. The metal did turn black, as per the directions, so the polish was suitable for this. If you have chrome handles this isn't the right stuff apparently, it can damage the chrome finish. I just used a terrycloth to apply the paste to the handles, worked it in (it turns black then) and then wiped clean with a microfiber cloth. They looked great after this.
The last step was to use the screwdriver to pop the tabs out to make sure the slider will catch on them and the drawer will not slide all the way out.
As the drawers were now done, I moved over to the box itself.
First up was to remove the sliders from the box. I took them off and placed them on a piece of cardboard marked with the drawer number and LHS/RHS to denote if it came from the left or right.
As the box had a lot more scuffs and imperfections than the drawers, I used Turtle Wax polishing compound to clean up some of the bad areas. I didn't use a rubbing compound as the damage was either too severe (scratches through the paint to the bare metal) or were taken care of with the polishing compound. Again, I applied a bit using a terrycloth, then worked it in, then wiped clean with a clean rag.
I also used the Simple Green to wash and degrease the slider rails, then washed with soapy water. I followed the same process as the doors to wax the outside of the box, and the aluminum cleaner for the handles on the cover doors and the push handle. I inspected the wheels and cleaned and lubricated them using 3 in 1 oil.
Next up was probably the worst part of this procedure - cleaning the sliders. Once upon a time someone applied some sort of white lithium grease to aid in lubrication, but it had become a thick, molasses-like mess. Under that was some other grease. I took my time here, and used the Simple Green to soak the sliders, then used the brush to scrub the metal thoroughly, then used a microfiber cloth soaked in the Simple Green solution to wipe clean, then another cloth that was damp to wipe over that. Once all sliders were cleaned, I washed them again with clean water to remove any residue.
At this point I lubed the sliders. After reading the many threads here about what was best, I decided to use the old method - wax. I used Paraffin wax for this - I could not find any of the "Door Ease" or a block of beeswax.
Let me say this: This job is messy, creates a lot of chunks of wax in the air, and a lot of wax. Maybe it's due to me not having experience, maybe it's due to this wax not being created for this job, I don't know. What I do know is the wax comes in the box in 4 large pieces, with notches to break it into 4 smaller pieces. Doing this caused the wax to splinter. I rubbed it onto the sliders where metal touches metal, until I could see a good coating on the metal. I used a brush (clean, unused) to wipe off the excess wax.
As I moved my way through the sliders, I put them back onto the rails in the box and tested them. Some needed a bit more wax to slide nicely. Some felt rough when put in even after extra wax, but once the drawer was back on they slide effortlessly.
After all the sliders were back on the rails, I test fit the drawers to make sure I was happy with the way they slid. Some needed a bit more wax, so that was done.
Once all drawers were back in, I made sure the cover still fit nicely, and it does.
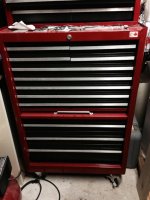
I've since added drawer liner but here's some pics of the "after" of the box:


Thanks for reading. Please feel free to leave any comments or constructive criticisms. Just keep in mind, this is for newbies who may not have experience doing this type of thing before.")
I've been looking around on here and couldn't really find any detailed how to's for beginners on how to take apart, clean, lube, and put back together an older style roll toolbox.
Some background:
- I am not a pro.
- I have never done this before, but based on what I have seen here, I was willing to try giving it a go.
- I'm pleased with the result. That doesn't mean you have to be
- This only goes over disassembly, cleaning, lubricating, and putting back together. It does not go over stripping paint, fixing dents, rust removal, etc.
- I'm in Canada, so all the links are to Canadian shops.
- I did not take "during" pictures, as I wasn't thinking about it till after. Maybe next time.
So, I picked up this box for $180, including the contents, at an auction. I was not upset with the price, it seemed fair to me.
Here's a picture from the catalog of the B-89:
I was drawn to this box for a few reasons. It's Canadian made, it's sturdy, it's got great lines, and I love the cover for the drawers when put away. I'd passed on another B-89 a few months ago and was kicking myself.
Here's the pictures from the auction (it was online-only):
So as you can see, it was pretty dirty and messy. When I got to see it when picking it up, I could see it was pretty dirty, but overall seemed pretty good, condition-wise. Emptying out the drawers, I found that there were some spots of rust inside a drawer, and almost every drawer had melted rubber bands on the bottom. The previous owner had run a seasonal barbecue stand, and the drawers were filled with BBQ parts, welding supplies, keys and locks, drill bits, and some other tools. Anyway, I ended up tossing a lot of the junk, but did find some stuff worth keeping (flex head 3/8" ratchet, calipers, drill bits, vintage snap-on tool and die set, as well as a SO vintage electrical circuit tester), and the rest went into secondary toolboxes or the scrap pile.
So, after I got it home, I got to work. First things first: As the drawers were friction sliders, I used a flathead screwdriver to pop the 12 drawers out and set them aside. I found this Youtube video from the new owners of Beach to be really helpful in properly getting the drawers out:
Now, I used the garden hose to wash out the box, and the drawers. I used some soapy water to wash it (first I used car wash soap and a wash pad.
Then I washed it using some dawn and soapy water to get rid of some lingering grease. Already the box was starting to have a much clearer shine.
Now, I dried it down using some microfiber cloths and let it sit in the sun for a couple of hours.
Next up was cleaning the mess left inside the drawers. For this, I used a plastic card to scrape out what was there. I was unable to find anything in any stores that resembled a plastic razor blade, so I used a bank card I found stuffed into the back of the box when it was disassembled. This helped a ton on getting the old rubber off, as well as some other unidentified liquids. For the really hard to clean stuff, I used a process of:
- Spray the area in goo gone
- Spray the leading edge of the card with goo gone
- Scrape the affected area
- Dip the card into a bucket of clean water
- Wipe off the excess goo gone and mess with a microfiber towel
- Wash with soapy water
I used this process also on removing the stickers on the box. It worked great. For the sides where the sliders were, I used a 1:1 ratio of Simple Green Max and water, mixed in a dollar-store spray bottle. I sprayed it on, used a cheap brush to scrub it, then hosed it off and washed with soapy water again to clean off any overspray or residue.
After cleaning off the drawers, I washed and rinsed the boxes and let them dry again. Once dry, I used Turtle Wax 1-Step Wax & Dry, from Walmart to wax them.
I followed the directions. I put a light mist of water on the drawer, then sprayed the wax on, then wiped dry with a cloth. The results were good. I was impressed with the deep red shine coming from the drawers. I had thought about doing a thorough waxing using paste wax, but was happy with the results of the spray wax. If it doesn't last long I may redo it.
The drawer pulls are polished aluminum on this box. I used Mother's Aluminum Polish to clean them. The metal did turn black, as per the directions, so the polish was suitable for this. If you have chrome handles this isn't the right stuff apparently, it can damage the chrome finish. I just used a terrycloth to apply the paste to the handles, worked it in (it turns black then) and then wiped clean with a microfiber cloth. They looked great after this.
The last step was to use the screwdriver to pop the tabs out to make sure the slider will catch on them and the drawer will not slide all the way out.
As the drawers were now done, I moved over to the box itself.
First up was to remove the sliders from the box. I took them off and placed them on a piece of cardboard marked with the drawer number and LHS/RHS to denote if it came from the left or right.
As the box had a lot more scuffs and imperfections than the drawers, I used Turtle Wax polishing compound to clean up some of the bad areas. I didn't use a rubbing compound as the damage was either too severe (scratches through the paint to the bare metal) or were taken care of with the polishing compound. Again, I applied a bit using a terrycloth, then worked it in, then wiped clean with a clean rag.
I also used the Simple Green to wash and degrease the slider rails, then washed with soapy water. I followed the same process as the doors to wax the outside of the box, and the aluminum cleaner for the handles on the cover doors and the push handle. I inspected the wheels and cleaned and lubricated them using 3 in 1 oil.
Next up was probably the worst part of this procedure - cleaning the sliders. Once upon a time someone applied some sort of white lithium grease to aid in lubrication, but it had become a thick, molasses-like mess. Under that was some other grease. I took my time here, and used the Simple Green to soak the sliders, then used the brush to scrub the metal thoroughly, then used a microfiber cloth soaked in the Simple Green solution to wipe clean, then another cloth that was damp to wipe over that. Once all sliders were cleaned, I washed them again with clean water to remove any residue.
At this point I lubed the sliders. After reading the many threads here about what was best, I decided to use the old method - wax. I used Paraffin wax for this - I could not find any of the "Door Ease" or a block of beeswax.
Let me say this: This job is messy, creates a lot of chunks of wax in the air, and a lot of wax. Maybe it's due to me not having experience, maybe it's due to this wax not being created for this job, I don't know. What I do know is the wax comes in the box in 4 large pieces, with notches to break it into 4 smaller pieces. Doing this caused the wax to splinter. I rubbed it onto the sliders where metal touches metal, until I could see a good coating on the metal. I used a brush (clean, unused) to wipe off the excess wax.
As I moved my way through the sliders, I put them back onto the rails in the box and tested them. Some needed a bit more wax to slide nicely. Some felt rough when put in even after extra wax, but once the drawer was back on they slide effortlessly.
After all the sliders were back on the rails, I test fit the drawers to make sure I was happy with the way they slid. Some needed a bit more wax, so that was done.
Once all drawers were back in, I made sure the cover still fit nicely, and it does.
I've since added drawer liner but here's some pics of the "after" of the box:
Thanks for reading. Please feel free to leave any comments or constructive criticisms. Just keep in mind, this is for newbies who may not have experience doing this type of thing before.
Last edited: