To avoid these ads, REGISTER NOW!

Rollaway mechanics work station with winch

Fxsb103

Well-known member
Joined
Jan 1, 2016
Messages
58
Location
Mohnton, PA, USA
Hey GJ I want to put a spin on these tool carts and 2" square tube welding tables I've been seeing.

Updated synopsis:
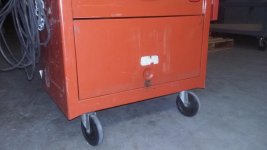
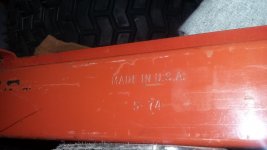
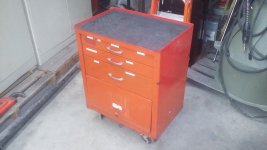
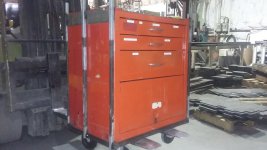
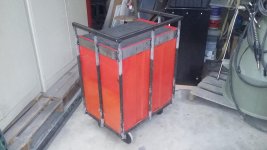
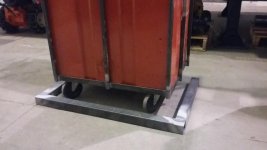
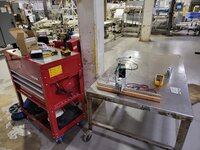
I have an American made roller cart that used to be used in a hospital. Iv drip bags and oxygen tank holders. (Orange) the (scout)
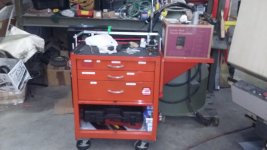
Craftsman/Waterloo side chest (black)
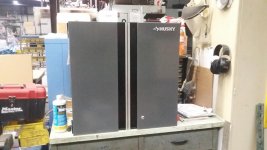
husky 2 door wall cabinet (grey)
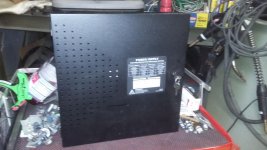
Soon to be side 18" locker with drawers.

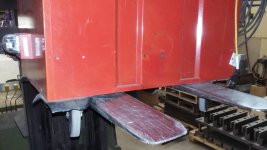
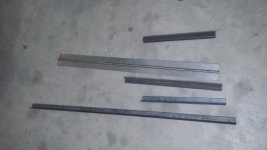
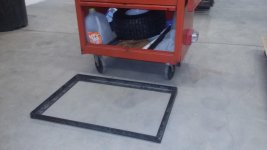
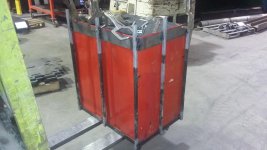
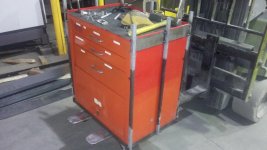
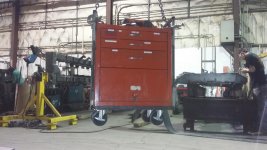
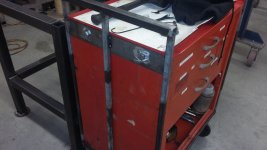
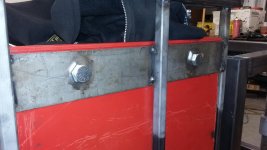
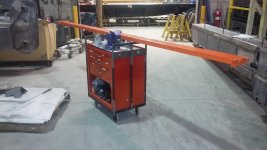
When I take my 27" cart ( the scout) to work on a machine there ia a lot of metal and pallots in my way.I built a roll cage for it so now I can lift it up and over with the 20 ton crane.

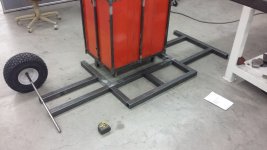
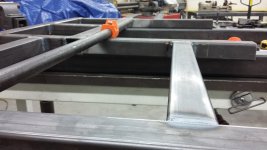
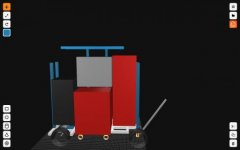
Once I push my cart back to my spot, it will have a modular location on the custom 5-6' WAGON work station. This will consist of 2" square tubing making a rollcage. This rollcage will be sporting a 2500lbs ATV winch that will raise my roller cart onto its position on the workstation. The back of the scouts roll cage will hook onto the main cart.

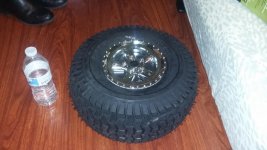
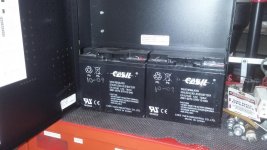
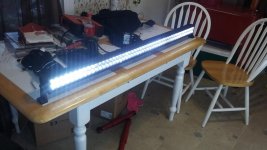
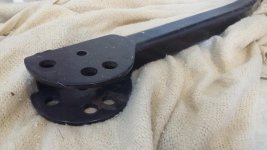
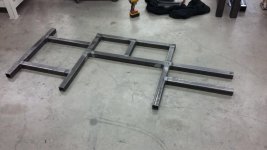
The main cart will be constructed of 2" square tubing. There will be a "rollcage" up and over to hold the winch and off road lights.There will be an oversized pallet jack style handle for steering. The hand lever will control the disk brake (from a 26" mountain bike). The handle will fold down into a tractor hitch in order to tow the entire thing. It will be riding on a set of Arnold's universal 15"h-6"w pneumatic tubless tractor tires with steel wheels. 24v batteries and a used motor and speed control will power the rig from an old mobility scooter. Outriggers will fold up and down on each side near each wheel. An electric trails jack on each end will power these outriggers to keep the unit off the tires whenever it is not rolling.

The chests and cabinets will be powder coated black with silver grey accents. The rollcage, frame, and wheels will be metallic blue. A arms and suspension have been ruled out of this project due to tip over resistance.

I will update every time I do a good amount of work to it. Feel free to give ideas and provide feedback when you see something wrong.
 

Attachments

  • Screenshot_2016-01-17-15-58-11.jpg
    Screenshot_2016-01-17-15-58-11.jpg
    9.5 KB · Views: 185
  • Screenshot_2016-01-17-16-00-09.jpg
    Screenshot_2016-01-17-16-00-09.jpg
    9.2 KB · Views: 122
  • Screenshot_2016-01-21-18-51-24.jpg
    Screenshot_2016-01-21-18-51-24.jpg
    12.3 KB · Views: 110
Last edited:
To avoid these ads, REGISTER NOW!
OP
F

Fxsb103

Well-known member
Joined
Jan 1, 2016
Messages
58
Location
Mohnton, PA, USA
Parts as seen in attachments:
 

Attachments

  • 20160101_223353.jpg
    20160101_223353.jpg
    142.6 KB · Views: 455
  • 20151214_165821.jpg
    20151214_165821.jpg
    136.6 KB · Views: 543
  • 20151229_153647.jpg
    20151229_153647.jpg
    135.2 KB · Views: 543
  • 20151229_153703.jpg
    20151229_153703.jpg
    142.4 KB · Views: 453
  • 20151229_153711.jpg
    20151229_153711.jpg
    140.5 KB · Views: 440
  • 20160102_125036.jpg
    20160102_125036.jpg
    140.5 KB · Views: 81
Last edited:

NUTTSGT

Super Moderator
Staff member
Joined
Sep 14, 2009
Messages
50,958
Location
Northern Central Ohio
Welcome to the GJ.


As far as the cart goes, My step-dad before he reetired was an electrican at GE. They pushed their tool carts around to where they worked. He started to build a new cart but changed his mind as he was getting close to retirement. It was going to hold a Cman 40" base and used casters readily available from the stock room. After I got it, I put a top on it for my miter saw and some plywood for a shelf where the box would have sat. The tubing welded to the ends have rods in them that slide in/out. This was so he could put spools of wire on the rods when he was running wire into conduit.


This is the box it was going to replace. flip up shelf on the left, vise on the right, fastener storage in the lower right box and a pull out drawer underneath.


Sorry for the crappy pics but hopeful they give you some ideas.
 

kbs2244

Well-known member
Joined
Nov 11, 2006
Messages
14,065
I want to see this when you are done.
I like the whole "garage parking spot" idea.

I do remember the maint guy that came up to the office area at one plant I worked.
He would bring a 10 in Channel Lock, and an 8 inch flat and Phillips screw driver.
"It is all I have ever needed up here" he told me once when I asked where his roll around was.
 
OP
F

Fxsb103

Well-known member
Joined
Jan 1, 2016
Messages
58
Location
Mohnton, PA, USA
Thanks guys. I LOVE the underneath angle iron slide drawer. I used to install fire alarm systems, during my 6 months at a hospital I saw the decked out pre filled $4,500 carts with organizers. Talked for a while about what I would do "if I was a maintenance guy". I'm talking with my friend on plc and dc motor controls for a powered cart.

**my tool cart had a fire alarm strobe light mounted with some 24vdc batteries on a toggle switch. It worked well up until the vibration of rolling it across the fab shop floor blew the high intensity bulb. I will replace it with an LED yellow. Similar to American DJ beacon. Or like the fork lifts.I love the small parts organiser but the shop has hundreds of them in the machine shop.
 
Last edited:
OP
F

Fxsb103

Well-known member
Joined
Jan 1, 2016
Messages
58
Location
Mohnton, PA, USA
Lifted the cart today to remove the casters in order to remove the cheap plastic bumpers at all four corners that were cracked. Then I'll get the true measurements of the bottom to beef up the stability and add some 1" square tubing for bumpers. There will also be support up the sides to where the hoist points will be.

The width of the MOA (Motor on axle) cart is 32". It will have better resistance to tilting and still fit through a doorway. The total length is over 6' to include the locker over top off the front tires, and the mounted tool chest will be relocated higher to provide space for the power supply system, batteries, and motor controls.height is TBD.
 

Attachments

  • 20160104_173056.jpg
    20160104_173056.jpg
    142 KB · Views: 181
  • 20160104_171449.jpg
    20160104_171449.jpg
    141 KB · Views: 171
  • 20160104_171504.jpg
    20160104_171504.jpg
    138.1 KB · Views: 170
  • 20160104_163056.jpg
    20160104_163056.jpg
    141.1 KB · Views: 172
  • 20160104_163041.jpg
    20160104_163041.jpg
    139.3 KB · Views: 198
  • 20160104_173139.jpg
    20160104_173139.jpg
    146.2 KB · Views: 195
Last edited:

kbs2244

Well-known member
Joined
Nov 11, 2006
Messages
14,065
This whole disscussion reminded me of this PIC of a plant "fireman"
As I understood it, the truck was electric and he had a batery powered welder on the
un-shown side.
 

Attachments

  • cushman1.jpg
    cushman1.jpg
    76 KB · Views: 294
OP
F

Fxsb103

Well-known member
Joined
Jan 1, 2016
Messages
58
Location
Mohnton, PA, USA
Today I made the bottom of the exoskeleton for my rollaway cart. 1" angle iron 26 1/2" wide hugs the front and back. 18 7/8" under on the sides. I lapped the sides to the bottom so they act as slides when I mount the cart to the MOA. I tacked the pieces together with a MIG while they were tight against the cart. (See the burnt corners) and the TIGed some lap welds to complete the base. I will be adding the angle iron slide drawer to this. Also in the photos I have the steel hing for my side locker, and the 1" square tubing for the rest of the exoskeleton.

More exoskeleton build. Top support bracket and 1/2" square tubing fire the "cage".
 

Attachments

  • 20160105_154611.jpg
    20160105_154611.jpg
    137.9 KB · Views: 120
  • 20160105_160839.jpg
    20160105_160839.jpg
    138.4 KB · Views: 107
  • 20160105_170836.jpg
    20160105_170836.jpg
    141.6 KB · Views: 101
  • 20160105_170826.jpg
    20160105_170826.jpg
    129.9 KB · Views: 103
  • 20160106_185824.jpg
    20160106_185824.jpg
    135.9 KB · Views: 90
  • 20160106_194427.jpg
    20160106_194427.jpg
    141 KB · Views: 87
  • 20160106_194953.jpg
    20160106_194953.jpg
    137.8 KB · Views: 98
Last edited:
OP
F

Fxsb103

Well-known member
Joined
Jan 1, 2016
Messages
58
Location
Mohnton, PA, USA
I stripped her down, squared her up and tacked her together. NOW we are getting somewhere. The cage will be bolted on. Next I'll add thicker 1" rail up top and find center balance and attack hoist mounts.
 

Attachments

  • 20160107_173607.jpg
    20160107_173607.jpg
    139.6 KB · Views: 128
  • 20160107_191414.jpg
    20160107_191414.jpg
    142.7 KB · Views: 135
  • 20160107_191429.jpg
    20160107_191429.jpg
    142 KB · Views: 137
  • 20160107_175243.jpg
    20160107_175243.jpg
    133.4 KB · Views: 123
  • 20160107_191439.jpg
    20160107_191439.jpg
    138.7 KB · Views: 142
OP
F

Fxsb103

Well-known member
Joined
Jan 1, 2016
Messages
58
Location
Mohnton, PA, USA
We have liftoff! Phase one of the project is almost done. Some TIG welding, bolt holes, and powder coating to the rolling cart. As well as a new fold out aluminum table with legs, wilton lightweight vise #69999, four outriggers, new casters and ball bearing drawer slides, new pad locking devise for a recessed handle on the fold up bulk storage. '
 

Attachments

  • 20160108_174102.jpg
    20160108_174102.jpg
    145.1 KB · Views: 150
  • 20160108_174113.jpg
    20160108_174113.jpg
    137.3 KB · Views: 152
  • 20160108_174127.jpg
    20160108_174127.jpg
    140.5 KB · Views: 156
  • 20160108_174052.jpg
    20160108_174052.jpg
    140.1 KB · Views: 142
  • 20160108_172334.jpg
    20160108_172334.jpg
    142.7 KB · Views: 165
OP
F

Fxsb103

Well-known member
Joined
Jan 1, 2016
Messages
58
Location
Mohnton, PA, USA
Tig welded the top bar. Vise came in. Got a donor motor lined up for the large frame.
 

Attachments

  • 20160111_135538.jpg
    20160111_135538.jpg
    148.3 KB · Views: 103
  • 20160112_153346.jpg
    20160112_153346.jpg
    145.9 KB · Views: 107
Last edited:
To avoid these ads, REGISTER NOW!
OP
F

Fxsb103

Well-known member
Joined
Jan 1, 2016
Messages
58
Location
Mohnton, PA, USA
Few parts came in for the motor cart. (2) 52" led light bars for upper rollcage front and back. (2) spot light led one for each side facing down. And I bolted the roll cage to the scout.
 

Attachments

  • 20160114_155652.jpg
    20160114_155652.jpg
    136.5 KB · Views: 124
  • 20160115_160532.jpg
    20160115_160532.jpg
    137 KB · Views: 123
  • 20160114_155710.jpg
    20160114_155710.jpg
    143.3 KB · Views: 121
  • 20160115_160807.jpg
    20160115_160807.jpg
    138.5 KB · Views: 118
Last edited:
OP
F

Fxsb103

Well-known member
Joined
Jan 1, 2016
Messages
58
Location
Mohnton, PA, USA
Here are the latest cad drawings for the steering. If you have any input on outriggers or landing gear like welding tables please share!
 

Attachments

  • Screenshot_2016-01-17-15-58-34.jpg
    Screenshot_2016-01-17-15-58-34.jpg
    10.9 KB · Views: 89

Moose364

Well-known member
Joined
Oct 21, 2014
Messages
282
Location
East Texas
Out riggers like on a backhoe would be cool, if you could figure out how to make them fold up and down.
 
OP
F

Fxsb103

Well-known member
Joined
Jan 1, 2016
Messages
58
Location
Mohnton, PA, USA
Absolutely! I was originally thinking swing out style, but fold down will work MUCH nicer. One per corner post. I'll see what I can do.

*** what you see in the photos***
The current cart
(Green) are electric 12vdc trailer Jacks top welded to frame. Bottom welded to bar of metal to be raised and lowered. Attatchment to each side will be (2) outriggers manually fold down. Trailer hitch pins will lock the outriggers in their desired angle via multiple holes in the pivot plate.
 

Attachments

  • Screenshot_2016-01-21-18-51-24.jpg
    Screenshot_2016-01-21-18-51-24.jpg
    12.3 KB · Views: 62
  • Screenshot_2016-01-21-18-47-01.jpg
    Screenshot_2016-01-21-18-47-01.jpg
    14.1 KB · Views: 76
Last edited:
OP
F

Fxsb103

Well-known member
Joined
Jan 1, 2016
Messages
58
Location
Mohnton, PA, USA
Still refining the scout. Added the pitch fork so the crane hooks don't slide around. The balance of the box depends on the ever changing load. Some hoists are balanced dead center (front hole front hole) and the bigger hoists are balanced using one front and one back hole. Here are two things in my way with week. A 40' trailer and a pallet of metal. Up and over we went I also used the rollcage to walk an 80lbs piece of metal across the shop.

***here are also examples of the plates for the outriggers. The pin will give the option to fold up or down.
 

Attachments

  • 20160122_170948.jpg
    20160122_170948.jpg
    142.7 KB · Views: 123
  • 20160122_162708.jpg
    20160122_162708.jpg
    140.5 KB · Views: 139
  • 20160118_092842.jpg
    20160118_092842.jpg
    140.2 KB · Views: 145
  • 20160122_171141.jpg
    20160122_171141.jpg
    144.8 KB · Views: 124
  • 20160123_122924.jpg
    20160123_122924.jpg
    144 KB · Views: 100
  • 20160123_122907.jpg
    20160123_122907.jpg
    138 KB · Views: 99
  • 20160123_123014.jpg
    20160123_123014.jpg
    146.4 KB · Views: 102
Last edited:
OP
F

Fxsb103

Well-known member
Joined
Jan 1, 2016
Messages
58
Location
Mohnton, PA, USA
The start of the main frame has begun. The center section that goes around the scout.
 

Attachments

  • 20160126_174419.jpg
    20160126_174419.jpg
    141.6 KB · Views: 74
  • 20160126_174428.jpg
    20160126_174428.jpg
    143.8 KB · Views: 76
OP
F

Fxsb103

Well-known member
Joined
Jan 1, 2016
Messages
58
Location
Mohnton, PA, USA
Allas, i got to working on the frame.
 

Attachments

  • 20160129_202822.jpg
    20160129_202822.jpg
    135.7 KB · Views: 69
  • 20160129_171026.jpg
    20160129_171026.jpg
    138.2 KB · Views: 74
  • 20160129_171036.jpg
    20160129_171036.jpg
    134.1 KB · Views: 76
  • 20160129_201539.jpg
    20160129_201539.jpg
    137.2 KB · Views: 75
OP
F

Fxsb103

Well-known member
Joined
Jan 1, 2016
Messages
58
Location
Mohnton, PA, USA
Some more support and 45 degree angles for the risers and horizontal bar that holds the winch.
 

Attachments

  • 20160223_162735.jpg
    20160223_162735.jpg
    141.2 KB · Views: 71
OP
F

Fxsb103

Well-known member
Joined
Jan 1, 2016
Messages
58
Location
Mohnton, PA, USA
Needed a more solid platform to place heavy items or use as a workstation. Added this piece of aluminum diamond plate. For normal use the diamonds are up. For detailed work the flat side is up.
 

Attachments

  • 20160224_135652.jpg
    20160224_135652.jpg
    144.7 KB · Views: 89

dustyroadz42

New member
Joined
Aug 27, 2023
Messages
1
I'm curious of what the overall outcome was of this project. As I've been planning to build a motorized cart to attract my toolbox on.
I work maintenance in a huge factory where I'd normally push my box to a stationary location normally being 1 of say 8 spots thru out the building and then return to my box as needed.

I've recently purchased 2 24v dc motors from a electric wheelchair on ebay fairly cheap. Now just browsing for ideas. Questions still floating around are power source... battery n charger.
Control... wireless or wired? Should I track down an electric wheelchair joystick controller or create my own?
I've seen a tutorial on dual motor control with arduino micro controllers. Just curious of how others may have done it.
 
OP
F

Fxsb103

Well-known member
Joined
Jan 1, 2016
Messages
58
Location
Mohnton, PA, USA
I left that fabrication shop in 2016 and kept moving up the ladder within the trade. I had my 302ci engine block decked/honed and prepped for a stroker kit while I was still there. I put all the internal engine parts in the box and the block on the aluminum top and strapped it down. I threw the scout in the pole barn and never got back to it. The 2" steel frame was scraped.

I now have a westward tool card that I use for testing and installing PLC, HMI, VFD and similar. I want to install a motor and drive wheel to get my cart around the plant and up the giant ramp easier. Irony has it that 8 years later and specializing in industrial automation... that I am heavily considering using a dewalt battery drill with a simple "bicycle brake" level to control the speed by cable attached to the drills trigger. I have even since seen delivery guys who purchased motorized carts like the Oplin Group.
 

Attachments

  • 20231230_142722.jpg
    20231230_142722.jpg
    884.3 KB · Views: 41
To avoid these ads, REGISTER NOW!
Top Bottom