To avoid these ads, REGISTER NOW!

Roof brackets for a shed roofing

PassnThru

Well-known member
Joined
Jan 5, 2010
Messages
6,512
Location
Bowling Green KY
My 10X14 shed needs a new roof - it was built close to 30 years ago and still has the original shingles. The idiot that designed it and built it (that would be me of course) put a 12/12 pitch roof on it. I don't even remember how I put the shingles on the first time - I think I just nailed some 2 by boards up somehow. For this round, I decided to be a little more sensible and safe and buy some roof brackets. The come in various angles and I'm not sure what would work the best. They recommend a 45 degree angle for a 12/12 which would basically give me a level platform to stand on. I can also get a 90 degree which would give me more of a backstop rather than standing on it. I see a 60 degree also which would be in between. Which would be more comfortable for the work? Obviously I won't be up there very long but my 60 year old body is less tolerant of being in uncomfortable positions these days.
This is the shed:
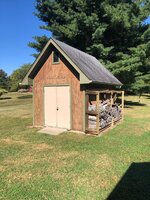
Shed.jpg
 
To avoid these ads, REGISTER NOW!

dfiler2

Well-known member
Joined
Dec 15, 2014
Messages
2,859
Location
NW Minnesota
I like the 90's, they can be used on any roof and will hold tools and roofers from sliding off. You are working on your knees most of the time and they provide a comfortable stop for your feet.
 

cgrutt

Well-known member
Joined
Mar 4, 2016
Messages
8,364
Adjustable or 45s would be my preference. The 60s would tilt you in a bit. Wouldn't be able to stand on the 90s. Also use a harness if you're uncomfortable on the roof.
 
OP
P

PassnThru

Well-known member
Joined
Jan 5, 2010
Messages
6,512
Location
Bowling Green KY
I like the 90's, they can be used on any roof and will hold tools and roofers from sliding off. You are working on your knees most of the time and they provide a comfortable stop for your feet.
I was thinking along those lines also. It's not like I can stand straight up and nail shingles on - I'll likely be on my knees or leaning forward at least.
 

AC-WC

Well-known member
Joined
Jan 22, 2023
Messages
783
Location
NE, Indiana
If you were closer I'd let you borrow my roof jacks. Did you just lean an extension ladder along the roof last time?
 

readhead

Well-known member
Joined
Dec 8, 2012
Messages
6,187
Location
Durango, Co.
Do the top half from some toe boards screwed about a third of the way up and then do the lower half from a plank or ladders. You don’t have to buy anything. Or, buy the brackets but I would still do the top and then the bottom.
 
OP
P

PassnThru

Well-known member
Joined
Jan 5, 2010
Messages
6,512
Location
Bowling Green KY
If you were closer I'd let you borrow my roof jacks. Did you just lean an extension ladder along the roof last time?
I have an extension ladder but I remember nailing something to the deck but it wasn't brackets. I assume it was ill advised and less than adequate but yet here I still am.
Do the top half from some toe boards screwed about a third of the way up and then do the lower half from a plank or ladders. You don’t have to buy anything. Or, buy the brackets but I would still do the top and then the bottom.
Never heard of that before - that last row in the middle must be a pain to nail. Having said that though - I've replaced several shingles on this roof in the past few years (on the side not showing - the west facing side) so I actually do have experience with that - same concept.
i'd put a metal roof over those shingles.
If I knew anything about metal I probably would. It would save me the tear off.
 

CraigStu

Well-known member
Joined
May 22, 2014
Messages
4,056
Location
Blacksburg, Va
We did the sheathing of my SIL's 10/12 roof w/ an extension ladder only. Worked out great but the ground the ladder sat on was not so nicely level as yours so one of my main contributions was simply sitting on the ladder 2 steps up.
 

cgrutt

Well-known member
Joined
Mar 4, 2016
Messages
8,364
I wouldn't start in middle of roof never heard of that before, haven't seen it recommended and believe it's probably ill advised but if by some reason you do this layout is a priority and strictly adhering to it is essential for it to have any chance at looking good and being functional. Got to start the middle bottom row on the correct course or risk seams lining up and water leakage, account for any overhang at bottom edge and no deviation on lower half or the two halves won't align properly and it will appear off (at best case) and don't nail the starting course along the nailing strip rather nail high and come back later and nail where it should be after you tuck the top of the lower half under. You'll risk tearing the roofing, esp if you've put any weight on the shingles or applied them while it was warm. Again, I wouldn't do it that way but just some suggestions if you decide to try it.

I'd also recommend keeping your roof racks as level as possible. You'll be more comfortable and arguably safer while walking along the roof. You're not really going to be on your knees as much as leaning against the roof with your feet on the platform. Keeping it level will feel more natural and you'll have less risk of tripping or feeling off balance. On a one story shed I'd try to do the first few courses from the ground while on a ladder if at all possible. You can also use the boards to stack some packs of shingles or keep a bucket of roofing nails if it's reasonably level.

I hate roofing good luck!
 

mike93lx

ALLIANCE MEMBER
Joined
Dec 9, 2013
Messages
37,903
Location
Richmond, VA
Hire it out. I paid a roofer $400 to do my shed last year (I supplied most of the materials) and it was money well spent. He did it significantly faster than I could have, it kept me from working at height and it looks great. I'm 20 years younger than you but am solidly done with working on a steep roof
 

MongoTA

Well-known member
Joined
Mar 10, 2018
Messages
1,017
Location
CT
I'm 62. Did A 22 square reroof last year. I use the same adjustable brackets shown in Old Moparz's post. Or similar, the ones I have are Qualcraft. Used them to do the original roof back in '95.

If you want metal roof, it really is pretty straightforward. Two years ago I put a metal roof over about 2/3rds of a 16' x 42' open lattice pool pergola covered with vines. I bought these panels at either the orange or blue box store, don't recall which. They sell the trim pieces as well. The bits and pieces of a metal roof can add up. But the work itself will go more quickly than shingling.

Good luck with the project.
 
To avoid these ads, REGISTER NOW!

sjvicker

Well-known member
Joined
Aug 9, 2014
Messages
605
Location
SW Washington
With a good extension ladder I'd be tempted to lean it up against the roof much like they do when they roof A-frame cabins.

2nd to that would be to set some scaffolding up next to it. The shed is so small you could reach most of the roof from the scaffolding.
 

Old Moparz

Well-known member
Joined
Jan 21, 2005
Messages
1,171
Location
Newburgh, NY 12550
Brackets are a great investment. Here's a photo from my roof on the back half of the house looking down on the two story garage. Using 2 x 10's to stand on made it much easier & safer to work.
 

Attachments

  • From The Top 01.jpg
    From The Top 01.jpg
    294.5 KB · Views: 40
Last edited:

cgrutt

Well-known member
Joined
Mar 4, 2016
Messages
8,364
Here are a few pics from a shed I built for a friend. Did everything up to the brackets from a ladder. The remainder from the plank. IIRC could access everything except the ridge from the planks. The brackets were inexpensive, something like $15 each at one of the big box stores.


First three courses from ladder

20200619_163005.jpg

Remainder from plank

20200619_202612.jpg
 
OP
P

PassnThru

Well-known member
Joined
Jan 5, 2010
Messages
6,512
Location
Bowling Green KY
I ended up getting the adjustable brackets - today was the day to start. I really underestimated the time it would take to tear off the old shingles. Just quit due to darkness and I still have about 5 rows to get to the top. The roof is 16 feet long and I think there are 22 rows of shingles to the cap. Since the roof is so tall I had to do 8 rows from a ladder before I put the brackets on.
This pic was from 5:30 and I had to shut it down about 6:30. Started around 8:30 this morning.
I am not as young as I used to be. I knew that - but today really drives that home.
Shed roof.jpg
 

cgrutt

Well-known member
Joined
Mar 4, 2016
Messages
8,364
Not sure if you've done other side or not but it's much easier starting from the top and working your way down. Personally I prefer the flat rippers such as those found in Home Depot that get under and pry up a bunch at a time. Good luck.
 
OP
P

PassnThru

Well-known member
Joined
Jan 5, 2010
Messages
6,512
Location
Bowling Green KY
It probably would be easier on a flatter roof that you can walk on to start from the top but I can't see that happening here. I went from the bottom up with a square shovel with a short D handle. I removed the first two rows with a pry bar and then used the shovel. It worked really well - I never used the rake you see in the picture. Didn't worry about the nails on the tear off - went back through afterward and pulled them. Much easier when the shingle is gone.
 

captain14

Well-known member
Joined
Dec 19, 2012
Messages
7,068
Location
Near College Park Maryland 20740
PassnThru,

In post #17, are those new shingles already installed on the lower courses?

And your first post shows firewood stacked against the side of the shed? Have you checked for damaged wood siding since it never gets a chance to dry out?
 
OP
P

PassnThru

Well-known member
Joined
Jan 5, 2010
Messages
6,512
Location
Bowling Green KY
Yes - those are new shingles.
On the other side, the siding is good. There is air space between the firewood and the side of the shed - the wood rack is free standing. There is a gutter there also. That would also be the roughly east facing side of the side so it rarely gets wind blown rain. The side in the pic above is the west facing side - it gets hit the hardest.
 
OP
P

PassnThru

Well-known member
Joined
Jan 5, 2010
Messages
6,512
Location
Bowling Green KY
Side two today. After I removed the gutter I had the idea that the wood rack could function as scaffolding with a little work. So I screwed some boards to the top of it with a little additional support. It was narrow but rock steady and sped things up considerably. It was basically a little higher than if you stood on the next to last step of my eight foot ladder. Only one board there now because once I nailed the roof brackets in I needed one of the boards for that. I attached the roof brackets on the eighth row of shingles on the other side - tenth row on this side - which gives me much better access to the cap. Basically I got to the same place today that took Saturday and Sunday last weekend - saved at least 4 or 5 hours but part of that was the kids getting into the rhythm (first roof for them) and me also since I haven't done this for many years. Tomorrow I can fairly leisurely tear off the cap - run some tar paper over the top - add two rows to each side - and cap it.
I know it looks a little rough right now but it barely hit 70 today - once it gets some sun on it with a warmer day it will settle down. Even after just a week the other side looks much better than it did and it's been cool and mostly cloudy all week.
Shed roof east.jpg
 
OP
P

PassnThru

Well-known member
Joined
Jan 5, 2010
Messages
6,512
Location
Bowling Green KY
No ridge vent - ventilation is through a few soffit vents and the front and rear gable vents.
I bought 4 square - 12 bundles. I have one unopened bundle left and most of one more.
I probably discarded a dozen or more shingles that had one issue or another. I bought them at a big box and didn't even bother to match lot numbers. It's a shed - wasn't really that important. Just opened multiple bundles at a time and drew from each of them to at least mix the different shades up. In a few years it won't even be noticeable.
 
To avoid these ads, REGISTER NOW!
Top Bottom