To avoid these ads, REGISTER NOW!

Roper whitney pexto brake

isb cornbinder

Well-known member
Joined
Nov 3, 2010
Messages
7,073
Location
Pacific South West, BC, Canada
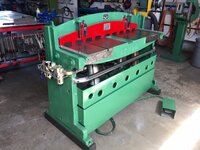
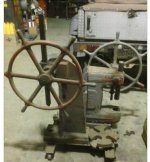
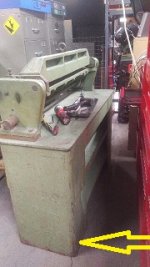
I found and bought a PEXTO 36 inch finger brake from CRAIGSLIST seller. This brake is AKA a box and pan brake.
After some GOOGLE search, I found a bunch of information and a operator warning. The brake carries a caution to the operator for tipping over easily. The manufacturer suggests securing the assembly to a wall or other safe permanent place. Cable or chain is suggested. The brake weight 846 pounds. The brake is mounted at 1/3 - 2/3 to the front of the steel cabinet. The cabinet base is about 18 inches, front to back and 36 inches tall.
When I lifted the brake by the supplied lifting eye-bolt, the brake and cabinet tilts forward at about a 30 degree angle. Setting the brake back on the floor requires serious handling to force it to vertical or it will tip forward. OSHA 2018 would never allow this.
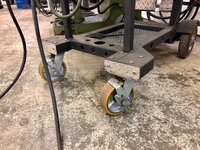
I need this brake to be moveable in the shop, environment. My shop a little crowded and I need to have the machinery on good quality casters so I can pull a machine out and then push it back, much like a drawer.
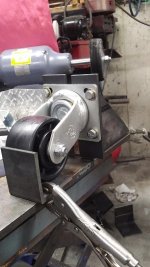
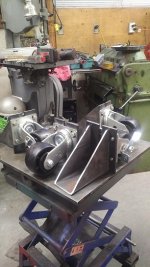
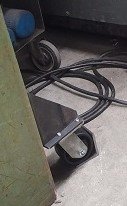
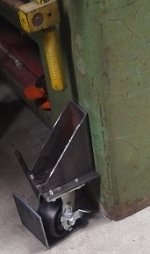
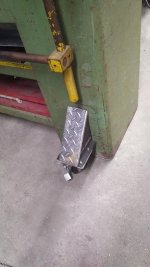
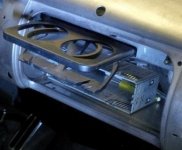
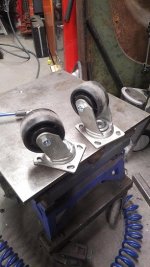
My solution to the mobility and stability situation is to mount good quality AL-GOOD casters on the front and back of the cabinet. I do not want to contribute to instability of the assembly by putting the wheels under and raising the cabinet to accommodate the wheels. The yellow arrows show where the caster will be attached. The cabinet will be raised about 3/8" to clear the floor.

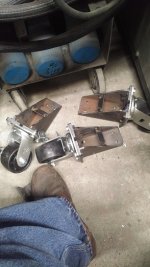
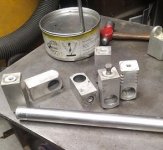
Yesterday, I bought the casters. Today I bought the steel for brackets, from METAL SUPERMARKET
 

Attachments

  • caster location 1.jpg
    caster location 1.jpg
    29 KB · Views: 245
  • caster location 2.jpg
    caster location 2.jpg
    28.8 KB · Views: 227
  • BOX AND PAN BRAKE.jpg
    BOX AND PAN BRAKE.jpg
    57.3 KB · Views: 254
  • PEXTO 1.jpg
    PEXTO 1.jpg
    28.9 KB · Views: 204
Last edited:
To avoid these ads, REGISTER NOW!
OP
I

isb cornbinder

Well-known member
Joined
Nov 3, 2010
Messages
7,073
Location
Pacific South West, BC, Canada
I spent about two hours making some much needed adjustments to the brake. There are about 100 set-screws that hold parts in place or limit travel. Before putting any hardware back, I cleaned the threads and put a little BOSTIK Pure Nickel anti seize on the threads.
The drive coupling/adapter had to be removed with a puller. The handle was bent and not moving. Rather than fighting with the bent handle, I cut it off with a bandsaw then back drilled the adapter coupling and drove the handle stub out. The replacement handle shaft is adjustable for length, now.
One of the pictures shows a yellow finger back gauge. This back-gauge will need a little fine tuning.
It is in my longer term plans to freshen this machine, as required.

The grey 52 inch sheetmetal brake is one that my Dad made for me. I do not have a use for it anymore, so it has gone to an automotive restoration shop. I got my asking price and the buyer thought I was not asking enough.
 

Attachments

  • PEXTO 1.jpg
    PEXTO 1.jpg
    28.9 KB · Views: 143
  • DRIVE COUPLING.jpg
    DRIVE COUPLING.jpg
    54.6 KB · Views: 142
  • SHEETMETAL BRAKE.jpg
    SHEETMETAL BRAKE.jpg
    143 KB · Views: 181
Last edited:

lis2323

Well-known member
Joined
Dec 25, 2016
Messages
3,234
Nice find! Don’t see much Pexto stuff around here. Some Brown Boggs once in awhile.....


Sent from my iPad using Tapatalk
 

matt_i

Well-known member
Joined
Mar 14, 2008
Messages
10,728
Location
SE Michigan
I think your plan to put the casters on the front and back sides of the base to make a "low boy" design will definitely improve its stability. Even some simple wooden wedges placed behind the rear casters I think would do well when bending full length, max capacity. Having the removable fingers is excellent. I placed a dedicated ratchet and hex bit on my brake just to make the removal and installation of fingers faster.
 
OP
I

isb cornbinder

Well-known member
Joined
Nov 3, 2010
Messages
7,073
Location
Pacific South West, BC, Canada
There are four 1/2" bolts holding the machine to the cabinet. The cabinet topis 3/8" plate with four tapped holes for the bolts. Every other fastener on this PEXTO brake is a 5 / 16 "socket head . The shafts and adjustable joints all have the same 1/4" set screw.
I have a plan to drill two holes in the top of the cabinet for the two sizes of Allen wrench.
I get the impression that this brake has seen very little use. It is obvious that service was not a priority.
I have been putting WD40 in all of the oil points then using shop air to clean and clear the oil points. Since I would like to paint the brake, I am very lightly oiling right now.
I want the base cabinet in a dark green. I want all of the socket-head fasteners, fingers and finger hold-downs to be Birchwood Casey Perma Blue.
I started to make the caster adapters yesterday. Like so many of my other ideas, I think of a better way and often discard the first try. I want the caster adapters to look like some thought went into making them.

The front casters have really good brakes.
 

Attachments

  • metal blue treatment  Birchwood Casey.jpg
    metal blue treatment Birchwood Casey.jpg
    24.4 KB · Views: 84
Last edited:

lis2323

Well-known member
Joined
Dec 25, 2016
Messages
3,234
That’s a really nice cabinet. Pretty hard to beat especially with a 3/8” top!

Here’s my 36”Brown Boggs. I built it with the front legs angled farther ahead of the brake’s centerline (than the rear legs)for stability.

I try to build everything so that it can be moved with a pallet jack or forklift. ce21124725236ee6b2ba63de5be77991.jpg
 

Attachments

  • ce21124725236ee6b2ba63de5be77991.jpg
    ce21124725236ee6b2ba63de5be77991.jpg
    783.4 KB · Views: 7
OP
I

isb cornbinder

Well-known member
Joined
Nov 3, 2010
Messages
7,073
Location
Pacific South West, BC, Canada
I like your brake. I much prefer old North America to anything new and offshore. It is important to buy stuff made here.
I am actively looking for a good used shear. I sold a very old Queen City 30". It was more ornate than function. 30 gauge was going maximum. I got $1000 for it.. I just missed a 16 gauge gap shear. Next time.
 

lis2323

Well-known member
Joined
Dec 25, 2016
Messages
3,234
I was real fortunate to find a 16 gauge shear from a roofing place.

Someone had done a botched up pneumatic conversion to it so it required a fair amount of “love” and redesign.

Sold my little stomper for $1500:

f2e779aa6feb60e277a11148bc47ddce.jpg

And paid $500 for this:


85fe9a34026f677117b1cf247137d7dc.jpg

850593bcf0134bd81a7b1c376148f6d5.jpg


Sent from my iPad using Tapatalk
 

Attachments

  • 850593bcf0134bd81a7b1c376148f6d5.jpg
    850593bcf0134bd81a7b1c376148f6d5.jpg
    674.5 KB · Views: 6
  • 85fe9a34026f677117b1cf247137d7dc.jpg
    85fe9a34026f677117b1cf247137d7dc.jpg
    1,013 KB · Views: 3
  • f2e779aa6feb60e277a11148bc47ddce.jpg
    f2e779aa6feb60e277a11148bc47ddce.jpg
    766.1 KB · Views: 5
OP
I

isb cornbinder

Well-known member
Joined
Nov 3, 2010
Messages
7,073
Location
Pacific South West, BC, Canada
I pitched yesterday's design in the scrap bin.
I think what I made today will be a keeper. All of the pieces, for todays attempt, were destined for the scrap/recycling bin.
I need to drill for fasteners and weld the bits together. I am thinking I should make some stainless caps for the caster brackets.
 

Attachments

  • casters 2.jpg
    casters 2.jpg
    77.7 KB · Views: 103
  • casters 3.jpg
    casters 3.jpg
    74.9 KB · Views: 101
  • casters 4.jpg
    casters 4.jpg
    69.9 KB · Views: 92
  • casters 1.jpg
    casters 1.jpg
    78.2 KB · Views: 108
Last edited:

lis2323

Well-known member
Joined
Dec 25, 2016
Messages
3,234
Stainless caps would look pro. I used aluminum checker plate for my welding cart. d7daf8913f68bb611a985a1f0940445b.jpg
 

Attachments

  • d7daf8913f68bb611a985a1f0940445b.jpg
    d7daf8913f68bb611a985a1f0940445b.jpg
    991 KB · Views: 4
OP
I

isb cornbinder

Well-known member
Joined
Nov 3, 2010
Messages
7,073
Location
Pacific South West, BC, Canada
I have about 100 casters and none of them are suitable for this project. I may bag my "extra" caster and take them to the local RE-STORE shop.
Your yellow casters look heavy duty.
I have a bunch of random aluminium diamond plate pieces. I may borrow your idea for end caps. Thank in advance.
Is that a Bridgeport mill in the background?
 
Last edited:

lis2323

Well-known member
Joined
Dec 25, 2016
Messages
3,234
Nope. Taiwan B’port clone. Traded an electric bike for it.

Here’s another weld cart. I used 16 gauge mild steel and dimple died it.

f8bebf33aaa92a1f138227ab3b6893a7.jpg

All those casters came from Princess Auto. They come on sale once or twice a year.
 

Attachments

  • f8bebf33aaa92a1f138227ab3b6893a7.jpg
    f8bebf33aaa92a1f138227ab3b6893a7.jpg
    815.2 KB · Views: 5
Last edited:
OP
I

isb cornbinder

Well-known member
Joined
Nov 3, 2010
Messages
7,073
Location
Pacific South West, BC, Canada
I was out and about doing the Don Quixote thing, today. So, I did not get very much done, in the shop. As a finish to the day, I stuck a finger against a belt grinder and took out a notch. I smell like bacon.
I was able to tack weld the brackets together and do a first test fit. I will be able to drill and bolt through the edge of lower shelf. I will not have to make a doubler for strength.
 

Attachments

  • BACK CASTER FIRST FIT.jpg
    BACK CASTER FIRST FIT.jpg
    31.9 KB · Views: 66
  • CASTERS FIRST TEST FIT.jpg
    CASTERS FIRST TEST FIT.jpg
    38.5 KB · Views: 73
Last edited:
OP
I

isb cornbinder

Well-known member
Joined
Nov 3, 2010
Messages
7,073
Location
Pacific South West, BC, Canada
While I like to remember my Dad and all that he contributed to me being what and who I am, the most important to me is the memories. Surrounding myself with stuff I do not use wrong. The brake has gone to a good home and the buyer wanted to know the story behind the brake. This is more than I could have asked for.
The brake continues to do what it was built to do.
My Dad was never a hoarder of stuff he did not use. I thank him for that.
 
Last edited:

lis2323

Well-known member
Joined
Dec 25, 2016
Messages
3,234
Looks good[emoji106]. How did you cut the square tube?


Sent from my iPad using Tapatalk
 
OP
I

isb cornbinder

Well-known member
Joined
Nov 3, 2010
Messages
7,073
Location
Pacific South West, BC, Canada
Decades ago, I found and bought a Delta Rockwell 14 inch bandsaw on Craigslist. This saw has a two speed transmission. This bandsaw is surprisingly accurate.
The only blades I buy are LENNOX bi-metal diemaster. Carbon steel blades will not cut the factory weld on square tube.
DIEMASTER blades are twice as expensive as carbon steel blades, BUT, a bi-metal Diemaster will last more than ten times longer.
 

Attachments

  • 14 INCH ROCKWELL.jpg
    14 INCH ROCKWELL.jpg
    27.4 KB · Views: 88
Last edited:

lis2323

Well-known member
Joined
Dec 25, 2016
Messages
3,234
Do you find you have to push hard to feed for the cut? I’ll have to buy one of those blades to try.

And could we have a closeup pic of that cool hose hanger on the right?

Sent from my iPad using Tapatalk
 
Last edited:
To avoid these ads, REGISTER NOW!
OP
I

isb cornbinder

Well-known member
Joined
Nov 3, 2010
Messages
7,073
Location
Pacific South West, BC, Canada
Last edited:

lis2323

Well-known member
Joined
Dec 25, 2016
Messages
3,234
Never had occasion to bend small tube. I’ll keep a look out for a used quality bend tool. Good idea, thanks!


Sent from my iPad using Tapatalk
 
OP
I

isb cornbinder

Well-known member
Joined
Nov 3, 2010
Messages
7,073
Location
Pacific South West, BC, Canada
Other than some more much needed service, this brake is done. Sometime in the future, I would like to freshen the brake up with new paint. I have made a set simple handles for the ends of the brake cabinet. I should have them on tomorrow. (pictures to follow)
The first job for the brake was to make caps for the caster brackets.
I will be watching CRAIGSLIST for an inexpensive toolbox for its parts. I may like to add drawers in the cabinet. If adapting is too much BS, I can make my own custom drawers.
The drawers in the pictures fit under the front seats in my 1940 Ford.

I do not like the reproduction pressed cardboard glove-box, so I made a custom fitted glovebox with a coffee cup holder hidden at the top. A little tap and the holder slides out and holds two cups. Thankyou VW Jetta.
 

Attachments

  • UNDER-SEAT DRAWER OPEN.jpg
    UNDER-SEAT DRAWER OPEN.jpg
    79.3 KB · Views: 74
  • DRAWER UNDER SEAT  4.jpg
    DRAWER UNDER SEAT 4.jpg
    62 KB · Views: 69
  • CASTER FINAL 2.jpg
    CASTER FINAL 2.jpg
    41 KB · Views: 70
  • BRAKE CASTER FINAL 1.jpg
    BRAKE CASTER FINAL 1.jpg
    62.4 KB · Views: 71
  • GLOVEBOX coffee holder - Copy (2).jpg
    GLOVEBOX coffee holder - Copy (2).jpg
    62.7 KB · Views: 76
Last edited:

lis2323

Well-known member
Joined
Dec 25, 2016
Messages
3,234
You may have already noticed, but Princess Auto has casters reasonably priced in their latest flyer.


Sent from my iPad using Tapatalk
 
OP
I

isb cornbinder

Well-known member
Joined
Nov 3, 2010
Messages
7,073
Location
Pacific South West, BC, Canada
Two simple handles. One for each end of the cabinet.
The round tube is one inch OD, stainless. The aluminium blocks are bored to fit the handle. The fastener is 5/16:X18tpi. All of the parts are recycled scrap.
 

Attachments

  • BRAKE HANDLE..jpg
    BRAKE HANDLE..jpg
    88.2 KB · Views: 46
  • HANDLE PARTS.jpg
    HANDLE PARTS.jpg
    58.4 KB · Views: 45
Last edited:
OP
I

isb cornbinder

Well-known member
Joined
Nov 3, 2010
Messages
7,073
Location
Pacific South West, BC, Canada
I bought two locking swivel caters today. One of these locking swivel casters replaced a regular caster, on each end, so the cabinet with brake will be easier to maneuver. At 846 pounds the brake cabinet is difficult to control when a caster is in contact with any anomaly, on the floor. One fixed caster will easily steer the cabinet, straight. This change allows the cabinet to easily maneuvered from either end.
 

Attachments

  • NON LOCKING SWIVEL.jpg
    NON LOCKING SWIVEL.jpg
    73.6 KB · Views: 38
  • LOCKING SWIVEL.jpg
    LOCKING SWIVEL.jpg
    60.6 KB · Views: 37
Last edited:

metalmagpie

Well-known member
Joined
Nov 1, 2011
Messages
798
Location
Seattle
I've fabricated several lowboy designs. They can stabilize a top-heavy machine while keeping it less than an inch off the ground.

Here is the latest one I made to fit a Famco 3-1/2C arbor press on factory stand.

rollingBase.jpg

It's a rectangular angle iron frame, two strongbacks, and four caster plates bent to a 90% and punched to bolt on the casters. I added some little gussets with 3/8-16 tapped holes in case I ever want to positively stop the thing from rolling. I'm very happy with this design and plan to use this design style from now on. Notice how the casters are spaced out far enough from the frame so that they cannot foul.

In case you're curious about what the machine looks like sitting on this lowboy rolling base, see the next image.

onBase-1.jpg

That machine isn't light, but it moves easily and feels very stable.

metalmagpie
 
OP
I

isb cornbinder

Well-known member
Joined
Nov 3, 2010
Messages
7,073
Location
Pacific South West, BC, Canada
I bought a two pack arbour press set mounted on a roller plate. I took the presses and left the plate behind. I need to build a better stable base for the arbour press or mount it to the side of my hydraulic press.
The most use I have out of my arbour press is compressing a cable crimper.
The remaining arbour press is a MANLEY.
 

Attachments

  • ARBOUR PRESS.jpg
    ARBOUR PRESS.jpg
    44.8 KB · Views: 47
  • ARBOUR PRESS 2.jpg
    ARBOUR PRESS 2.jpg
    70.4 KB · Views: 46
Last edited:

lis2323

Well-known member
Joined
Dec 25, 2016
Messages
3,234
You got the two arbor presses for $200??! Nice.


Sent from my iPad using Tapatalk
 

lis2323

Well-known member
Joined
Dec 25, 2016
Messages
3,234
Lol.

BTW good plan about mounting it on the side of your hydraulic press. That’s what I did

9cfd1d564ad45296e57adfc78e939569.jpg


Sent from my iPad using Tapatalk
 

Attachments

  • 9cfd1d564ad45296e57adfc78e939569.jpg
    9cfd1d564ad45296e57adfc78e939569.jpg
    741.5 KB · Views: 16
To avoid these ads, REGISTER NOW!
Top Bottom