To avoid these ads, REGISTER NOW!

Rotisserie

isb cornbinder

Well-known member
Joined
Nov 3, 2010
Messages
7,073
Location
Pacific South West, BC, Canada
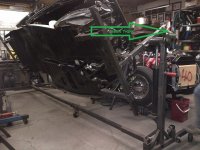
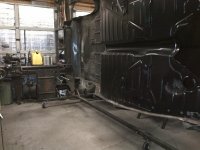
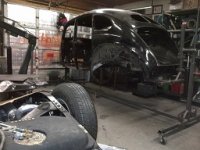
This is a picture of a rotisserie that I made. The car body is a 1940 Ford. It is on the way to metal cleaning. The rotation is controlled by a modified automatic air brake slack adjuster. The height of the rotisserie is adjustable with built on hydraulic lift cylinders
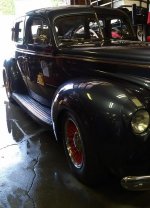
The car is painted Ford Medium Wedgewood Blue.
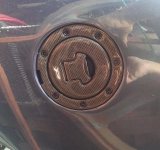
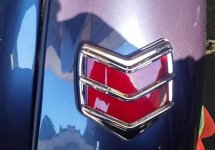
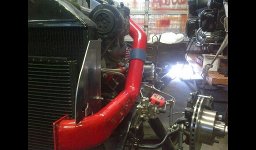
The Car: It is a 1940 Ford Deluxe four door with power windows, 10 way power leather seats in the front, power recline split leather bench in the rear, all leather interior, Vintage Air, tilt power steering, all LED lighting, back-up camera, dash cam, Autometer Gauges, air spring suspension, BBS wheels and 4 wheel disc brakes. The engine is a 1947 Canadian C69A flathead V8 with an Eaton M90 supercharger, TEC3r engine management, full flow oil filtering, Ford C4 automatic and Gear Vendors overdrive. The original gas filler was redirected to a side filler assembly from a Honda R1000RR locking gas cap.
The Ford is finished and waiting for a snow and salt free spring day
 

Attachments

  • rotisserie drive (aka front).jpg
    rotisserie drive (aka front).jpg
    134.8 KB · Views: 714
  • on the floor.jpg
    on the floor.jpg
    132.6 KB · Views: 484
  • ABOM79 FIREWALL.jpg
    ABOM79 FIREWALL.jpg
    100.6 KB · Views: 416
  • gas filler 1.jpg
    gas filler 1.jpg
    87.1 KB · Views: 369
  • TAIL LIGHT TECHMOSTALGA.jpg
    TAIL LIGHT TECHMOSTALGA.jpg
    62.2 KB · Views: 336
  • WASHED AND READY.jpg
    WASHED AND READY.jpg
    100 KB · Views: 329
To avoid these ads, REGISTER NOW!

larry4406

Well-known member
Joined
Jan 27, 2006
Messages
19,264
Location
Northern Virginia
Especially tell us about "The Green Thing"?

I think the "green thing" is a truck slack brake adjuster. Basically a worm gear device which is self locking. You can connect a wrench to the worm input and rotate the spline section which in this case is connected to the rotating arbor.
 
OP
I

isb cornbinder

Well-known member
Joined
Nov 3, 2010
Messages
7,073
Location
Pacific South West, BC, Canada
larry4406 is absolutely correct about the slack adjuster. The "slack" works better and smoother if the harsh detent system is removed.
I got my "slack adjuster" from a commercial shop ad I donated $10 to their coffee fund.
I made an ALLISON transmission work stand for a local transmission shop. The stand is similar to one of those engine stands. I used a modified slack adjuster to power the part that rotates. On the other end of the rotating shaft is a steel plate that matches the PTO on the transmission case.
 
OP
I

isb cornbinder

Well-known member
Joined
Nov 3, 2010
Messages
7,073
Location
Pacific South West, BC, Canada
Sadly, the rotisserie was left out in the weather and is in need of some serious TLC. The hydraulic lift jacks have seized and may not be repairable. I may replace the hydraulic lifts with Acme Screw scissor jacks. I will be using the rotisserie in the not so distant future on two early IHC pickup truck projects. Both of these resto-mods will be Cummins powered and 4X4. I can post more information if someone asks and tells me where to "put it".
 
OP
I

isb cornbinder

Well-known member
Joined
Nov 3, 2010
Messages
7,073
Location
Pacific South West, BC, Canada
More pics of rotisserie!

The end of the rotisserie that is farthest from the camera is the same as the closest end, except it doe not have drive.
The lower connecting tube is important to stabilize the unit.
I started to modify my design and have the removable leg extensions shorter. extendable and permanently installed in the end units. I did one end and so far, I like the change.
All of the material came from The Metal Supermarket. The cost to build was about $1200, for the materials, ten years ago.
 

C_F

ALLIANCE MEMBER
Joined
Jan 21, 2005
Messages
9,675
Location
Utah...SNOW BLOWS!
Well, the rotisserie looks very well designed & thought out. I especially like all the extra wheel attachments, for rolling it around when it's apart & such. Thanks for sharing the pics!:beer:
 
To avoid these ads, REGISTER NOW!

brownbagg

Well-known member
Joined
Mar 20, 2006
Messages
5,208
i didnt want wheels on mine, it set flat on the floor, i always hated when you start sanding, grinding and the unit starts moving across the slab, you end up chasing it all day. beside I wanted the friction of the whole unit on the ground too keep from tipping. my outrigger are 10 feet wide
 
OP
I

isb cornbinder

Well-known member
Joined
Nov 3, 2010
Messages
7,073
Location
Pacific South West, BC, Canada
The rotisserie base should be able to be adjusted to the expected width of what will be on the rotisserie. If a the base width is too narrow, wheels or flat base, the rotisserie will try to roll over.
My design allows for the load to be centered on the rotating points allowing the load to be rotated by one finger and the load will remain stationary. I added a "worm-drive" system to better control the load and a "worm-drive" will not allow the load to turn when work pressure is applied to the load.
One of the casters on each end has a wheel brake. In the absence of a wheel brake, a short length of small chain around where the wheels contact the floor will keep the wheels from wandering.
 
OP
I

isb cornbinder

Well-known member
Joined
Nov 3, 2010
Messages
7,073
Location
Pacific South West, BC, Canada
I'd like more info on the blower set up.


The EATON M90 supercharger and the intercooler are off a Ford Thunderbird SC. 3.8 litre V6. I did not like the idea of another SC mounted over the engine, I chose to mount the SC over the right cylinder head. There is a complicated adapter for the M90 to the engine with spacers to prevent loading the cylinder head and transfer the load to custom made studs. The front drive of the SC is with a fitted bracket that positively connects the SC to the front of the block.
The SC is driven with an OEM crankshaft pulley and OEM SC pulley. I had to mill out an adapter for this pulley to fit the 1947 Flathead crankshaft. This adapter also adapts a serpentine belt pulley that drives the AC pump. The alternator and two water pumps serpentine belt runs over a reverse mounted power steering pump. This double reverse turns the PS pump in the correct rotation.
I made three inch ducting to move the charge air forward and between the side of the radiator and the inner-fender apron around to the intercooler. I had to make transition fittings to minimise the amount of metal forming needed. The left side is similar and fastens to the Offenhauser intake manifold. The intake section of the manifold was milled into an intake plenum with a splitter then I milled the manifold to accept 8 Bosch electronic fuel injectors. The injectors and the BMW electric fan are controlled by an Electromotive TEC3r ECU and a charge air sensor and another 8 sensors around the engine.
 

Attachments

  • SUPERCHARGER intercooler~fan condensor ahead of the rad.jpg
    SUPERCHARGER intercooler~fan condensor ahead of the rad.jpg
    62.2 KB · Views: 122
  • SUPERCHARGER air duct left.jpg
    SUPERCHARGER air duct left.jpg
    65 KB · Views: 116
  • SUPERCHARGER air duct RIGHT.jpg
    SUPERCHARGER air duct RIGHT.jpg
    100.1 KB · Views: 114
  • SUPERCHARGER DRIVE.jpg
    SUPERCHARGER DRIVE.jpg
    95.4 KB · Views: 132

matt_i

Well-known member
Joined
Mar 14, 2008
Messages
10,728
Location
SE Michigan
Im curious how you developed the engine calibration for fuel injection for an engine where there's really no other equivalent? I get that you can go conservatively and keep the A:F ratios in the 12s, but did you use an actual A:F sensor (not just an O2 sensor but a wide-band A:F sensor) to double check on what's happening or ? Just interested :)

Impressed with your project also! :thumbup:
 
Last edited:
OP
I

isb cornbinder

Well-known member
Joined
Nov 3, 2010
Messages
7,073
Location
Pacific South West, BC, Canada
All of that information is available from ELECTROMOTIVE TEC3R. I installed a 4 wire heated oxygen sensor along with MAP, MAT, TPS, IAC, road speed sensor and coolant temperature sensors. TEC3R offer tune and component selection tips. Conservative power estimates are encouraged. This C69A engine had an original 110 hp and I estimated a conservative 175hp for setup. This number can be adjusted after and during a road test. I don't remember the injector size, but I went conservative with them. I added a boost referenced residual check valve to the fuel rail return. My start number is 45 psi. The intank pump can supply enough fuel to raise the 45psi with in the specifications of these injectors and several larger injectors, if required.
I am not trying to build a monster Flathead V8. I challenged myself to try and make this lump of inneffiicient cast-iron run as well as a SBF.
This is not a crazy as it sounds, if a person remembers that an engine is an air pump. I have done little more than try to make the otherwise lackluster pump work more efficiently against resistance.
The ECU restricts the Flathead V8 to 4500 rpm.
While a SBC is a nice fit, something inside me makes this a distant choice. This Ford nearly got a Cummins 4bta. I have a new Cummins 4bta and a 24 valve in dry storage. The 24 valve has a 1953 R120 IHC crewcab 4X4 in its future. A 1940 Ford Deluxe sedan with Cummins 4bta Power is maybe not so far out there.
 
OP
I

isb cornbinder

Well-known member
Joined
Nov 3, 2010
Messages
7,073
Location
Pacific South West, BC, Canada
Finally, some pictures of the rotisserie.
I am able to hydraulically adjust the height of the body so it will clear the connecting bar. The connecting centre bar is necessary to keep the end units from trying to turn and stressing the body.
The rotisserie can be adjusted to centre the load on the rotation bearings with ACME screws.
The five casters allow the rotisserie to me moved effortlessly. One caster locks on each end. I started to modify the out-riggers so they can be moved and locked. One end is done and the other end has removable out-riggers.
The length of the outriggers do not have to extend farther than the outside ars of the body.
The metal cleaning company was very pleased to have the rotisserie to position the car body
http://www.osairstrip.ca/
 

Attachments

  • ROTISSERIE 6.jpg
    ROTISSERIE 6.jpg
    35.1 KB · Views: 114
  • ROTISSERIE 5.jpg
    ROTISSERIE 5.jpg
    48.6 KB · Views: 112
  • ROTISSERIE 4.jpg
    ROTISSERIE 4.jpg
    60.3 KB · Views: 107
  • ROTISSERIE 3.jpg
    ROTISSERIE 3.jpg
    45.4 KB · Views: 99
  • ROTISSERIE 2.jpg
    ROTISSERIE 2.jpg
    58.4 KB · Views: 100
  • ROTISSERIE 1.jpg
    ROTISSERIE 1.jpg
    26.8 KB · Views: 104
OP
I

isb cornbinder

Well-known member
Joined
Nov 3, 2010
Messages
7,073
Location
Pacific South West, BC, Canada
More pics of rotisserie!
This took a while. A generation may have passed.
I still have this rotisserie.
the drive for the rotisserie is a HALDEX automatic slack adjuster. I made a few wimple mods. The worm 21/1 drive holds the rotisserie when the crank stops. It is very stable. The casters are, ALL-GOOD.
 

Attachments

  • ROTISSERIE CAR OUT FOR METAL CLEANING.jpg
    ROTISSERIE CAR OUT FOR METAL CLEANING.jpg
    43.4 KB · Views: 42
  • ROTISSERIE BODY ON SIDE.jpg
    ROTISSERIE BODY ON SIDE.jpg
    78.4 KB · Views: 42
  • ROTISSERIE FRONT DRIVE.jpg
    ROTISSERIE FRONT DRIVE.jpg
    91.9 KB · Views: 39
  • ROTISSERIE BACK OF CAR.jpg
    ROTISSERIE BACK OF CAR.jpg
    53.2 KB · Views: 44
  • HALDEX AUTO ADJUST.jpg
    HALDEX AUTO ADJUST.jpg
    58.5 KB · Views: 92
Last edited:

Beerhippie

Well-known member
Joined
Oct 13, 2023
Messages
9,804
Location
Far NE Oregon
That should give you a nice, even, crispy brown all the way around!

I just hate it when the auto body is perfectly done on one side but burnt to a crisp on the other....

Cool Tool!
 

no704

Well-known member
Joined
Apr 27, 2016
Messages
5,221
I built one many years back. Had 2 3” Id roller bearings about 5” apart on each end. With adjustable mounting plates. When set up correct you could spin a body with one hand.
 
To avoid these ads, REGISTER NOW!
Top Bottom