To avoid these ads, REGISTER NOW!

Rotten Sill Plate and Unlevel Top Plate

paulsbunion

Active member
Joined
Dec 13, 2021
Messages
34
Hi All,

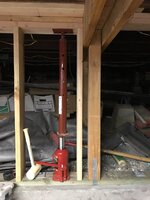
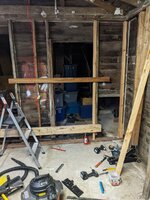
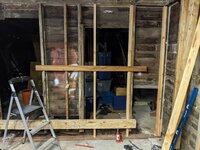
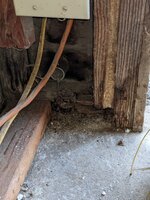
I just bought a house and was getting the garage set up when I ran into much more rot/termite damage than I expected. The entire sill plate on the south and east walls on my garage is completely rotted along with the bottom of quite a few studs. I haven't uncovered the drywall on the North wall but I expect some rot there as well. The garage is built on a slab with no stem wall and there is a sidewalk at the same grade on the South Wall. I imagine this caused water to pool and do its work. I plan on using a sill gasket when I eventually make the repairs. The south wall also has a relatively new window and door installed that I would like to reuse.

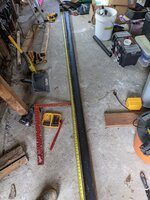
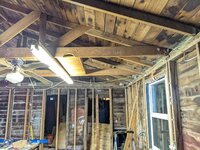
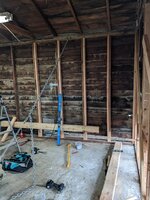
Here are a few pics:

South Wall: West Wall/Entrance: Sill Plate Damage: Down the South Wall Top Plate:
I was originally thinking this would be a standard "jack it up, replace the sill plate and rotted studs and set it down" however I ran into something interesting when I shot the laser. I anticipated the corner where the South & East walls meet to be sagged/lower as the sill plate and bottom of studs is rotten, however when measuring from the sill plate down to my laser line it is actually 1-3/4" higher. When I run the laser across the West Wall/Entrance, the beam that runs the length is dead level. I am guessing that the previous owner tried to put in some sill plate sections to deal with the rot and jammed longer studs in? I'm not sure but it's got me a bit confused on how best to tackle the repair.

I was hoping I could work my way around the garage as I'm sure there's more rot on the North wall. My plan was to use the entrance as my true and level everything to that but how do I bring the back corner wall down?

Any advice would be greatly appreciated and if you need more photos or info just let me know. I'm in Central CA so no worries about snow/ice.

Thanks!
 
To avoid these ads, REGISTER NOW!

egdede

ALLIANCE MEMBER
Joined
Dec 20, 2009
Messages
2,105
Get 'basement jacks'. Clean out the bottom sill. Put a treated sill plate down (on top of sill seal). Sister in new studs next to each existing stud. If you have stucco on the outside you must leave what remains of each old stud to maintain the connection between the stucco and the old studs. Use GRK screws, r4 9 by 3 1/8 both to sister the new and old studs and to toe-in the new stud at the top and bottom.


I lost the NOT backed up phone with pictures of me doing exactly this. Years ago I posted some good pictures in someone else's thread. My foundation was being replaced too so I was able to attach my sill plate from underneath with 2 big 1/4 X 4 GRK structural screws: straight in for the win.
 
OP
P

paulsbunion

Active member
Joined
Dec 13, 2021
Messages
34
Thanks! I think I found your old photos. I'll link them here for anyone in the future looking at this post. https://www.garagejournal.com/forum...ing-studs-to-bottom-plate.423405/post-7924066

I was planning on using this gasket underneath as I've heard great things from builders in the area: http://www.conservationtechnology.com/building_gaskets.html

I have a few follow up questions if you don't mind:

1. How would you go about jacking up the wall? I have (3) 12 Ton Bottle Jacks that I can make use of.

2. How do I deal with the top plate not being level for the length of the repair run? I thought it would be lower where the rot was the worst but it is actually higher by 1-3/4". I think there have been some mickey mouse repairs throughout the years as there are sistered studs and some places have a double sill plate

See these photos:
Rotten Wall(South): Entrance:
Do I try and level the top plate as I'm replacing studs or is this just part of dealing with a 60+ year old structure?

3. The back wall (East) also has rot and is the gable end. How do you go about lifting that side and can I do one wall at a time or do they both need to be done at the same time? I know that side isn't load bearing but I still need to get the weight off the plate.

4. I think now would be a good time to tackle the siding as there is no exterior sheathing and the siding is beat up in many places. Where would that fall in the order of operations?

Really appreciate your help and I'm looking forward to getting this garage set up! Plenty of other work to do on the house but I feel out of place without my "headquarters"!
 

yeldogt

Well-known member
Joined
Jan 2, 2012
Messages
18,184
If there is water outside that will wet the new plate -- you do have to fix that situation.

Is the outside stucco? That's a problem .... if not you can just work around the building shoring up each area and making everything match the lowest level. New bottom plate -- you can double it and cut the studs back and fix the siding. Sister if too short .... I used bolts on one I did years ago.

What area are you ? -- you have to make sure the building is properly attached tot he slab
 
OP
P

paulsbunion

Active member
Joined
Dec 13, 2021
Messages
34
>What you need to do is build a concrete block stub wall to get the sill up and out of the standing water. Then you won't have to sister the studs at all, just cut off the rotten ends.

That would be the ideal solution. This is not my forever house and funds are a bit tight right now so I'm going the PT route instead.

>If there is water outside that will wet the new plate -- you do have to fix that situation.

Is the outside stucco? That's a problem .... if not you can just work around the building shoring up each area and making everything match the lowest level. New bottom plate -- you can double it and cut the studs back and fix the siding. Sister if too short .... I used bolts on one I did years ago.

Here are a few photos of the outside.
East Wall: South Wall:
This is just after about 24 hours of rain (I'm in the Central California Coast Area). There is no pooling at that rotten side and it generally gets a full days worth of sun. I think the main problem was the Previous Owner had no gutters. I know having the sidewalk at the same grade is not desirable but it doesn't seem to have any pooling or standing water.

As far as attaching bottom plate to the slab, I was planning on either 1/2 or 5/8 stainless Titan anchors. https://www.strongtie.com/mechanicalanchors_mechanicalanchoringproducts/thd_anchor/p/titen-hd
 

yeldogt

Well-known member
Joined
Jan 2, 2012
Messages
18,184
How about fix as you say and use a PVC or Boral freeze board on the outside ... both can take some water ... fix into the siding.

It's a shame the new side walk was placed that way w/o removing the old ...
 

MoonRise

Well-known member
Joined
Nov 5, 2010
Messages
4,033
Location
NJ
Cali?

You most likely WILL have to deal with seismic construction code requirements.

Which in addition to proper anchoring of the bottom plate to the slab usually also requires proper anchoring of the wall studs to the plate/sill/slab (more Simpson tie brackets usually), proper required shear wall sheathing and nailing patterns on the wall sheathing to the studs (right now you have NO shear wall sheathing, just the horizontal wall board siding which usually doesn't count as shear wall sheathing), proper required anchoring of the wall to the top plate and roof joist/rafter structure (usually more Simpson tie brackets/straps).

Wood at ground level WILL rot.

Wood on masonry (the slab in this case) WILL rot. Masonry is considered 'wet', and wood in contact with masonry must either be fully protected from contact with the masonry (wicking protection) or be rot-resistant PT lumber.

btw, unless your garage slab is mondo-thick you will NOT be able to use the 1/2" or 5/8" stainless steel Simpson Titen anchor screws. They require a MINIMUM slab thickness of 5" (for the 1/2" dia screws) or 6" (for the 5/8" dia screws).

http://embed.widencdn.net/pdf/plus/ssttoolbox/0es8usguid/C-A-2021-p095-103.pdf (Simpson spec design PDF for the Titen screws)

Check to see just how much termite damage you have in the wall studs and the siding. Hopefully you don't have termite damage up into the top plate or roof rafters yet. If you do, you will probably be looking at a complete tear down and rebuild.

If you can get away with just replacing the rotten bottom sill plates, you will basically build an entire new 4 walls inside the existing garage walls and support the entire garage on those temp walls. Then you cut the existing studs from the existing rotten sills, carefully jack up the entire garage to get clearance to remove the rotten sill plates and to level your existing top plates. Then you install now 'proper' PT sill plates anchored to the slab. Then build all new exterior wall studs on top of the new sill plates. Then attach the new stud walls to the existing top plate (which is hopefully not termite infested or damaged). Then attach the new wall studs to the existing siding (if it is reusable) or to the new siding and to the old wall studs after any rot and damaged sections are cut out and removed.

Or, depending on just how much termite damage and rot there is, you might be better off removing the 'new' window and door and setting them aside and demolish the entire rotten garage and just rebuild it. No rot, no termites, all plumb and level.

You have to determine where the change-over point from 'patch and fix' to 'remove and rebuild' applies.
 
OP
P

paulsbunion

Active member
Joined
Dec 13, 2021
Messages
34
Thanks! That's great info and I totally understand what you mean by finding out where that line is. There is no termite damage I can see other than the sill plates and bottom of the studs. I still need to pull the drywall off on the other side so who knows what I'll find there.

The new sill plates will absolutely be PT and they will have EPDM rubber structural building gaskets underneath. On the walls that don't have concrete on the exterior there also be proper flashing. After wall repairs, I will sheath with OSB and building wrap and then new siding. Not sure what siding I'm going to go with yet, though.

I will remove the rest of the drywall and assess the termite damage and then pretty much follow your instructions but I'm going to try and just do one wall at a time. I'll also look into the seismic retrofit requirements that are currently in place and make those as required.

Could you give me some advice on how you'd go about jacking up the walls?

Thanks!
 

egdede

ALLIANCE MEMBER
Joined
Dec 20, 2009
Messages
2,105
It is easiest to use 2 of these at each end of the wall with a 4x6 as a header underneath the joists. Put this structure parallel to the wall. i have stood 2X4 on bottle jacks at each end of a header, but this is wobbly and crazy (hold my beer).


It possible to put the basement jacks in between the studs but you are more likely to flex the top plate instead of raising the whole wall.
 
Last edited:

Shiftless

Well-known member
Joined
Mar 9, 2014
Messages
14,605
Location
East Bay SFO
Looks like you’re close to the point of rebuilding the whole garage. The Sheetrock that a previous owner installed did a good job of covering up pre existing damage and letting trapped moisture do more damage. :(
 
OP
P

paulsbunion

Active member
Joined
Dec 13, 2021
Messages
34
Looks like you’re close to the point of rebuilding the whole garage. The Sheetrock that a previous owner installed did a good job of covering up pre existing damage and letting trapped moisture do more damage. :(
Yup, I expect to find many surprises from our friend the previous owner. I've heard their name becomes a curse word throughout your time in home ownership. I can see it happening and his was "Borba". Pretty good as far as curse words go!
 

egdede

ALLIANCE MEMBER
Joined
Dec 20, 2009
Messages
2,105
My wife had some pictures. The floor was gravel/concrete was 3" thicker than planned so it ended up on only a 1" curb. You don't have to keep your old studs. You can screw the siding to the new studs. 5DC23B06-FC61-468E-9F71-257B555698F2.jpeg

The second photo shows a jack that uses 4x4 posts. You can lift with the basement jacks by hammering the bar, but they'll eventually fail. When it came time to correct a 1" dip I need a bottle jack. I found the basement jack to be more stable than a cut post.

You can beat on these.


In retrospect, after I had broken a couple of the cheaper ones, I wished I had popped for 4 of these in the first place : (
 

Attachments

  • 1CE3C5EB-4DBE-4B7C-9672-51BF6F3CF609.jpeg
    1CE3C5EB-4DBE-4B7C-9672-51BF6F3CF609.jpeg
    403.3 KB · Views: 154
  • B278D173-17DF-4610-8B88-088E9846813C.jpeg
    B278D173-17DF-4610-8B88-088E9846813C.jpeg
    252 KB · Views: 164
Last edited:

Uncle murph

Well-known member
Joined
Jan 28, 2021
Messages
1,484
Location
Harford county
Hi All,

I just bought a house and was getting the garage set up when I ran into much more rot/termite damage than I expected. The entire sill plate on the south and east walls on my garage is completely rotted along with the bottom of quite a few studs. I haven't uncovered the drywall on the North wall but I expect some rot there as well. The garage is built on a slab with no stem wall and there is a sidewalk at the same grade on the South Wall. I imagine this caused water to pool and do its work. I plan on using a sill gasket when I eventually make the repairs. The south wall also has a relatively new window and door installed that I would like to reuse.

Here are a few pics:

South Wall: West Wall/Entrance: Sill Plate Damage: Down the South Wall Top Plate:
I was originally thinking this would be a standard "jack it up, replace the sill plate and rotted studs and set it down" however I ran into something interesting when I shot the laser. I anticipated the corner where the South & East walls meet to be sagged/lower as the sill plate and bottom of studs is rotten, however when measuring from the sill plate down to my laser line it is actually 1-3/4" higher. When I run the laser across the West Wall/Entrance, the beam that runs the length is dead level. I am guessing that the previous owner tried to put in some sill plate sections to deal with the rot and jammed longer studs in? I'm not sure but it's got me a bit confused on how best to tackle the repair.

I was hoping I could work my way around the garage as I'm sure there's more rot on the North wall. My plan was to use the entrance as my true and level everything to that but how do I bring the back corner wall down?

Any advice would be greatly appreciated and if you need more photos or info just let me know. I'm in Central CA so no worries about snow/ice.

Thanks!
You’re pushing and pulling on the same problem,forget about the wall,jack the roof/ceiling until its level,replace the sill plate,repair studs as required to hold it there.
 

Leaflessshadetree

Well-known member
Joined
Aug 1, 2013
Messages
7,183
Location
Don't ask.
To lift mine I made some triangular plywood gussets and screwed them to the studs at a height that worked for my jacks. (Think of it like mounting a shelf upside down). I put 4 of them along a 20ft wall lifted with a jack and used jack stands to hold it us as I worked my way around the garage.
 

Hank11

Well-known member
Joined
Aug 19, 2019
Messages
1,159
Location
Tennessee
I might not lift it. Build four support walls inside the existing walls with enough room to work in between. Snap a chalk line and cut off the rotted parts leaving just enough room to slide the new plates in place. Shoot it all down through the plate with drilled anchors or a nail gun. Take out the temp walls. You might lose 1/4 to 1/2 inch of headroom. Done.

The band board at the bottom with a waterproof material is very good.
 
To avoid these ads, REGISTER NOW!

mike93lx

ALLIANCE MEMBER
Joined
Dec 9, 2013
Messages
37,989
Location
Richmond, VA
If that roof is going to need any work to, I'd year it down and build it right. I personally hate working around other people's bad workmanship and fixing stuff like rot.
 

no704

Well-known member
Joined
Apr 27, 2016
Messages
5,235
Just make a dam on the inside and pour fiberglass resin into it! Did this on my 1986 bayliner transom, held up great until I a was able to give it away with a smile!🤣
 

PWC Repair

Well-known member
Joined
Dec 27, 2012
Messages
3,198
Location
Arkansas
I don't envy you. I had termites eat up several floor joists, an 8ft section of wall, and I just finished repairing a piece of top plate and the end of one rafter.......not fun stuff......definately fixable though.
 
OP
P

paulsbunion

Active member
Joined
Dec 13, 2021
Messages
34
Do you always compare apples and oranges?.

I'd tear it down carefully and reuse what is possible.
That building is trashed. Anything can be saved, but it often isn't the best approach
I hear you. If this was the forever house then that would definitely be the approach. We'll be looking to sell/rent this in the next 2 years so I want to make it right the most economical way.

I made some headway pulling down sheetrock after work today and it looks like maybe there's only two walls of rot. The north side looks to be solid at the corner but I haven't got further than that.

Roof seems to be fine and no rot/termite damage higher than a foot or so on the studs. Still working my way around the building but it's looking repairable.

I'll get some progress photos up and hopefully make a video of the process for any future users with similar issues. Appreciate the help and ideas so far!
 

Leaflessshadetree

Well-known member
Joined
Aug 1, 2013
Messages
7,183
Location
Don't ask.
Do you always compare apples and oranges?.

I'd tear it down carefully and reuse what is possible.
That building is trashed. Anything can be saved, but it often isn't the best approach
Not really apples and oranges. Cost to fix what is there is a couple hundred bucks, one guy could do it in a day or two. Doesn't require many skills or special tools (some very basic framing, measure and cutting 2xs to length no angles).
Cost to rebuild I'd estimate $10,000 (easily could be more). One guy could do it but would be nice to have several guys during certain stages. Time required measured in weeks (maybe months).
Sure you end up with a newer (not necessarily better) item that serves the same purpose.
 
OP
P

paulsbunion

Active member
Joined
Dec 13, 2021
Messages
34
Alright! Quick update on where this nasty project sits:


I decided to go the repair route as rebuilding the garage would be too costly and it currently sits about 1' from the property line so a rebuild would need to be at least 10' away.

I used 5/16 X 5-1/8" GRK screws and a 4X6 as my lifting "header". A bottle jack on either end and she came up quite nicely with a small groan here and there. Got what was left of the sill plate cleaned off and put the new PT sill plate down. I used the building gasket from Conservation Technologies to hopefully help create a better capillary break and give this wall a fighting chance. Pretty cool stuff!

The corner and 2 studs have been replaced and I'm working my way down the line. New studs are getting toe-nailed in with #10 X 3-1/8" GRKs. I really like these screws!

Things I don't like:

1. The back right area of the garage appears to be spread over two concrete pads. They are not level where they meet and there's about a 1/16" gap under the sill plate even with the building gasket. I might try one of those foundation epoxy kits after everything is done to fill that area.

2. I wish I would have went with a 2X6 for the sill plate to get me more room to put my concrete anchors in. I was thinking about it and I could have notched around the bottle jacks to fit the 2X6 in but I didn't. I went with 1/2" anchors and a bearing plate instead of just the washer. Redhead says 5 anchor widths away from the edge and I was able to get that distance and still get the bearing plate on the 2X4, just barely. All anchors snugged up to 60 ft. lbs. of torque so I was happy with that.


All in all it's gone relatively smooth. This is the non-load bearing wall. So far I'm into it about $300 with lumber a few new drill bits and the GRK screws. I'll do a final tally at the end.

Question regarding the siding after this is all buttoned up. I don't want to go through pulling it all off so I'm thinking 7/16" OSB over the 1X4 tongue and groove that's there now and fur out any studs that don't have siding on them. Building wrap over that and then maybe the cement board planks? What do you guys think?
 

Attachments

  • PXL_20220103_183642960.jpg
    PXL_20220103_183642960.jpg
    421.5 KB · Views: 126
  • PXL_20220103_212900173.jpg
    PXL_20220103_212900173.jpg
    532.9 KB · Views: 118
  • PXL_20220104_014117695.jpg
    PXL_20220104_014117695.jpg
    376.4 KB · Views: 114
  • PXL_20220104_015809318.jpg
    PXL_20220104_015809318.jpg
    351.2 KB · Views: 130
Last edited:

egdede

ALLIANCE MEMBER
Joined
Dec 20, 2009
Messages
2,105
Great Job! You could shim the bottom plate with these:


These are 100% ABS, I don't trust composites on concrete. You can put a whole sheet down and come in from each side (even if you have to remove siding to slide on in from the outside). I have smeared ABS glue on them much in the same as you would glue wood shims. They are e=segmented and break nicely or they can be cut with a saw saw ; ) once the weight of the wall is upon them.

If the structure is stable just screw down the 1X boards with little #8 x 2 GRK screws and then put the wrap and siding straight on. I might put OSB if I were seriously trying to deaden sound, but not for structural reason on your garage.
 
Last edited:
OP
P

paulsbunion

Active member
Joined
Dec 13, 2021
Messages
34
That's a fantastic idea. I actually picked up a pack of the composite shims so I think I'll tap it in there tomorrow morning. Thanks!
 

Bretny

Well-known member
Joined
Jul 31, 2017
Messages
3,918
Location
Dutchess county NY
>What you need to do is build a concrete block stub wall to get the sill up and out of the standing water. Then you won't have to sister the studs at all, just cut off the rotten ends.

That would be the ideal solution. This is not my forever house and funds are a bit tight right now so I'm going the PT route instead.

>If there is water outside that will wet the new plate -- you do have to fix that situation.

Is the outside stucco? That's a problem .... if not you can just work around the building shoring up each area and making everything match the lowest level. New bottom plate -- you can double it and cut the studs back and fix the siding. Sister if too short .... I used bolts on one I did years ago.

Here are a few photos of the outside.
East Wall: South Wall:
This is just after about 24 hours of rain (I'm in the Central California Coast Area). There is no pooling at that rotten side and it generally gets a full days worth of sun. I think the main problem was the Previous Owner had no gutters. I know having the sidewalk at the same grade is not desirable but it doesn't seem to have any pooling or standing water.

As far as attaching bottom plate to the slab, I was planning on either 1/2 or 5/8 stainless Titan anchors. https://www.strongtie.com/mechanicalanchors_mechanicalanchoringproducts/thd_anchor/p/titen-hd
No gutter? It's a bit hard to tell in the pic.
 
OP
P

paulsbunion

Active member
Joined
Dec 13, 2021
Messages
34
No gutter? It's a bit hard to tell in the pic.
Yes, there is a gutter now but that was just recently put in. It definitely helps keeping water off the slab though.

I'll get an update up tonight and hopefully be done with the back wall and on to the side wall.
 

Uncle murph

Well-known member
Joined
Jan 28, 2021
Messages
1,484
Location
Harford county
Alright! Quick update on where this nasty project sits:


I decided to go the repair route as rebuilding the garage would be too costly and it currently sits about 1' from the property line so a rebuild would need to be at least 10' away.

I used 5/16 X 5-1/8" GRK screws and a 4X6 as my lifting "header". A bottle jack on either end and she came up quite nicely with a small groan here and there. Got what was left of the sill plate cleaned off and put the new PT sill plate down. I used the building gasket from Conservation Technologies to hopefully help create a better capillary break and give this wall a fighting chance. Pretty cool stuff!

The corner and 2 studs have been replaced and I'm working my way down the line. New studs are getting toe-nailed in with #10 X 3-1/8" GRKs. I really like these screws!

Things I don't like:

1. The back right area of the garage appears to be spread over two concrete pads. They are not level where they meet and there's about a 1/16" gap under the sill plate even with the building gasket. I might try one of those foundation epoxy kits after everything is done to fill that area.

2. I wish I would have went with a 2X6 for the sill plate to get me more room to put my concrete anchors in. I was thinking about it and I could have notched around the bottle jacks to fit the 2X6 in but I didn't. I went with 1/2" anchors and a bearing plate instead of just the washer. Redhead says 5 anchor widths away from the edge and I was able to get that distance and still get the bearing plate on the 2X4, just barely. All anchors snugged up to 60 ft. lbs. of torque so I was happy with that.


All in all it's gone relatively smooth. This is the non-load bearing wall. So far I'm into it about $300 with lumber a few new drill bits and the GRK screws. I'll do a final tally at the end.

Question regarding the siding after this is all buttoned up. I don't want to go through pulling it all off so I'm thinking 7/16" OSB over the 1X4 tongue and groove that's there now and fur out any studs that don't have siding on them. Building wrap over that and then maybe the cement board planks? What do you guys think?
Looks Great!
 
OP
P

paulsbunion

Active member
Joined
Dec 13, 2021
Messages
34
Finished up the back wall and now working down the far side wall. Back wall is about an 1/8" off level when I use the laser from right to left. Much better than the 1.5" it was prior. It's a bit frustrating working with an old building but I just have to keep telling myself that things can't be perfect and any improvement is going to be much better than what it was when i got it.

Before I go further down the load bearing wall I'm going to get a chain to attach around the top plate from load bearing wall to load bearing wall to help prevent any bowing at the top. There are two 2X8 "ceiling joists" but they cut a half circle out of one for some reason so I don't want to rely on those too much.

I don't see a lot of sag in the roof but with just 2X4 rafters I'm guessing it would probably be wise to add some additional joists across the top plate. What do you guys think?
 

Attachments

  • PXL_20220105_022413537.MP.jpg
    PXL_20220105_022413537.MP.jpg
    357.8 KB · Views: 95
  • PXL_20220105_022421203.jpg
    PXL_20220105_022421203.jpg
    365.7 KB · Views: 85
  • PXL_20220105_022514471.jpg
    PXL_20220105_022514471.jpg
    425.5 KB · Views: 81

theoldwizard1

Well-known member
Joined
Feb 22, 2011
Messages
43,344
Location
SE MI
Fix your exterior drainage problem FIRST ! No "gasket" is going to keep water out permanently.

Worst case, you may need some kind of French Drain.
 
OP
P

paulsbunion

Active member
Joined
Dec 13, 2021
Messages
34
Fix your exterior drainage problem FIRST ! No "gasket" is going to keep water out permanently.

Worst case, you may need some kind of French Drain.
The problem is the sidewalk was poured at the same grade as the sidewalk. See the picture in post #8. Outside of lifting the garage and adding a stem wall there's not much I can do to fix that problem. I don't think I could get away with lifting it and getting concrete in here without a permit and they won't issue a permit because the garage is right up against the property line so it doesn't meet current setback requirements.

So I chose gasket, gutter and PT bottom plate. I'm in CA so rain isn't months, it's more like a week or two of rain. Standing water doesn't seem to be an issue so far. I know it's not ideal but I think it will stand for another 20+ years.
 
OP
P

paulsbunion

Active member
Joined
Dec 13, 2021
Messages
34
Alright! Progress Update.

Making my way down the first load bearing wall but going much slower than on the other wall. I noticed my wall was getting pushed out at the top and realized there were no full length siding runs on the wall I just did. I set up this redneck system with a couple 2X4s anchored to the floor to pull the top of the wall back in and then locked it in with some triangle bracing on the gable wall. That has worked out but I spent way to long stressing on figuring that out.

After I got that set up I was able to move a bit quicker. I have on 8' section completely done with new studs sistered in place. I'm within an 1/8" of level so far which is acceptable I think.

PXL_20220108_000810711.jpg

I realized I messed up and have been using zinc plated anchors instead of galvanlized. I'm going to use galvanized from here on out and go back when I'm all done and make sure each sill plate has a few galvanized anchors. Dumb move I know!

Couple questions:

1. How would you anchor these two small sill plates at the front corner. They'll be something like 5-7" each. I'm thinking just one anchor will have to do?

2. Was it common for the ridge beam to be made from two pieces? The rafters are 2X4 and the ridge beam is also 2X4 and is made of two pieces. It looks original and not spliced. I'm not concerned about it but just curious.

Finally, what kind of tolerances would you be holding yourself to in a repair like this? I am personally a bit of a perfectionist usually but have come to terms with the fact that owning an old home/garage is not a game of perfect. I'm looking down the outside wall on the gable side and I'm pretty sure it's going to have a little "wave" to it. I'm 95% concerned with making the structure safe and sound so if it's just aesthetic oh well. Anyway, just wanted some opinions from folks who have done this since it's all new to me!

Appreciate all the help! Hoping to make some good progress down this wall tomorrow.
 

Attachments

  • PXL_20220108_000653407.jpg
    PXL_20220108_000653407.jpg
    474 KB · Views: 71
  • PXL_20220108_000725915.jpg
    PXL_20220108_000725915.jpg
    506.6 KB · Views: 89

mike93lx

ALLIANCE MEMBER
Joined
Dec 9, 2013
Messages
37,989
Location
Richmond, VA
It isn't a ridge beam. It is just a ridge board and isn't structural. The boards tying the walls together stop the walls from spreading and the ridge from sagging
 
OP
P

paulsbunion

Active member
Joined
Dec 13, 2021
Messages
34
It isn't a ridge beam. It is just a ridge board and isn't structural. The boards tying the walls together stop the walls from spreading and the ridge from sagging
Ah! That makes more sense now. There are two rafters that look like they've had an "extension" spliced in. Is this something I should be concerned with?
 

Attachments

  • PXL_20220107_191702098.jpg
    PXL_20220107_191702098.jpg
    417.7 KB · Views: 86
To avoid these ads, REGISTER NOW!
Top Bottom