OutlawDrifter
Well-known member
Rudi, your engine bay is cleaner than the exterior of my Z28!
Nice work man!
Nice work man!

 https://flic.kr/p/2jijzrL
 https://flic.kr/p/2jiiheL
  https://flic.kr/p/2jifmEN
  https://flic.kr/p/2jijzsT
  https://flic.kr/p/2jiihdd
  https://flic.kr/p/2jiihcM
 Rudi, your engine bay is cleaner than the exterior of my Z28!
Nice work man!

 https://flic.kr/p/2jmxkHt
 https://flic.kr/p/2jmxkKx
  https://flic.kr/p/2jmxkJR
  https://flic.kr/p/2jmuq4W
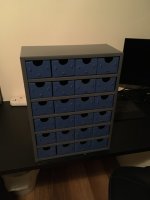
I totally didn’t spend four days sandblasting and painting my nut and bolt bins so they matched my toolbox last off roster....
Rudi, I don't mean to tell a bloke his business, but that steering wheel is on the wrong side.

 https://flic.kr/p/2jpHCWZ
  https://flic.kr/p/2jpHCUe
  https://flic.kr/p/2jpEPDt
  https://flic.kr/p/2jpEPDJ
  https://flic.kr/p/2jpHCVm
  https://flic.kr/p/2jpJQU5
 Rudi, I don't mean to tell a bloke his business, but that steering wheel is on the wrong side.
")
BUT, if I were you I'd take them apart and sand the orange parts with a fairly rough grit to give the surface real "tooth" for a high adhering primer to grab onto. I recently used one from Home Depot (do you have Home Depot there?) to paint some cheap melamine cabinets and its sticking really well! Since it's such a small amount to cover I'd brush it. Possibly a couple coats of the primer then cover with a garden variety enamel like Rustoleum here in the U.S.
Hey mate, hope I'm not too late, but I've got four jackstands you could borrow. I live in Lidcombe. PM me if you're interested.
Yes we do have something similar to Home Depot, called Bunnings. We have age old tradition of going for a famous Bunnings snag, which is going to Bunnings on a Saturday morning to buy weekend warrior gear and supplies, and buying a $2 sausage on bread with onion from whichever little league kids sport team is there selling snags to raise money for their team.
Its part of Australia's rich culture!
Nah, all good brother, my other pair are holding up my second scooby at dads place. I figure i pull my finger out and get the front end finished and on the floor so that's one job done, then i can work on the back.
Rudi.
Rudi;
Nice looking work area you've made, wish mine was half as sorted as yours. Great looking work on the Z, like the color. There are a few of them running around the Chattanooga (TN) area. A long lost friend of mine bought one new (brown) in 1972 and I've always wanted to test drive one. Keep up the good work.
 https://flic.kr/p/2jAVBt8
 https://flic.kr/p/2jAVBsw
  https://flic.kr/p/2jASa9H
  https://flic.kr/p/2jAVQgC
  https://flic.kr/p/2jASMy1
  https://flic.kr/p/2jAX3PT
  https://flic.kr/p/2jASMva
  https://flic.kr/p/2jAWfqK
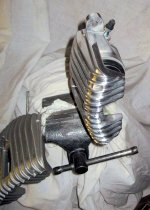
Rudi, I suspect it's illegal down under but I spent more time than I should polishing the aluminum brake calipers on my '87 Corvette.

I like the lighting; you really know how to showcase your work!
Takes a ton of time and effort, I know. I just did the wheels on the S10: 400, 600, 1000, 1500, 2000, 2500 wet or dry sandpaper by hand with some soapy water, then about 10 minutes with a foam cone and a bunch of Mother's, too. Really pitted from brake dust and a lack of care for a couple of years on the street.

how do they deal with factory spacers on dually rigs?
 https://flic.kr/p/2jFK7b7
  https://flic.kr/p/2jFPsAr
 https://flic.kr/p/2jFNCc1
 https://flic.kr/p/2jFL1m4
  https://flic.kr/p/2jFL1kn
 https://flic.kr/p/2jGxSfg
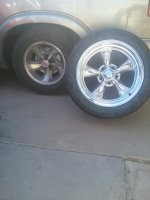
 Rim update
Got 2 weeks off work now... for ... reasons that will become apparent soon..... maybe i can get some more work done, probably not...
Rudi.
Did you sleep soundly before now? Forget it until you know what reaches 12 pounds. Zombieland approaches.....
https://flic.kr/p/2jAVQgC  https://flic.kr/p/2jGT1oo
  https://flic.kr/p/2jJy2Ct
  https://flic.kr/p/2jJCqCT
 Did you sleep soundly before now? Forget it until you know what reaches 12 pounds. Zombieland approaches.....