carolina3418
New member
- Joined
- Feb 1, 2018
- Messages
- 4
I've been lurking and absorbing information for several weeks now, so thanks to everybody for that.
I was initially drawn to Rust Bullet because it seemed to offer a nearly comparable product to epoxy (in terms of pure durability, when done right), while not requiring the same degree of floor prep. I also liked the more "paint-like" application process. I purchased all of my materials from Garage Flooring LLC and started emailing them with questions to make sure I had my floor prepped properly for Rust Bullet. Justin Krauss did a great job of following up very quickly about all of my floor prep questions.
The garage is 420sf and about 8 years old. I'd done nothing at all to maintain the floor up until this point, so it looked like ****.

First thing I did was a Simple Green hose down and deck brush scrub. Justin had advised me that the focus for Rust Bullet prep should be on the porosity of the surface, and I reasoned that if I washed off the top layer of carolina mud, the porosity should check out. After the floor dried out, I threw a 1/4 cup of water down and it just didn't seem to absorb like it needed to

My next step was renting the 3200psi pressure washer from Home Depot, hoping that it could open the floor up enough to achieve a more consistent porosity. The pressure washing didn't really help that much. At this point my mentality changed and I decided I needed to grind the floor and be done with worrying about the porosity. I did the Home Depot floor buffer rental with the Diamabrush attachment. I did a wet grind because I didn't want to spend extra money on dust control equipment.

Wet grinding creates a huge mess and I'd never do it again. I had a pressure washer on hand to help wash out the wet slurry immediately after grinding, and even then the slurry removal wasted hours of my time.
It took the floor several days to dry after the grind/pressure wash combo. Once dry, I realized that the floor buffer had missed a decent amount of surface area on the edges and corners of the garage. Further, the grinding opened up the floor and exposed a number of cracks I had no idea existed. I decided to re-grind edges and corners with the 4.5 angle grinder with the diamond cup attachment. This time around, I spent a little extra time to put together dust collection system:

The next day I repaired cracks with the Simpson strong-tie crack pack product. It's an epoxy filler with the viscosity of olive oil. I used some sand to help fill in and places, mixed with the epoxy.

I sanded those crack repairs the next day and did a final sweeping.

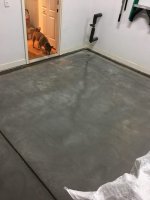
I think it's important to note I did my coating on a Saturday in February in Charlotte, and we had 80 degrees and about 70 percent humidity. I left both garage doors open the entire time I did the project (for the fumes, they are terrible) so it was an accelerated dry time environment. I got the first coat down by about 10:00Am that morning:

I was initially drawn to Rust Bullet because it seemed to offer a nearly comparable product to epoxy (in terms of pure durability, when done right), while not requiring the same degree of floor prep. I also liked the more "paint-like" application process. I purchased all of my materials from Garage Flooring LLC and started emailing them with questions to make sure I had my floor prepped properly for Rust Bullet. Justin Krauss did a great job of following up very quickly about all of my floor prep questions.
The garage is 420sf and about 8 years old. I'd done nothing at all to maintain the floor up until this point, so it looked like ****.
First thing I did was a Simple Green hose down and deck brush scrub. Justin had advised me that the focus for Rust Bullet prep should be on the porosity of the surface, and I reasoned that if I washed off the top layer of carolina mud, the porosity should check out. After the floor dried out, I threw a 1/4 cup of water down and it just didn't seem to absorb like it needed to
My next step was renting the 3200psi pressure washer from Home Depot, hoping that it could open the floor up enough to achieve a more consistent porosity. The pressure washing didn't really help that much. At this point my mentality changed and I decided I needed to grind the floor and be done with worrying about the porosity. I did the Home Depot floor buffer rental with the Diamabrush attachment. I did a wet grind because I didn't want to spend extra money on dust control equipment.
Wet grinding creates a huge mess and I'd never do it again. I had a pressure washer on hand to help wash out the wet slurry immediately after grinding, and even then the slurry removal wasted hours of my time.
It took the floor several days to dry after the grind/pressure wash combo. Once dry, I realized that the floor buffer had missed a decent amount of surface area on the edges and corners of the garage. Further, the grinding opened up the floor and exposed a number of cracks I had no idea existed. I decided to re-grind edges and corners with the 4.5 angle grinder with the diamond cup attachment. This time around, I spent a little extra time to put together dust collection system:
The next day I repaired cracks with the Simpson strong-tie crack pack product. It's an epoxy filler with the viscosity of olive oil. I used some sand to help fill in and places, mixed with the epoxy.
I sanded those crack repairs the next day and did a final sweeping.
I think it's important to note I did my coating on a Saturday in February in Charlotte, and we had 80 degrees and about 70 percent humidity. I left both garage doors open the entire time I did the project (for the fumes, they are terrible) so it was an accelerated dry time environment. I got the first coat down by about 10:00Am that morning:
Last edited: