My garage floor has been ridden hard and put up wet, much like the rest of the garage....The concrete is super slick as well as chipped in many places.
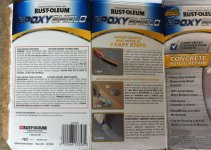
 My reasons for applying epoxy the floor are to make it easy to keep clean and present a finished look to the garage, there are one billion companies that can help with this and I settled on Rustoleum Professional 2 part epoxy. It was within my budget and I could get free shipping if I went through Home Depot (HD from here on). For you guys that are new to epoxies, the Rustoleum Professional is solvent based (about 75% solids as per the data sheet) and HD has it available. There are many other places that stock it. meanwhile, I was busying myself with the not-so-small-matter of floor prep. In retrospect, I should have opted for the shot blaster method, but I had worked with Muriatic Acid in the past and I decided to go with it this time as well. 5 jugs of Acid were purchased from our friends at HD and set off to etch the super smooth, chemically sealed, 35 year old concrete. I used a mix of about 1 to 1 rather than 1 to 3 because more is always better, right? Along with my respirator and gloves, I got busy etching and scrubbing and sweating. 10X10 foot sections proved to be too big because the floor needed so much attention. I had to skinny it down to 5X5 sections and got better results. I rinsed and rinsed and rinsed the
floor when I was finished etching. By the way, you will need a squeegee to get the water out of the garage when you rinse. My super awesome plan to just use a shop broom turned out be a really suckie plan. The next day I went out to the garage only to see many areas that still needed attention if the epoxy was to adhere properly, so off to HD again. I returned with 5 more jugs of Muriatic Acid and repeated the process. This time the floor looked like it had the 150 grit surface that is recommended for good epoxy adhesion.
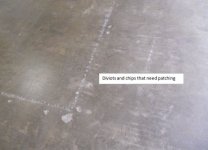
Previous owners had framed out a room in the garage and used a Ram Set for nailing the base plate into the concrete. Needless to say that when I pulled out the nails, they left behind huge divots. There were also 3 larger divots on the other side of the garage.
Enter Rustoleum Concrete Patch and Repair and the extremely efficient folks at Drillspot.com, they had my shipment at my front door in 4 days. Here is what I found when working with the Concrete Patch and Repair. It was approximately 89 degrees on the day I mixed the stuff up and got busy and I'm here to tell you, I had no more than 15 minutes before it got super sticky and hard to work with. I had a friend helping me patch all of the divots and we both ran out of time--so if you think you have even a fairly heavy patch job, get two boxes of this stuff---I was about to learn that the hard way. We ended up not finishing all of the divots and the Patch and Repair was applied way to thick in a few spots. No more than 2 hours after
we finished, this stuff was HARD AS A ROCK! I was very happy with how tough this stuff is. Just one problem. How do I remove the excess we left behind in our haste to finish? I can tell you that 60 grit and 40 grit and 20 grit won't work. I can also tell you that a 6" angle grinder with a wire wheel won't work either. I found a wheel make of rock at HD that fit the angle grinder and this thing got the job done: Beware if you are not somewhat experienced with grinders! This rock will get down into the concrete if you don't keep it moving--I mean don't even think about keeping it in one spot for a second!
All was going so well until I noticed a tube of dirt quietly running from the floor and up the base plate into the wall. Yep Live Termites! Glad I found them before they chewed the house up, but damn, this project is now in its 5th week of prep.
A good friend of mine is in the Termite Killin' Business so he told me to hang tight and he would be over on Saturday morning to handle the issue.
We drilled the garage floor along the affected areas and treated the outside of the garage wall where the termites were coming from. Job done..but wait a second, I now have to fill the holes we drilled. Yet another go around with the Concrete Patch and Repair. Quick note here: Don't use plastic wide knives for this, the metal ones will leave a much better finish.
Well, since the last paragraph in this story, 4 months have passed and there is no epoxy on the floor. Why?, because we have very hot summers here in Dallas and the Rustoleum tech line (they are really great to work with) said that any constant temperatures over 90 degrees can be an issue. It was already getting into the high 90's and in a week it would have been in the 100's. So my Spring project turned into a Fall project.
Why not do some more floor prep? Isn't more always better??? My friend loaned me his nice 2,550 PSI Power Washer and I got busy with it and was absolutely shocked at how much **** was powered out of the concrete. I'm standing on the un-power washed part and the dark areas have been washed.

I am sure that some of you are wondering why I have gone to so much trouble on the floor prep and here is why: Because I read all of these posts that feature failed epoxy jobs and the root is usually bad/half@ssed prep and I don't want to be the reason my floor would fail. I hit the concrete twice with the power washer which has about a 2inch wide swath at the end of the wand, imagine how many passes it took to do a 550 square foot garage. Once I squeegeed off the floor I took a quick PH test that showed a 7 in 3 different areas, I got the fans blowing on the wet base plates and closed the door. It was Tuesday, I planned on applying epoxy on Sunday.
I woke up on Sunday at 6:00 AM and got busy sweeping and cleaning the floor, it was finally epoxy day. One of the questions that never seem to get answered here is "How much epoxy do I need?". Sorry to report that I will not be able to help you with this either. I was convinced that 1 and a quarter kit would do it, my wife said mix them both, my friend said 1 and a half---we went with mixing up both because we would rather have too much than not enough. I was surprised to see that we were almost out of epoxy when we got to the end. Now understand that I used a 3/8 nap roller and we put it down heavier than most people do and it took every bit of the two kits to cover 550 feet of garage floor.
 I will also need another coat because my inspection Sunday afternoon showed it to be thin in a couple of areas and I'd rather not have it thin.
The last coat went down like budda'! Even though I was solo on this one and it went much faster than the first coat, one gallon covered the floor and I also applied the glow in the dark chips that I got from Epoxy-Coat (http://www.epoxy-coat.com/flake_colors.php). Just a note that I should have mentioned earlier: The fumes that this epoxy gives off will stun a Mastodon so make sure you have enough ventilation when you roll this stuff. Also, if you have a drip or two that you don't catch before you are "done" rolling, wait a few hours and the epoxy will be dry enough to walk on with sock feet. At this point the drips can be removed with a razor blade. Lay it as flat to the concrete as you can and gently cut it off. Use your finger to "sand' it smooth. if you have a good touch they are really hard to spot when you are done.
The coolest part of this project by far was my first look at the glow in the dark chips. Seeing a garage floor glow in the dark is just not something you see very often. It really was worth the extra 30 bucks for the chips. I used an 8" wide knife and scraped the entire floor. This step took down any chips that did not lay not flat and got the floor ready for clear.
4 days later on and it's time for the clear coat. Let's talk Shark Grip (SG from here on). It's primary purpose is anti-skid but I also noticed how it breaks up glare. Since I am not after a mirror finish, I decided to use the SG not only as an anti skid additive but as a method to reduce glare on the concrete.
I used two kits of clear. Mixed them together with 2 bottles of SG. Many posters have mentioned that SG will sink to the bottom of the paint tray so I stirred it every time I filled up a tray. I started rolling it on with the able assistance of Jeff "The Radio Sniper". I have to echo the comments of other posters in saying that you will indeed play hell trying to find your wet edge. It would have helped if I had a flashlight with me (hint hint). The clear coat fumes are not as bad as the epoxy fumes even though I could still taste that smell every once in a while the next day at work. Just make sure you have plenty of ventilation where you are rolling.

It was 4 months in the making, countless hours of scraping and filling and grinding, a termite treatment, waiting out a 105 degree summer, rearranging my tool boxes and workbench from one garage into another--TWICE, days upon days of "Dry Time" and in the end it was lot of fun. I learned to buy more than you think you will need and be prepared to encounter setbacks along the way.
Now I'll see if all this work pays off. I plan to put this epoxy to the test often and I will update the post as time goes by.
I need to thank Jayman and Jeff "The Radio Sniper" for taking time to help me on this project, I could not have done it without you guys. I have to say that the Rustoleum tech line folks were great, except one lady that was about as excited to be at work as the guy who shovels elephant dung at a circus. Everyone else was very knowledgeable and extremely helpful.