

My Rustoleum Experience
If a 17 yo could do it YOU can If you have time and patience..
Parents bought 2 kits of the professional epoxy and a kit of premium clear coat from rustoleum. We have a 400 sq ft garage TOTAL SPENT: 2 epoxy + clear =294 w/o tax
TOTAL w/ materials under $400 WEEKS spent: 3
After researching about preparation, I realized this was the MOST important step for a successful application. Starting June 3, the task of removing clutter from the garage was time consuming and tiring. Working by myself, i managed to empty the garage with the exception of a the heavy cabinets and toolboxes. With the help of my dad, we emptied the garage. What i didnt expect was the amount of mice droppings. They were above average droppings suggesting they were genetically mutated by the mess in our garage haha. After i did the moisture test with the plastic bag method and it passed
I bought the Behr Cleaner and degreaser and cleaned the garage. TEDIOUS WOrK!! For roughening the surface to ensure the epoxy bonds, i discovered there were sandblasting method, but i opted for a 1:3 ratio of muriatic acid to water... instructions said muriatic acid (pour acid into water not the other way around). I did this 2x because the first time it was not rough enough. What i didnt expect was the floor to become dirtier. .SO I pressure washed every inch of the garage again and dried with a squeegee make sure you get one!make sure you rinse the acid a minimum of 3x Let dry for one week.
I bought the rustoleum patch kit but the bad thing is my ******* mixed the both of the containers and with only a 30 minute working time, i found myself down to the wire filling the holes and cracks. Cure time is 8 hrs.
Sadly my family was busy on that weekend so i had to wait another week. Come Monday, i rinsed the floor again this time with a hose not pressure washer to get rid of the dust before working on it FRIDAY SATURDAY SUNDAY
Now the fun part, Friday. I woke up at 10:00am to prepare. Sweeped the garage 2x and used an air compressor to blow out the remaining dirt. Lay down a tarp in front of your garage to have a working space. First i mixed the activator then the base with a drill attachment. Then poured both into a 5 gallon bucket. IT was 69F in the garage so i had to wait an hour to sit not the 30 minutes for temps 70 and above. After an hour it was time. The epoxy is not like paint, its glue like... If you want to SAVE money, clean the drill attachment with acetone. I had my mom clean it while i started cutting in. Once she cleaned it, MY dad mom and I cut in first. Eventually first coat is done in about 2 hrs. unevenness in first coat
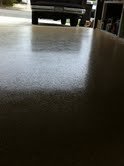
SAturday prepared the materials on the tarp... mix the epoxy(2-3min) let sit for an hour. After the time passed mix again. A second coat is a MUST IMO to achieve uniform coating in the garage. MY dad and I cut in like last time then rolled. This time i put the flakes in the epoxy while my dad rolled the epoxy. YOu will have a lot left over at least in my case i had a fourth left over. I didnt squeegee and backroll i simply dipped the roller in the 5 gallon bucket. Spreading the flakes was challenging to get a uniform coverage. Luckily you receive 2 bags of flakes each kit so i had 4 total and put it all in a Ziploc gallon bag. Working along with my dad, we eventually finished the garage. But i still had a lot of flakes left. Spikes are a MUST to walk on wet epoxy. i improvised with track shoes walking on my tippy toes because there are no spikes on the heel. I suggest you buy spiked shoes or lawn aerator shoes..
Now Sunday. time for clear. I sweeped and used the air compressor to blow out the remaining flakes Make sure you have a light to see the clearcoat coverage. i had my 12 yr old brother hold a light for me
Clear is runnier than epoxy.I poured into a 5 gallon bucket. Dipped the roller in the 5 gallon bucket and spread clear. Did pour anti skid but it settles on the bottom.. use a paint tray instead
TIPS
I used blue painters tape and sealed tape with white acrylic caulking. Achieves straight lines... you could also use duct tape.. pull when epoxy is wet
buy 5 gallon bucket. I bought 2 one for epoxy one for clear... after i was done with first coat i cleaned the bucket with acetone
buy spiked shoes
Always wear a respirator!!!!
HAve a box of gloves
Charge drill before use
plenty rollers and brushes epoxy destroys these
HAve a tarp for working space
Place to store your tools and such
Have an electric fan
MATERIALS
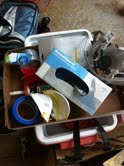
gloves, squeegee, spiked shoes, drill mixing attachment, 2 kits of epoxy rustoleum professional, 1 kit of clear- coverage 500 sq ft. 3/8 nap rollers- i used 4- 2 rollers on first coat and 1 on the second coat and 1 for the clear, brushes, acetone
I would like to thank the forum for providing me with the most helpful tips and advice. PREP IS EVERYTHING. Tell me how you think i did")
NEXT PROJECT
Painting the garage walls
If a 17 yo could do it YOU can If you have time and patience..
Parents bought 2 kits of the professional epoxy and a kit of premium clear coat from rustoleum. We have a 400 sq ft garage TOTAL SPENT: 2 epoxy + clear =294 w/o tax
TOTAL w/ materials under $400 WEEKS spent: 3
After researching about preparation, I realized this was the MOST important step for a successful application. Starting June 3, the task of removing clutter from the garage was time consuming and tiring. Working by myself, i managed to empty the garage with the exception of a the heavy cabinets and toolboxes. With the help of my dad, we emptied the garage. What i didnt expect was the amount of mice droppings. They were above average droppings suggesting they were genetically mutated by the mess in our garage haha. After i did the moisture test with the plastic bag method and it passed
I bought the Behr Cleaner and degreaser and cleaned the garage. TEDIOUS WOrK!! For roughening the surface to ensure the epoxy bonds, i discovered there were sandblasting method, but i opted for a 1:3 ratio of muriatic acid to water... instructions said muriatic acid (pour acid into water not the other way around). I did this 2x because the first time it was not rough enough. What i didnt expect was the floor to become dirtier. .SO I pressure washed every inch of the garage again and dried with a squeegee make sure you get one!make sure you rinse the acid a minimum of 3x Let dry for one week.
I bought the rustoleum patch kit but the bad thing is my ******* mixed the both of the containers and with only a 30 minute working time, i found myself down to the wire filling the holes and cracks. Cure time is 8 hrs.
Sadly my family was busy on that weekend so i had to wait another week. Come Monday, i rinsed the floor again this time with a hose not pressure washer to get rid of the dust before working on it FRIDAY SATURDAY SUNDAY
Now the fun part, Friday. I woke up at 10:00am to prepare. Sweeped the garage 2x and used an air compressor to blow out the remaining dirt. Lay down a tarp in front of your garage to have a working space. First i mixed the activator then the base with a drill attachment. Then poured both into a 5 gallon bucket. IT was 69F in the garage so i had to wait an hour to sit not the 30 minutes for temps 70 and above. After an hour it was time. The epoxy is not like paint, its glue like... If you want to SAVE money, clean the drill attachment with acetone. I had my mom clean it while i started cutting in. Once she cleaned it, MY dad mom and I cut in first. Eventually first coat is done in about 2 hrs. unevenness in first coat
SAturday prepared the materials on the tarp... mix the epoxy(2-3min) let sit for an hour. After the time passed mix again. A second coat is a MUST IMO to achieve uniform coating in the garage. MY dad and I cut in like last time then rolled. This time i put the flakes in the epoxy while my dad rolled the epoxy. YOu will have a lot left over at least in my case i had a fourth left over. I didnt squeegee and backroll i simply dipped the roller in the 5 gallon bucket. Spreading the flakes was challenging to get a uniform coverage. Luckily you receive 2 bags of flakes each kit so i had 4 total and put it all in a Ziploc gallon bag. Working along with my dad, we eventually finished the garage. But i still had a lot of flakes left. Spikes are a MUST to walk on wet epoxy. i improvised with track shoes walking on my tippy toes because there are no spikes on the heel. I suggest you buy spiked shoes or lawn aerator shoes..
Now Sunday. time for clear. I sweeped and used the air compressor to blow out the remaining flakes Make sure you have a light to see the clearcoat coverage. i had my 12 yr old brother hold a light for me
Clear is runnier than epoxy.I poured into a 5 gallon bucket. Dipped the roller in the 5 gallon bucket and spread clear. Did pour anti skid but it settles on the bottom.. use a paint tray instead
TIPS
I used blue painters tape and sealed tape with white acrylic caulking. Achieves straight lines... you could also use duct tape.. pull when epoxy is wet
buy 5 gallon bucket. I bought 2 one for epoxy one for clear... after i was done with first coat i cleaned the bucket with acetone
buy spiked shoes
Always wear a respirator!!!!
HAve a box of gloves
Charge drill before use
plenty rollers and brushes epoxy destroys these
HAve a tarp for working space
Place to store your tools and such
Have an electric fan
MATERIALS
gloves, squeegee, spiked shoes, drill mixing attachment, 2 kits of epoxy rustoleum professional, 1 kit of clear- coverage 500 sq ft. 3/8 nap rollers- i used 4- 2 rollers on first coat and 1 on the second coat and 1 for the clear, brushes, acetone
I would like to thank the forum for providing me with the most helpful tips and advice. PREP IS EVERYTHING. Tell me how you think i did
NEXT PROJECT
Painting the garage walls
Attachments


Last edited:


