To avoid these ads, REGISTER NOW!

S.o.s.

holleyrj

Active member
Joined
May 4, 2012
Messages
38
Location
Alabama
Alright fella's, y'all got a Newb In Distress call. I picked up this old machinist chest for almost nothing at that flea market. What caught my attention was it was all there, it all worked very well and there was very little damage. I'm wanting to restore it to some degree of "original, and I need directions to parts and threads and advice, and this looks like the place to be. I'm ignorant, but I ain't stoopid :) So any help will be appreciated...
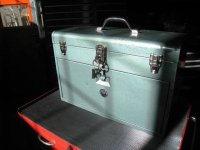
!st off, what exactly is it ? Ive been told its a Kennedy, but there are things that give me doubts. The Green wrinkle paint, the draw latches and the little round drawer pulls...
(1) Is it Kennedy ? A Kennedy built Craftsman or what ?

(2) I want to remove the latches to paint, so where can I find information on how to replace them? They're pretty rough, so rather than trying to salvage the old ones, I'd like to go with new. I have no idea where to find the correct latch or how to install new hardware, any info, linked tutorials and stuff like that would be huge for me.

(3) I got the paint job covered, I just don't know where to find the correct paint, and does anybody know what color green that is ?

To me, the chest is in fine shape, everything functions, the drawers all shut tight and open easily. The lid shuts square and tight and latches down like new. The whole project just screams restoration (to me).
It had several coats of grey rustoleom, or some type of heavy enamel, badly applied over some really tough primer. Once those layers were peeled away, the original paint, that green wrinkle color, was 90% complete, I don't know why they painted it. Old, what looks like pool table felt, was roughly glued down inside and had rotted. That's gone, revealing some light, spotty, surface rust. Im ready to start disassembling the rest. I need help guys. I know this has probably been discussed to death and theres links and threads all over the place answering my questions, if y'all could point me in the right direction, I'll pick up the trail and take off. Thanks in advance for ANY help you can give :)

idad77.jpg

r1hst3.jpg

ztkt5.jpg

343q25f.jpg
 
Last edited:
To avoid these ads, REGISTER NOW!

Warrenator

Well-known member
Joined
May 31, 2008
Messages
781
Location
Newberg, OR
I just did the same project on my similar but wider drawers swap meet Kennedy box. 25 bucks. Mine was pretty rusty under the felt, I ended up soaking the felt in warm water and scraping with a putty knife to remove felt. Sandblasted the insides of drawers to remove the last bit of rust then repainted with rustoleum inside the drawers. I decided the outside was good enough to leave alone, then I just replaced the felt with cork sheets. I like the cork better than felt for padding machinist tools (micrometers and rulers and dividers and such)

Kennedy I think sells some parts. Might look there.... they have a brown wrinkle finish paint. http://www.kennedykeys.com

I think it is OK to change the color, change the drawer pulls, make it your own. Mine has the original green wrinkle paint on the inside but had a brown wrinkle paint on the outside. Not nuts about the brown, the green is just right though. Mine has the last owners "patina" of brown and grey paint worn by years of use, which is cool in its own way. I just fixed the rusty spots and left the rest alone for character.
 
OP
H

holleyrj

Active member
Joined
May 4, 2012
Messages
38
Location
Alabama
Kennedy I think sells some parts. Might look there.... they have a brown wrinkle finish paint. http://www.kennedykeys.com

I think it is OK to change the color, change the drawer pulls, make it your own. Mine has the original green wrinkle paint on the inside but had a brown wrinkle paint on the outside. Not nuts about the brown, the green is just right though. Mine has the last owners "patina" of brown and grey paint worn by years of use, which is cool in its own way. I just fixed the rusty spots and left the rest alone for character.

Thanks man, I been looking at Kennedy site. I think my biggest fear are the latches. I've never used rivets like those and not really sure "how to". I haven't decided what to do with the inside yet, or what to actually use the box for. But for $20 bucks, I wasn't passing it up. :thumbup:
 

dale500

Well-known member
Joined
Jun 5, 2012
Messages
137
I've seen that color on a "sears" branded box before. It was a regular 26 inch six drawer top box with "sears" stamped in the face of the bottom drawer. I'm not sure about the age of his box but I would guess it was from the 70's. He got it sometime in the 80's used.
 
OP
H

holleyrj

Active member
Joined
May 4, 2012
Messages
38
Location
Alabama
I've seen that color on a "sears" branded box before. It was a regular 26 inch six drawer top box with "sears" stamped in the face of the bottom drawer. I'm not sure about the age of his box but I would guess it was from the 70's. He got it sometime in the 80's used.

Thanks for the info Brotha, I saw several of those Sears boxes online and was thinking that's what I had too, but I never saw one with the third, center, keyed latch. The ones that did have the center latch all had rectangular shaped pulls on the drawers, where my box has little round ones, LIKE A CRAFTSMAN lol. At that stage of my searching, I was basically looking for Manufacturer and models numbers and I still haven't seen anything that satisfies me 100%. I know I'm over thinking it, that's just how I am. I'm hung up on the paint color too. I got gallons of Craftsman and Mac / Snap-on reds and I just don't want to paint it RED... Looking for the correct green today. :) Oh, and the tag at the flea market read "Vintage 1960's Tool Chest". Ive run Google ragged looking for one just like it...
Google - 1,000,000,000 - Jeff - 0
 

FJ 432

Well-known member
Joined
Aug 2, 2010
Messages
3,723
Location
Littleton Colorado
See if this matches:
 

Attachments

  • WL.jpg
    WL.jpg
    50.2 KB · Views: 107
  • WL2.jpg
    WL2.jpg
    38.2 KB · Views: 145
  • WL3.jpg
    WL3.jpg
    52.3 KB · Views: 115
  • WL4.jpg
    WL4.jpg
    53.5 KB · Views: 85
OP
H

holleyrj

Active member
Joined
May 4, 2012
Messages
38
Location
Alabama
Paid 60 for mine but I think I have you on condition. :thumbup:

$60 bucks as is ? !!! Dude... :) :thumbup:
I need latches and paint and Im on my way. I need to learn about installing those latches. I'm afraid I'll get in over my head. I'm stoked now lol.

I cant read the Badge info, is that a model Number ? Or do you know it ? When it was built ? It is identical to mine, very cool :)
 
Last edited:

FJ 432

Well-known member
Joined
Aug 2, 2010
Messages
3,723
Location
Littleton Colorado
If I can do it anyone can. Here's an older Craftsman that I restored in 2010 using a different color scheme that I had powder coated. Ya just got to find the time. Good luck.
 

Attachments

  • Craftsman Machinist.jpg
    Craftsman Machinist.jpg
    47.3 KB · Views: 91

gearhead1

Well-known member
Joined
Oct 14, 2013
Messages
1,935
Location
NC
I have a box that looks like it but the metal Nameplate says SK Wayne. Did Waterloo make them for SK?
 

espyking83

Well-known member
Joined
Jan 31, 2014
Messages
1,690
Location
Hell hole of a King Air 200
Paint looks like a Kennedy on the inside for sure. Never seen those knobs on a Kennedy or a Craftsman. Im only 32 though, and Kennedy made boxes for a lot of people. Kennedy is still a Kennedy regardless, LOL. My favorite boxes.
 
OP
H

holleyrj

Active member
Joined
May 4, 2012
Messages
38
Location
Alabama
It's cleaning up nice so far. I'll try and get home and work on the drawers and slides tonight. Shopping for new hardware is making me a little mental though. I'm on the right track I think, thanks to some great help and advice from you guys. Thanks :beer:
4hfebk.jpg

33ehdl1.jpg

2uftzzt.jpg
 

MoonRise

Well-known member
Joined
Nov 5, 2010
Messages
4,027
Location
NJ
That original green 'wrinkle' paint looks -awfully- close to some Rustoleum green Hammertone paint.

Just saying. :D
 
OP
H

holleyrj

Active member
Joined
May 4, 2012
Messages
38
Location
Alabama
That original green 'wrinkle' paint looks -awfully- close to some Rustoleum green Hammertone paint.

Just saying. :D

IT DOES ! lol Hammer finish "Verde Green". Also Grizzly makes a "Grizzly Green" that's almost identical too. I'm studying on both as we speak ;)
:thumbup: Thanks, good looking out.
 
To avoid these ads, REGISTER NOW!

jim

Well-known member
Joined
Feb 26, 2005
Messages
284
Location
wi
I do some tool box restoration but have never taken off the original latches because I could never match the original rivets. Looking forward to see how you are going handle that. Following along. Jim
 
OP
H

holleyrj

Active member
Joined
May 4, 2012
Messages
38
Location
Alabama
I do some tool box restoration but have never taken off the original latches because I could never match the original rivets. Looking forward to see how you are going handle that. Following along. Jim

I stand a better chance of running into Bigfoot at the Walmart Deli, than I do matching the rivets, then affording the tool to install them lol. I didn't think that far ahead :dunno: Its looking like I'm gonna have to use a machine screw, with a nut... Or something of that nature :headscrat

<edit> I actually found the rivets, but can't, or not going to, fork out the money right now, for the proper tool. So, I'm working on plan B.
 
Last edited:
OP
H

holleyrj

Active member
Joined
May 4, 2012
Messages
38
Location
Alabama
I did get a little work done on the drawer fronts. They're slicking down nice after some minor peening and sanding. I'm going to shoot the inside of them with some black bed liner. Got to work on the original pulls. They're in about as bad shape as the latches were, so I dont know if they'll make the cut or not. I did manage to locate the correct latches and ordered them. So, I'm pushing forward.
ic7j1u.jpg
 
OP
H

holleyrj

Active member
Joined
May 4, 2012
Messages
38
Location
Alabama
Nice box, but I've never seen those pulls on a Kennedy. Looks like it could be a Union to me.

Thanks, I thought so too :)
We've determined that it's a Waterloo... As usual, I jumped in with both feet, full steam ahead, without first getting more accurate information on the latch rivets. The latches, as you can see in the other pics, were, in my opinion, beyond rescue. At least with my limited access to the right tools. A bead blast might have saved em, then some paint, but I wanted new, so I drilled em out and ordered new latches without fully understanding what would be required to re-rivet. So, I'm kinda stuck with what I got for now. But, its a fun project, and It's going to look nice when I'm done. Its for my own personal use anyway, so as long as I'm happy with it...Right ?
 
OP
H

holleyrj

Active member
Joined
May 4, 2012
Messages
38
Location
Alabama
I was able to get the insides of the drawers, and chest painted last night. I sprayed them with Rusto Truck bed liner. I like that stuff. The pics show the drawers still a little wet, but they gassed out and dried really nice and even.

21al37p.jpg

smpmie.jpg

2cy39n8.jpg


The drawer slides needed a little work. The steel catches had rusted and even though the drawers functioned pretty good, they were grungy and needed a good scrubbing. I just about got that done, will finish it up over the weekend.

142eh69.jpg


I'm happy with the way this is coming along. I'm waiting on my new hardware and green paint to be delivered so I can start putting this back together. I think its gonna look nice when its all done. Since I had all the stripper and prepping materials already in the shop, I'm gonna end up with around $80 bucks in the whole project. That's including the $20 bucks spent on the box itself. So, I think I'm doing good so far.
 

larryq

Well-known member
Joined
Jul 12, 2011
Messages
2,421
They had exactly what I wanted, thanks for the heads up :rocker:

More than welcome, your restore is coming along great--- it's obvious you've put in a lot of time, the final product will be something to see! Keep us posted.
 
OP
H

holleyrj

Active member
Joined
May 4, 2012
Messages
38
Location
Alabama
I looked at several different alternatives to replace the small pulls. The original ones were just too far gone to re-use. I like these. They're available and easy and inexpensive and I think they'll do just fine.

156zfau.jpg
 
OP
H

holleyrj

Active member
Joined
May 4, 2012
Messages
38
Location
Alabama
More than welcome, your restore is coming along great--- it's obvious you've put in a lot of time, the final product will be something to see! Keep us posted.

Waiting on that green paint to get here... :rolleyes: Got tired of waiting on Waterloo to respond. Grizzly wanted way too much, for way too little. I went with the Rustoleum Hammer finish "Verde Green", its very very close. It should be here sometime late this week and I can wrap this up.
 

Jarhead0408

Well-known member
Joined
Apr 1, 2012
Messages
5,733
Location
Who knows?
Nice! Boy is this ever the hread for me!

Back in 2008/09 (pre-GJ for me!) I picked up a beat up old tool box for the grand sum of $0.25. Yep. 25-cents! After joining the GarageJournal I realized I had lucked into an old Kennedy (identical to yours in configuration).

It's pretty rough though. I think I'll use your thread as a guide to restoring my own. Thanks!
 
OP
H

holleyrj

Active member
Joined
May 4, 2012
Messages
38
Location
Alabama
Nice! Boy is this ever the hread for me!

Back in 2008/09 (pre-GJ for me!) I picked up a beat up old tool box for the grand sum of $0.25. Yep. 25-cents! After joining the GarageJournal I realized I had lucked into an old Kennedy (identical to yours in configuration).

It's pretty rough though. I think I'll use your thread as a guide to restoring my own. Thanks!

Well, while I certainly appreciate your enthusiasm, I must say, this was a first for me and I've had to figure this out pretty much on my own, one step at a time. I have had some advice and tips passed along by other members, that was a great help. There are other threads here, posted by guys a lot more experienced at this than me, and from what I've seen and read, are having amazing results.
I hope you continue to follow along, because I'm having a lot of fun with this thing and I cant wait to get it finished up. My new hardware should be here today and I'm expecting my paint to be delivered this weekend, so I hope to be wrapping this one up soon, and start another one. I'm wide open to hints, suggestions and comments, so please, feel free to pitch in. :thumbup:
 
Last edited:

gonmad54

Well-known member
Joined
Jun 12, 2015
Messages
193
Location
Temecula, CA
Loving this thread! I have the same box that my dad used when he raced motocross back in the day and I have wanted to restore it. Reading this has inspired me to actually start cleaning it up. Looking forward to some details when you go to paint it. I have about zero experience with painting so I will be taking notes! Keep up the good work.


Sent from my iPhone using Tapatalk
 
OP
H

holleyrj

Active member
Joined
May 4, 2012
Messages
38
Location
Alabama
Absolutely.

Any chance you could throw up some links on the hardware?
I searched maybe a million links looking for the latches. Theyre everywhere. A member here shared this link with me. They had exactly what I wanted, at a very fair price, and they shipped really quick. These match almost identical to what came on the box....
http://www.hardwareelf.com/elf/latchesandlocks.jsp

52lv85.jpg


The small pull knobs I just made up. I was in Lowe's, digging through the nut and bolt bin for some screws for another project, and saw these little #8 knurled knobs. They're brass and don't match the nickel finish of the latches, but I think they're kinda cool, neat looking, so I'm going to use them.
w1pdmc.jpg

http://www.lowes.com/pd_137192-37672-880461_0__
 
OP
H

holleyrj

Active member
Joined
May 4, 2012
Messages
38
Location
Alabama
I had zero problems with the rivets. My local fastener shop had'em by the pound. My problem was not being prepared on my end. I dont have the proper tool to fasten the rivets. So I decided I'd just go buy the proper tool... :shocking: WOW ! They are proud of those bad boys. One with enough reach and versatility for use on future projects, just wasn't in my budget right now. The old ones had to come off, they were sad as you can see. But I cant see spending the money right now on a rivet tool. SO, I've decided to use a machine screw with a lock washer and nut. I have those by the pound myself. I took your standard zinc coated, pan head machine screw and polished the head with a little Mothers Mag wheel polish and now they match the nickel finish on my new latches perfectly. I'll post some pics showing a test fit tonight. Its really coming along nicely. The new latches fit perfectly so I don't have to fill holes or drill new holes, every thing lines up perfect. NOW if that dang paint will just get here, I can wrap this up. I'll keep you guys posted as it develops. :thumbup:
 
OP
H

holleyrj

Active member
Joined
May 4, 2012
Messages
38
Location
Alabama
Loving this thread! I have the same box that my dad used when he raced motocross back in the day and I have wanted to restore it. Reading this has inspired me to actually start cleaning it up. Looking forward to some details when you go to paint it. I have about zero experience with painting so I will be taking notes! Keep up the good work.


Sent from my iPhone using Tapatalk

This is actually my second box re-do. The first was an old Craftsman Rally box that I inherited from my Paw in Law. It was a simple paint job and done. That was about 10 years ago, and its back on the bench for an upgrade. I have a few ideas rattling around in my head for a new paint scheme. I'll post up some pics later. Thanks for stopping by, I appreciate your interest. :beer:
 
To avoid these ads, REGISTER NOW!
Top Bottom