To avoid these ads, REGISTER NOW!

Sagging Garage door header

christopizza

Well-known member
Joined
Dec 3, 2010
Messages
129
Location
NC
I have a tendency to over do things... so I thought I'd run this by the group.

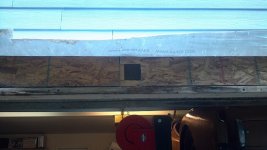
I have a 16 foot span on my garage door - it appears to be sagging approximately 3/4 of an inch in the center.

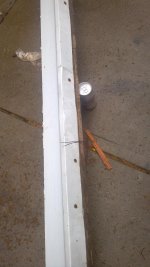
The garage is 10 years old. I pulled down the trim as I had some pine borer beetle holes in the trim that had started to rot.

It's raining now and the underside of the beam is dry - so I don't believe I have a leak there.

Should I replace/investigate the 3/4 sag by removing the rest of the trim - or does general consensus think 3/4 inch sag over 10 years is not enough to mess with?

Thanks

Chris
 

Attachments

  • sag beam.jpg
    sag beam.jpg
    29.6 KB · Views: 261
To avoid these ads, REGISTER NOW!

JamieK

Well-known member
Joined
Aug 13, 2009
Messages
1,760
Location
Winston-Salem, NC
Does it interfere with the operation of the garage door? As long as the door operates and still seals, then I wouldn't worry about it. Fixing it may cause more problems and cost money. Check it again in a few years, though.
 

KELLHAMMER

Well-known member
Joined
Nov 20, 2006
Messages
222
Location
south eastern pennsylvania
How did you measure the sag? I would pull a level string line from corner to corner and check. The standard I would expect to see is that the header sag should not exceed l/360 for the span.

If the span is 16 foot, convert to inches and divide by 360

16X12 = 192" / 360 = .58" or 9/16" Under total load 9/16" of sag is considered acceptable.

10 years is a good measure of it's performance. If everything else is normal. Infestation or rot could cause a structural member to fail slowly over time
 

Steevo

Well-known member
Joined
Aug 18, 2009
Messages
8,738
Location
43.49600, -112.04300
You could always buy a 12" x 16' piece of 1/2" steel plate, jack up the center, and lag bolt it to the header, just to make it look straight.
If you don't see any evidence of beetle or water damage to the header beam, I would not go to the expense of straightening it.
 

nehog

Well-known member
Joined
Jan 2, 2010
Messages
7,935
Location
Jaffrey, NH
You could always buy a 12" x 16' piece of 1/2" steel plate, jack up the center, and lag bolt it to the header, just to make it look straight.
If you don't see any evidence of beetle or water damage to the header beam, I would not go to the expense of straightening it.

Well, that steel will weigh almost 350 lb, wonder if it might sag more than the wood does? :headscrat

I think the answer might be to use titanium and not steel. :beer:
 

tcianci

Well-known member
Joined
Feb 7, 2009
Messages
4,242
Location
Walpole, Ma
A couple of things. You can't see too much from the picture but the door appears to be in the gable end of the building. If it is and there's a 2nd floor to the structure, there is probably a carrying beam that runs perpendicular to the gable wall. The 2nd floor joists sit on that beam. That beam, unless it's an engineered unit that spans from the front of the garage to the back is probably only bearing 1/4 to 1/3 of the 2nd floor load on the header. If 3/4 inch is what you have seen in 10 years you are probably not too bad off even though it does exceed the accepted 1/360th of the span deflection. If there is no 2nd floor I would'nt worry about a thing since there is practically no weight on that header in that case. You don't specify if the door header is engineered lumber or dimmensional lumber. Dimensional lumber is "plastic" and it will take a set over time, or who knows, it may have never been installed with the "crown" up and it's been more or less heading in the wrong direction since it was put in.

You could jack the header and plate it with some steel, but it's kinda a PITA to do unless you can simply lag it to the inside of the header. If you do that, crown the existing header a good quarter inch minimum before you fasten the plate, that way when your remedial steel assumes the load you should end up pretty much flat. And dont worry about the weight of the plate, the biggest problem with what the plate weighes is talking enough of your buddies into coming over to heft the thing into place.

And, if you have the trim off anyway, shim the left and right ends of the trim down so that the thing looks straight regardless of the header sag.
 
OP
C

christopizza

Well-known member
Joined
Dec 3, 2010
Messages
129
Location
NC
Thanks for all the replies.

The door is in the gable end and it supports a bonus room above - very little furniture up there - just a couch and coffee table in the middle of the room and some storage at each eave behind the knee walls. i.e - not a lot of weight up there.

I went out to take some better measurements and got my taller ladder - I did not like what I saw.

There is flashing on top of the trim. All bent around nicely - but it does not go under and behind the siding. It looks like they forgot to flash this before they sided the garage and just stuck a piece of tin up there.

It looks like water can run down the siding and under this flashing and who knows where else. I'll be removing the rest of the trim this morning and take some pics.

Also - due to the sag in the beam, it looks like the siding **** joints are opening up a bit and adding more ways for water to get in - looks like some caulking is in my future (after I determine that the header is intact).

Thanks again,

Chris
 

Attachments

  • picbeam.jpg
    picbeam.jpg
    27.8 KB · Views: 105
  • trim sketch.jpg
    trim sketch.jpg
    18 KB · Views: 89

BWS

Well-known member
Joined
Sep 3, 2006
Messages
923
Location
Mnts of Va
Keep checking.....think about how the thing was built originally.The header went in first....might've had a bit of sag but,any upper framing "should've" been installed straight.Sooooo...take a string and check the next floor.That might be a check?Really try to get an understanding how the thing was designed.....look for load points that "may" not've been consider'd during the build.Keep looking for possible reasons for its occurance.

Possibly,get a pro to come over and give you a price on replacing the header.Just be straight up with him though......explaining that you aren't so much price shopping as you are just getting an idea about general costs involved.And if its something he'd be interested in doing....sometime "down the rd"?Good luck,BW
 
To avoid these ads, REGISTER NOW!

383

Well-known member
Joined
Aug 14, 2011
Messages
1,230
Location
Harrisonburg, VA
It's hard to tell from the pictures, but your bonus room is probably built with attic trusses, so very little load would be on the gable end over the door. Since this isn't a load bearing wall, I like the idea of shimming the ends of the trim to make it look straight unless you find water damage when you remove the rest of the trim. Good luck!
 

Zeke

Well-known member
Joined
Aug 13, 2009
Messages
17,176
Location
Long Beach CA, the sewer by the sea.
I think you're got the right idea on the flashing. I'd shim the trim on the reinstall so it's straight and call it good. You could always plane the bottom straight if you own a planer. Doing it by hand would be a *****.
 
OP
C

christopizza

Well-known member
Joined
Dec 3, 2010
Messages
129
Location
NC
I think I'm ok. Here's what I found this morning.

Remaining trim came off in one piece and without damage. My Harbor Freight pry bar did a nice job - just slowly worked back and forth along the length until the entire thing was loose. I'll cut the nails or pull them through before I put it back on. I got a nice dusting of small ants while removing - they seem to be focused on the moist wood - I did not see any tracks or holes. I vacummed up the few that were there, it was not a colony. and I sprayed ant juice there as well. Also, the fungicide I'm using to treat anythign that looks like rot also kills termites and ants so I'll be liberal with that.

I cut back the vapor seal - trying to make sure I could tape it up when done.

Good news - Sheathing looked great. no signs of moisture. I have a Bosch ******** saw so I took the liberty of cutting an inspection hole in the sheathing and did not find a beam. Yikes.

Freaking out a little - as there is so much I've had to fix on this house - roof sheathing stops 1.5 inches from facia board , gutters installed right up to the shingles, tiny little downspout holes - hot water heater pump supported only by the flex copper lines from the heater... you name it.

Went to the plans - call for double LVL over the door. No trusses - stick built.

Went back outside and looked up the hole I cut - no insulation - no wonder the garage is so cold in the winter.... and saw what looks like a 3.5 inch wide lvl in place - it does not appear to be doubled as the plans but a solid beam- no evidence of water there. I measured up into the hole to the bottom of the lvl and it looks like it's approximately 15 inches and from the bottom to the ceiling inside the garage is 31 inches. I'm guessing the sag was built that way as a fully intact lvl should not deflect 3/4 of an inch!

Remedy -

So - I'm going to use my little saw and cut out 8 feet of the horizontal 2x6 spacer that has the rot in it. It's currently exposed and better to remove it than rely on the treatment. I'll also pretreat it to make sure nothing happens in the future.

Now - to figure out how to bend a 16 feet piece of flashing and stick it up under the siding! Anyone have any tricks for that? I'll do some searching on the forum - I'll bet it's come up. I'll buy a roll of white flashing when I pick up the 2x6 today. I was googling flashing earlier - just when my wife walks by and says ****!!!!! my luck....

I won't put caulk at the bottom of the siding - that's what the flashing is for.

I was debating making the thing straight - and I've stopped myself - The trim was fitting a bit of a sag - if I straighten it I'm liable to make even more trouble for myself.

Thanks - and I look forward to any advice on crisply bending the flashing. I added a few extra pics of my saw and my currently crappy garage.... I just emptied 2 storage buildings and am going through their contents. It's like an archaeological dig into my past lives....

Chris
 

Attachments

  • inspection hole.jpg
    inspection hole.jpg
    36.9 KB · Views: 78
  • saw.jpg
    saw.jpg
    48.4 KB · Views: 65
  • plans.jpg
    plans.jpg
    51.8 KB · Views: 67
  • 2011-09-24_10-29-34_548.jpg
    2011-09-24_10-29-34_548.jpg
    146 KB · Views: 63
  • crappy garage.jpg
    crappy garage.jpg
    86 KB · Views: 62
Last edited:

ForceFed70

Well-known member
Joined
Apr 27, 2010
Messages
3,441
Location
BC, Canada
3.5" wide LVL beam is a 2 ply LVL. LVL beams are typically 1.75" wide, so you have 2ply.

I'll have to check my beam calcs that the truss designer gave me for my LVL's, but some sag is expected. I think 3/4" over 10years is about what is expected although it may be on the high side.

Beams will sag (even LVL beams). I think you are worrying about nothing. My only concerns would be the lack of insulation (funny they put up vapor barrier with no insulation) and the asthetics.
 

hockey88fan

Well-known member
Joined
May 25, 2011
Messages
428
As far as the flashing you really need access to a brake to get it crisp, and you could do it in 2 pieces just over lap 6" and seal the joint with silicone. Make sure you go up behind the siding atleast 3" inches with the flashing.
 

tcianci

Well-known member
Joined
Feb 7, 2009
Messages
4,242
Location
Walpole, Ma
You should be able to buy the flashing at any lumber yard typically 8 or 10 foot lengths, just over lap it. You really do need to correct that detail for sure. Even if you go to a shop that has a brake, your going to be maxed out at about 12 feet. Remember these brakes were made for the siding business, 12 feet is about tops. The guys I buy my seamless gutter materials from have a nice computerized brake in their shop and they can make up some pretty fancy custom flashings but they are limited to 12 feet.
 
OP
C

christopizza

Well-known member
Joined
Dec 3, 2010
Messages
129
Location
NC
Good progress today.

All rot cut out and replaced. Went back and put deck screws along the framing for the door opening. Measured against the string and it's now closer to 5/8 of an inch.

The trim assembly I pulled this morning has been cleaned and treated and the rot cut out and replaced.

I did some research on sheet metal brakes and cobbled up something from some 3 inch angle iron I had - It's not pretty and uses most of the clamps I have but it seems to work. I've got a bit of finish work to do to get the waves out but we are there.

My stainless steel bumpers for my TR2 came in today. They look great. Anxious to get back to working on my cars.

Chris
 
To avoid these ads, REGISTER NOW!
Top Bottom