
You are using an out of date browser. It may not display this or other websites correctly.
You should upgrade or use an alternative browser.
You should upgrade or use an alternative browser.
Sail Shades.. How much slope?
- Thread starter luvit
- Start date
mike93lx
ALLIANCE MEMBER
None is needed. Water goes through it. It will sag in the center and go back after drying.
Mine is level and has been like that for a couple years
Mine is level and has been like that for a couple years
Shiftless
Well-known member
I thought water might run down a slope so I installed mine with a slight slope but as mike said earlier, rain water goes through, forms a dip in the middle where it drips through and then when dry, goes back to straight.
Make sure to have really solid attachment points because with the proper tension on the cables, there is a big pull toward the center.
Mine is about 10x20
Make sure to have really solid attachment points because with the proper tension on the cables, there is a big pull toward the center.
Mine is about 10x20
mike93lx
ALLIANCE MEMBER
I take mine down for the winter and it goes back up in the spring. i've left it out in hurricanes, tropical storms, wind advisories, tornado warnings...etc. They let enough air through that it has just never been a problem.
maybe a really cheap one won't handle it, but mine has been fine.
This is what I'm using. 16x16
https://www.amazon.com/gp/product/B06XCKJYSC/?tag=atomicindus08-20
I used this hardware kit and some chain from Lowe's:
https://www.amazon.com/gp/product/B00V8Z4DHM/?tag=atomicindus08-20
The turnbuckles are nice as the sail will stretch a good amount when new. the chain was a lot easier than the rope i used initially as it is way easir to move a link vs retying the rope.
I just ordered two more and should be installing them this weekend.
NWOhioChevyGuy
Well-known member
Mine go up in spring stay up until fall.
Have a little bit of slope but just for aesthetics- water goes through them
I use SS cable to mount ours- works well ends get connected with these
https://tse4.mm.bing.net/th?id=OIP.sSJI2V6oBFFhbP5uNeARGAHaHa&pid=15.1&P=0&w=300&h=300
Have a little bit of slope but just for aesthetics- water goes through them
I use SS cable to mount ours- works well ends get connected with these
https://tse4.mm.bing.net/th?id=OIP.sSJI2V6oBFFhbP5uNeARGAHaHa&pid=15.1&P=0&w=300&h=300
readhead
Well-known member
I have built quite a few posts and wall brackets for shade sails. I always install two loops. One to pull the sail tight which frees up the second one for the attachment. I work with several awning companies and they usually sew in two loops. One for tension and one for attachment. It also helps to take the tension off when you take it down.
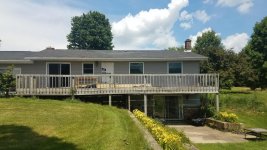
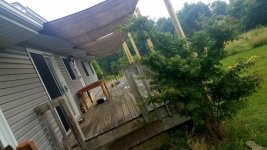
Thanks guys. This was my Memorial Day project postponed until today. I used the rope today and like the chain idea. My deck project will take a few summers and I wanted to see sail shades this summer to see if I want them in the final project. I have three 12x8 and one 8x8 sail shades. ..7-8 hours alone. UVs were high, so I constantly went in and viewed from windows to plan each step. Got way enough sun.. I'm a little pink. The final pics look a little droopy because it was a downpour during the pic, but I got it done minutes before the rain 
Attachments


rtz
Well-known member
This is a good video:
mike93lx
ALLIANCE MEMBER
Thanks guys. This was my Memorial Day project postponed until today. I used the rope today and like the chain idea. My deck project will take a few summers and I wanted to see sail shades this summer to see if I want them in the final project. I have three 12x8 and one 8x8 sail shades. ..7-8 hours alone. UVs were high, so I constantly went in and viewed from windows to plan each step. Got way enough sun.. I'm a little pink. The final pics look a little droopy because it was a downpour during the pic, but I got it done minutes before the rain
Looks great. You will love having them.
Whiskeymike
Well-known member
What options are there for metal poles? How tall can you go with what kind of tube? How big can you go with these things?
I’ve been looking at options for some shade, but was leaning towards 2 post awning designs.
I’ve been looking at options for some shade, but was leaning towards 2 post awning designs.
mike93lx
ALLIANCE MEMBER
What options are there for metal poles? How tall can you go with what kind of tube? How big can you go with these things?
I’ve been looking at options for some shade, but was leaning towards 2 post awning designs.
It is diy, so let your imagination sail...
My folks have a couple over their pool with galvanized pipe that looks like chainlink fence top rail. Works but doesn't allow for tension.
I used 6x6 and while i don't have them so tight that they have no sag, there is enought that one of the posts has curbed slightly towards the house
I think 3x3x1/8 tube would work fine just need to mount it in a liitle concrete and either cap it or drill drain holes
Shiftless
Well-known member
The 3x3 eighth inch thickness tube works for me. That’s a truck tie down D-ring welded on with a welded on steel cap. Stainless steel turnbuckle let’s me adjust tension.
This is all bolted onto the framing of the deck.
If you sink a long pole in concrete better use a deep hole with lots of concrete. The force and the leverage will be more than you expected. You should consider tipping the pole backwards a few degrees opposite the direction of pull.
This is all bolted onto the framing of the deck.
If you sink a long pole in concrete better use a deep hole with lots of concrete. The force and the leverage will be more than you expected. You should consider tipping the pole backwards a few degrees opposite the direction of pull.
Attachments

Last edited:
mike93lx
ALLIANCE MEMBER
The 3x3 eighth inch thickness tube works for me. That’s a truck tie down D-ring welded on with a welded on steel cap. Stainless steel turnbuckle let’s me adjust tension.
This is all bolted onto the framing of the deck.
If you sink a long pole in concrete better use a deep hole with lots of concrete. The force and the leverage will be more than you expected. You should consider tipping the pole backwards a few degrees opposite the direction of pull.
I've found that with 8' above grade and 2-3' below grade, a 6x6 is completely sufficient without any concrete or other archoring. My posts are rock solid.
Unless headroom is really tight, I don't see a need to put massive amounts of tension on the sail. They just end up stretching anyway and you just keep chasing it.
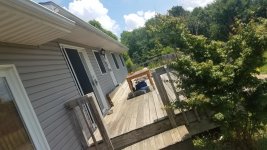
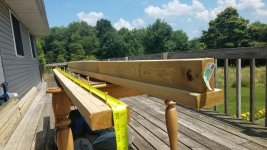
I meant to get opinions on my post design. In my pictures above, I have two pressure treated 2x4 to mock a 2x6. They are screwed together every 8 inches. I was hoping this was stronger than a 2x6. My anchors penetrate both boards. This T- shape made securing the posts to the frame easier, too.
Attachments


Last edited:
danielbuck
Well-known member
- Joined
- Apr 15, 2014
- Messages
- 921
I've got a triangle sail shade that's about 25 feet on the longest side, I just put a very slight slope, seems to be fine.
mike93lx
ALLIANCE MEMBER
I meant to get opinions on my post design. In my pictures above, I have two pressure treated 2x4 to mock a 2x6. They are screwed together every 8 inches. I was hoping this was stronger than a 2x6. My anchors penetrate both boards. This T- shape made securing the posts to the frame easier, too.
Looks fine to me. There really isn't that much pressure on them, as long as you don't go crazy with the turnbuckles