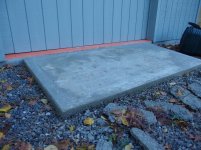
Looking for advice on salvaging our recent failed apron pour. Our shop needed an apron badly as it is used primarily for automotive work so my wife and I set out to pour one last Saturday. The forms were set, rebar installed and crush stone compacted. I grabbed the requisite 13 bags of 4k Sakre** from L**** and we began pouring in perfect 65 degree temps. Unfortunately 4 bags in we discovered that every bag had a different composition of aggregate, portland and unidentified sea shell like substance. We also discovered that most of the bags had at least partially cured. The resulting pour is pretty brittle and porous. We have poured many pony walls, pads& slabs in the past and this apron looks terrible and not in keeping with our usual high quality of work. Any advice on filling the voids in the verticle surfaces/horiontal to keep water out?


You are using an out of date browser. It may not display this or other websites correctly.
You should upgrade or use an alternative browser.
You should upgrade or use an alternative browser.
Salvaging apron pour fail
- Thread starter Patrobot
- Start date

doctordirt
Well-known member
- Joined
- May 15, 2014
- Messages
- 492
Mix looks like it was to dry. I have used a couple of different products. They are especially made for thin coat repairs. Way stronger than they original crete. They all are very quick setting. These type of product are not big box store products, best to locate commercial concrete supply company. One we used was a 2 part, liquid and powder mixed in 5 gallon pail with drill., I believe it was 2 letter then numbers, although not the product something like, ie rg103. Hopefully, color is not an issue as these products were dark grey in color.
BlackJackJim
Member
- Joined
- Oct 31, 2017
- Messages
- 17
Aggregate differences among bags is likely of little overall consequence in this case. The problems I see from your pictures are the voids and gaps evident on the vertical surfaces, and the slab thickness appears to be too short -- looks like about 2 inches judging from the adjacent 57 gravel. You can eliminate voids by using a handheld concrete ******** (Harbor Freight sells a good on for under $100). The minimum thickness for my slabs is about 5-1/2 inches and using 2x6s for forms.
I also prefer 5000 psi concrete mix, an I am partial to Sakrete 5000 psi mix because of its whiter white color when cured.
I also prefer 5000 psi concrete mix, an I am partial to Sakrete 5000 psi mix because of its whiter white color when cured.
A portion of the apron is below grade, total thickness is 4". I agree the 5k Quickrete we have used in the past has been great with a nice finish. There was a conspicuous absence of 5k product at this location so we used the 4k which should have been perfectly sufficient. I took a large sample back to the store and cracked it in half with my hands, the xtra 4k from my shop slab pour was strong enough to defy a 12lb sledge hammer. I'm going to look for the "rg103" thin set, we have a mason's supply house ~7 miles from here. I appreciate the feedback guys.
Last edited:
Shootinok
Well-known member
Is this apron made for foot traffic?
This appears to be a light duty apron and should suffice for that. I doubt the entire slab has that same consistency. Its not uncommon to see poor consolidation around the edge forms with a dry mix because the concrete sticks to the form and doesn't properly fill against it.
If it bothers you ecstatically you can rub the edges with some grout. The same store you purchased the mix from should sell a grout product made for patching concrete. That would also help with the potential for water getting in there and popping off pieces during freeze/thaw.
A good practice on future pours is to simply tap around the forms with a hammer to allow the concrete to move itself into place along the form.
6768rogues
Banned
You could try mixing come type S mortar and applying it to the edge voids.
I would use it until it fails, then bust it up and replace it. Next time, tap on the form with a hammer to work out air pockets.
I would use it until it fails, then bust it up and replace it. Next time, tap on the form with a hammer to work out air pockets.
D45
Well-known member
It also looks to be sloping down to the left
Look where it meets the garage.......on the right it looks to be level and when it ends at the left it appears to be 1/2" low
Why so small also, I would atleast gone a few inches past each side of the garage opening
Look where it meets the garage.......on the right it looks to be level and when it ends at the left it appears to be 1/2" low
Why so small also, I would atleast gone a few inches past each side of the garage opening
matt_i
Well-known member
I would just use it until it fails. Then break it out and try again. I can't imagine you being able to apply some magic goo to it for less than the ~$65 for the concrete mix it would take to redo it, and give long-term acceptable results. Labor not included to break-out and repour but you probably are going to diy if I had to guess.
Leaflessshadetree
Well-known member
I usually add portland cement to bags of concrete (about 1 shovel per bag). Work out the air bubbles/voids as you are pouring, a short length of rebar works good. To avoid voids along the forms I'll work (up and down sawing motion) a brick trowel between the forms and concrete, Then walk along the forms tapping them with a hammer (not shy taps, a large ball peen or small sledge work well). I've also seen guys use a sander.
Adding portland is not a bad idea & the sander is a neat trick, I will try that for the next project. I want to avoid rotten trim boards so I poured only as much as was needed.The upper, left corner is 0.125" lower than the rest of the apron edge. We had some problems with the pour.
ScottsGT
Well-known member
Tile it 
ard
Well-known member
last Saturday.
Doesnt concrete double in strength each week for the first 28 days?
Sledge now?
rburke65
Well-known member
How thick is the pad?
Strouty
Well-known member
I think this is a lesson on why you use a ********. Had you used one, it would not look like that, even if you poured super dry and there were inconsistencies between the mixes. Next time take a piece of rebar and push it in and out of the concrete all around the perimeter, then tap the forms with a hammer, better to just buy a ******** if you plan on doing a bunch more concrete, it will offer much better results.
It looks like you poured too dry. I have never used a ********, so I cant comment on that. But I have done several skids of bagged concrete this year alone and none of them looked remotely close to that.
I would run it until it crumbles, it might last many years, no point in redoing it until you need too. Plus, you might get more experience with concrete work thus making the next rendition look better.
If you are doing much concrete at all the harbor freight concrete mixer is worth it many times over. I own both the small and the larger one.
Last edited:
I use Quikrete and add portland cement to my mix. Tapping on the side of the form with a hammer helps settle the concrete.
I would dig down around your small apron, about 12" deep. Drill the apron and add some small sections of rebar and then form up to pour a new edge wall around what you already have. 4-6 inches wide for the perimeter of the apron.
Use this to figure out what you need so you don't run out of bagged mix.
https://www.concretenetwork.com/concrete/howmuch/calculator.htm
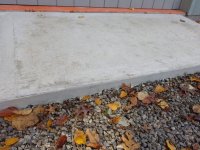
Last week, before the cold weather hit I had an hour to patch up the apron while a kind friend of ours watched the twins. Since my little masters only permitted me a quick visit to the Depot I grabbed a box of Rapid Set Cementall and got to work. It's a nice product with a very fine grain capable of delivering a very smooth, polished marble like finish. These photos are after 5 days of wet curing and two days without a tarp and water.
Attachments

DarrenF
Well-known member
looks great now
SALIV8
Well-known member
Great repair.
Is that going to be driven on as is, or are you going to add some fill so the lip has a transition?
Is that going to be driven on as is, or are you going to add some fill so the lip has a transition?