To avoid these ads, REGISTER NOW!

Sam's 3.5ton SUV Floor Jack

Joined
Sep 25, 2013
Messages
12
Location
North Michigan
This is my latest project. I've owned this for a while, and it started leaking oil from the pump.

Naturally, I tore into it to see what was going on...

This is the floor jack that my Sam's sold before going to the Michelin floor jack, which they sold for many years. I have a feeling there are way more Michelin's out there than this Allied jack that I have.

I've owned it for 10+ years and this is the first time it's given me any issues. If I can locate everything I need, I will try and save it.
 
To avoid these ads, REGISTER NOW!
OP
P
Joined
Sep 25, 2013
Messages
12
Location
North Michigan
Trying to figure out how to post my pictures.
 

Attachments

  • Jack-Label.jpg
    Jack-Label.jpg
    20.5 KB · Views: 80
  • Jack-Valving.jpg
    Jack-Valving.jpg
    135.2 KB · Views: 91
  • Collection-of-Orings.jpg
    Collection-of-Orings.jpg
    8.3 KB · Views: 66

Monkey Milk

Well-known member
Joined
Nov 18, 2012
Messages
450
Location
Hawaii
I have that same jack and it's never given me any problems until lately, it just need some oiling on the release valve. It's a very good jack even though it's made overseas. I bought it just to lift my dad's 65 thunderbird, that's a heavy car!

Please don't tell me that there is no cup seal in there, just an O ring for the main ram.
 

EDGAR

Well-known member
Joined
Aug 21, 2010
Messages
437
That is a TORIN pump and no, there isn't an u-cup there, just the o-ring and o-ring retainer. That same pump is the one in HIBALL's overseas jack repair tutorial. With some lathe work, the ram can be modified to accept an u-cup. That same pump has been used in many rebranded Chinese jacks or sold to other jack manufacturers who build their own jack bodies.

OTC uses that pump in their OTC 1503A and 1504A jacks and they sell a repair kit for them. They have two different kit parts numbers but, supposedly the contents of both kits is the same. As a matter of fact almost all the parts for both jacks are the same but they carry a different parts number for each jack. They also sell the casters very cheap.

Note: There has been some variations in these pumps over time and some of the kit's parts may or may not fit the Allied pump.


http://www2.otctools.com/otctools.com/newcatalog/products/522982_E.pdf
 

Attachments

  • OTC 1504A PUMP PARTS.JPG
    OTC 1504A PUMP PARTS.JPG
    76.6 KB · Views: 77
Last edited:
OP
P
Joined
Sep 25, 2013
Messages
12
Location
North Michigan
Please don't tell me that there is no cup seal in there, just an O ring for the main ram.

Sorry to disappoint, just an o-ring energized plastic seal. Very cheap.

Edgar, thanks for the reply, especially oh-so-early in the morning. The diagram is close, but notice I have a couple of differences which I attempted to photograph.

I have an extra port on the side of the pump unit. I haven't taken this apart as I do not know its function. I suspect there is an o ring in there as well.

I also have this flap inside which I have not seen in other photographs or diagrams on the web. Again, I do not know its function, so I am leaving it alone.
 

Attachments

  • Jack-Side-Port.jpg
    Jack-Side-Port.jpg
    133.7 KB · Views: 46
  • Inside-Jack-Cylinder.jpg
    Inside-Jack-Cylinder.jpg
    133.9 KB · Views: 51

Hiball

Well-known member
Joined
Apr 30, 2009
Messages
14,029
Location
Missery
Sorry to disappoint, just an o-ring energized plastic seal. Very cheap.

Edgar, thanks for the reply, especially oh-so-early in the morning. The diagram is close, but notice I have a couple of differences which I attempted to photograph.

I have an extra port on the side of the pump unit. I haven't taken this apart as I do not know its function. I suspect there is an o ring in there as well.

I also have this flap inside which I have not seen in other photographs or diagrams on the web. Again, I do not know its function, so I am leaving it alone.

I cant tell by the Pictures, but does the Jack have a Foot Pedal on the Side attached to the Lift Arm? Generally when you see that Flap holding a Ball in a Seat like that, its "Normally" is the Feed for the Quick lift. How it works is when you step on the pedal it raises the Lift arm, Which draws oil from the Reservoir thru that Port via Suction created by the Main Seal. The Then Positive pressure seats the Ball and allows the Lift arm to stay up. The Port on the Side is more than likely just a pathway to the Valve system that is used to flush etc.

I say Normally because ive seen that Inner cylinder flap on Jacks (older imports) without the "Foot Pump" and Never really understood if it was a just a case of "1 Hydraulic unit for multiple models" or if its actually allows more oil to enter the cylinder "Per Stroke" before it reaches the load and becomes Inactive.
 
Last edited:
OP
P
Joined
Sep 25, 2013
Messages
12
Location
North Michigan
does the Jack have a Foot Pedal on the Side attached to the Lift Arm

Yes it does have the lift arm on the outside of the jack. It looks very much like this: http://leeding.en.alibaba.com/product/311949495-213314351/3_5T_Trolley_Jack.html

Is there some kind of art to finding the seals for these jacks? For instance, I measured the largest o-ring which seals the tank nut to the reservoir. I got an ID of 63.5mm x 3.47mm cross section. That size is not easy to find. The o-ring that seals the rod to the tank nut (when the jack lifts) is 33mm ID x 3.44mm. Other items I need are similar. Where can I find these odd items?
 

Hiball

Well-known member
Joined
Apr 30, 2009
Messages
14,029
Location
Missery
Yes it does have the lift arm on the outside of the jack. It looks very much like this: http://leeding.en.alibaba.com/product/311949495-213314351/3_5T_Trolley_Jack.html

Is there some kind of art to finding the seals for these jacks? For instance, I measured the largest o-ring which seals the tank nut to the reservoir. I got an ID of 63.5mm x 3.47mm cross section. That size is not easy to find. The o-ring that seals the rod to the tank nut (when the jack lifts) is 33mm ID x 3.44mm. Other items I need are similar. Where can I find these odd items?

Is that ID measurement off the actual oring? Or are you measuring the groove? Its uphill business trying to measure a used orings, Measure the groove or the hard part the oring seals + the cross section (oring thickness). Do you have a local hydraulic shop in your area? If so take the old parts along with you, if you don't have a shop send me the measurements via PM and I probably have what you need.
 

EDGAR

Well-known member
Joined
Aug 21, 2010
Messages
437
Phosphate N Oil

Just so you are aware, the sizes you want may be substitute by SAE O-rings.

The oil tank o-ring can be substituted by:

OR 230 = 1/8" x 2.5" = 3.5mm x 63.5mm (assuming the I.D. is the right size)

The ram o-ring in the big nut:

OR 219 = 1/8" x 1- 5/16" = 3.5 x 33.3mm

The tank o-ring sometimes can be reused if you don't find a replacement. The other rings should be changed.

When measuring the cross section, measure from top to bottom side of the o-ring. Measuring from the inside diameter to the outside diameter will give you a smaller measurement as you are measuring the worn part of the o-ring. A 3.44mm cross section does not exist, the closest available size is 3.5mm.

The pump piston o-ring and the o-ring used with the "plastic" retainer as a ram seal may also have SAE substitutes if these are 3.5mm cross section.

If the ram main seal o-ring used with the plastic is 4mm, there is no SAE o-ring substitute readily available. A 5/32" size is a 4mm size but as far as I know, only one company is making that size, and I doubt that the average hydraulic repair shop carries that size. Probably can only be obtained from that company in quantities.

If you prefer metric o-rings, you may try:

http://www.theoringstore.com/

The SAE o-rings can be sourced from your local hydraulic repair shop. Most repair shops don't carry metric o-rings because they are more expensive and having a full set of metric o-rings in stock is not cost effective, so they try to substitute metric for SAE o-rings whenever possible.

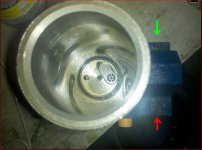
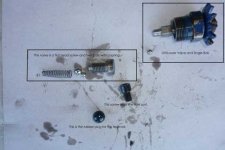
The picture of your pump show the TR letters (red arrow) which are for TongRun which is the maker of Torin jacks. The green arrow shows the place were the pump series is identified. The latest pumps have an X in that place. Earlier pumps may not have any mark there. Can you see what letter or mark is there, in your pump?

The side port is usually a hole drilled to connect the oil galleries inside the pump. Then the hole is threaded and plugged.
 

Attachments

  • PHOSPHATE N OIL  TORIN PUMP.JPG
    PHOSPHATE N OIL TORIN PUMP.JPG
    70.8 KB · Views: 26
Last edited:
OP
P
Joined
Sep 25, 2013
Messages
12
Location
North Michigan
The side port is usually a hole drilled to connect the oil galleries inside the pump. Then the hole is threaded and plugged.

Ok, so a 6mm wrench and I had the side port open. It is just a socket head screw. Nothing special. I expected an o-ring to seal it and I destroyed the following (see photo) so I need to find a substitute seal. :sad:


Can you see what letter or mark is there, in your pump?
See the attached photo. Compared to the "TR" it looks like a letter "C" on its side. Not sure what it means.


Measure the groove or the hard part the oring seals + the cross section

Following the advice I measured what I could:

Tank nut to rod seal: Could not be measured with the calipers.
OD of the rod: 34mm

Rod "piston" area:
Groove OD: 35mm
Groove Width: 3.45mm
Groove Shoulder OD: 36mm
Piston Diameter OD: 41.92mm
Pressure Cylinder ID: 42mm

Tank nut to reservoir area:
Tank nut groove OD: 66.5mm
Tank nut groove Width: 4.5mm
Reservoir Cylinder ID: 72mm​

Right or wrong, I expect a Made in China item to be metric, so all my measurements are in millimeters.
 

Attachments

  • Side-Port-Not-an-Oring.jpg
    Side-Port-Not-an-Oring.jpg
    161.4 KB · Views: 22
  • TongRu-Logo-Casting-Mark.jpg
    TongRu-Logo-Casting-Mark.jpg
    21.2 KB · Views: 20
  • Hydraulic-Jack-Rod.jpg
    Hydraulic-Jack-Rod.jpg
    136.8 KB · Views: 20
OP
P
Joined
Sep 25, 2013
Messages
12
Location
North Michigan
A couple more images in case anyone tries this for themselves.

One is of the internals, and I did not touch the valving under the Do Not Adjust cap, per the advice on this forum. I'm hoping I can clean out any residual swarf from the jack without taking the Do Not Adjust valve apart.


The second image is of the tank nut. The odd thing is that the nut on this jack has tapered sides. I should have followed the advice to use a pipe wrench; however I tried with sockets and found that two (3 probably) would fit the nut 2-1/8, 2-1/4 and if I could have found a 2-3/16 that would have fit too.

-- P_n_O
 

Attachments

  • Internals.jpg
    Internals.jpg
    15.2 KB · Views: 42
  • Tank-Nut.jpg
    Tank-Nut.jpg
    143 KB · Views: 30

EDGAR

Well-known member
Joined
Aug 21, 2010
Messages
437
PHOSPHATE N OIL

For the o-ring that energizes the plastic retainer you can use the following SAE size:

OR 220 = 1/8" x 1- 3/8" (I.D.)= 3.5 x 34.92mm (or use metric: 3.5 X 35)

For the o-ring that seals the oil tank, use:

OR 231 = 1/8" x 2- 5/8" (ID) = 3.5 x 66.7mm ( or use metric: 3.5 X 67 )

If the actual OD of the ram is 34mm as you stated, you will need a metric size for that one. 3.5mm x 34mm

If you have a lathe, or have a friend who owns a lathe, you could machine the ram a little and use an u-cup instead of the plastic retainer/o-ring combo. This machining would replace the groove with a wider one to accept the height of the u-cup. The problem would be to find an u-cup in one of the following sizes:

35mm (ID) X 42mm (OD) x 6mm / 7mm (H) (since the groove dia. is 35mm)
34mm X 42MM X 6mm (or 7mm)
33mm X 42MM X 6mm (or 7mm)

You may even have to machine the groove down to accept a 32mm X 42mm X 6mm (or 7mm height depending availability) but it all depends on what's available in your area or on an internet seal site.

I am limiting the height to 7mm because there isn't to much space there to put a taller u-cup. A taller u-cup would require some machining of the thick metal piece behind the plastic seal/o-ring combo to gain height. Also, a raised edge has to be left at the end of the ram (in front of the seal) to retain the u-cup in place. This edge should be between 1mm to 1.5 mm tall and wide, as well, with a tapered or rounded front edge. Also, the groove height or width (not depth) should be at least one mm taller than the u-cup. A 6 mm tall u-cup uses a 7mm wide groove, for example.

In SAE, the closest u-cup size is 1- 3/8" X 1- 5/8" X 1/4" which comes out as 34.92MM X 41.27MM X 6.35mm.

There is an o-ring inside the release assembly, in case you haven't taken it apart yet. Remove the nut holding the release gear and push the shaft so it comes out the other side.
 
Last edited:
OP
P
Joined
Sep 25, 2013
Messages
12
Location
North Michigan
There is an o-ring inside the release assembly, in case you haven't taken it apart yet. Remove the nut holding the release gear and push the shaft so it comes out the other side.

Dear Sir, you were correct. I had to chuck the gear in the vise to get the leverage to break it loose even after soaking with some penetrating oil.

I measure the "hard part" at 15mm OD (just a hair under 15)
I measure the O-ring OD at 19.90mm
I measure the O-ring cross section at 2.65mm

(This is another one where I can't measure the groove to get all the dimensions from the steel. Since I do not have the right tools.

Thanks again for all the advice thus far!
 
To avoid these ads, REGISTER NOW!

EDGAR

Well-known member
Joined
Aug 21, 2010
Messages
437
PHOSPHATE N OIL

If the OD of the hard part is 15mm, there is no SAE o-ring to replace that, as the equivalent sizes jump from 14.2mm to 15.8mm. The metric size most commonly available would be 2.5 x 15mm. Maybe THE ORING STORE could have something in 2.60mm or 2.65mm.

The actual metric size of a 3/32" CS o-ring is between 2.60mm to 2.65mm, but as mentioned above there is no direct substitute for the 15mm ID.

Be advised that the most common place metric O-rings come in cross section sizes of:

1.5mm, 1.6mm, 1.78mm, 1.9mm, 2mm, 2.4mm, 2.5mm, 3mm, 3.1mm, 3.5mm, 4mm, 5mm, etc.

There are other o-ring CS available but these are difficult, if not impossible, to find.

So if you have an o-ring that measures 3.44mm CS for example, the o-ring that covers that size is the 3.5mm o-ring.

There are a number of different "standards" in o-rings, which is simply a group of O-rings developed by a particular nation or group. Because of this, there are many metric sizes with different CS and ID. The problem is that these O-rings are not readily available everywhere. See below the link to a page showing the different standards. Missing in that page is the Italian standard which has many sizes of O-rings, more so than the others.

http://www.prepol.com/my-ppe/o-ring-sizes

Click on the left side bar items to see the different sizes.
 
Last edited:
OP
P
Joined
Sep 25, 2013
Messages
12
Location
North Michigan
While I await for some new parts to show up, I have a question for the experts. I have not touched the overload. Do I gain anything by taking apart the overload and reassembling it? I have no reason to believe there is an issue with the overload so any work would purely be preventative. I am worried that I would do more harm than good. Should I just leave it alone?
 

Hiball

Well-known member
Joined
Apr 30, 2009
Messages
14,029
Location
Missery
While I await for some new parts to show up, I have a question for the experts. I have not touched the overload. Do I gain anything by taking apart the overload and reassembling it? I have no reason to believe there is an issue with the overload so any work would purely be preventative. I am worried that I would do more harm than good. Should I just leave it alone?

"If" when you tore the jack down you noticed "any" seal particles or debris in general its a good idea to flush that vein. The reasoning being that if by chance a piece was sitting there just waiting for that ball to lift, it could prevent the ball from seating and essentially leave a open pathway (albeit small) from the cylinder to the reservoir. Unless you have a test station in your shop or want to invest in one, the best thing you can do is simply remove the cap and count the revolutions from the "current" position to "completely compressed". Doing this will ensure that you can reset the overload "back" to its current position.

Note: this does not mean that the overload is set properly currently.

I say this because over time that overload spring loses tension and/or the adjusting plug can back off. The overload is a important part of the jack, it's designed to prevent cylinder PSI reach a point, that exceeds the seal limits. I'm not trying to spook you, just explain how it works and why its important. It's very important to remember that hydraulic jacks should only be used to raise a load and then jack stands should be used to support the load.
 
Last edited:
OP
P
Joined
Sep 25, 2013
Messages
12
Location
North Michigan
I blew it. I was expecting there to be a screw acting as a cap above the adjusting screw. So when I pulled off the plastic cap and unscrewed the screw I knew it didn't bode we'll for proper reassembly.

I have a rust ring to guide me and not much else. How do I guess at the initial setting?

If you have this jack, don't follow my example.:shocking:
 

Hiball

Well-known member
Joined
Apr 30, 2009
Messages
14,029
Location
Missery
I blew it. I was expecting there to be a screw acting as a cap above the adjusting screw. So when I pulled off the plastic cap and unscrewed the screw I knew it didn't bode we'll for proper reassembly.

I have a rust ring to guide me and not much else. How do I guess at the initial setting?

If you have this jack, don't follow my example.:shocking:

:headshake Compress fully and back it of 2 revolutions "should" keep you in the safe zone, Again impossible to set to factory due to changes in spring tension etc.. Just remember to always use jack stands.
 

redwrench60

Well-known member
Joined
Sep 10, 2011
Messages
6,069
Location
East Tennessee
:headshake Compress fully and back it of 2 revolutions "should" keep you in the safe zone, Again impossible to set to factory due to changes in spring tension etc.. Just remember to always use jack stands.

Hiball, in this case would it be possible/practical to obtain a new overload valve spring and then set it to factory specs?

I rebuilt a Lincoln/Hein Werner 2 ton jack that was given to me because it wasn't working. (I bought the repair kit from you :thumbup:) When disassembling the overload releif valve I counted the turns from fully seated (1-3/4) and applied them during reassembly but once built and bled the jack would just bypass pressure once you put any real load on it. I removed the welsh plug and adjusted the screw to 1 turn from fully seated and installed a new plug and the jack worked perfectly. I don't know why setting the screw back to it's origional setting didn't work but an old weakened spring crossed my mind.
 

Hiball

Well-known member
Joined
Apr 30, 2009
Messages
14,029
Location
Missery
Hiball, in this case would it be possible/practical to obtain a new overload valve spring and then set it to factory specs?

I rebuilt a Lincoln/Hein Werner 2 ton jack that was given to me because it wasn't working. (I bought the repair kit from you :thumbup:) When disassembling the overload releif valve I counted the turns from fully seated (1-3/4) and applied them during reassembly but once built and bled the jack would just bypass pressure once you put any real load on it. I removed the welsh plug and adjusted the screw to 1 turn from fully seated and installed a new plug and the jack worked perfectly. I don't know why setting the screw back to it's origional setting didn't work but an old weakened spring crossed my mind.

There really isn't a one size fit all for setting overloads, there are too many variables including spring tension differences, cylinder size, model differences which translate into the amount of oil being transferred <--- which affects the setting along with the lift height the overload is set. There are liability reasons on why these parts aren't generally included in kits. Available? Sure. Id be willing to bet if you took (10) 93642 jacks that where "freshly" rebuilt and set the overload on each one consecutively in similar form, you would find that some of the settings would be similar. I've always wondered if it was a spring tension issue or a combination of the tension wearing off and allowing the adjusting screw to back off.. Dunno?
 

redwrench60

Well-known member
Joined
Sep 10, 2011
Messages
6,069
Location
East Tennessee
There really isn't a one size fit all for setting overloads, there are too many variables including spring tension differences, cylinder size, model differences which translate into the amount of oil being transferred <--- which affects the setting along with the lift height the overload is set. There are liability reasons on why these parts aren't generally included in kits. Available? Sure. Id be willing to bet if you took (10) 93642 jacks that where "freshly" rebuilt and set the overload on each one consecutively in similar form, you would find that some of the settings would be similar. I've always wondered if it was a spring tension issue or a combination of the tension wearing off and allowing the adjusting screw to back off.. Dunno?

Yeah, liability.....there's that......
My reason for questioning is that I really don't have a way to know what my releif valve is set to. It could be over or under the rated 2 ton capacity of the jack. Now, I know better than to be jacking up Kodiac 6500 dumptrucks with it but it picks up all the cars and trucks I ask it to.
 

Hiball

Well-known member
Joined
Apr 30, 2009
Messages
14,029
Location
Missery
Yeah, liability.....there's that......
My reason for questioning is that I have really don't have a way to know what my releif valve is set to. It could be over or under the rated 2 ton capacity of the jack. Now, I know better than to be jacking up Kodiac 6500 dumptrucks with it but it picks up all the cars and trucks I ask it to.

And that's where we are at.. Mathematically you could take a 3.5 ton jack, weld the overload seat completely closed and lift 2 tons all day with absolutely no problem, unfortunately some of these 3+ ton rated jacks today seriously skirt the limits with there bore size, thus they perform terribly when they get anywhere near that limit and bypass (output) a higher percentage versus what they input and that percentage gets closer as the load elevates.
 

redwrench60

Well-known member
Joined
Sep 10, 2011
Messages
6,069
Location
East Tennessee
And that's where we are at.. Mathematically you could take a 3.5 ton jack, weld the overload seat completely closed and lift 2 tons all day with absolutely no problem, unfortunately some of these 3+ ton rated jacks today seriously skirt the limits with there bore size, thus they perform terribly when they get anywhere near that limit and bypass (output) a higher percentage versus what they input and that percentage gets closer as the load elevates.

So what I'm hearing is a quality jack is overbuilt, rated conservitively, has more safety margin built in and will lift all of what it's rated for and then some.
 

Hiball

Well-known member
Joined
Apr 30, 2009
Messages
14,029
Location
Missery
So what I'm hearing is a quality jack is overbuilt, rated conservitively, has more safety margin built in and will lift all of what it's rated for and then some.

To a point.. But You won't find too many shops that will set a overload above and beyond what the jack is rated for regardless of the brand because outside of the hydraulic lifting aspect you need to factor in the frame and hardware. I believe liability is the word we are looking for again..
 
Last edited:
OP
P
Joined
Sep 25, 2013
Messages
12
Location
North Michigan
Compress fully and back it of 2 revolutions "should" keep you in the safe zone, Again impossible to set to factory due to changes in spring tension etc.. Just remember to always use jack stands.

Thank you, sir. This will be my plan. I was surprised that the overload ball is only 3mm, it was so much smaller than the ball bearings used in the rest of the valving.

I think trying to get the ram machined for a proper U-cup is next on my list.
 
To avoid these ads, REGISTER NOW!
Top Bottom