To avoid these ads, REGISTER NOW!

Sandblast Cabinet air venting.

csp

Well-known member
Joined
Mar 23, 2010
Messages
5,719
Location
Franktown, CO
I'm only getting about that (3-5 minutes) with my IR with a 80 gallon tank. Once the compressor kicks in I stop blasting till she's done pumping then go at it again.

Stops and starts are what leads to an early death in compressors. If you have a 100% duty cycle compressor and if it will keep up with the volume that the blast cabinet needs, let it run. I will sometimes blast for an hour with my compressor running all but the first 5-10 minutes if it has a full charge when I start.

The only good reason to stop is if your compressor can't keep up with the CFM demands.
 
To avoid these ads, REGISTER NOW!

islandkent

Well-known member
Joined
Jan 29, 2009
Messages
281
Location
PEI,Canada
Good information csp. Like we had mentioned earlier. We wondered if would hurt the compressor. I'm not sure what the duty cycle is on my old IR but will find out as soon as I respond here or I should say try to find out. lol
I think it would take a rather large pump to keep up to blasting with a 3/8 line.
But Trooper is wondering about his CH model. Like I mentioned I let mine work for a hour and still going strong. (on more than one occasion)I usually don't blast for a hour straight but if I have to I would. She has been good to me over the years. And I really think they don't make things like they use to. My old girl was bought new in the late 70's. Never opened up. I knew and worked for the original owner. Have all the books and even a reed rebuild kit. Farmer owned. So no real amount of hours on mine.
 
OP
T

trooper1954

Well-known member
Joined
Nov 4, 2016
Messages
197
Location
Salmon Arm, BC, Canada
So I spent awhile breaking down the metering valve and the gun...no obvious blockage.
Sifted the media....no noticeable bits in it.
I watched the media hose (which is clear) while I operated the gun, and it can be clearly seen that the media is coming in blocks and not flowing consistently. I have adjusted the air intake on the metering between fully open and fully closed.....no noticeable difference....media still traveling in "blocks".
I can't determine if the media is damp....it certainly feels fine in the hands with no clumps.....I guess the next thing to do is replace it with new media and see if I have the same problem? Also, could it be as Kent said......not enough air flowing through the air valve....ie...it's not big enough? Media feed hose is 1/2" ID....would changing to 3/8" make a difference?
Thanks.....oh....I'm using 3 750Gram tubs of media at a time.
 
OP
T

trooper1954

Well-known member
Joined
Nov 4, 2016
Messages
197
Location
Salmon Arm, BC, Canada
The compressor.....from start of blasting to pump kick in is about 4 minutes. Starting pressure is 125psi
If I keep blasting, the pressure drops to and then maintains at 80psi continuously.....the cabinet is currently set at 60psi.
 

Jswain

Well-known member
Joined
Apr 26, 2013
Messages
2,463
Location
Calgary, AB
Take the suction line off your gun and adjust the air jet for maximum vacuum, you should be able to feel a difference using just your finger. Take a picture of the air jet while it's entirely removed from the gun
 
OP
T

trooper1954

Well-known member
Joined
Nov 4, 2016
Messages
197
Location
Salmon Arm, BC, Canada
Hi all,
Here's the photos of the air intake on the metering valve...it's 3/8" thread 3/8" id. Having thought about this there seems a few things I can do to alleviate the problem:
1. Decrease the size of the media hose
2.Increase the size of the air intake
3.Increase the running PSI of the cabinet to create a better venturi.
4. Try with smaller media....currently running 30-60 crushed glass.

Any suggestions?
Thanks.
 

Attachments

  • IMG_20210224_092614.jpg
    IMG_20210224_092614.jpg
    134 KB · Views: 41
  • IMG_20210224_092823.jpg
    IMG_20210224_092823.jpg
    149.4 KB · Views: 30
  • IMG_20210224_092857.jpg
    IMG_20210224_092857.jpg
    71.4 KB · Views: 28

csp

Well-known member
Joined
Mar 23, 2010
Messages
5,719
Location
Franktown, CO
I could be completely wrong, but that metering valve sure does transition down quickly to 3/8". Is that 1" going to 3/8"? Seems like that quick of a transition would be a cause of clogging when media in the largest volume area is accelerated via vacuum to the smallest area. Mine is similar, but I do have a longer area of transition and it's only going from 3/4 to 3/8 and still do get minor surging.

When I look at the media valves like the one Tacoma makes, the inlet valve is in the area where the transition to a smaller ID is taking place, rather than in an area of greatest volume, if that makes sense.
 
OP
T

trooper1954

Well-known member
Joined
Nov 4, 2016
Messages
197
Location
Salmon Arm, BC, Canada
Thanks csp...
So if I understand correctly, I should either elongate the ****** from the T to the reducer and perhaps step down to 3/4" and then to 3/8" closer to the media hose connection?
 

islandkent

Well-known member
Joined
Jan 29, 2009
Messages
281
Location
PEI,Canada
Ok trooper just seen your set up. 3/8 is small. I have to head to work now. Mine is bigger than that here are a couple of shots of my set up. The ID of my media hose is 1/2 inch stretched over that ******. That is a 7/16 drill bit stuck in there. All those fittings from Canadian tire. I wish I had more time. Here is a close up. Hope this helps. I'll check back on the morning if you have any questions. Oh in this situations Bigger is better. Just put your ******* in a vice and drill it out as big as possible. No real pressure there right?
Use drill bits to find the real inside diameter. What they say and what they are are two different animals.
 

Attachments

  • hose 2.jpg
    hose 2.jpg
    66.4 KB · Views: 45
  • hose.jpg
    hose.jpg
    87.2 KB · Views: 40
Last edited:

Jswain

Well-known member
Joined
Apr 26, 2013
Messages
2,463
Location
Calgary, AB
If you have 1/2 hose like you said you do I doubt the problem is in the metering valve setup.

If your gun is drawer the proper ~14 inches of vacuum it's a pretty substantial amount of vacuum to **** media through a relatively short hose.

Ensure you have good vacuum at the gun then work your way to the problem. Without good vacuum you could put 2" fittings and a 1" hose and experience the same results
 
Last edited:
OP
T

trooper1954

Well-known member
Joined
Nov 4, 2016
Messages
197
Location
Salmon Arm, BC, Canada
Jswain....going to get a vacuum gauge first thing tomorrow and see what it reads. The felt vacuum with my finger feels strong, but I'd like to be able to give numbers to the issue.
If I do get a reading of around 14 with the gauge I guess looking at the metering valve would be the next troubleshooting task?
Thanks
 

OccupantRJ

Well-known member
Joined
May 15, 2009
Messages
11,117
Location
Eastern North Carolina
I feel that a 3/8” suction hose is a bit small, but with the right atmospheric air intake it may work ok. You need a steady stream of air being sucked through the media hose, then media dribbled into it at a constant rate, whatever that takes to get it.

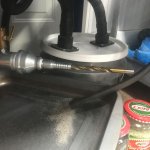
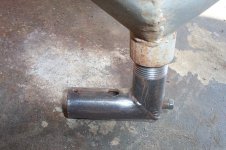
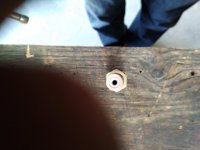
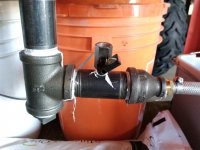
On my custom gun that I made, note that there is no barb fitting at the base of the gun. I use a 5/8” inside diameter automotive heater hose for the suction hose, and the O ring in the handle gets compressed onto the outside of the hose by the knurled ring to seal it. On my media mixer, it is a 3/4” nominal hard pipe ******, cut in two at a 45 degree angle, rotated, then welded back together to turn the corner. There is an air hole on top of the fitting to allow intake air, and the hose just push fits into the fitting the amount required for a good media/air mix through the hole. It is a grit “carburetor”. There is a tapped hole for a set screw, but I found it was not needed due to the nice fit of the hose into the mixer.

The hole needs to be relatively close to the corner of the fitting so grit laying in the fitting gets pulled by the air stream. Too far away, and the grit gets a chance to pile up and create a rich mix. The base of a gun can be drilled and tapped for a larger fitting for more grit flow.
 

Attachments

  • 4552B625-7BD1-4163-9CA6-D039C7611AEA.jpeg
    4552B625-7BD1-4163-9CA6-D039C7611AEA.jpeg
    68.6 KB · Views: 25
  • 4A01E397-C0D7-43F5-AC9C-E390CA499CE5.jpeg
    4A01E397-C0D7-43F5-AC9C-E390CA499CE5.jpeg
    72.7 KB · Views: 23
  • A7956538-A295-4669-9A0F-BFE8300F65D4.jpg
    A7956538-A295-4669-9A0F-BFE8300F65D4.jpg
    62.3 KB · Views: 24
  • 55E9F013-9FAC-4A0C-AC56-87F230194C82.jpeg
    55E9F013-9FAC-4A0C-AC56-87F230194C82.jpeg
    100.5 KB · Views: 23
Last edited:

OccupantRJ

Well-known member
Joined
May 15, 2009
Messages
11,117
Location
Eastern North Carolina
The plug on the back of this fitting is there for future experimentation. A tube of proper length and diameter could be adapted with a fitting to go into this hole and the tube reach past the air inlet hole. If air is applied when the gun is in operation, the tube should create a secondary venturi to help pull and then push media toward the blast gun. The setup works well for me now, so I have no need.

If someone wants to experiment with my theory, go for it. There is always something to learn.
 

Attachments

  • 9FCE133F-7CDE-498B-AD27-FD0E43DDF4FB.jpeg
    9FCE133F-7CDE-498B-AD27-FD0E43DDF4FB.jpeg
    100.5 KB · Views: 20

Jswain

Well-known member
Joined
Apr 26, 2013
Messages
2,463
Location
Calgary, AB
You could skip the gauge if you'd like and just use your finger as you adjust the jet, but it sure is nice to put a number to it. But I would pull the jet right out the back of the gun and take a photo first. Then adjust the jet for max vacuum using either your finger or a gauge, then go from there.

RJ at work we have 400bbl tanks used for bulk barite / cement mixes and they have fluffers usually along the bottom of the cones(4x) per tank and then one jet to add air to the main suction line but the entire 400bbl tank is pressurized to 12-15psi but your theory is definitely a good one
 
OP
T

trooper1954

Well-known member
Joined
Nov 4, 2016
Messages
197
Location
Salmon Arm, BC, Canada
Thanks again guys....forging ahead.
Jswain, here's photos of the jet inside the gun.
I assume that when you say adjust the jet to improve the vacuum, you are referring to this jet by backing off the black nut...and not the air intake jet on the mixing valve? Sorry if thats a dumb question but I 'm just a little overwhelmed with all the info I've been getting.
Thanks
 

Attachments

  • IMG_20210224_112220.jpg
    IMG_20210224_112220.jpg
    85.8 KB · Views: 25
  • IMG_20210224_112207.jpg
    IMG_20210224_112207.jpg
    69.3 KB · Views: 23
  • IMG_20210224_112133.jpg
    IMG_20210224_112133.jpg
    149.4 KB · Views: 28

Jswain

Well-known member
Joined
Apr 26, 2013
Messages
2,463
Location
Calgary, AB
Yes that's exactly it! Just making sure that rubber/plastic covering was on there properly. Start with it all the way in and then back it out checking vacuum with your finger/ or a gauge until it gets to a maximum. Also when your installing the pink ceramic nozzle on the front of the gun when you're tightening it eyeball it so it's centred to the jet as you can usually get 1mm play either way with it
 

OccupantRJ

Well-known member
Joined
May 15, 2009
Messages
11,117
Location
Eastern North Carolina
Thanks again guys....forging ahead.
Jswain, here's photos of the jet inside the gun.
I assume that when you say adjust the jet to improve the vacuum, you are referring to this jet by backing off the black nut...and not the air intake jet on the mixing valve? Sorry if thats a dumb question but I 'm just a little overwhelmed with all the info I've been getting.
Thanks

What you are adjusting when you screw the air jet in or out is the relationship of it to the vacuum port inside the gun, and also the relationship of the jet to the back end of the blast nozzle. As air is flowing, these combinations are used to create the maximum suction at the abrasive port of the gun. If you change blast nozzle from being worn, or install a new blast nozzle, this adjustment needs doing again to retain proper suction. The back end of my blast nozzle is conical, which also comes into play in creating the vacuum. The nice thing about using a vacuum gauge is being able to adjust the gun while it is in action, other than actually moving grit. This gets rid of the guessing. That is how I originally came up with using the vacuum gauge to prevent frustration and be able to dial it in. Using a vacuum gauge was a holdover idea from my engine hotrodding days of tuning engines.
 

OccupantRJ

Well-known member
Joined
May 15, 2009
Messages
11,117
Location
Eastern North Carolina
This is a factory Empire brand mixing valve. It is made like mine to insert the hose and use the size of the opening left to control mix air. There is a rubber expansion plug to allow media changes. Note how close the hole is to the internal corner. I ended up with this mixer in an auction buy, so I used it on the funnel of my larger blast cabinet after I removed the original mixing device.
 

Attachments

  • A25D0486-E6FB-48F8-854A-EBCB61F18295.jpeg
    A25D0486-E6FB-48F8-854A-EBCB61F18295.jpeg
    109 KB · Views: 34
  • BF19B608-2771-41B2-BFC3-187DBEFD172A.jpg
    BF19B608-2771-41B2-BFC3-187DBEFD172A.jpg
    18.8 KB · Views: 28
  • 4E4575E5-67A2-495C-B5D6-7646539E7942.jpg
    4E4575E5-67A2-495C-B5D6-7646539E7942.jpg
    20.6 KB · Views: 29
To avoid these ads, REGISTER NOW!
OP
T

trooper1954

Well-known member
Joined
Nov 4, 2016
Messages
197
Location
Salmon Arm, BC, Canada
Quick question before I start the process....I assume once I've adjusted the gun to 4 threads out for example, I then need to go through different settings on the air intake valve on the metering valve while checking the vacuum?For example, start at 25% open, then 50% then 75% etc? Have vacuum gauge in hand and about to start.
Thanks
 

OccupantRJ

Well-known member
Joined
May 15, 2009
Messages
11,117
Location
Eastern North Carolina
I would remove the grit hose from the gun and set the max vacuum on the gun alone, then install grit hose to finish tuning. You do not want outside influences affecting the actual gun suction to confuse you. Make sure there is a good seal up between the gauge and gun.
 
OP
T

trooper1954

Well-known member
Joined
Nov 4, 2016
Messages
197
Location
Salmon Arm, BC, Canada
Something is not right here....see attached photos of my hookup...and then the reading!!!!! What's going on???? I'm getting a reading of 13 without any gun adjustment?
 

Attachments

  • IMG_20210226_091408.jpg
    IMG_20210226_091408.jpg
    64.8 KB · Views: 34
  • IMG_20210226_091400.jpg
    IMG_20210226_091400.jpg
    145.6 KB · Views: 37
OP
T

trooper1954

Well-known member
Joined
Nov 4, 2016
Messages
197
Location
Salmon Arm, BC, Canada
Something is not right here....see attached photos of my hookup...and then the reading!!!!! What's going on???? I'm getting a reading of 13 without any gun adjustment?
 

Attachments

  • IMG_20210226_091943.jpg
    IMG_20210226_091943.jpg
    124.3 KB · Views: 34

Jswain

Well-known member
Joined
Apr 26, 2013
Messages
2,463
Location
Calgary, AB
What psi are you running through the gun right now? Can lower it to around 60 or lower if it's not and see what you get. Then adjust the jet out to see if it performs better
 
Last edited:

OccupantRJ

Well-known member
Joined
May 15, 2009
Messages
11,117
Location
Eastern North Carolina
What is happening is that you are learning. Tune the gun for the highest vacuum for the supplied air pressure, then move on to other issues like the mix area and possible increased suction hose. Mixing air first. Remove the valve from the mix device to see what happens. Emotions are the enemy of diagnostics.
 
OP
T

trooper1954

Well-known member
Joined
Nov 4, 2016
Messages
197
Location
Salmon Arm, BC, Canada
So I'm running 60 psi on regulator which is 55psi actual working pressure when pedal depressed. Thats giving me a reading of 13. If I decrease the pressure down to 30 giving me 25psi working pressure I get a reading of 10. I have checked my media hose from the valve...photo attached....it's 1/2"ID.
My metering valve goes from 1" through a 1 1/4' to 1/2" reducer and then into the media hose....could this area be the issue? I'm assuming a vacuum reading of 13 is good?
 

Attachments

  • IMG_20210226_093816.jpg
    IMG_20210226_093816.jpg
    147.3 KB · Views: 23
  • IMG_20210224_092614.jpg
    IMG_20210224_092614.jpg
    134 KB · Views: 32

OccupantRJ

Well-known member
Joined
May 15, 2009
Messages
11,117
Location
Eastern North Carolina
Nothing wrong with 13, but tune it and see what you can get with air set at your desired blast pressure. I run 75psi in action, but no rules on that. I wouuld remove the valve from the mixer to see what happens, and likely tape off that hole and drill another one as close to the T as possible. The less the suction stream has to struggle to get grit, the better. If you have more than a couple of quarts of media in the feed area, that can cause compaction, and therefore feed issues.
 
OP
T

trooper1954

Well-known member
Joined
Nov 4, 2016
Messages
197
Location
Salmon Arm, BC, Canada
Sorry fellas....had to go back to the house as my phone was dying. Thanks OccupantRJ....will go back and tune it and see if it improves, and if not will move the mixer closer to the T.
Jswain....going back down to try the tuning on the gun....
 

OccupantRJ

Well-known member
Joined
May 15, 2009
Messages
11,117
Location
Eastern North Carolina
For hoots, take the pipe ****** off with the air valve in it. Stick the bare suction hose a half inch into the open T. Duct tape into place, leaving the top half of the T opening untaped to act as an air inlet. See what happens.
 

Jswain

Well-known member
Joined
Apr 26, 2013
Messages
2,463
Location
Calgary, AB
It will all be worth it in the end! The better it works the less air you use per item/less time standing at the blast cabinet!!
 
OP
T

trooper1954

Well-known member
Joined
Nov 4, 2016
Messages
197
Location
Salmon Arm, BC, Canada
So here goes fellas...

Jswain....@60psi the following adjustments;
4 threads out 7
3 -"- 4
2 -"- 2
1 -"- 12
0 "-" 13

OccupantRJ.....

Remove air valve and leave open.....hardly any media at all
Remove ****** and ducktape hose into T....even less media!

I just picked up 1/2" flexilla hose......I intend to run from compressor to Filter and regulator, from regulator to foot padal and from foot pedal to gun.
As Kent I think already said, the ID of the 1/2" is in fact somewhere between 29/64ths and 15/32"....this will be a marked improvement on the current setup ID.
I'm at the stage where I feel I'll have to make do with the performance I have....live with the surging, but get on and blast some F****** horseshoes!!
I'm not hopeful changing to 1/2" is going to make a huge difference but I'll do it anyhow....may as well at this stage.
Could someone help by identifying the name of these fittings? They are too small to accept the new hose so I'll need to replace them...and the name of the piece that actually goes through the cabinet if anyone knows.
Are they called compression fittings??
Thanks guys.
 

Attachments

  • IMG_20210226_152922.jpg
    IMG_20210226_152922.jpg
    94.5 KB · Views: 30
  • IMG_20210226_150213.jpg
    IMG_20210226_150213.jpg
    88.9 KB · Views: 30
To avoid these ads, REGISTER NOW!
Top Bottom