To avoid these ads, REGISTER NOW!

Sandblast Cabinet air venting.

Jswain

Well-known member
Joined
Apr 26, 2013
Messages
2,463
Location
Calgary, AB
One other thing to try is it looks like vacuum is increasing as you are turning it out. Keep going, maybe @ 0 turns out you have good vacuum but poor space for the media to flow through. 2 more turns out may give you the same vacuum but a larger area for media to flow & not plug off. Maybe not but you're equipped now so worth a shot
 
Last edited:
To avoid these ads, REGISTER NOW!

Jswain

Well-known member
Joined
Apr 26, 2013
Messages
2,463
Location
Calgary, AB
Yep and at 4 threads out vacuum was higher, then went down, down again, then up...try 5 & 6 threads out and see if it is higher than the 4 and continues to go that way.
 

Jswain

Well-known member
Joined
Apr 26, 2013
Messages
2,463
Location
Calgary, AB
No problem, if it will get up to that 13-14 what a much larger flow path in the gun hopefully your problem is no longer a problem!!
 

islandkent

Well-known member
Joined
Jan 29, 2009
Messages
281
Location
PEI,Canada
Well fellas. All this talk about vacuum made me hook up my gauge to check out my situation. Clocked in at 15 psi at the gun. Done this last night. Heading out to the shop now to make a plug for my mixing valve. And see what it will be right from the mixing valve. Just ******** around on my day off. Might head to town later and get me some components to make meself on them there blasting guns. lol Got me all curious.
Great videos here fellas.Check it out. You guys might have already checked them out. Enjoy!


OP
T

trooper1954

Well-known member
Joined
Nov 4, 2016
Messages
197
Location
Salmon Arm, BC, Canada
Well....I've done just about everything....still need to try one more adjustment session on the gun.....going to go even further out to see if the vacuum picks up to an acceptable level.
I have a question for you....when you changed your hoses to flexilla, you obviuously had to change the hose connections to 1/2"? Where did you find the bulkhead fitting that goes thru the cabinet wall.....or did you use the one it came with and a couple of other fittings to make the 1/2' fit?
Thanks
 

Jswain

Well-known member
Joined
Apr 26, 2013
Messages
2,463
Location
Calgary, AB
I bought my gun off amazon although it is identical it didn't come with a hose just the jet and then a brass hose barb. So I just drilled a proper sized hole and used a rubber grommet that is a fairly snug fit around the OD of the flexzilla hose. It was a Gardner bender pack of grommets I think 6 grommets 2 of each of the 3 sizes and you can get them on Amazon or at home Depot etc.

https://www.homedepot.ca/product/ga...3-8-inch-1-2-inch-3-4-inch-8-pack-/1000843174

3/4 looks to be the size and it is a tight fit, need a little lube but it works great and no leaks
 

islandkent

Well-known member
Joined
Jan 29, 2009
Messages
281
Location
PEI,Canada
Dish soap. Works wonders. If more is needed... hot water.

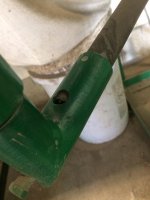
If your hell bent to find a fitting, go to a truck shop or a hydraulic shop. Should be able to find a through way fitting there. If you took out the bulk head fittings just one less step down for you. I would think it would work better direct. If no grommet just wrap with electrical tape to cut down on the leakage till you find one.

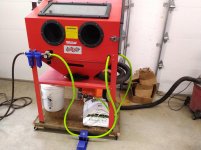
What J said. I drilled through the cabinet with a step drill and used said grommet for my gun hose. Except I'm not there yet with the foot pedal set up. But I'm off to my local Home Hardware the minute I push enter to pick up some pieces to fab up a gun. You guys need anything?? :D Might go to Crappy tire when I'm on the move. You know where I'm at Jswain. Wont be long lol
A few beer listening to the Hoe Down tonight and making a gun 10-4! :rocker:

Wish me luck!
 

Jswain

Well-known member
Joined
Apr 26, 2013
Messages
2,463
Location
Calgary, AB
Oh and if you get that pack that I linked either the medium or the smaller one fits a 3/8 air hose perfect if you want to plumb in a blow gun down the road, super handy for blowing off the parts and cleaning out the cabinet with the door closed = no mess
 

islandkent

Well-known member
Joined
Jan 29, 2009
Messages
281
Location
PEI,Canada
Well that was a wasted trip. My town is in lockdown. A number of cases today. So my local hardware plumbing store is closed. Went to CT. No luck there for a 45* tee fitting. Oh well just thought I'd play around with it tonight.
Hope trooper has better luck finding his parts.

"want to plumb in a blow gun down the road, super handy for blowing off the parts and cleaning out the cabinet with the door closed = no mess"

Yeah they certainly come in handy. I made myself a distribution block and geared up a hose. You can see what I'm using in those pictures I posted earlier of my cabinet. I think trooper also gear up such a hose.
 
Last edited:

OccupantRJ

Well-known member
Joined
May 15, 2009
Messages
11,138
Location
Eastern North Carolina
I was in the shop today, so I took a better picture of my air mixer and hose setup. If you look closely you can see how the hose itself pushes into the fitting and adjusts outside air depending on how much it closes off the hole. This cabinet is set up for glass beads.
 

Attachments

  • 6EF4D4CC-5723-4F28-A42E-A28B817C8A8E.jpg
    6EF4D4CC-5723-4F28-A42E-A28B817C8A8E.jpg
    56.9 KB · Views: 49
OP
T

trooper1954

Well-known member
Joined
Nov 4, 2016
Messages
197
Location
Salmon Arm, BC, Canada
I had good luck Kent.....except the fittings for the foot pedal are sure difficult to match. In the end I just used a heat gun, pushed on the 1/2" hose and put a hose clamp on it.My concern now is how much effect the filter and regulator will have on the system. They are 3/8".....everything else is 1/2" except these fittings.....how much difference do you think it will make to the end result?
Thanks
 

OccupantRJ

Well-known member
Joined
May 15, 2009
Messages
11,138
Location
Eastern North Carolina
So it stays in position no problem? So how big is that hole? 1/2 5/8?? Pretty good idea. Keeping it simple RJ.

The hose stays right where I put it. Enough grit gets between it and the inner wall of the device that it tends to hold it in place. The small hole was for a thumb screw to hold the hose in place, but I found that it was not needed. A light twist with your hand gets the hose loose to move if needed. I will try to remember to check the hole size today for you.
 

islandkent

Well-known member
Joined
Jan 29, 2009
Messages
281
Location
PEI,Canada
Good morning trooper.
I have this 3/8 regulator...
https://www.canadiantire.ca/en/pdp/mastercraft-regulator-3-8-in-0587979p.html#srp

Even though I have the 1/2" flexilla hose it's necked down to 3/8" My dryer is a old Snap-on one that I fixed up. Replaced the plastic drain valve with a aluminum one I made. It is true 1/2" but once more my hose is necked down. I could go pure 1/2" if i cut off my hose and went with barbed fittings right? But with my gun and everything else it works really good I think anyway??
So if your getting "good" results I wouldn't bother. If your going to step up it's going to be pricey. With bigger fittings eh? You could go on and on right??
So about how long are you getting to a horseshoe? 3-5 minutes??


Trooper I just went back and looked at all your pictures. Your stuff(reg/dry/lines) looks to be as big as mine. I think your really good to go with what you have. I can't understand why your having problems. So when you say good you might be there???
 
Last edited:

Jswain

Well-known member
Joined
Apr 26, 2013
Messages
2,463
Location
Calgary, AB
I have 3/8" filters & regulators as well and run my cabinet off 25' of 3/8" hose and it works great. I was going to change the hose and still may some day but haven't felt the need to. Everything past the foot pedal is 1/2" though
 
To avoid these ads, REGISTER NOW!

Jswain

Well-known member
Joined
Apr 26, 2013
Messages
2,463
Location
Calgary, AB
I built my own pedal out of a 3/8 whistle valve so I just used a brass 1/2 female npt to 3/8 male npt reducer and screwed it in.
 
OP
T

trooper1954

Well-known member
Joined
Nov 4, 2016
Messages
197
Location
Salmon Arm, BC, Canada
So....now have all the 1/2" Flexilla hose installed....did what Jswain has done and left my 3/8ths line running from the compressor.
The one thing I noticed right away when using the gun is that the hose pinches right near the gun restricting air flow....not sure what to do about that?
See attached photos.
The blasting is taking about 90 seconds per horseshoe now, and that's quite an improvement, but i'm still getting the surging.....I'm not messing anymore and have decided I will live with it and soldier on!
:beer:
 

Attachments

  • IMG_20210228_160104.jpg
    IMG_20210228_160104.jpg
    78.2 KB · Views: 52
  • new hose setup.jpg
    new hose setup.jpg
    145.3 KB · Views: 51

Jswain

Well-known member
Joined
Apr 26, 2013
Messages
2,463
Location
Calgary, AB
Looks dead ****!! At least try backing the jet out 5-6 threads though and see if it improves it will take 5 minutes! Lol!!

Mine pinches there too only holding at extreme angles when I have the gun right near the roof, but I ran mine both in from the front just below where you have your air line ran in on the angled part of the hopper side by side.

You could try a bend restrictor like they sell for garden hoses and that may fix it for you
 
OP
T

trooper1954

Well-known member
Joined
Nov 4, 2016
Messages
197
Location
Salmon Arm, BC, Canada
Its really a shame the intake to the gun for the media is not at an angle...I'm sure that would make a difference.
BTW J....did back the nut right out of the gun up to 12 threads ....then worked back in....Vacuum was in the dumpster until I got back to 1 and then 0.
 

Jswain

Well-known member
Joined
Apr 26, 2013
Messages
2,463
Location
Calgary, AB
Yeah you have to either cut down the frame inside the cabinet & remove the support below it or cut a big notch in it for the hoses to run through so likely a make work project now.
 

OccupantRJ

Well-known member
Joined
May 15, 2009
Messages
11,138
Location
Eastern North Carolina
Surging is caused by not enough constant air flow into the mixer. It ***** a wad of grit, then air after it. Air flow has to be constant, then grit dribbled into the air stream as it flows constantly.
 
OP
T

trooper1954

Well-known member
Joined
Nov 4, 2016
Messages
197
Location
Salmon Arm, BC, Canada
Thanks OccupantRJ, just not sure where the air problem lies. The only thing I can think of to change is the size of the air intake valve on the mixer, but we tried taking it off, and also putting the media hose directly into the T....neither were successful.
Jswain....one other thought I have is about the air gun to blow off stuff inside the cabinet. I'bought the small in-line style from CT which I think is only 1/4", and so I'm thinking if I in-line this to my new 1/2" hose somewhere inside the cabinet it will restrict flow?
Perhaps you could tell me how you hooked yours up?
Thanks.
 

Attachments

  • IMG_20210224_092823.jpg
    IMG_20210224_092823.jpg
    149.4 KB · Views: 26

Jswain

Well-known member
Joined
Apr 26, 2013
Messages
2,463
Location
Calgary, AB
I hooked up mine before the pedal, because you do not want to have to press the pedal and have it blasting media while you're trying to clean with air.

Hooked a T up to air inlet from reg to pedal, then ran its own seperate 3/8 hose. Everytime im finished blasting I spray off the part quick, and then spray off around the door before I open it.
 
OP
T

trooper1954

Well-known member
Joined
Nov 4, 2016
Messages
197
Location
Salmon Arm, BC, Canada
Sounds good....I'm on it! Separate line makes total sense now. Have the transformer to pick up tomorrow from 110 to 12v and then once this air gun is hooked up I do believe I can actually start using the damd thing! :)
Thank you
 
OP
T

trooper1954

Well-known member
Joined
Nov 4, 2016
Messages
197
Location
Salmon Arm, BC, Canada
I might re-do the connection for the 1/2" hose near the gun.....I'm wondering if using a heat gun on that end to squeeze it onto the barb has caused the hose to weaken there and that's why it's pinching. I'll also put on a hose protector and hope it works.
 

Jeff Ivers

Well-known member
Joined
Apr 9, 2010
Messages
2,557
Location
Oklahoma
I have been following this thread from the start, as I am currently making mods to my cabinet.

Island Kent: I really like your setup and am jealous of your blue cabinet.

OccupanRJ: I am really impressed with your homemade gun. Also, I noted your metering valve is very simple and much like the stock setup on my original sandblaster (no cabinet model).

TrooperRJ: Your improvements are impressive. I like the blast gate you installed. You are working with the same foot pedal and gun that I ordered so I have been following this thread very closely.

My cabinet was working quite well with the original gun and my typical media of 80 grit aluminum oxide. I am concerned about the specs on the Eastwood gun, but got it because I wanted to add foot control. My mixing valve (not yet tested) is quite different than yours and was assembled based on items I had in stock and what I found at the local discount plumbing place, in an attempt to copy what I had seen on a number of posts/videos.

I have a question. Have you tried rotating your horizontal tube on the mixing valve so the air inlet is horizontal instead of vertical or somewhere between? I am wondering if the large diameter could have your air entering into a void in that large diameter pipe rather than media filled pipe and if this could be affecting your flow. I have initially assembled mine with the air inlet horizontal.
 
OP
T

trooper1954

Well-known member
Joined
Nov 4, 2016
Messages
197
Location
Salmon Arm, BC, Canada
Hey Jeff....never thought about that but what an idea. Will give it a shot and let you know....the other thought is to have the air introduced into the valve at an angle....perhaps 45 to the ****** where the mixing takes place. Perhaps that would create not so much of an air " vortex" ( not sure that's the right word!:willy_nil)
 

OccupantRJ

Well-known member
Joined
May 15, 2009
Messages
11,138
Location
Eastern North Carolina
I might re-do the connection for the 1/2" hose near the gun.....I'm wondering if using a heat gun on that end to squeeze it onto the barb has caused the hose to weaken there and that's why it's pinching. I'll also put on a hose protector and hope it works.

Try a piece of 5/8” inside diameter automotive heater hose slid over your 1/2” hose as a stiffener if the sizes work out correctly
 

harley jim

Well-known member
Joined
Dec 6, 2013
Messages
11,415
Location
Cleveland Tn..........out in the sticks
I have been lurking here since the beginning, I have the same style cabinet as most of the posters have. I was working on some of the same updates also. Then my neighbor asked me to blast a car wheel for him and it was all I could do to get it in the cabinet and turn it for blasting, I like to do pedal cars and other (toys) that dont fit at all.
So I have decided to build a whole new cabinet. I have started gathering parts and will be rereading this thread. This thread has caused me to rethink a lot of the things I thought I was going to do, great collaboration guys.

Sent from my SM-A102U using The Garage Journal mobile app
 
OP
T

trooper1954

Well-known member
Joined
Nov 4, 2016
Messages
197
Location
Salmon Arm, BC, Canada
Hi guys...
On the very last leg of this journey, and have an electrical problem. I picked up a 110 to 12v transformer to be able to run my cabinet lights. When I wired up the switch the lights just flashed about every 3 seconds....when I book them up individually they work fine!!!! Anyone have an idea what's going on here?
Thanks
 
OP
T

trooper1954

Well-known member
Joined
Nov 4, 2016
Messages
197
Location
Salmon Arm, BC, Canada
Here's a few photos of the situation.
 

Attachments

  • IMG_20210303_134633.jpg
    IMG_20210303_134633.jpg
    126.1 KB · Views: 29
  • IMG_20210303_134608.jpg
    IMG_20210303_134608.jpg
    106.3 KB · Views: 29
  • IMG_20210303_134549.jpg
    IMG_20210303_134549.jpg
    142.6 KB · Views: 25
  • IMG_20210303_134504.jpg
    IMG_20210303_134504.jpg
    87.6 KB · Views: 31
OP
T

trooper1954

Well-known member
Joined
Nov 4, 2016
Messages
197
Location
Salmon Arm, BC, Canada
Thanks harley -jim....I have to admit I have no idea how to check the polarity...terrible with electricity...can you explain what I should do?
I know the red wire from both lights runs to one spade and the black to the other.....if I have it wrong how would they work at all?
Thanks
 
To avoid these ads, REGISTER NOW!
Top Bottom