To avoid these ads, REGISTER NOW!

Saskatchewan 2 car Fix up

Mikemac1

Active member
Joined
Jan 12, 2013
Messages
37
Hi Folks - Long time lurker, first time poster. I wanted to share what I did as it might help others. I have a 2 car (22'w x 24'd) built on pad, with a cottage roof. I had several issues

- Drainage (the back corners were undercut by water)
- Pad sunk in the back corners (due to drainage and poor soil)
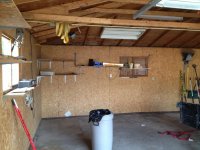
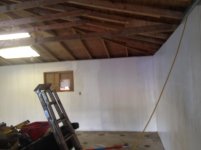
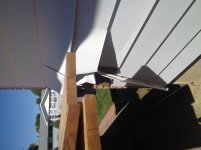
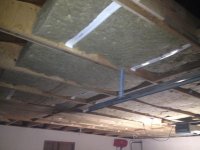
- Walls bowing out in the centers as the rafter ties were non existent (only collar ties)
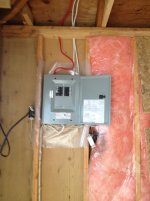
- Electrical panel has 30A 240v service, but not enough circuits
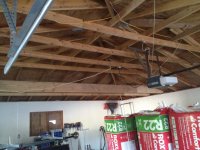
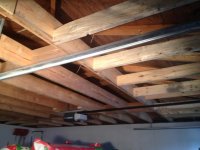
- No insulation in ceiling (cause there wasn't one)
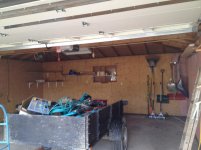
- Poor lighting

I don't have photo's of everything but I have some crummy ones of the major changes :D

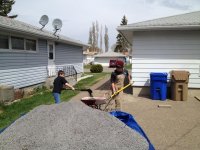
1st step. Build up the grade around the pad to address the drainage issues (these are my boys shoveling 3 yards of slag)

Sorry no photos of finished grade - essentially sloped a good pitch around the entire pad
 

Attachments

  • IMG_1067.jpg
    IMG_1067.jpg
    148.7 KB · Views: 67
To avoid these ads, REGISTER NOW!
OP
M

Mikemac1

Active member
Joined
Jan 12, 2013
Messages
37
Step 2. Empty the garage

You can see the slope and framing issues. The rater tie was me doing a test run and the wide tie strap is what I used the pull the walls back in
 

Attachments

  • IMG_1339.jpg
    IMG_1339.jpg
    142.1 KB · Views: 63
  • IMG_1340.jpg
    IMG_1340.jpg
    137.6 KB · Views: 48
  • IMG_1341.jpg
    IMG_1341.jpg
    138.7 KB · Views: 48
OP
M

Mikemac1

Active member
Joined
Jan 12, 2013
Messages
37
Step 3. Hire mudjackers.

I had a couple of places do quotes. Both companies measured the back corners do be down 4-5 inches. Yikes. One company was $500 more than the other. I figured level is level, right? I went with the cheaper company. I am not entirely convinced that was the best decision. So, they did show up, do the work and charge me what was on the quote. They were really "rammy" with the whole process though. It was discovered (when my 75 y/o neighbor and original home owner) came by that the current garage burned down about 20 years ago. It was rebuilt on a frowning pad as insurance would not cover that. When the floor was level there was a gap in the center where the wall was above the pad about 2 inches. They mudjack guys had to bring the center up a bit to close the gap. Essentially put it back the way it was 20 years ago, with a slight frown. That made me frown too :sad:
 
OP
M

Mikemac1

Active member
Joined
Jan 12, 2013
Messages
37
Here are a couple shots post mudjacking, with primer on the walls
 

Attachments

  • IMG_1351.jpg
    IMG_1351.jpg
    143.8 KB · Views: 42
  • IMG_1350.jpg
    IMG_1350.jpg
    131.9 KB · Views: 38
OP
M

Mikemac1

Active member
Joined
Jan 12, 2013
Messages
37
Step 4. Lumber delivered. (sighs)

The lumber company is replacing the siding on one side of my house now. They were very good to deal with, but I am still dealing with it which is my fault.
 

Attachments

  • IMG_1354.jpg
    IMG_1354.jpg
    146.4 KB · Views: 42
OP
M

Mikemac1

Active member
Joined
Jan 12, 2013
Messages
37
Step 5. Cut triangles

I cut a ton of these things out of 5/8 sheeting. The purpose of them is to tie into the existing framing. These are going to be used to sandwich the 2x10's that will meet the existing framing. The 2x10's will be cut to meet the angle of the existing roof line. Then apply PL premium and screw these to the outside. The skinny end of the triangle will sit on top if the wall.
 

Attachments

  • IMG_1360.jpg
    IMG_1360.jpg
    136.4 KB · Views: 23
OP
M

Mikemac1

Active member
Joined
Jan 12, 2013
Messages
37
Step 6. Install the 2x10's

These things span 21'6" approximately, so fir 2x10's were required to meet the lb/sqft for dead load. I don't remember the calculation off hand, but I was withing the rating on the lumber consortium website for dead load and 3/16 deflection at the center. The existing framing was 24" OC. You can see how I used the triangles to tie everything together
 

Attachments

  • IMG_1361.jpg
    IMG_1361.jpg
    145.6 KB · Views: 29
  • IMG_1362.jpg
    IMG_1362.jpg
    152.7 KB · Views: 29
OP
M

Mikemac1

Active member
Joined
Jan 12, 2013
Messages
37
More shots of 2x10's

How does one lift 22' 2x10's and be accurate? With only yourself and young boys to help? With a slightly modified drywall lift!
 

Attachments

  • IMG_1371.jpg
    IMG_1371.jpg
    138.9 KB · Views: 32
  • IMG_1372.jpg
    IMG_1372.jpg
    133 KB · Views: 26
OP
M

Mikemac1

Active member
Joined
Jan 12, 2013
Messages
37
Step 7. End framing

I needed framing to go in the opposite direction when the clearance of the roof line would no longer allow me use more 2x10's

I used 2x6's - I also custom notched them out to sit level on the existing sil plates. I did not bother with the triangles in this direction as the span was only about 5 ft.
 

Attachments

  • IMG_1378.jpg
    IMG_1378.jpg
    130.4 KB · Views: 14
  • IMG_1376.jpg
    IMG_1376.jpg
    129.6 KB · Views: 17
To avoid these ads, REGISTER NOW!
OP
M

Mikemac1

Active member
Joined
Jan 12, 2013
Messages
37
Step 8. Electrical

Just a quick shot of the existing breaker panel (if you could call it that). Like magic, there is the new panel. The panel is really just a sub off the house. The breaker is just 30amp in my house panel feeding the garage. This is fine for now and suits my needs (and wallet).
 

Attachments

  • IMG_1384.jpg
    IMG_1384.jpg
    133.7 KB · Views: 29
  • IMG_1387.jpg
    IMG_1387.jpg
    139.5 KB · Views: 29
OP
M

Mikemac1

Active member
Joined
Jan 12, 2013
Messages
37
Step 9. Insulation

I ran power for lights and an outlet for electric heat. After that it was time for insulation. What a bear to put in. I should have used kraft paper faced insulation and stapled it. OR I should have just poly'd and hung vapor barrier and had someone blow it in. To top it off a lot of the insulation was faulty.

I don't have photos of this - but I used 2" foam, custom cut to provide ventilation in 8 spots. The foam board butts up againt the wall and allows clearance for attic ventilation. The product I used is roxul r22 for 24" centers. I ended up buying some random strapping metal and nailing it in to hold the insulation up. Terrible experience. Will never do that again.
 

Attachments

  • IMG_1394.jpg
    IMG_1394.jpg
    142.8 KB · Views: 22
  • IMG_1395.jpg
    IMG_1395.jpg
    144.1 KB · Views: 18
  • IMG_1396.jpg
    IMG_1396.jpg
    146.1 KB · Views: 15
OP
M

Mikemac1

Active member
Joined
Jan 12, 2013
Messages
37
Step 10. Sorry - limited photos. I poly'd the ceiling with 6 mil. Lots of staples. Learned a few tricks. It is easier to work with if you don't unfold the poly first.

Also started boarding. I learned that the new light drywall *****. It is far to flexible and terrible for cutting a nice edge/
 

Attachments

  • IMG_1432.jpg
    IMG_1432.jpg
    125.2 KB · Views: 19
  • IMG_1431.jpg
    IMG_1431.jpg
    124.4 KB · Views: 20
  • IMG_1429.jpg
    IMG_1429.jpg
    160.8 KB · Views: 19
OP
M

Mikemac1

Active member
Joined
Jan 12, 2013
Messages
37
Step 11. Boarding and lighting complete

With the help of my Dad, we finished hanging the drywall. There are quite a few places/joints that I wish had turned out better. But overall I was really happy with the result. You can also see what I did for lighting. On the left side there are 2x 16' double strips, the center is a 4 bulb "workshop" light and a 4' double. The right side is 8' of double lighting. This is all t5 6500k bulbs. It is actually just right for me. I always have the option of adding more. The attic hatch is in the front. You can see the hatch in one of the photos. I did this because there was not enough clearance for the garage door opener at the top for the mounting bracket.

I hope you all enjoy my post. If you have questions etc please post away! Sharing is caring ;)
 

Attachments

  • IMG_1434.jpg
    IMG_1434.jpg
    133.6 KB · Views: 35
  • IMG_1435.jpg
    IMG_1435.jpg
    136.7 KB · Views: 32
  • IMG_1436.jpg
    IMG_1436.jpg
    137 KB · Views: 34
  • IMG_1439.jpg
    IMG_1439.jpg
    163.1 KB · Views: 34
OP
M

Mikemac1

Active member
Joined
Jan 12, 2013
Messages
37
Overall the plan was to have a space to work on whatever I need. Last year there was 7 months of winter. I am currently doing house reno's and will need a place to build cabinets and built ins. So I think the plan is to get either a sawstop or festool track saw. Still fighting with myself on that. A regular table saw is out if the question as I need my fingers to earn a living. After cabinets I will need to do a whole lot of painting trim, doors etc. I am considering buying a sprayer and sectioning off half the garage for painting. The primary purpose is to house my lil commuter (Acura 1.6) and my wifes car. It is so nice to park inside and not deal with frosty windows and cars covered with snow in the morning!
 

deezee

Well-known member
Joined
Feb 28, 2014
Messages
60
Location
Saskatchewan
Hello fellow Saskatchewanian. Looks like quite a project. I have a double garage cottage style as well. 24 x 24. What are you planning for heat?
 
OP
M

Mikemac1

Active member
Joined
Jan 12, 2013
Messages
37
Hi deezee

I put a 30amp outlet in - which will run a 4800w heater. I have "borrowed" one from dad for the time being. It is an older unit, built quite well. It's was manufactured by Federal Pioneer Electric in Manitoba. I was surprised to see that. So far so good - it will warm up the garage enough to work in but it takes a couple hours. It has was -16 last night and I was in the garage changing out a heater motor in my car. It wasn't bad at all.

Obviously this is not economical in the long run. I calculated it costs about $12 per day to run it (for 24 hours)

In the spring, I plan to run a gas line from the house meter. Well, I will be doing the grunt work and my neighbor is a licensed gas fitter. We will work something out. I have a feeling I will be shingling his house with him :beer: I have been looking at the reznor unit ceiling mount heaters. I was hesitant at first due to open flame. It appears that there are models available that use outside air for combustion. However, the cost to run the venting out the wall goes up - over $400 for a side vent kit. The heater is only about $800. My BIL is in Saskatoon and has about the same setup with a 40k btu unit. It is fantastic and the recovery times are 5-10 mins after opening the door. I think that is the way to go. Unless somebody tells me otherwise.
 

Bricen18

Well-known member
Joined
Mar 9, 2013
Messages
279
Location
PA
You have done lots of work, Everything has turned out great. I recently had to put up a 33ft double 2x12 lvl beam up in my garage to fix all the sagging and improperly built trusses. Using the drywall lift for the 2x10 was a great idea.
 

deezee

Well-known member
Joined
Feb 28, 2014
Messages
60
Location
Saskatchewan
I was lucky and was able to build mine from scratch a decade ago. I put infloor heat, it's awesome and fast recovery too. You pay now or pay later. Sounds like a good plan.
 
To avoid these ads, REGISTER NOW!
Top Bottom